Canon Finisher-T1 Service Manual
Hide thumbs
Also See for Finisher-T1:
- Portable manual (66 pages) ,
- Service manual (174 pages) ,
- Service manual (64 pages)

Related Manuals for Canon Finisher-T1


Summary of Contents for Canon Finisher-T1
- Page 1 Finisher-T1 SERVICE MANUAL DU7-1145-000 JAN. 2005 REV. 0 CANON Finisher-T1 REV. 0 PRINTED IN U.S.A. COPYRIGHT 2005 CANON INC.
- Page 2 This manual may contain technical inaccuracies or typographical errors due to improvements or changes in products. When changes occur in applicable products or in the contents of this manual, Canon will release technical information as the need arises. In the event of major changes in the contents of this manual over a long or short period, Canon will issue a new edition of this manual.
- Page 3 Introduction Symbols Used This documentation uses the following symbols to indicate special information: Symbol Description Indicates an item of a non-specific nature, possibly classified as Note, Caution, or Warning. Indicates an item requiring care to avoid electric shocks. Indicates an item requiring care to avoid combustion (fire). Indicates an item prohibiting disassembly to avoid electric shocks or problems.
- Page 4 Introduction The following rules apply throughout this Service Manual: 1. Each chapter contains sections explaining the purpose of specific functions and the relationship between electrical and mechanical systems with reference to the timing of operation. In the diagrams, represents the path of mechanical drive; where a signal name accompanies the symbol, the arrow indicates the direction of the electric signal.
-
Page 5: Table Of Contents
Contents Contents Chapter 1 Specifications 1.1 Product Specifications ....................1-1 1.1.1 Specification......................1-1 1.2 Names of Parts ......................1-5 1.2.1 External View ..................... 1-5 1.2.2 Cross Section....................... 1-6 Chapter 2 Functions 2.1 Basic Operation......................2-1 2.1.1 Basic Operation....................2-1 2.1.2 Overview of the Electrical Circuitry..............2-2 2.2 Feed Drive System..................... - Page 6 Contents 2.7.2 Protection Function ................... 2-38 Chapter 3 Parts Replacement Procedure 3.1 External Covers......................3-1 3.1.1 Rear Upper Cover ....................3-1 3.1.2 Grate-shaped Upper Guide ..................3-1 3.1.3 Grate-shaped Lower Guide .................3-1 3.1.4 Front Inside Upper Cover ..................3-2 3.1.5 Front Door ......................3-3 3.1.6 Escape Tray Cover ....................3-4 3.1.7 Escape Door ......................3-4 3.2 Drive System......................
- Page 7 Contents 4.2.3 Periodical Servicing .................... 4-3 4.2.3.1 Periodical Servicing (Finisher Unit) ............4-3 4.3 Adjustment......................... 4-4 4.3.1 Basic Adjustment ....................4-4 4.3.1.1 Upward Curl Mode..................4-4 4.3.1.2 Special Curl Mode..................4-4 4.3.1.3 Downward Curl Mode.................. 4-5 4.3.1.4 Heavy Paper Upward Curl Mode ..............4-6 4.3.1.5 Stack Delivery Mode..................
- Page 8 Contents Chapter 5 Error Code 5.1 Overview........................5-1 5.1.1 Overview ......................5-1 5.2 User Error Code ......................5-2 5.2.1 Staple is absent....................5-2 5.2.2 Stapler safety protection function activated ............5-2 5.2.3 Stack tray overstacking ..................5-3 5.3 Service Error Code..................... 5-4 5.3.1 E500 ........................
-
Page 9: Chapter 1 Specifications
Chapter 1 Specifications... - Page 10 Contents Contents 1.1 Product Specifications ....................1-1 1.1.1 Specification......................1-1 1.2 Names of Parts ......................1-5 1.2.1 External View ..................... 1-5 1.2.2 Cross Section....................... 1-6...
-
Page 11: Product Specifications
Chapter 1 1.1 Product Specifications 1.1.1 Specification 0009-2494 T-1-1 Item Specifications Escape tray: fixed type Stacking method Trays 1 and 2: Independently move up and down Stacking Face up orientation Face down Stacking size*1 A3, A4, A4R, A5R, B4, B5, B5R, 279 mm x 432 mm (11 x 17), LGL, LTR, LTRR, STMTR, others Paper weight 64g/m2 to 200g/m2... - Page 12 Chapter 1 Item Specifications Large size: 96 mm high/50 sets Small size: 188 mm high/100 sets Tray 2: Staple sort Large size: 96 mm high/50 sets Small size: 188 mm high/100 sets Size mixing: Mixed stacking capac-ity Escape tray: 43 mm high Tray 1 and 2: 96 mm high (650 sheets) Stapling: 96 mm high/50 sets...
- Page 13 Chapter 1 T-1-2 Item Specifications Remarks Staple supply Special staple cartridge (5000 staples) Staple detection Provided 0 to 20 remaining staples Manual stapling Not provided Stapling size Front 1-point stapling (30 deg.) A4R, LGL, LTRR Front 1-point stapling (45 deg.) A3, B4, A4, B5, 279mm x 432mm (11 x 17), LTR Rear 1-point stapling (30 deg.) A4R, LGL, LTRR...
- Page 14 Chapter 1 <Stapling Positions> Front 1-point stapling (30deg.) Front 1-point stapling (45deg.) A4R, LGL, and LTRR A3, A4, B4, B5, 279mm 432mm 11 17 ,and LTR 5-/+2mm 5-/+2mm F-1-1 Rear 1-point stapling (30deg.) Rear 1-point stapling (45deg.) A4R, LGL, and LTRR A3, A4, B4, B5, 279mm x 432mm 11 x 17 , and LTR 5-/+2mm...
-
Page 15: Names Of Parts
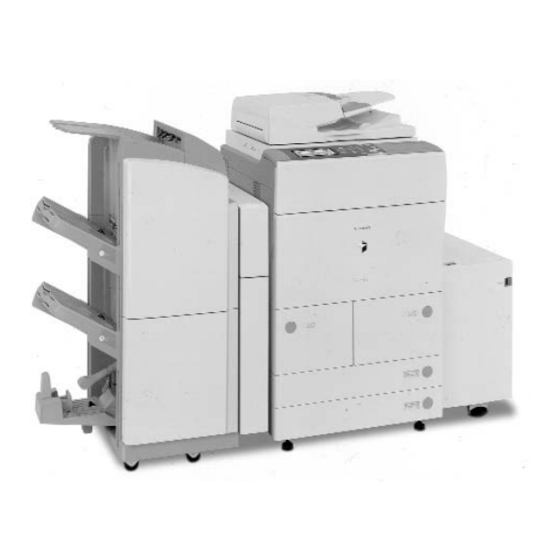
Chapter 1 1.2 Names of Parts 1.2.1 External View 0009-2506 [10] [11] F-1-4 T-1-3 [1] Escape tray [7] Grate-shaped upper guide [2] Escape door [8] Tray 1 [3] Rear upper cover [9] Tray 2 [4] Front door [10] Auxiliary plate [5] Front lower cover [11] Grate-shaped lower guide [6] Foot cover... -
Page 16: Cross Section
Chapter 1 1.2.2 Cross Section 0009-2507 [10] [11] [16] [12] [13] [14] [15] F-1-5 T-1-4 [1] Tray 1 [9] Escape feed roller [2] Tray 2 [10] Buffer roller [3] Shutter [11] Feed roller [4] Stack delivery roller [12] Inlet roller [5] Aligning plate [13] Return roller [6] 1st delivery roller... -
Page 17: Chapter 2 Functions
Chapter 2 Functions... - Page 18 Contents Contents 2.1 Basic Operation......................2-1 2.1.1 Basic Operation....................2-1 2.1.2 Overview of the Electrical Circuitry..............2-2 2.2 Feed Drive System..................... 2-3 2.2.1 Overview......................2-3 2.2.2 Constraction of the Control System ..............2-4 2.2.3 Paper Delivery Path .................... 2-7 2.3 Intermediate Process Tray Assembly ..............2-12 2.3.1 Stack Job Offset ....................
-
Page 19: Basic Operation
Chapter 2 2.1 Basic Operation 2.1.1 Basic Operation 0009-2508 The finisher is designed to deliver copies arriving from its host machine, and its modes of delivery include simple stacking, job offset, and staple. All operations involved in these modes are controlled by the finisher controller PCB, according to the appropriate commands from the host machine. -
Page 20: Overview Of The Electrical Circuitry
Chapter 2 2.1.2 Overview of the Electrical Circuitry 0009-2509 The finisher's sequence of operation is controlled by the finisher controller PCB. The finisher controller PCB is a 16-bit microprocessor (CPU), and is used for communication with the host machine (serial) in addition to controlling the finisher's sequence of operations. The finisher controller PCB responds to the various commands coming from the host machine through a serial communications line to drive solenoids, motors, and other loads. -
Page 21: Feed Drive System
Chapter 2 2.2 Feed Drive System 2.2.1 Overview 0009-2510 This product consists of the Finisher unit and the Saddle Stitcher unit. The Finisher unit simply stacks sheets delivered from a host machine, offsets a stack job, or staples and delivers the sheets to the trays according to commands delivered from a host machine. -
Page 22: Constraction Of The Control System
Chapter 2 2.2.2 Constraction of the Control System 0009-2511 The copy sent from the host machine is delivered to the ejection tray, escape tray, or processing tray according to the ejection type. Job offset or stapling is performed, according to the instruction from the host machine, for copy delivered to the staple tray. When ejecting from the processing tray, rear end assist guide is used in addition to the stack ejection roller to eject the stack. - Page 23 Chapter 2 Finisher controller PCB(1/2) Feed driver M103 M109 M112 M102 M101 M113 M104 M107 M105 M111 M108 Feed driver Finisher controller PCB(2/2) F-2-5...
- Page 24 Chapter 2 Finisher controller PCB Feed driver PI118 PI111 PI103 PI104 PI112 F-2-6...
-
Page 25: Paper Delivery Path
Chapter 2 2.2.3 Paper Delivery Path 0009-2512 <Overview> There are three ejection paths to tray 1 and 2 depending on the ejection processing. There is only one paper ejection path to the escape tray. <Straight Ejection (Destination: Tray 1/ Tray 2)> When the equipment is set to non-sort, all copies are ejected through the following path. - Page 26 Chapter 2 1st delivery roller Paper Buffer roller Stack ejection roller Feed roller Inlet roller Processing tray Paper Rear end assist F-2-8...
- Page 27 Chapter 2 <Buffer/Processing Tray Path (Destination: Tray 1/ Tray 2)> This is the copy ejection path when the equipment is set to sort for A4, B5, or LTR paper size. Feed two sheets of paper to buffer (two or three sheets if 2-point stapling). Then they are aligned and stapled in the processing tray and ejected.
- Page 28 Chapter 2 3) The first delivery roller descends and works together with the stack delivery roller to deliver the 1st and 2nd paper toward the processing tray. At the same time, the stack in the processing tray is delivered toward the delivery tray by the return roller and rear end assist guide.
- Page 29 Chapter 2 5) The 1st and 2nd paper delivered to the processing tray are aligned and then delivered to the delivery tray. Stack ejection roller Return roller Rear end assist guide F-2-13 <Escape Ejection (Destination: Escape Tray)> When the escape tray is specified as the destination of paper ejection in the non-sort mode, the paper delivered from the host machine to the finisher is rerouted to the path shown below by the escape inlet flapper and ejected to the escape tray.
-
Page 30: Intermediate Process Tray Assembly
Chapter 2 2.3 Intermediate Process Tray Assembly 2.3.1 Stack Job Offset 0009-2513 Job offset operation offsets paper stack to the front or rear when ejecting to sort the paper stack. The forward/backward movement of the copy delivered to the processing tray is controlled by the front aligning plate and rear aligning plate. - Page 31 Chapter 2 Results Delivering 4 sets 4th set 3rd set 2nd set 1st set Direction of delivery F-2-16 T-2-1 Motor Function Aligning plate front motor (M103) Aligns paper in processing tray to the front Aligning plate rear motor (M104) Aligns paper in processing tray to the rear Swing motor (M106) Moves the swing guide up/down Rear end assist motor (M109)
-
Page 32: Processing Tray Paper Stacking Operation
Chapter 2 2.3.2 Processing Tray Paper Stacking Operation 0009-2514 When the rear end of the paper exits the 1st delivery roller, the paper is delivered to the processing tray by the stack delivery roller and return roller and then pushed against the processing tray stopper. -
Page 33: Offset Operation
Chapter 2 2.3.3 Offset Operation 0009-2515 Each sheet is pulled forward or backward using the front aligning plate and the rear aligning plate. The offset operation is performed each time a sheet is pulled onto the processing tray. Rear aligning plate Sheet to be offset Front aligning plate Tray... -
Page 34: Rear End Assist Operation
Chapter 2 2.3.4 Rear End Assist Operation 0009-2516 In order to improve stacking performance when ejecting copies delivered to the processing tray, a rear end assist guide is used in addition to the stack ejection roller to support the rear end of the stack during stack ejection. -
Page 35: Stack Delivery Operation
Chapter 2 2.3.5 Stack Delivery Operation 0009-2517 The stack is ejected each time three large size sheets*1 or five small size sheets*2 are offset on the processing tray. The swing motor turns and the swing guide descends. This causes the upper/lower stack delivery rollers to hold the stack. -
Page 36: Staple Operation
Chapter 2 2.4 Staple Operation 2.4.1 Stapler Unit 0009-2519 The staple motor (M111) is used to perform stapling operation. This motor rotates the cam one turn for stapling. The home position of this cam is detected by the staple home position sensor (PI50). - Page 37 Chapter 2 M111 Finisher controller PCB F-2-22 2-19...
-
Page 38: Shifting The Stapler Unit
Chapter 2 2.4.2 Shifting the Stapler Unit 0009-2520 The stapler unit is shifted by the stapler shift motor (M105). The home position is detected by the stapler shift home position sensor (PI110). When there is a staple command from the host machine, the stapler shifts to the staple ready position, which depends on the stapling position and paper size. - Page 39 Chapter 2 <Rear 1-Point Stapling> The position is the same as the stapling position. Rear aligning plate Stapling position/ Wait position Stopper Feeding direction Front aligning plate F-2-24 2-21...
- Page 40 Chapter 2 <2-Point Stapling> The stapler waits at the paper front end side staple position. The stapling sequence is first near side and then far side. Rear aligning plate Stopper Stapling position Stopper Feeding direction Stapling position/ Wait position Stopper Front aligning plate F-2-25...
-
Page 41: Stapling Operation
Chapter 2 2.4.3 Stapling Operation 0009-2521 <Overview> Stapling operation staples the prescribed number of copies with the stapler unit. The staple position depends on the staple mode and paper size. Whether the staple unit is at home position or not is detected by the stapler shift home position sensor (PI110). - Page 42 Chapter 2 Paper width 1/2 Front diagonal stapling 2-point stapling Rear diagonal stapling F-2-27 T-2-3 Sensor Symbol Connector Function Remarks Stapler shift PI110 J721A-15 Detects the home position for home position the stapler moving back and sensor forth. Stapler PI116 J720-3 Staple prohibited area detection...
- Page 43 Chapter 2 T-2-4 Function Motor Symbol Remarks Moves the stapler. Stapler shift motor M105 Performs Staple motor M111 stapling operation. <First Sheet> The finisher controller PCB moves the stapler according to the specified stapling position. When the rear end of the first sheet passes the 1st delivery roller, the finisher controller PCB stops the stack delivery motor (M102) and then rotates it in reverse.
- Page 44 Chapter 2 Swing guide home position sensor (PI105) Stack ejection roller (upper) Stack ejection roller (lower) Swing guide Swing motor (M106) Stack ejection lower roller clutch (CL102) Stack ejection motor (M102) F-2-29 2-26...
- Page 45 Chapter 2 <Second and Subsequent Sheets> The finisher controller PCB starts the swing motor (M106) and lowers the swing guide when the rear end of the 2nd paper passes the 1st delivery roller. The stack delivery motor is reversed. The stack delivery motor rotates the stack delivery roller (upper) and return roller and sends the paper to the processing tray.
- Page 46 Chapter 2 <Last Sheet> When alignment of the last sheet completes, the finisher controller PCB moves the aligning plate to alignment position with the aligning motor (M103/M104) (with the paper held with the aligning plate). Then the finisher controller PCB staples at the specified staple position. After stapling, the finisher controller PCB starts the swing motor (M106) and lowers the swing guide.
-
Page 47: Stack Tray Operation
Chapter 2 2.5 Stack Tray Operation 2.5.1 Tray Operation 0009-2522 This equipment has three delivery trays. The upper tray is called escape tray, the middle tray is called tray 1, and the lower tray is called tray 2. The escape tray is fixed and tray 1 and tray 2 can move up and down independently. The escape tray has an escape tray full detector sensor (PI119). - Page 48 Chapter 2 Tray 1 paper surface Rack sensor (PI111) Tray 1 switch (MSW103) Tray 1 shift motor (M107) Tray 1 shift area sensor PCB Tray 2 shift motor (M108) Tray 2 shift area Tray 2 paper surface sensor PCB sensor (PI112) Light-shielding plate Rack...
- Page 49 Chapter 2 Tray 1 paper surface sensor (PI114) Paper surface sensor flag Edge Tray 2 paper surface sensor 2 (PI120) Tray 1 Tray 2 paper surface sensor 1 (PI115) Paper surface sensor flag Edge Tray 2 F-2-33 T-2-5 Tray 1 shift area sensor PCB Area sensor Area sensor Area sensor...
- Page 50 Chapter 2 T-2-6 Tray 2 shift area sensor PCB Area sensor Area sensor Area sensor Detected items 1(PS983) 2(PS982) 3(PS981) Tray 2 upper limit Stack count 650 sheet limit exceeded Stack count 1700 sheet limit exceeded Stack count 2450 sheet limit exceeded Tray 2 lower limit (finisher) Tray 2 lower limit (saddle finisher) * The symbol for the area sensor of each PCB is same because tray1/tray 2 shift area sensor...
-
Page 51: Shutter Operation
Chapter 2 2.5.2 Shutter Operation 0009-2523 When tray 1 passes the delivery section with paper already stacked, the stacked paper may get caught by the delivery section. A shutter is provided at the delivery section to prevent this. The shutter closes when tray 1 passes the delivery section. This is performed even when no paper is stacked. -
Page 52: Detecting Jams
Chapter 2 2.6 Detecting Jams 2.6.1 Detecting Jams (Finisher Unit) 0009-2524 The following sensors are used to detect the presence of paper and to determine that paper is delivered properly. - Inlet sensor (PI103) - Delivery sensor (PI104) - Escape tray path sensor (PI118) A jam is identified by checking whether paper is present at each sensor at the timing programmed in the memory of the microcomputer (CPU) on the finisher controller PCB. - Page 53 Chapter 2 T-2-7 Jam Type Sensor Jam Condition Code Inlet sensor PI103 When the inlet sensor (PI103) does not detect paper 1001 delay after a prescribed time (distance) has elapsed since receiving a delivery signal from the host machine. Inlet sensor PI103 When paper does not exit the inlet sensor (PI103) after 1101...
- Page 54 Chapter 2 Jam Type Sensor Jam Condition Code Power-on PI103, When paper is detected by the inlet sensor (PI103), the 1300 PI104, delivery path sensor (PI104), or the escape tray path PI118 sensor (PI118) during power on. Door open PI102, When the front cover open/close sensor (PI102) or the 1400...
-
Page 55: Power Supply
Chapter 2 2.7 Power Supply 2.7.1 Power Supply Route 0009-2525 When the power of the host machine is turned on, 24 VDC is supplied from the host machine to the finisher controller PCB through two power supply lines. 24 VDC supplied through one power supply line is used to drive motors and solenoids. -
Page 56: Protection Function
Chapter 2 2.7.2 Protection Function 0009-2526 The 24 VDC for motor and solenoid drive has a fuse or motor driver with over-current protection function for over-current protection. 2-38... -
Page 57: Chapter 3 Parts Replacement Procedure
Chapter 3 Parts Replacement Procedure... - Page 58 Contents Contents 3.1 External Covers......................3-1 3.1.1 Rear Upper Cover ....................3-1 3.1.2 Grate-shaped Upper Guide ..................3-1 3.1.3 Grate-shaped Lower Guide .................3-1 3.1.4 Front Inside Upper Cover ..................3-2 3.1.5 Front Door ......................3-3 3.1.6 Escape Tray Cover ....................3-4 3.1.7 Escape Door ......................3-4 3.2 Drive System......................
-
Page 59: External Covers
Chapter 3 3.1 External Covers 3.1.2.2 Removing the Escape Tray Cover 0009-4406 Refer to Procedure 3.1.6 3.1.1 Rear Upper Cover 3.1.2.3 Removing the 3.1.1.1 Removing the Grate-shaped Upper Rear Upper Cover 0009-4228 Guide 0009-3571 1) Remove four screws [1] and remove the 1) Lower tray [1] below the grate-shaped rear upper cover [2]. -
Page 60: Front Inside Upper Cover
Chapter 3 3.1.3.2 Removing the When replacing, be careful not to hook Rear Upper Cover 0009-4232 the grate-shaped lower guide to the sensor flag arm on the delivery side. Refer to Procedure 3.1.1 3.1.3.3 Removing the Escape Tray Cover 0009-4410 Refer to Procedure 3.1.6 3.1.3.4... -
Page 61: Front Door
Chapter 3 front lower cover. Then remove the front lower cover [3]. 2) Remove the screw [4] and remove the fixing plate (upper) [5] of the front lower cover. F-3-5 3.1.5 Front Door 3.1.5.1 Removing the Front Door 0009-4487 F-3-4 1) Open the front door [1] and remove the clip [2]. -
Page 62: Escape Tray Cover
Chapter 3 F-3-7 F-3-6 3.1.7 Escape Door 3.1.6 Escape Tray Cover 3.1.7.1 Removingh the 3.1.6.1 Removing the Escape Door 0009-4397 Escape Tray Cover 0009-4402 1) Open the front door. 2) Remove two screws [1] and remove the 1) Remove four screws [1], open the escape door [2]. -
Page 63: Drive System
Chapter 3 3.2 Drive System 3.2.1 Stapler 3.2.1.1 Removing the Front Door 0009-4493 Refer to Procedure 3.1.5 3.2.1.2 Removing the Escape Tray Cover 0009-4414 Refer to Procedure 3.1.6 F-3-9 3.2.1.3 Removing the 2) Release the claw [1] and remove the Front Inside Upper PCB [2]. -
Page 64: Swing Unit
Chapter 3 3.2.2 Swing Unit 3.2.2.1 Removing the Front Door 0009-4495 Refer to Procedure 3.1.5 3.2.2.2 Removing the Rear Upper Cover 0009-4496 Refer to Procedure 3.1.1 3.2.2.3 Removing the F-3-10 Escape Tray Cover 0009-4415 5) Turn the stapler over, disconnect two Refer to Procedure 3.1.6 connectors [1], remove two screws [2], and remove the stapler from the stapler base. - Page 65 Chapter 3 3.2.2.8 Removing the Grate-shaped Lower Guide 0009-4498 Refer to Procedure 3.1.3 3.2.2.9 Removing the Processing Tray 0009-3670 Refer to Procedure 3.3.1 3.2.2.10 Removing the F-3-13 Swing Unit 0009-3658 1)Remove two screws [1] and remove the 3) Remove two E rings [1] at the joint solenoid cover [2].
- Page 66 Chapter 3 F-3-15 F-3-14 5) Remove the belt [1] from the gear [2], remove the belt [3] from the gear [2] and gear [4], and pull out the swing unit [5] from the delivery direction.
-
Page 67: Document Feeding System
Chapter 3 Document Feeding 3.3.1.7 Removing the Tray 2 System 0009-3653 Refer to Procedure 3.3.3 3.3.1 Process Tray Assembly 3.3.1.8 Removing the Grate-shaped Lower 3.3.1.1 Removing the Guide 0009-4506 Front Door 0009-4502 Refer to Procedure 3.1.3 Refer to Procedure 3.1.5 3.3.1.9 Removing the 3.3.1.2... - Page 68 Chapter 3 [2] [3] F-3-16 F-3-17 2) Remove the stack delivery roller front 3) Remove all finisher controller PCB side E ring [1], gear [2], parallel pin [3], E connectors[1] and remove the harness ring [4], washer [5], and bearing [6]. from two clamp [2].
-
Page 69: Tray 1
Chapter 3 remove the clutch [2]. 6) Remove the E ring [3], washer [4], and bearing [5] and remove the stack delivery roller. [3] [4] [5] F-3-20 3.3.2 Tray 1 F-3-19 3.3.2.1 Removing the Front Door 0009-4507 7) Disconnect two connectors [1] and Refer to Procedure 3.1.5 remove harness from the clamp and edge saddle [2]. - Page 70 Chapter 3 3.3.2.5 Removing the Tray 1 0009-3577 When moving the tray down to attach it, you need to push the tray lift motor gear [1] to the front (using a screwdriver or the like) to release the clutch. However, when the clutch is released, the tray [2] drops by its own weight.
-
Page 71: Tray 2
Chapter 3 compare the heights of the shutter guide top edges [2] with those of the tray projections [3] at the front and rear to check that tray attached horizontally. If their heights are not the same, remove the tray and then attach it again. -
Page 72: Tray 2
Chapter 3 3.3.3.3 Removing the Escape Tray Cover 0009-4427 Refer to Procedure 3.1.6 3.3.3.4 Removing the Front Inside Upper Cover 0009-4512 Refer to Procedure 3.1.4 3.3.3.5 Removing the Grate-shaped Upper Guide 0009-3615 F-3-27 Refer to Procedure 3.1.2 3.3.3.6 Removing the 1) Remove screw [1] and remove the stopper [2]. -
Page 73: Buffer Roller
Chapter 3 compare the heights of the shutter guide top edges [2] with those of the tray projections [3] at the front and rear to check that tray attached horizontally. If their heights are not the same, remove the tray and then attach it again. -
Page 74: Return Roller
Chapter 3 3.3.4.3 Removing the 3.3.5.4 Removing the Buffer Roller Front Inside Upper 0009-4156 Cover 0009-4518 1) Remove the buffer roller axis [2] from two arms [1]. Refer to Procedur 2) Remove two clips [3] and remove two buffer rollers [4]. 3.3.5.5 Removing the Grate-shaped... -
Page 75: Return Roller Unit
Chapter 3 3.3.5.10 Removing the Return Roller 0009-3709 The return roller is subjected to special production processing known as "aging" to prevent possible increases in its feeding power. Do not clean the return roller. Cleaning (with water, example), will increase its feed power, ultimately causing feeding faults. -
Page 76: Escape Unit
Chapter 3 3.3.6.5 Removing the 3.3.6.12 Removing the Grate-shaped Upper Return Roller Unit 0009-3679 Guide 0009-3688 1) Remove the return roller unit front side connector [1] and remove the harness from Refer to Procedure 3.1.2 two clamps [2]. 2) Remove the spring [3] and three screws 3.3.6.6 Removing the [4] and pull out the return roller unit [5]... - Page 77 Chapter 3 3.3.7.3 Removing the Escape Tray Cover 0009-4482 Refer to Procedure 3.1.6 3.3.7.4 Removing the Front Inside Upper Cover 0009-4526 Refer to Procedure 3.1.4 3.3.7.5 Removing the Escape Unit 0009-4527 F-3-36 1) Disconnect four connectors [1] and 3) Remove the three screws [1] at the front remove the harness from two clamps [2] of the escape unit.
-
Page 78: Escape Door Unit
Chapter 3 F-3-39 F-3-38 3.3.8.5 Removing the Escape Door Unit 0009-4477 3.3.8 Escape Door Unit 1) Remove two E-rings [1]. 2) Remove screw and remove the escape 3.3.8.1 Removing the unit support plate [3]. Front Door 0009-4523 3) Open the escape door unit [4] and remove the escape door unit. -
Page 79: Electrical System
Chapter 3 3.4 Electrical System Do not remove the two screws [1] securing escape door shaft. 3.4.1 Finisher Controller PCB 3.4.1.1 Finisher Controller PCB 3.4.1.1.1 Removing Rear Upper Cover 0009-4528 Refer to Procedure 3.1.1 3.4.1.1.2 Removing Finisher Controller PCB 0009-4159 1) Disconnect all connectors [1] on the F-3-41 finisher controller PCB. -
Page 80: Static Charge Eliminator 1
Chapter 3 3.4.2 Static Charge Eliminator 3.4.2.7 Removing the Tray 2 0009-3705 Refer to Procedure 3.3.3 3.4.2.1 Removing the 3.4.2.8 Removing the Front Door 0009-4529 Grate-shaped Lower Refer to Procedure 3.1.5 Guide 0009-4533 Refer to Procedure 3.1.3 3.4.2.2 Removing the Rear Upper Cover 0009-4531 3.4.2.9... -
Page 81: Static Charge Eliminator 2
Chapter 3 3.4.3 Static Charge Eliminator 3.4.3.1 Removing the Front Door 0009-4530 Refer to Procedure 3.1.5 3.4.3.2 Removing the Escape Tray Cover 0009-4441 F-3-43 Refer to Procedure 3.1.6 3) Pull out the static charge eliminator [1] 3.4.3.3 Removing the at the center of the swing unit from the Inlet Static Charge bottom. -
Page 82: Static Charge Eliminator 3
Chapter 3 3.4.4 Static Charge Eliminator 3.4.4.1 Removing the Escape Door 0009-4400 1) Open the front door. 2) Remove two screws [1] and remove the escape door [2]. F-3-47 A ground plate [1] is provided in the area where the escape delivery static charge eliminator [2] is mounted. -
Page 83: Chapter 4 Maintenance
Chapter 4 Maintenance... - Page 84 Contents Contents 4.1 User Maintenance ...................... 4-1 4.1.1 User Maintenance (Finisher Unit)............... 4-1 4.2 Maintenance and Inspection ..................4-2 4.2.1 Periodically Replaced Parts .................4-2 4.2.1.1 Periodically Replaced Parts (Finisher Unit) ..........4-2 4.2.2 Durables ......................4-2 4.2.2.1 Durables (Finisher Unit)................4-2 4.2.3 Periodical Servicing ....................
- Page 85 Contents 4.5.3 Solenoids (Finisher Unit) .................. 4-21 4.5.4 Motors (Finisher Unit) ..................4-23 4.5.5 Clutches (Finisher Unit)..................4-25 4.5.6 PCBs (Finisher Unit)..................4-26 4.6 Variable Resistors (VR), Light-Emitting Diodes (LED), and Check Pins by PCB. 4-28 4.6.1 Overview......................4-28 4.6.2 Finisher Controller PCB..................4-28 4.7 Upgrading ........................
-
Page 86: User Maintenance
Chapter 4 4.1 User Maintenance 4.1.1 User Maintenance (Finisher Unit) 0009-2559 T-4-1 Item Timing Staple cartridge replacement When prompted (indicator on host machine control panel) -
Page 87: Maintenance And Inspection
Chapter 4 4.2 Maintenance and Inspection 4.2.1 Periodically Replaced Parts 4.2.1.1 Periodically Replaced Parts (Finisher Unit) 0009-2560 The Finisher unit does not have parts that must be replaced on a periodical basis. 4.2.2 Durables 4.2.2.1 Durables (Finisher Unit) 0009-2561 Some of the parts of the machine may need to be replaced one or more times because of wear or tear during the machine's warranty period. -
Page 88: Periodical Servicing
Chapter 4 As of November, 2004 Name Quantity Approx. life Remark Buffer roller FC5-3442-000 1,000,000 sheets Return roller (Rear) FC5-3457-000 1,000,000 Color;White sheets Return roller (Front) FC5-6873-000 1,000,000 Color;Black sheets 4.2.3 Periodical Servicing 4.2.3.1 Periodical Servicing (Finisher Unit) 0009-2562 Does not have parts that must be serviced on a periodical basis. -
Page 89: Adjustment
Chapter 4 2) Set the bits of SW104 on the finisher 4.3 Adjustment controller PCB as follows: 4.3.1 Basic Adjustment 4.3.1.1 Upward Curl 1 2 3 4 5 6 7 8 F-4-2 Mode 0009-2563 a. Outline 3) Turn on the host machine. Paper tends to curl upward in certain - When this mode item is enabled, the conditions, preventing normal delivery/... - Page 90 Chapter 4 executed for every sheet of paper (instead of every 5 sheets) and the timing at which Paper with appreciable body. the delivery tray is moved down is advanced so that the paper will be stacked properly. - When this mode item has been enabled, changes in conditions (e.g., the use of paper with little curl) can prevent proper stacking.
-
Page 91: Downward Curl Mode
Chapter 4 paper source (e.g., cassette). If doing so following figure.) makes the downward curling worse than *For instance, heavy paper cover mode before, turn back over the stack. If the and single-side binding are selected, and paper still develops downward curl and, the front/back cover is LDR and 157 g/m2 thus, fails to deposit itself normally, try or more. -
Page 92: Stack Delivery Mode
Chapter 4 3) Turn on the host machine. - When this mode item is enabled, the machine changes its operation it executes after the start of stack edging, thus ensuring that the paper will be stacked properly. - When this mode item has been enabled, changes in conditions (e.g., the use of paper with little curl or delivery of paper with downward curl) can prevent the... -
Page 93: Offset Stack Mode
Chapter 4 paper will be stacked correctly. - When this mode has been enabled, the - After this mode items has been enabled, stack delivery is performed without changes in conditions (e.g., the use of buffering and the speed of the stack paper with little upward curl or delivery of delivery roller is changed to an appropriate paper with downward curl) can prevent the... -
Page 94: Adjusting The Staple Position
Chapter 4 PCB. 2) Check that the host machine power is off When SW103 is pressed, the swing guide and set SW104 on the finisher controller opens and the alignment plate moves to PCB as follows according to paper/stitch prescribed position. position used for adjustment. - Page 95 Chapter 4 stapled paper manually to verify the staple position because it is not ejected. 7) Press SW103 on the finisher controller PCB once. 8) If the staple position is correct, insert a sheet of paper between the aligning plates and push it against the stopper, push the far end edge of the paper to the rear aligning plate, and press SW103 once...
-
Page 96: Troubleshooting
Chapter 4 4.4 Troubleshooting 4.4.1 Error Code 4.4.1.1 E500;Communication error 0009-2588 Finisher controller PCB/Host machine DC controller PCB 1) Does it improve when the host machine power switch is turned OFF/ON? YES : End Wiring 2) Is the wiring between the finisher controller PCB and host machine DC controller PCB normal? NO : Repair the wiring. -
Page 97: E530;Front Aligning Plate Motor Error
Chapter 4 Rear end assist mechanism 3) Is there any abnormality in the rear end assist mechanism? YES : Repair the rear end assist mechanism. Rear end assist motor (M109)/Finisher controller PCB 4) Does it improve when the rear end assist motor is replaced? YES : End NO : Replace the finisher controller PCB. -
Page 98: E535;Swing Motor Error
Chapter 4 1) Is the stapler caught in the way of its travel route and is the sensor flag of the stapler alignment interference sensor (PI116) activated when power is ON? YES : Manually move the stapler to the position where the sensor flag is not activated. Stapler drive home position sensor (PI110) 2) Check the stapler drive home position sensor. -
Page 99: E540;Tray 1 Shift Motor Error
Chapter 4 NO : Replace the sensor. Wiring 2) Is the wiring between the finisher controller PCB and rear aligning plate motor normal? NO : Repair the wiring. Rear aligning plate 3) Is there mechanical trapping in the path of the aligning plate? YES : Repair the mechanism. -
Page 100: E584;Shutter Malfunction
Chapter 4 NO : Replace the sensor. Tray 2 shift area sensor PCB 2) Check the tray 2 shift area sensors 1 to 3. Do the sensors operate normally? NO : Replace the tray 2 shift area sensor PCB Wiring 3) Is the wiring between the finisher controller PCB and tray 2 shift motor nor-mal? NO : Repair the wiring. -
Page 101: Outline Of Electrical Components
Chapter 4 4.5 Outline of Electrical Components 4.5.1 Sensors (Finisher Unit) 0009-2613 PI119 PI105 PI109 PI108 PI111 PI107 PI114 PI104 PI103 PI121 PI106 PI118 PI102 PI113 PI115 PI116 PI120 PI110 PI112 F-4-14 4-16... - Page 102 Chapter 4 T-4-3 Ref. Name Description Parts No. Error PI102 Front cover sensor Detects front cover open/close WG8- 1400/ 5593 1788 PI103 Inlet sensor Detects paper in inlet WG8- 1001/ 5509 1101/ 1200/ 1300 PI104 Feed path sensor Detects paper in feed path WG8- 1004/ 5509...
- Page 103 Chapter 4 Ref. Name Description Parts No. Error PI116 Stapler alignment Detects stapler alignment WG8- E532 interference sensor interference 5509 PI118 Escape tray path sensor Detect paper in escape tray path WG8- 5593 PI119 Escape tray full sensor Detects paper full in escape tray WG8- 5593 PI120...
-
Page 104: Microswitches (Finisher Unit)
Chapter 4 Ref. Stapler PCB 2 Stapler PCB 1 Feed driver PCB Finisher controller PCB PI119 J887 / J886A J708B PI120 J721A PI121 J887 / J886A J708B 4.5.2 Microswitches (Finisher Unit) 0009-2614 MSW104 MSW102 MSW103 MSW101 F-4-15 4-19... - Page 105 Chapter 4 T-4-5 Ref. Name Description Parts No. Error Finisher controller Front cover switch Detects front cover FH7-6379 1400 E5F9 J707 close Swing guide switch Detects swing guide FH7-6379 J714 open Tray 1 switch Detects tray 1 FH7-6377 J715 Staple safety switch Detects swing guide FH7-6379...
-
Page 106: Solenoids (Finisher Unit)
Chapter 4 4.5.3 Solenoids (Finisher Unit) 0009-2615 SL102 SL103 SL101 SL104 SL105 F-4-16 T-4-6 Ref. Name Parts No. Feed driver PCB Finisher controller PCB Feed roller separation FL2-0811 J713 solenoid Buffer roller separation FL2-0813 J713 solenoid 4-21... - Page 107 Chapter 4 Ref. Name Parts No. Feed driver PCB Finisher controller PCB 1st delivery roller FL2-0812 J713 separation solenoid Buffer rear end holding FL2-0821 J713 solenoid Escape solenoid FH6-5089 J889 / J881B J705B 4-22...
-
Page 108: Motors (Finisher Unit)
Chapter 4 4.5.4 Motors (Finisher Unit) 0009-2616 M107 M106 M102 M101 M104 M109 M112 M103 M113 M108 M111 M105 F-4-17 T-4-7 Ref. Name Parts No. Error M101 Feed motor FH5-1034 M102 Stack ejection motor 4K1-1106 E584 4-23... - Page 109 Chapter 4 Ref. Name Parts No. Error M103 Front aligning plate motor FH5-1040 E530 M104 Rear aligning plate motor FH5-1040 E537 M105 Stapler shift motor FH5-1037 E532 M106 Swing motor FH5-1036 E535 M107 Tray 1 shift motor 4K1-1102 E540 M108 Tray 2 shift motor 4K1-1102...
-
Page 110: Clutches (Finisher Unit)
Chapter 4 4.5.5 Clutches (Finisher Unit) 0009-2617 CL102 CL101 F-4-18 T-4-9 Ref. Name Parts No. Error Finisher controller PCB CL101 Shutter clutch FH6-5101 E584 J732 CL102 Stack ejection lower roller clutch FH6-5101 E584 J716 4-25... -
Page 111: Pcbs (Finisher Unit)
Chapter 4 4.5.6 PCBs (Finisher Unit) 0009-2618 F-4-19 T-4-10 Ref. Name Parts No. Error Finisher controller PCB 4G1-1487 4-26... - Page 112 Chapter 4 Ref. Name Parts No. Error Stapler PCB 1 FM2-1426(CABLE, STAPLE E531/ CONNECTING ASS'Y) E532 Stapler PCB 2 FM2-1426(CABLE, STAPLE E531/ CONNECTING ASS'Y) E532 Feed driver PCB 4G1-1488 Tray 1 shift area sensor PCB FG3-2886 E540 Tray 2 shift area sensor PCB FG3-2886 E542 Tray 1 shift motor PCB...
-
Page 113: Variable Resistors (Vr), Light-Emitting Diodes (Led), And Check Pins By Pcb
Chapter 4 4.6 Variable Resistors (VR), Light-Emitting Diodes (LED), and Check Pins by PCB 4.6.1 Overview 0009-2619 Of the LEDs and check pins used in the machine, those needed during servicing in the field are discussed. Do not touch the check pins not found in the list herein. They are exclusively for factory use, and require special tools and a high degree of accuracy. - Page 114 Chapter 4 T-4-11 Switch Switch Function SW101 Used for making adjustments to the alignment position/stapling position. SW102 Used for making adjustments to the alignment position/stapling position. SW103 Used to start operation for alignment position adjustment/stapling position adjustment. SW104 Used to start operation for alignment position adjustment/stapling position adjustment.
-
Page 115: Upgrading
Chapter 4 4.7 Upgrading 4.7.1 Upgrading (Finisher Unit) 0009-2621 Overview A flash ROM is used for the IC108 (CPU) of the Finisher unit. To upgrade this IC, the downloader PCB (FY9-2034) is used. The operating instructions for it are given below. How to Use the Downloader PCB (FY9-2034) 1.When to Use the Downloader PCB The downloader PCB is used when upgrading the CPU (IC108) of the Finisher Controller... - Page 116 Chapter 4 Description Function Model LED To be lit when the Finisher is connected. Power LED To be lit when power is supplied from the Finisher to the downloader PCB RS-232C cable (straight A cable to connect the downloader PCB and a PC.Be sure to full wiring;...
- Page 117 Chapter 4 F-4-22 4) Select the data inside the NewROM folder F-4-23 4-32...
- Page 118 Chapter 4 5) Select [Register]. F-4-24 6) Select [OK] and register the data. F-4-25 4-33...
- Page 119 Chapter 4 b. Connection to the Finisher 1) Turn off the power of the host machine. 2) Remove the rear upper cover of the Finisher. 3) Insert the cable B to J723 on the Finisher controller PCB. 4) Connect the RS-232C cable to the RS-232C connectors of the circuit board and the PC. 5) Turn on the power of the host machine.
- Page 120 Chapter 4 F-4-27 3) Press the START/STOP key of the downloader PCB. LOAD LED is lit. 4)Select the data and press [START]. F-4-28 4-35...
- Page 121 Chapter 4 5) Follow the instructions on the screen to prepare for downloading. A press on [OK] will bring up the next screen. F-4-29 6) Select the data to download. F-4-30 4-36...
- Page 122 Chapter 4 7) Press [START] to start downloading. F-4-31 8) Press [START] so that the computer and the downloader PCB will start downloading the program. F-4-32 4-37...
- Page 123 Chapter 4 9) If downloading ended normally, press [OK]. F-4-33 10)Return to the main menu and finish the download. F-4-34 4-38...
- Page 124 Chapter 4 5. Release of Connection 1) Press the START/STOP key of the downloader PCB. LOAD LED is turned off. 2) Turn off the power of the host machine. 3) Disconnect the cable B from the Finisher. 4) Mount the rear upper cover to the Finisher. 5) Turn on the power of the host machine.
-
Page 125: Service Tools
Chapter 4 4.8 Service Tools 4.8.1 Solvents and Oils 0009-2622 T-4-13 Name Description Composition Remarks Vic Clean Cleaning: Hydrocarbon(fluorine Do not bring near fire. e.g., glass, family) Procure locally. plastic, rubber parts, Alcohol Isopropyl alcohol may external covers Surface activating be substituted. -
Page 126: Chapter 5 Error Code
Chapter 5 Error Code... - Page 127 Contents Contents 5.1 Overview........................5-1 5.1.1 Overview ......................5-1 5.2 User Error Code ......................5-2 5.2.1 Staple is absent....................5-2 5.2.2 Stapler safety protection function activated ............5-2 5.2.3 Stack tray overstacking ..................5-3 5.3 Service Error Code..................... 5-4 5.3.1 E500 ........................5-4 5.3.2 E505 ........................
-
Page 128: Overview
Chapter 5 5.1 Overview 5.1.1 Overview 0009-2669 The CPU on the machine's finisher controller PCB is equipped with a mechanism to check the machine condition as needed; when it detects a fault, the machine communicates the fact to the host machine in the form of a code and a detail code. The host machine indicates the code on its control panel. -
Page 129: User Error Code
Chapter 5 5.2 User Error Code 5.2.1 Staple is absent 0009-2670 T-5-1 Error Condition Detection timing Machine Resetting Descrip- operation tion Staple is The staple Always monitored Normal operation Replace the staple absent cartridge can be continued. cartridge; or, set it has run However, whether correctly. -
Page 130: Stack Tray Overstacking
Chapter 5 5.2.3 Stack tray overstacking 0009-2673 T-5-3 Error Condition Detection timing Machine Resetting Descrip- operation tion Stack tray The number of After ejecting the Normal operation Remove paper over- sheets on the sheet/set exceeding will continue. from ejection tray. stacking ejection tray the limit. -
Page 131: Service Error Code
Chapter 5 5.3 Service Error Code 5.3.1 E500 0009-2677 T-5-4 Code Detail Error Description Detection timing E500 0001 Communication The communication with the host machine is error interrupted. 5.3.2 E505 0009-2678 T-5-5 Code Detail Error Description Detection timing E505 0001 Backup RAM The checksum for the finisher controller PCB... -
Page 132: E530
Chapter 5 5.3.4 E530 0009-2681 T-5-7 Code Detail Error Description Detection timing E530 8001 Aligning plate The aligning plate does not return to aligning frontmotor plate front home position sensor when the (M103)/Aligning alignment plate front motor has been driven for plate fronthome 4 seconds. -
Page 133: E532
Chapter 5 5.3.6 E532 0009-2684 T-5-9 Code Detail Error Description Detection timing E532 8001 Stapler shift The stapler does not leave the stapler shifthome motor(M105)/ position when the stapler shift motor hasbeen Stapler shift driven for 5 seconds. homeposition sensor 8002 The stapler does not return to the stapler shift (PI110) -
Page 134: E537
Chapter 5 5.3.8 E537 0009-2688 T-5-11 Code Detail Error Description Detection timing E537 8001 Aligning plate The aligning plate does not leave the aligning rear motor plate rear home position sensor when the (M104)/Aligning alignment plate rear motor has been driven for 4 plate rear home seconds. -
Page 135: E540
Chapter 5 5.3.9 E540 0009-2689 T-5-12 Code Detail Error Description Detection timing E540 8001 Tray 1 shift If the tray does not return to home position when motor(M107)/ the tray 1 shift motor is driven for 20 seconds. Tray 1 shift area If the tray does not move to other area when tray sensor PCB 1 shift motor is driven for 4 seconds. -
Page 136: E542
Chapter 5 5.3.10 E542 0009-2690 T-5-13 Code Detail Error Description Detection timing E542 8001 Tray 2 shift motor If the tray does not return to home position when (M108)/Tray 2 the tray 2 shift motor is driven for 20 seconds. shift area sensor If the tray does not move to other area when tray 2 shift motor is driven for 4 seconds. -
Page 137: E584
Chapter 5 5.3.11 E584 0009-2692 T-5-14 Code Detail Error Description Detection timing E584 8001 Stack ejection The stapler does not leave the shutter home motor (M102)/ position when the stack ejection motor has been Shutter open/ driven for 3 seconds. close clutch 0002 The stapler does not return to the shutter home... - Page 138 Chapter 5 1) When the main power switch is turned on, the DC controller PCB will communicate to the main controller PCB that a functional limit has been imposed. The control panel will indicate that a functional limit has been imposed on the finisher. 2) The DC controller PCB backs up information on the functional limit.
- Page 139 Appendix...
- Page 140 Contents 1 Genelal Timing Chart ....................1 Finisher Unit......................1 2 General Circuit Diagram ................... 3 Signal Names......................3 General Circuit Diagram ..................5...
- Page 141 1 Genelal Timing Chart Finisher Unit Stapling : A4 size paper, 2-sheet document, rear1-point stapling Operation start signal Host machine eject signal Operation Inlet sensor (PI103) Feed path sensor (PI104) Inlet motor (M113) Feed motor (M101) Stack ejection motor (M102) 1st delivery roller separation solenoid (SL103) Stack ejection lower roller...
- Page 142 2 General Circuit Diagram Signal Names List of Signal Names/Abbreviations (Finisher Unit) The following presents the abbreviations of signals used in this manual and in drawings, and the meaning of each signal. Reference: Signals enclosed by brackets [ ] are electrical signals, However, the state "1" or "0" of these analog signals cannot be indicated. Otherwise, the state of digital signals "1" or "0" can be indicated. T-2-1 ASSIST-HP-SEN REAR END ASSIST GUIDE HP DETECT Signal...
- Page 143 General Circuit Diagram Finisher Unit General Circuit Diagram(1/3) SL104 SL103 SL102 SL101 1st delivery roller Buffer rear end Buffer roller Feed roller separation MSW104 MSW102 holding solenoid separation solenoid separation solenoid solenoid MSW101 Staple safety Swing guide PI103 switch switch Front cover switch PI105 PI104...
- Page 144 Finisher Unit General Circuit Diagram(2/3) PI116 M111 Stapler alignment M105 M108 Stapler motor interference sensor Stapler shift motor Tray 2 shift motor PI112 Tray 2 paper sensor J829 Tray 2 shift area J826 J827 J828 sensor PCB J824 J825 J1981 J993 J995 J994...
- Page 145 Finisher Unit General Circuit Diagram(3/3) M112 Escape feed motor PI118 PI119 PI102 PI121 Escape tray path sensor Escape tray full sensor Front cover sensor Escape door sensor J894 M113 J896 J897 J806 J861 Inlet motor SL105 Escape solenoid J891 J893 J895 J889 J883...