
Related Manuals for Arcflash Labs EMG-01 Alpha

Summary of Contents for Arcflash Labs EMG-01 Alpha
- Page 1 EMG-01 Alpha 8 Stage IGBT Coilgun User Manual Arcflash Labs, LLC 8620 Belford Ave, Unit 603 Los Angeles CA 90045 - (424) 256-5087 www.arcflashlabs.com admin@arcflashlabs.com Limited Warranty P a g e...
- Page 2 AS PROVIDED UNDER THIS WARRANTY, IS THE BUYER’S EXCLUSIVE REMEDY. This exclusive remedy will not be deemed to have failed of its essential purpose so long as Arcflash Labs is willing and able to repair or replace any defective product, or refund the purchase price, in the prescribed manner. In the event Arcflash Labs fails to provide the Buyer with free repair or replacement, or refund the purchase price as aforesaid, Arcflash Labs’...
- Page 3 1. Introduction The Arcflash Labs EMG-01A (Electro-Magnetic Gun – 01 Alpha) is an 8 stage, IGBT switched, low voltage capacitor augmented fully automatic coilgun. It features 8 IGBT stages, each with an independent infrared optical gate. The fire control and sequencing of the coils is aided by microcontroller which provides nanosecond-precise timing signals to the IGBT gates and allows for firing up to 4 rounds per second at >45m/s.
- Page 4 Terminology and Safety The list below and throughout this manual is a summary of the major hazards associated with the device, but is NOT ALL INCLUSIVE. There are many other hazards associated with the device which are not laid out in this manual. We recommend wearing high voltage, flame retardant gloves at all times when using the device as well as goggles and thick clothing.
-
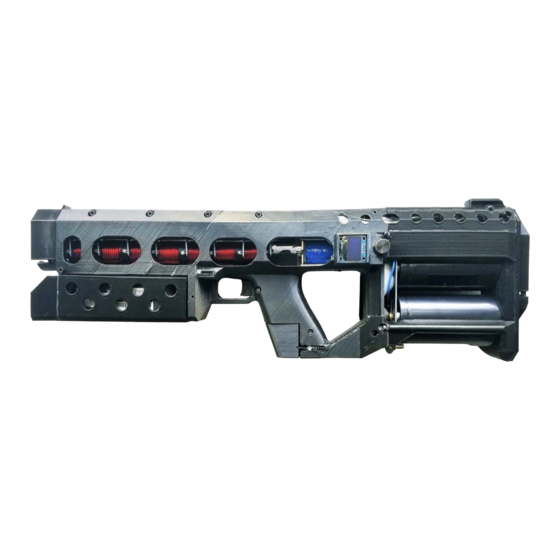
Page 5: Overview Of Components
2. Overview of components Mounting rail Drive coils (barrel) Magazine with Muzzle chambered round Injector solenoid Display/encoder Charge LED Battery LiPo Battery Trigger release lever Magazine release Main fuse Capacitors Compartment IGBT collectors Injector solenoid terminals 2.1 Barrel - Severe shock hazard: never touch the IGBT collectors or internal wiring of the gun, especially when it is powered on. - Page 6 REMOVE THIS ORANGE TAPE FROM THE IGBT COLLECTOR PADS. If it falls off for any reason, discontinue use of the device and send the device back to Arcflash Labs, LLC for repairs if the tape falls off for any reason. It is a simple repair. Firing the device with no tape on the pads will almost certainly lead to severe shock and/or irreversible damage to the gun.
- Page 7 2.3 Display/encoder The display shows the velocity of the prior shot and also allows for the user to select various firing modes as well as the number of active driver stages. The display also allows the user to set the gun on safe and displays a warning when the gun is set to safe. 2.4 Main fuse - The Main Fuse may be used as a power switch.
- Page 8 The trigger of the EMG-01A is connected to a small microswitch internally and is actuated by a small spring. The trigger only has roughly 0.25” of travel length and the spring return is very fragile. If excessive pressure is exerted on the trigger, the spring return could detach.
-
Page 9: Operation
3. Operation 3.1 Startup - It is unsafe to power up the gun with a magazine inserted. - Always check that there is nothing inside the barrel before powering up. Any rounds or debris inside the barrel during startup could result in a misfire or explosion of the IGBTs. 1. - Page 10 4. Insert fuse at an angle as shown below. Connect one terminal, then rotate to connect the other terminal. Once both terminals are connected, do not remove the fuse – press in firmly until the fuse is fully seated in its terminals. If you accidentally disconnect the fuse during insertion, let the system fully power down before re-inserting.
- Page 11 Push to charge 6. The blue LED near the handle should illuminate, indicating that the capacitors are charged and the system is energized. Charge LED 7. The computer should enter its normal operating mode, showing a display that looks similar to the picture below.
-
Page 12: Inserting A Magazine
b. BURST: Fires up to three rounds per trigger-press. If the user releases the trigger before the end of the three round burst, the rest of the burst will not fire. c. AUTO: Fully automatic operation. Fires rounds continuously until the trigger is released. -
Page 13: Changing Power Level
3.3 Changing power level 1. One of the most interesting properties of electromagnetic guns is the ability to change the muzzle velocity on the fly. The EMG-01A integrates this feature on the main menu. Simply select the option: “P:********” and press down on the button to select the power level. By default, the gun is set on maximum power at startup. - Page 14 2. Remove the Main Fuse from its socket – this immediately removes the battery from the circuit. 3. Remove the magazine from the gun and verify that there is no round still remaining in the barrel. 4. Wait for ALL LEDs (especially the blue LED near the handle) to extinguish before storing the unit 14 | P a g e...
-
Page 15: Hardware Specifications
01A software is expressly discouraged and will immediately void any express or implied warranties. Any attempt to modify the software may render the gun unusable or unsafe. Arcflash Labs, LLC assumes absolutely no responsibility for units which have had their software modified by the end user. - Page 16 16 | P a g e...
Need help?
Do you have a question about the EMG-01 Alpha and is the answer not in the manual?
Questions and answers