Advertisement
Table of Contents
Advertisement
Table of Contents

Related Manuals for Elecrow CrowPi All-in-One Kit

Summary of Contents for Elecrow CrowPi All-in-One Kit
- Page 1 Elecrow CrowPi All-in-One Kit Quick Start Guide Please read this instruction carefully before using this Kit and keep it for future reference. Product pictures are for reference only...
-
Page 2: Table Of Contents
Table of Contents The CrowPi About the CrowPi development board --------------------------------------------- 1-2 Enclosure and materials ----------------------------------------------------------------- 3 Hardware, sensors & GPIO usage -------------------------------------------------- 4-7 Safety notes and warnings ------------------------------------------------------------ 7-8 Initial Installation CrowPi Pre-installation Requirements --------------------------------------------- 8-9 Downloading CrowPi image --------------------------------------------------------- 9-10 Burning the image into an Micro SD Card -------------------------------------- 10-11 Attaching the Raspberry Pi to the CrowPi board ----------------------------- 11-13 First time booting into the Operating System----------------------------------- 14-16... -
Page 3: The Crowpi
About the CrowPi development board Thank you for supporting and purchasing our Elecrow CrowPi Board! After months of dedicated working with our top R&D engineers and teams at Elecrow, We are proudly presenting the “CrowPi” , a one of a kind Raspberry Pi Development board, Which we truly believe you'll like just as we do. - Page 4 All-in-One Kit, CrowPi embeds regular materials for doing RPI projects Sensors LCD display Switches Button Buzzer Relay Servo Bread boards Steper motor IR receiver I2C NFC moudle LED matrix 4 Bite segment Button arry CrowPi Development Board Jumpers With our board we are solving issues that have been in the wild for quite a while .. issues like: Being in an unproductive, messy environment - full of sensors, jumpers, bread boards and cables.
-
Page 5: Enclosure And Materials
Enclosure & Materials Beautifully Designed for Everyday Life Black Blue CrowPi case is made of ABS plastic. The case edge is made of Aluminium alloy. The monitor frame is made of arcylic.The fastener and hinge is made of iron. The handle is made of plastic with metal coating. -
Page 6: Hardware, Sensors & Gpio Usage
Hardware, Sensors & GPIO Usage Module List: 1. ABS Plastic Case 11. Sound Sensor 21. Relay 2. Camera 12. PIR Motion Sensor(LH1778) 22. Matrix Buttons 3. 7inch HDMI Touch Screen 13. Ultrasonic Sensor 23. Independent Buttons 4. Power Circuit 14. Servo Inteface 24. - Page 8 Sensor Control Description Sensor Name Control Pin Control Remarks Method BUZZER pin12/GPIO18 GPIO OUTPUT RELAY pin40/GPIO21 GPIO OUTPUT SOUND SENSOR pin18/GPIO24 GPIO INPUT TILT SWITCH pin15/GPIO22 GPIO INPUT UX5-2 ON VIBRATION MOTOR pin13/GPIO27 GPIO UX5-1 ON OUTPUT MOTION SENSOR pin16/GPIO23 GPIO OUTPUT TOUCH SENSOR...
-
Page 9: Safety Notes And Warnings
Elecrow doesn't use dangerous materials while manufacturing, and we follow extremely strict QA tests to make sure the highest quality product will be shipped to our customers. The CrowPi is a safe-to-use product with 5V input by power supply. Even though it's completely safe to use it under normal circumstances there are a few rules that parents should be aware of when buying this product for their children. -
Page 10: Initial Installation
Please go through the following checklist and make sure you have it all Note: These are not optional. They are all necessary for the installation process. Official Elecrow CrowPi Board Raspberry Pi 3 Micro SD Card (Highly recommended... -
Page 11: Downloading Crowpi Image
Mouse + Keyboard (Can be Micro SD Adapter (To be able to bluetooth as well as USB) connect to your PC / Laptop) If you've confirmed you have the above items, You're ready to go! Downloading the CrowPi Image The Raspberry Pi uses an Linux-based operating system in order to function properly, it uses a Micro-SD card to boot the operating system into a use-friendly environment to enable customers like you to code and make amazing things. -
Page 12: Burning The Image Into An Micro Sd Card
After you've successfully downloaded the image, you should have a file called “<file_name>.img” while “<file_name>” can depend on where you downloaded from, either Elecrow website or the Raspberry Pi Official website. The file extension should be “.img” or “.zip” if it’ s an “.zip” you should extract it to have a file file extension “.img”... -
Page 13: Attaching The Raspberry Pi To The Crowpi Board
1) Click the “Select Image” button and select your .img file which you downloaded from either Elecrow Website or Raspbian official website 2) Click “Select Drive” button to select your Micro SD Card that you would like to burn the... - Page 14 After successfully plugging back in the Micro SD card, we'll need to lay the Raspberry Pi over it's location on top of the CrowPi board. Raspberry Pi 3 HDMI Port USB 2.0 Note: First of all, we should have to plug the cable first, then mount screw . You can put the unused cable under the board.
- Page 15 And … We are done! Well … almost! To make sure that the Raspberry Pi won't move during your rapid development we will need to attach it using screws, the Raspberry Pi contains screws to be attached to the CrowPi board, take a look at the following picture for reference: Make sure to attach them tightly for your Raspberry Pi safety.
-
Page 16: First Time Booting Into The Operating System
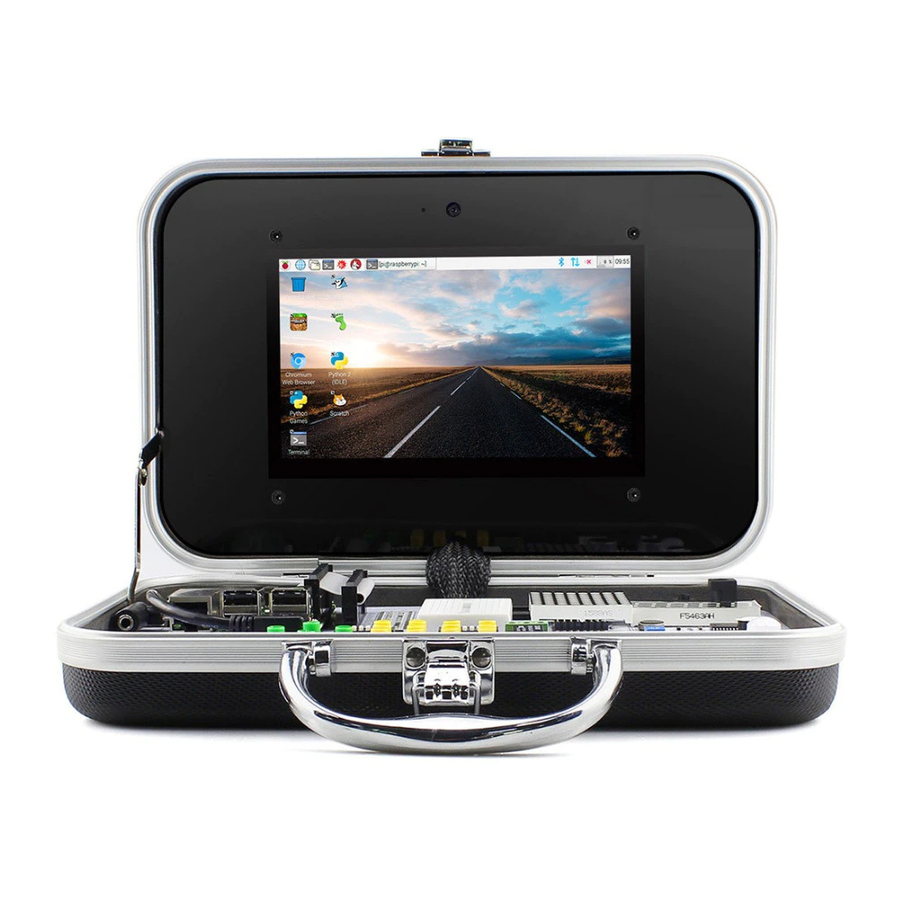
USB Powered-Easy and Convenient First time booting into the Operating System After We've prepared everything and plugged the power on, if the Raspberry Pi doesn't turn on by itself - it means the power button isn't pressed. Power Button After powering on the board by clicking on the power button, the Raspberry Pi should load the operating system automatically. - Page 17 Congratulations! You've officially got your CrowPi up and running. You might have realized that you have no way to control the desktop environment except for the 7 inch touch screen … let's get it solved by plugging in a keyboard and external mouse.
- Page 18 Or connect Bluetooth keyboard and mouse using the touch screen with the bluetooth configuration Last thing will be connecting to a local wifi access point or using Ethernet cable if that works better for you (both are optional) WiFi Ethernet cable After this, you should have fully functional CrowPi laptop that you can do everything you want to with it!
- Page 19 The lessons will get you started using Python 2.7 and modules usages including all on-board sensors and creating your own first circuit using the breadboard. Download the lessons PDF Here: https://www.elecrow.com/download/CrowPi-lessons.pdf Lesson 1 - Using the Buzzer for alert sound or notification. Lesson 2 - Get input from button to control the Buzzer.
- Page 20 Elecrow MAKE YOUR MAKING EASIER +86 0755-23204330 info@elecrow.com Floor, F-building, Fusen industry www.elecrow.com park, Gushu Town, Bao'an District, Shenzhen, China. CrowPi is a new brand by Elecrow...
Need help?
Do you have a question about the CrowPi All-in-One Kit and is the answer not in the manual?
Questions and answers