Table of Contents
Advertisement
Advertisement
Table of Contents

Related Manuals for Creative Audigy 2 ZS Platinum


Summary of Contents for Creative Audigy 2 ZS Platinum
-
Page 2: How To Use This Manual
How to use this manual This document has been designed to provide you with complete product knowledge. You can resize the document window or print this document, access linked web sites and get information from specially prepared graphics. To jump to a linked topic or a web site, click the underlined blue text, or the hand symbol whenever it appears. - Page 3 About Your Hardware To learn more about your product, refer to the corresponding section: Your Audigy 2 ZS audio card Your Joystick/MIDI Bracket Your Platinum Drive (included with Audigy 2 ZS Platinum) Your Remote Control (included with Audigy 2 ZS Platinum)
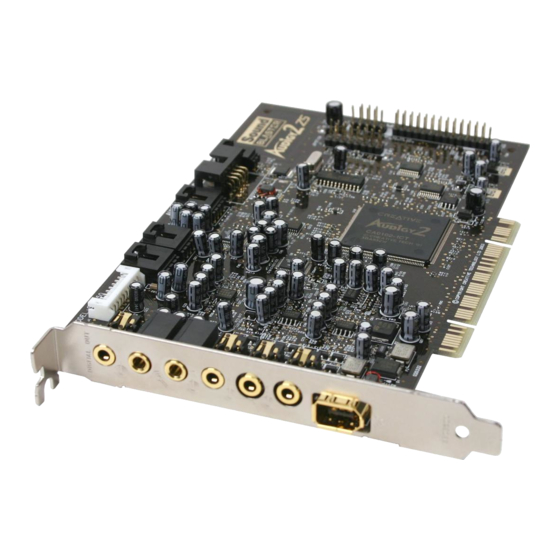
- Page 4 Y our Audigy 2 ZS audio card Your audio card has these jacks and connectors to enable the attachment of a wide variety of devices: Jack or Connector Description FireWire (IEEE 1394) Connects to a FireWire (IEEE 1394) compatible external device (for example, a digital video camcorder, connector digital still camera, printer or scanner).
- Page 5 Joystick/M IDI connector Connects to the Joystick/M IDI bracket for gaming or M IDI devices (optional). (JOYSTICK) AD_EXT connector Connects to the AD_EXT connector on the Platinum Drive (included with Audigy 2 ZS Platinum). (AD_EXT)
- Page 6 Y our Joystick/MIDI Bracket The Joystick/MIDI bracket is used to attach a joystick or MIDI device: Jack or Connector Description Joystick/M IDI connector Connects to a joystick or a M IDI device.
- Page 7 Y our Platinum Drive (included with Audigy 2 ZS Platinum) The Platinum Drive provides additional connectivity for a number of other devices.
-
Page 8: Front Panel
Connects to a FireWire (IEEE 1394) compatible external device (for example, a digital video camcorder, connector digital still camera, printer or scanner). Connects to headphones. Speaker output will be muted if selected in software (Creative Audio HQ or Headphones jack Creative Audio Control). - Page 9 Top panel Jack or Connector Description Connects to the supplied shunt. By default, your Platinum Drive is set for use with a condenser Jumper JP1 microphone. Connect the supplied shunt to Jumper JP1 if you want to use a dynamic microphone. Power connector Connects to the supplied power splitter cable.
- Page 10 Y our Remote Control (included with Audigy 2 ZS Platinum) The Platinum Drive has an infrared receiver for your Creative remote control. Your remote control lets you operate your computer from the comfort of your sofa or bed, at a distance of four meters (13 feet).
- Page 11 Changing the battery To insert your remote control's battery: 1. Release the battery compartment by depressing the small tab on the left, and then slide out the battery compartment. Place the battery with its positive polarity indicator (+) facing up, and slide the battery compartment back in.
- Page 12 Using your remote control Note OSD - On Screen Display. The OSD appears on your computer monitor. To select an option on the OSD, press the Up, Down, Reverse/Left and Fast-Forward/Right buttons to scroll the option, and then press the Select/OK button on your remote control. Depending on where you purchased your product, the actual remote control may vary from the one shown here.
- Page 13 Previous Goes to the previous track, or previous OSD submenu. Enables Time Scaling for M P3, WAV and VCD files (for Creative Sound Blaster Audigy series audio cards only). Slow Press repeatedly to select the speed. To resume normal playback, press the Play/Pause button.
-
Page 14: Installing Hardware
Joystick/MIDI bracket (optional). The Analog CD audio cable is available separately. If you are installing the Platinum Drive (available with Audigy 2 ZS Platinum), you will also need these following items: Warning! Use the AD_EXT cable ONLY with the Platinum Drive. Do not attempt to use a conventional IDE cable or any other cable with the Platinum Drive as it may cause electrical shorts and permanent damage to your Audigy 2 ZS audio card, Platinum Drive and computer. - Page 15 Remove any existing audio card or disable the onboard audio chipset. For more information, see Problems with Multiple Audio Devices. If you are installing the Platinum Drive (included with Audigy 2 ZS Platinum), remove the front panel cover from an unused 5 1/4-inch drive bay.
- Page 16 Component 5 1/4-inch drive bay cover...
- Page 17 Step 2: Prepare your Platinum Drive This step only applies if you are installing the Platinum Drive (included with Audigy 2 ZS Platinum). If you are not installing the Platinum Drive, go to Step 6: Install the audio card. There are two types of microphones that can be connected to your Platinum Drive: dynamic microphones and condenser microphones.
- Page 18 Step 3: Connect cables to the Platinum Drive This step only applies if you are installing the Platinum Drive (included with Audigy 2 ZS Platinum). Component Internal FireWire (IEEE 1394) cable Jumper JP1 Power splitter cable To system power supply unit...
- Page 19 Step 4: Install the Platinum Drive This step only applies if you are installing the Platinum Drive (included with Audigy 2 ZS Platinum). 1. Carefully pass the cables attached to the Platinum Drive through the vacant drive bay of your computer. Make sure these cables do not block the airflow of the fans and heatsinks in your computer.
- Page 21 Step 5: Connect cables to the Audigy 2 ZS audio card This step only applies if you are installing the Platinum Drive (included with Audigy 2 ZS Platinum). Component Internal FireWire (IEEE 1394) cable Pin 1 AD_EXT cable Red-colored wired...
- Page 22 Step 6: Install the audio card 1. Align the Audigy 2 ZS audio card with the PCI slot and press the card gently but firmly into the slot as shown here. Secure the card to your computer. Depending on your computer's configuration, you may need a screw to secure your Audigy 2 ZS audio card to the computer.
- Page 23 Step 7: Install the Joystick/MIDI bracket 1. If you are installing a joystick or MIDI device (optional), secure the Joystick/MIDI bracket to the slot next to the Audigy 2 ZS audio card. Depending on your computer's configuration, you may need a screw to secure your Audigy 2 ZS audio card to the computer.
- Page 24 Step 8: Connect CD/DVD-ROM drive For analog CD audio output: Connect an Analog CD audio cable (available separately) from the Analog Audio connector on your CD/DVD-ROM drive to the CD_IN connector on the Audigy 2 ZS audio card. For digital CD audio output: Connect the Digital CD audio cable from the Digital Audio connector on your CD/DVD-ROM drive to the CD_SPDIF connector on the Audigy 2 ZS audio card Component...
- Page 25 Digital CD Audio Extraction To enable this feature in Windows 98 SE, Windows Me or Windows 2000 (SP3) (Windows XP has this feature enabled), follow the steps below: In Windows 98 SE 1. Click Start -> Settings -> Control Panel. Double-click the Multimedia icon.
- Page 26 1. Replace the computer casing. Plug the power cord into the AC wall outlet, and turn on the computer. To connect your Audigy 2 ZS audio card and Platinum Drive (included with Audigy 2 ZS Platinum) to other devices, see Connecting Related Peripherals.
-
Page 27: Installing Drivers And Applications
Installing and Uninstalling Software Installing Drivers and Applications You need to install device drivers and applications before using your Audigy 2 ZS or Audigy 2 ZS Platinum. The instructions below apply to all supported Windows operating systems. 1. After you have installed your audio card, turn on your computer. Windows automatically detects your audio card and searches for device drivers. - Page 28 Audigy 2 ZS Feature Showcase Demonstration To feel the audio card's awesome gaming, music reproduction and home studio capabilities, install the Audigy 2 ZS Feature Showcase Demonstration. This demonstration requires high-quality 5.1, 6.1 or 7.1 speakers for optimal listening experience. See Audigy 2 ZS Feature Showcase Demonstration.
-
Page 29: Using Creative Software Autoupdate
Locating, downloading and installing updates for your Creative products is now simpler and faster with the new web-based Creative Software AutoUpdate system. When you connect to creative Software AutoUpdate via the Internet, the web site will analyze your computer system to determine what operating system (OS), language and Creative products are installed in our system. - Page 30 Updating Windows 2000 (Service Pack 3) Windows 2000 now provides better support for AC-3 SPDIF output (non-PCM through waveOut) for software DVD viewing. Download the Windows 2000 Service Pack 3 to enjoy this support and to fix other issues in the Windows 2000 operating system. Download this update from www.microsoft.com.
- Page 31 Updating DirectX To download the latest the latest update for DirectX, go to www.microsoft.com.
-
Page 32: Uninstalling And Reinstalling The Applications And Device Drivers
Uninstalling and Reinstalling the Applications and Device Drivers At times you may need to uninstall or reinstall some or all of the audio card's applications and device drivers to correct problems, change configurations, or upgrade outdated drivers or applications. The following instructions tell you how to do so in all Windows operating systems. -
Page 33: Reinstalling All Audio Drivers And Applications
Reinstalling all Audio Drivers and Applications 1. Click Start -> Settings -> Control Panel. Double-click the Add/Remove Programs icon. Click the Install/Uninstall tab (or Change or Remove Programs button). Select the Audigy 2 ZS entry, and then click the Add/Remove (or Change/Remove) button. In the InstallShield Wizard dialog box, select the Repair option. -
Page 34: Uninstalling All Audio Drivers And Applications
Uninstalling all Audio Drivers and Applications 1. Click Start -> Settings -> Control Panel. Double-click the Add/Remove Programs icon. Click the Install/Uninstall tab (or Change or Remove Programs button). Select the Audigy 2 ZS entry, and then click the Add/Remove (or Change/Remove) button. In the InstallShield Wizard dialog box, select the Remove option. - Page 35 Click the Install/Uninstall tab (or Change or Remove Programs button). Select the Creative MediaSource entry, and then click the Add/Remove (or Change/Remove) button. In the InstallShield Wizard dialog box, click the Custom Uninstallation button, and then click the Next button.
-
Page 36: Connecting Related Peripherals
Connecting Related Peripherals Your Audigy 2 ZS or Audigy 2 ZS Platinum will give you endless hours of listening pleasure. To connect related peripherals, refer to the corresponding section. The cables shown here are available separately. Playing Games Watching DVDs... - Page 37 Playing Games Connector Description Joystick/M IDI connector Connects to the Joystick/M IDI bracket for gaming or M IDI devices (optional).
-
Page 38: Watching Dvds
If you have a Dolby Digital/DTS external decoder or AV Amplifier, you can use it to decode Dolby Digital or DTS signals from your Platinum Drive (included with Audigy 2 ZS Platinum) or Audigy 2 ZS audio card. For more information on external decoder or AV Amplifier speaker connection settings, consult the User's Guide of your external decoder or AV Amplifier. - Page 39 AV Amplifier. Decoding with Audigy 2 ZS If you have an external Dolby Digital/DTS DVD player, you can use your Platinum Drive (included with Audigy 2 ZS Platinum) to decode the Dolby Digital or DTS signal. For optical connections:...
- Page 40 Jack, Connector or Description Cable Coaxial SPDIF In connector Connects to external devices with Coaxial connectors. Coaxial cable (available Connects to the Coaxial SPDIF In connector on the Platinum Drive and the SPDIF Out connector on separately) your external DVD player. Connecting a multichannel AV Amplifier If you have a multichannel AV Amplifier, connect it directly to the Audigy 2 ZS audio card's Line Out 1, Line Out 2 and Line Out 3 jacks as shown below.
- Page 41 Jack, Connector or Cable Description Rear Left connector Connects to the Line Out 2 jack on the Audigy 2 ZS audio card. Rear Right connector Connects to the Line Out 2 jack on the Audigy 2 ZS audio card. Side Right connector Connects to the Line Out 2 jack on your Audigy 2 ZS audio card.
- Page 42 separately) Connects to the Side Left, Center and Subwoofer connectors on an AV Line Out 3 jack Amplifier.
- Page 43 (available separately) playback/recording device. If you installed the Platinum Drive (included with Audigy 2 ZS Platinum), you can also connect headphones and FireWire (IEEE 1394)- compliant devices to the Platinum Drive. If you want to record music to your DAT or MiniDisc recorder, connect your recording device to the Optical or Coaxial SPDIF Out connector on the Platinum Drive.
- Page 44 Optical cables (available separately) Connect to the Optical SPDIF In/Out connectors on your Platinum Drive and your playback/recording device. Optical SPDIF In/Out connectors Connect to recording/playback devices. FireWire (IEEE 1394) cable (available Connects to the FireWire (IEEE 1394) connector on the Platinum Drive and your separately) playback/recording device.
-
Page 45: Creating Music
M IDI cable (15-pin) (available Connects Creative BlasterKey to the Joystick/M IDI bracket. separately) If you have installed the Platinum Drive (included with Audigy 2 ZS Platinum), you can also connect a MIDI Synthesizer, an electric guitar or a microphone to the Platinum Drive. - Page 46 Jack, Connector or Cable Description Optical cable (available Connects to the Optical SPDIF Out connector on the Platinum Drive and the SPDIF In connector separately) on your M iniDisc recorder. Optical SPDIF Out connector Connect to recording devices with optical connectors. Line In 2/M ic In 2 jack Connects to an external microphone or electric guitar.
- Page 47 If you want to transfer data from an external hard disk drive or a movie from your camcorder, connect the device to the FireWire (IEEE 1394) connector using a FireWire (IEEE 1394) cable. If you installed the Platinum Drive (included with Audigy 2 ZS Platinum), you can use the FireWire (IEEE 1394) connector on either the Audigy 2 ZS audio card or Platinum Drive.
-
Page 48: Connecting Speakers
The connectors and associated components shown here may be different from that of your speaker system. Consult the User's Guide of your speaker system to identify similar input connectors. The cables shown here are available separately. For interactive help on speaker connectivity, visit the Knowledgebase at www.creative.com. Positioning your speakers Good speaker placement can enhance your listening experience, while careless placement can make good audio systems sound bad. - Page 49 Speaker component Subwoofer Front Left Front Center Front Right Rear Left Rear Center Rear Right For 7.1 channel speakers: Speaker component Subwoofer Front Left...
- Page 50 If you have a 5.1 channel, 6.1 channel or 7.1 channel speaker system, you can upmix your stereo sources (for example, CD Audio, MP3, WMA, MIDI, and Wave) to the respective channels by using Creative Multi-Speaker Surround (CMSS) technology. To upmix, you need to enable the CMSS feature in Creative EAX Console. Refer to the Creative EAX Console online Help.
- Page 51 Connecting Digital Speaker Systems The Digital Out output on your Audigy 2 ZS or Audigy 2 ZS Platinum is continuously active except during DVD-Audio playback. Enabling the Digital Output Only selection in Creative Speaker Settings will disable analog speaker output. It is not necessary to enable Digital Output Only to use the Digital Out connector.
- Page 52 2.1 channel digital speakers Device/Cable Digital Out jack 2 channel audio cable (available separately) Digital In jack...
- Page 53 5.1 channel digital speakers Device/Cable Digital Out jack M iniplug-to-DIN cable (available separately) Digital DIN cable (available separately) Digital DIN connector...
-
Page 54: Connecting Analog Speaker Systems
Connecting Analog Speaker Systems You can connect analog speakers systems of up to 7.1 channels. - Page 55 2.1 channel analog speakers Jack, Connector or Cable Line Out 1 jack 2 channel audio cable (available separately) Audio Input jack...
- Page 56 4.1 channel analog speakers Jack, Connector or Cable Line Out 1 jack Line Out 2 jack 4 channel audio cable (available separately) Front (Audio Input) jack Rear (Audio Input) jack...
- Page 57 5.1 channel analog speakers Jack, Connector or Cable Rear (Audio Input) jack Front (Audio Input) jack 5.1 channel audio cable (available separately) Line Out 1 jack Line Out 2 jack Line Out 3 jack Center/Subwoofer (Audio Input) jack...
- Page 58 6.1 channel analog speakers Jack, Connector or Cable Line Out 1 jack Line Out 2 jack Line out 3 jack 6.1 channel audio cable (available separately) Front (Audio Input) jack Rear (Audio Input) jack Center/Subwoofer/Rear Center (Audio Input) jack...
- Page 59 Side (Audio Input) jack Note When you are using 7.1 channel analog speakers with your audio card, make sure you select the 7.1 Speakers option in Creative Speaker Settings to experience 7.1 channel audio. If you want 6.1 channel audio with 7.1 channel analog speakers, select the 6.1 Speakers option in Creative Speaker Settings, and move...
-
Page 60: General Specifications
General Specifications This section displays the specifications of your Audigy 2 ZS audio card, Joystick/MIDI bracket and Platinum Drive (included with Audigy 2 ZS Platinum). PCI Bus Mastering PCI Specification V ersion 2.1 compliant Bus mastering reduces latency and speeds up system performance... - Page 61 Multispeaker technology Upmixes mono or stereo sources to 7.1 channels Professional-quality panning and mixing algorithm DTS-ES Support DTS decoding for 5.1 audio Support DTS-CD playback and decoding for 5.1 audio Support DTS-ES for 7.1/6.1 audio DTS-ES Matrix 6.1 for decoding 5.1-channel soundtracks with a back surround channel matrix encoded into the left and right surround channel DTS-ES Discrete 6.1 for 6.1 soundtracks mastered with a discrete back surround channel EAX ADVANCED HD...
-
Page 62: Audio Inputs
Connectivity Audigy 2 ZS audio card Audio Inputs Line-level analog Line input via stereo jack on rear bracket Mono Microphone analog input via stereo jack on rear bracket CD_IN line-level analog input via 4-pin Molex connector on card AUX_IN line-level analog input via 4-pin Molex connector on card TAD line-level analog input via 4-pin Molex connector on card CD_SPDIF digital input via 2-pin Molex connector on card Audio Outputs... -
Page 63: Problems With Multiple Audio Devices
Problems with Multiple Audio Devices The other installed audio card is not working well. You may have an existing audio device installed in your computer. The audio device may be an audio card or an onboard audio chipset. Before you install your Audigy 2 ZS audio card, you are advised to completely uninstall and remove your existing audio device. Operating multiple audio devices in your computer may introduce usability issues. -
Page 64: Problems Installing Software
Problems Installing Software The installation does not start automatically after the Audigy 2 ZS Installation and Applications CD is inserted. The AutoPlay feature in your Windows system may not be enabled. To start the installation program through the My Computer shortcut menu: 1. - Page 65 Demonstrations Two demonstration packages have been included to showcase the basic as well as the advanced features of your Audigy 2 ZS audio card. We recommend that you play them at least once in order to have a good overview of your card's features. Audigy 2 ZS Getting Started Demonstration This is a good starting point from which you can learn about Audigy 2 ZS.
-
Page 66: Troubleshooting And Faqs
Troubleshooting and FAQs This section provides solutions to problems you may encounter during installation or normal use. This includes: Problems Installing Software Problems with Sound Problems with Sound and CD-ROMs Problems with File Transfers on Some VIA Chipset Motherboards Insufficient SoundFont Cache Problems with the Joystick Problems with Multiple Audio Devices Problems with Sound Blaster Live! Series or Sound Blaster PCI512 card... -
Page 67: Problems With Sound
Creative Surround Mixer (for example, the Windows V olume Control application) is at the opposite end compared to the position to which you have panned the source in the Basic tab of Creative Surround Mixer. For example, the CD Audio balance in Windows V olume... - Page 68 To solve this problem: Open that other mixer, and center the balances for all the audio input sources. This ensures that your analog sources will not turn silent when you pan them in Creative Surround Mixer.
- Page 69 Problems with Sound and CD-ROMs No audio output when playing audio CDs. To solve this problem: Make sure the Analog Audio connector on the CD/DVD-ROM drive and the CD In connector on the audio card are connected. Enable digital CD playback: For Windows 98 SE: i.
-
Page 70: Problems With File Transfers On Some Via Chipset Motherboards
BIOS for your motherboard from the manufacturer's web site*. *Content in these web sites is controlled by other companies. Creative bears no responsibility for information or downloads obtained from them. This information is provided only as a convenience to you. -
Page 71: Insufficient Soundfont Cache
Insufficient SoundFont Cache There is insufficient memory to load SoundFont banks. This may occur when a SoundFont-compatible MIDI file is loaded or played while insufficient memory has been allocated to Creative SoundFont Bank Manager. To have sufficient SoundFont cache memory: Remove one or more SoundFont banks from your SoundFont cache. - Page 72 In the Control Panel window, double-click the System icon. In the System Properties dialog box, click the Device Manager tab. Double-click Sound, Video and Game Controllers, and then select Creative Sound Blaster Audigy 2 ZS Gameport (Creative Gameport for Windows 2000).
- Page 73 In the Control Panel window, double-click the System icon. In the System Properties dialog box, click the Device Manager tab. Double-click Sound, Video And Game Controllers, and then select Creative Sound Blaster Live! Series or Creative Sound Blaster PCI512. Click the Properties button.
- Page 74 Resolving I/O Conflicts Conflicts between your audio card and another peripheral device may occur if your card and the other device are configured to use the same I/O address. To resolve I/O conflicts, change the resource settings of your audio card or the conflicting peripheral device in your system using the Device Manager in Windows 98 SE/Me.
-
Page 75: Problems In Windows Xp
You may see the message when you install hardware drivers from companies other than Creative. If you do, you may choose to click the Continue Anyway button. Device drivers not signed by Microsoft may be used in Windows XP, and need not impair or destabilize your computer. -
Page 76: Problems With Digital Audio Devices
You may need to select a lower digital output sampling rate. The choices available are 48 kHz and 96 kHz. To solve this problem: 1. In Creative MediaSource Go! Launcher, click the Product Settings tab. Double-click the Device Controls icon.
Need help?
Do you have a question about the Audigy 2 ZS Platinum and is the answer not in the manual?
Questions and answers