
Related Manuals for Tramontina 80901/102


Summary of Contents for Tramontina 80901/102
- Page 1 HOME APPLIANCES 4.4 Cu. Ft. W & B EVERAGE ENTER 126 Can Capacity Use & Care Instructions Read All Instructions Carefully. Save These Instructions.
-
Page 2: Table Of Contents
Product Introduction ............. 2 Installation ................3-9 Defrosting ................10 Cleaning and Maintenance ..........10 LED Light Replacement ............11 Troubleshooting ..............12 Safety Warnings ..............13 Customer Service ..............14 Product Warranty ..............15 3149457 Model #80901/102 - 1 -... -
Page 3: Product Introduction
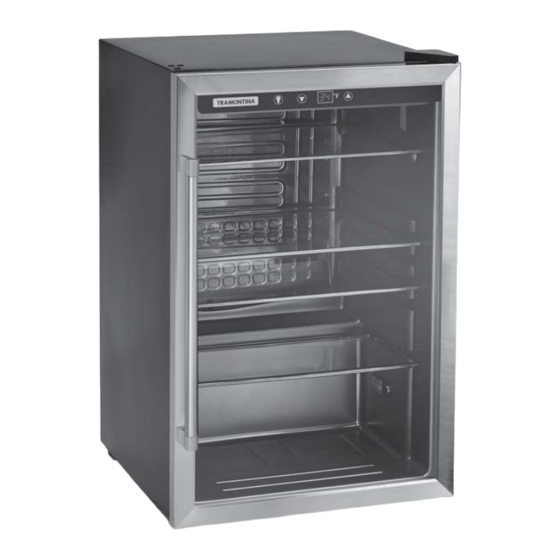
PRODUCT INTRODUCTION Adjustable Electronic Thermostat with Digital Display LED Interior Light Control LED Interior Light Adjustable Tempered Glass Shelves Adjustable Front Leveling Legs Reversible Double Pane Glass Door with Stainless Steel Frame Stainless Steel Handle - 2 -... -
Page 4: Installation
INSTALLATION STOP! BEFORE YOU DO ANYTHING! Do not plug the wine and beverage center into a power outlet until it has been resting in its upright position for at least six (6) hours. If the wine and beverage center has been laid on its side, placed upside down or tilted more than 45°... - Page 5 INSTALLATION POWER SUPPLY Fig. A This wine and beverage center is equipped with a 115V/60Hz single phase motor. Do not use a ground-fault circuit interrupter (GFCI) outlet to connect the unit. (Fig. A.) The power plug is a standard grounded three-prong non-polarized flush mount, RESET which allows for easier connection to power outlets.
- Page 6 INSTALLATION HANDLE INSTALLATION TOOLS NEEDED: Phillips screwdriver #2. IMPORTANT: NEVER LAY THE WINE AND BEVERAGE CENTER ON ITS BACK. The compressor and motor components are installed at the back of the unit and may easily be damaged if the wine and beverage center is placed on its back. IMPORTANT: DO NOT USE STAINLESS STEEL HANDLE TO MOVE OR LIFT THE UNIT.
- Page 7 INSTALLATION DOOR REVERSAL INSTRUCTIONS TOOLS NEEDED: Phillips screwdriver #2 or 5/16" (8 mm) socket tool and thin flathead screwdriver. The wine and beverage center is shipped with the door hinge brackets attached on the right side. The door may be reversed to allow opening from the left side. If you plan on reversing the door hinges, DO NOT plug the wine and beverage center into the power outlet.
- Page 8 INSTALLATION DOOR REVERSAL INSTRUCTIONS Remove screw and re-insert into the opposite side Remove Metal Switch Axel Base Bracket Insert Position With the unit on its side, remove the bottom metal Gently place the wine and beverage center on base bracket with nylon washer. Unscrew the axle opposite side to complete the door reversal.
- Page 9 INSTALLATION USING YOUR WINE AND BEVERAGE CENTER Startup Connect the power cord to a standard wall outlet. Do not use a GFCI outlet to connect the unit (see page 4). After connection, you will immediately hear a short beep. Temperature - Adjustable Thermostat Control The default temperature is 43ºF.
- Page 10 INSTALLATION LED LIGHT Press the button to turn the LED light on and off. To enhance the lifespan of the LED light and conserve energy, it is recommended to predominantly utilize the light for loading and selecting beverages. SHUTDOWN If the wine and beverage center will not be in use for a long period of time, disconnect it from the power outlet, clean inside thoroughly and leave the door open to prevent mildew.
-
Page 11: Defrosting
For your protection, tempered glass is designed to shatter into many small pebble-size pieces. - If any replacement components are required, they must be obtained from Tramontina’s Customer Service Department. This ensures the correct replacement components are provided, and minimizes risk of possible ignition due to incorrect parts or improper service. -
Page 12: Led Light Replacement
If the LED light is not illuminating, the light most likely needs to be replaced. Replacement LED lights may be purchased from Tramontina by calling Tramontina’s Customer Service Department (800-221-7809). NOTE: The replacement light is NOT available from home LED Light improvement, hardware or discount stores. -
Page 13: Troubleshooting
• Align the door using a 5/16” (8 mm) socket, adjusting the screws under the triangular bracket cover. For assistance, please contact Tramontina’s Customer Service Department. Side panel of wine and beverage center • The unit exchange heats through the side walls, therefore does is hot. -
Page 14: Safety Warnings
SAFETY WARNINGS Before you use your wine and beverage center, please read this owner’s manual carefully. Use this appliance only for its intended purpose as described in this owner’s manual. DANGER - Risk of child entrapment. Before you throw away your old refrigerator or freezer: •... -
Page 15: Customer Service
In the unlikely event this item is damaged or missing parts, please do not return it to the store. Instead, please contact our customer service department listed below for assistance so we can work quickly and efficiently to resolve product issues. TRAMONTINA USA, Inc. Customer Service 12955 West Airport Blvd. -
Page 16: Product Warranty
1 YEAR LIMITED WARRANTY This product is warranted by TRAMONTINA to be free of defects in material and workmanship for a period of one year from the date of the original purchase, provided the unit is used under normal operating conditions intended by the manufacturer. Any piece will be repaired or replaced at no charge with the same item or one of equal or better value if it is found to be defective under normal, noncommercial single-family household use and when cared for according to the manufacturer’s...
Need help?
Do you have a question about the 80901/102 and is the answer not in the manual?
Questions and answers