Table of Contents
Advertisement
SWISSLOG
PNEUMATIC
TUBE SYSTEM
TECHNICAL DOCUMENTS LIBRARY
Nexus™ Station
With multiple-carrier
management, queuing,
and controlled delivery
APR/2017
Technical Operations and
Maintenance Guide
Operate and maintain a Nexus Station in your
organization's Pneumatic Tube System (PTS)
PN 94215401_B | ECN 21747
Advertisement
Table of Contents
Troubleshooting

Summary of Contents for Swisslog Nexus
- Page 1 Technical Operations and SWISSLOG PNEUMATIC Maintenance Guide TUBE SYSTEM Operate and maintain a Nexus Station in your organization’s Pneumatic Tube System (PTS) TECHNICAL DOCUMENTS LIBRARY PN 94215401_B | ECN 21747 Nexus™ Station With multiple-carrier management, queuing, and controlled delivery APR/2017...
- Page 2 ©Swisslog Healthcare 2016. Property of Swisslog. This document contains confidential and proprietary information intended for use by Swisslog and its customers only. Transfer to third parties is permissible only with the consent of Swisslog. Transfer without consent may result in civil penalties.
-
Page 3: Table Of Contents
Nexus Station top assembly cross-section ........ - Page 4 Delivery of carriers from the system to the Nexus Station ......16...
- Page 5 Prevent and respond to spills at the Nexus Station ....... .
- Page 6 ONTENTS APR/2017 TECHNICAL OPERATIONS AND MAINTENANCE GUIDE | NEXUS STATION...
-
Page 7: Get Started
©2016 Swisslog Healthcare. This document contains confidential and proprietary information intended for use by Swisslog and its customers only. Transfer to third parties is permissible only with the written consent of Swisslog. Transfer without consent may result in civil penalties. -
Page 8: About This Document
These instructions guide the Nexus Station technical user through the technical operations and mainte- nance recommendations and procedures for the Nexus Station. Audience The intended audience for these instructions is technical users and servicers of the Nexus Station, including customer facilities and maintenance personnel and Swisslog customer service representatives and field technicians. -
Page 9: Information Elements Used In This Guide
Safety precautions and station use Follow the safety precautions listed next when working with the Nexus Station or any other station in the Swisslog pneumatic tube system, and ensure that your system users understand these precautions as well. -
Page 10: Electrical Safety Considerations
Emergency considerations In the event of a system shut-down or malfunction, if a carrier sent to a Nexus Station has been mis- placed, check each compartment in the turnstile for the carrier. If necessary, remove the outer door, disengage the pin actuator by pulling on its ring, and then rotate the turnstile to the right. Continue moving the turnstile manually until you have reviewed the contents of each compartment and/or removed all carriers from the turnstile compartments. -
Page 11: Operations
©2016 Swisslog Healthcare. This document contains confidential and proprietary information intended for use by Swisslog and its customers only. Transfer to third parties is permissible only with the written consent of Swisslog. Transfer without consent may result in civil penalties. -
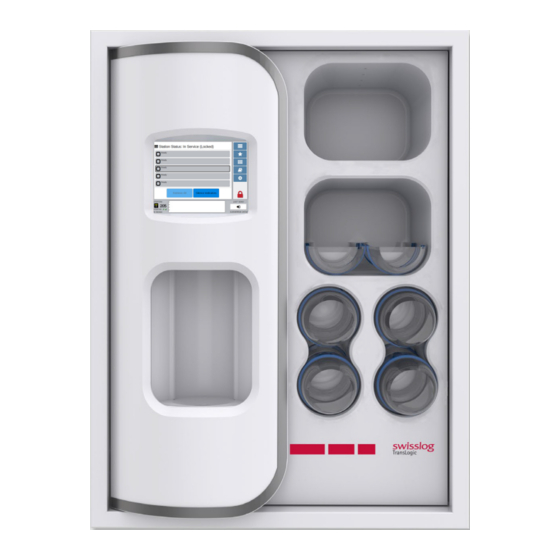
Page 12: Installed Nexus Station
Portions of the upper shelf Station-full sensor opening Lower divider Lower fascia FIGURE 1. Parts of a standard, recessed station that are used in a Nexus Station retrofit Installed Nexus Station An installed Nexus Station is shown next. It includes the following features: ... -
Page 13: Station Installation, Repair, And Maintenance
Station installation, repair, and maintenance The Nexus Station one-person installation kit includes a set of rails and a trolley that allow a single installer to lift the station core-turnstile assembly into the station housing. Both the tool kit and the instal- lation kit can be used for multiple installations as well as for equipment replacement and repairs when they become necessary. -
Page 14: Station Design
Security door with outer slide rods Turnstile compartment Bypass air tube Air filter Turnstile motor Base frame Pin actuator Door actuator Security-door bear- ings Lower door bracket FIGURE 3. Nexus Station front view APR/2017 TECHNICAL OPERATIONS AND MAINTENANCE GUIDE | NEXUS STATION... -
Page 15: Nexus Station Rear View
TATION REAR VIEW Nexus Station rear view The next mechanical drawing shows the back of the Nexus station. Although this drawing shows a retrofit- ted station, the components are also the same as those in newly installed Nexus Station housing. -
Page 16: Nexus Station Top Assembly
Air-valve motor Air-valve sensors Slide plate motor RFID reader board Load and unload sensor at the center of the LED control panel LED control panel FIGURE 6. Nexus station top assembly cross-section APR/2017 TECHNICAL OPERATIONS AND MAINTENANCE GUIDE | NEXUS STATION... -
Page 17: Nexus Station Core Assembly
The Nexus Station core assembly is shown next. Core assembly right... - Page 18 Incoming and outgoing station Provides entry and exit to and from the Nexus Station. In a retrofit, the exist- pipe ing incoming pipe is used to connect to the station pipe. Lift-cable Lift-cables are bolted to the lower frame of the core assembly and held in place with brackets that are attached at the top of the turnstile.
- Page 19 The air valve attached to the slide plate opens and closes as necessary to han- dle vacuum return after a carrier is launched. Movement of the outer valve is controlled by a motor-controlled gear two magnetic sensors that measure the position of the valve opening. NEXUS STATION | TECHNICAL OPERATIONS AND MAINTENANCE GUIDE APR/2017...
- Page 20 The turnstile moves to the left or right to accept and release carri- ers in the front position and prepare carriers for dispatch at the back position that aligns with the station pipe. APR/2017 TECHNICAL OPERATIONS AND MAINTENANCE GUIDE | NEXUS STATION...
-
Page 21: Transaction Event Sequences
Those conditions are described next. Signed-on / in service The most common state for the Nexus Station is signed-on or in-service. It is defined by the mechanical status listed next. -
Page 22: Delivery Of Carriers From The System To The Nexus Station
Delivery of carriers from the system to the Nexus Station The system can deliver a carrier from anywhere in the PTS to a Nexus Station at any time. Status: carrier incoming For a carrier to be sent to a station, the events described next must occur. These events occur when a send transaction is initiated and again at turn-around of the final cycle to ensure that the destination is mechanically capable of receiving the carrier. -
Page 23: Dispatching Carriers From The Nexus Station
A user can load a carrier into the Nexus Station and start a transaction any time at least one carrier posi- tion is available for loading. After loading a carrier into the front position, a user has a limited amount of time to enter instructions for sending the carrier at the station display panel. - Page 24 Turnstile rotates to an empty position. Carrier dispatch When one or more carriers have been loaded into the Nexus Station and the user is no longer interacting with it, the server initiates a dispatch operation. To complete a dispatch operation, the system moves the carrier to the dispatch position, clears the air path, and resets the sensors.
- Page 25 Top sensor reports that the carrier has launched. If a carrier is not detected, the system reports a “missed sighting” to the SCC. Air valve opens. Slide plate closes. Station returns to idle. NEXUS STATION | TECHNICAL OPERATIONS AND MAINTENANCE GUIDE APR/2017...
- Page 26 RANSACTION EVENT SEQUENCES ISPATCHING CARRIERS FROM THE EXUS TATION APR/2017 TECHNICAL OPERATIONS AND MAINTENANCE GUIDE | NEXUS STATION...
-
Page 27: Parts Identification
©2016 Swisslog Healthcare. This document contains confidential and proprietary information intended for use by Swisslog and its customers only. Transfer to third parties is permissible only with the written consent of Swisslog. Transfer without consent may result in civil penalties. -
Page 28: Door Actuator And Motor
The door actuator controls movement of the security door with the help of a motor that is attached to a motor mount and plate. It is located at the front of the station, just below the front turnstile position. TABLE 1. Parts and maintenance for the Nexus Station door actuator and motor Part No. -
Page 29: Rotary Air Valve Assembly And Motor
TABLE 3. Air-valve assembly and motor parts Part No. Description Recommended maintenance 56741001 Valve actuator assembly (full) Replace upon failure Nexus Station valve assembly and motor Valve assembly (includes inner and outer tubes) Motor Collar gear Position sensors Collar flange Pin actuator assembly The pin actuator contains a motor and pin assembly that engages holes in three-degree increments around the base turnstile plate to stop the turnstile when it is in the correct position. -
Page 30: Push Actuator Assembly
Recommended maintenance 56743201 Push actuator assembly Replace the full mechanical assembly on failure of a mechanical part; replace the motor separately upon failure. Nexus Station push actuator assembly Rubber bumper cap Pusher spring pin Pusher slide tube Motor; attached to the... -
Page 31: Motor Arm Assembly And Motor
ECHANICAL PARTS OTOR ARM ASSEMBLY AND MOTOR Nexus Station coupler tube motor assembly (brake actuator) Motor Nylon strap Belt-loop sheet Motor arm assembly and motor The motor arm assembly controls the movement of the turnstile. It is located at the lower, front portion of the turnstile, on the right side TABLE 7. -
Page 32: Drip Container
ECHANICAL PARTS RIP CONTAINER Nexus Station filter assemblies Back filter Base filter Door filter Drip container The drip container is a plastic bucket that sits below the turnstile to catch possible spills. It is removed and cleaned as needed and can be replaced when necessary. -
Page 33: Security Door
RFID and Ethernet connections as well. Both control boards are mounted vertically at the top of the turnstile assembly, immediately behind the display. TABLE 12. Nexus Station circuit boards Part Number Description... -
Page 34: Rfid Components
Radio Frequency Identification (RFID) is used in the station to track and detect carriers. RFID-equipped car- riers include RFID antennae for tracking throughout the pneumatic tube system. The Nexus Station is equipped with an antenna at the top of each of the five carrier positions on the carousel. At the top, front of the carousel assembly are two primary transformers that connect to the RFID reader board, which connects to the main control board. -
Page 35: Led Tube Cover And Carrier-Sensor Pcb Assemblies
Replace when needed 86510701 Carrier sensor PCB assembly Replace when needed Nexus Station LED tube cover and carrier sensor PCB assemblies Carrier sensor PCB assembly LED PCB assembly Sensors Sensors are attached at the back of the turnstile, above the brake, and over the front-load position on the turnstile. -
Page 36: Additional Parts
75- pound core-turnstile assembly into the station housing. The packing platform included in the Nexus Station shipping container can be used to safely hold a core- turnstile assembly in place as it is being serviced or replaced. - Page 37 DDITIONAL PARTS EXUS TATION ONE PERSON INSTALLATION KIT Nexus station one-person installation kit Trolley Rails Toward station front Toward station rear NEXUS STATION | TECHNICAL OPERATIONS AND MAINTENANCE GUIDE APR/2017...
- Page 38 DDITIONAL PARTS EXUS TATION ONE PERSON INSTALLATION KIT APR/2017 TECHNICAL OPERATIONS AND MAINTENANCE GUIDE | NEXUS STATION...
-
Page 39: Maintenance And Repair Instructions
©2016 Swisslog Healthcare. This document contains confidential and proprietary information intended for use by Swisslog and its customers only. Transfer to third parties is permissible only with the written consent of Swisslog. Transfer without consent may result in civil penalties. -
Page 40: Outer Station
IMPORTANT! Because a locked door is essential for maintaining carrier security, Swisslog recommends that Nexus Station door keys be kept in a secure location to which only authorized and trained maintenance personnel have access. -
Page 41: Upper-Door Bracket
Depending on whether the station was installed as a retrofit into an existing standard, recessed station or as a new installation into galvanized steel station housing specifically designed for a Nexus Station, the upper bracket is attached either with a combination of a bolted PEM stud and three self-drilling screws or... -
Page 42: Storage Panel
Then snap the storage-panel rail into place on the extended rail. APR/2017 TECHNICAL OPERATIONS AND MAINTENANCE GUIDE | NEXUS STATION... -
Page 43: Inside Components And Electronics
The outer door must be removed from the station before the security door can be installed or removed. Follow these steps to install the Nexus Station security door. Starting at the bottom of the station-front, slide the outer rods on the security door into the two lower cylindrical bearings. - Page 44 Follow these steps to remove the security door from the turnstile assembly. Remove the screws and locking-nuts from the lower-front of the security door, as shown in the pre- vious installation photos. APR/2017 TECHNICAL OPERATIONS AND MAINTENANCE GUIDE | NEXUS STATION...
-
Page 45: Power Supply
Plug the power cord into the power box next to the power supply. Follow these steps to remove the power supply from the station. Unplug the power cord from the box outlet to the left of the power supply. NEXUS STATION | TECHNICAL OPERATIONS AND MAINTENANCE GUIDE APR/2017... -
Page 46: Coupler Tube And Brake Motor (Brake Actuator Assembly)
A rubber tube assembly fits over the ends of the existing send-receive tube and motor-plate tube to provide the entry and exit point for carriers being delivered to and sent from the Nexus Station. It includes a carrier sensor, along with a brake that is attached to the rubber tube with an adjustable nylon strap that retracts when the brake is engaged to slow the descent of a carrier into the station. - Page 47 Tighten both metal bands securely around the top and bottom of the tube, with the collar secured into place at the bottom by the lower metal band. NEXUS STATION | TECHNICAL OPERATIONS AND MAINTENANCE GUIDE APR/2017...
- Page 48 First, take apart the brake actuator assembly if it is currently assembled. the top and bottom of the rubber tube, and then remove the collar and strap, leaving the open rubber APR/2017 TECHNICAL OPERATIONS AND MAINTENANCE GUIDE | NEXUS STATION...
- Page 49 1 inches down, as shown next. The ribbon should be placed in a straight line from where it is attached to the stem on the brake motor, as shown. NEXUS STATION | TECHNICAL OPERATIONS AND MAINTENANCE GUIDE APR/2017...
-
Page 50: Upper Air Manifold (Slide-Gate Cover)
The upper air manifold, or slide-gate cover, requires removal to expose the air valve on earlier versions of the Nexus Station. Remove the manifold to lubricate the air valve or gear or check the air valve in the event of a problem. - Page 51 Verify the position of the pin actuator, with the flat side toward you and the harness connection toward the front fascia. Then tighten the set-screw to secure the pin actuator into place. NEXUS STATION | TECHNICAL OPERATIONS AND MAINTENANCE GUIDE...
-
Page 52: Turnstile Motor And Arm
See “Lift the core-turnstile assembly into place” on page 53. APR/2017 TECHNICAL OPERATIONS AND MAINTENANCE GUIDE | NEXUS STATION... - Page 53 Follow these steps to remove the turnstile motor and arm. Disconnect the turnstile frame from the base frame, and raise the core-turnstile assembly from the base frame using the Nexus Station one-person installation kit. See “Core-turnstile assembly” on page 50.
-
Page 54: Roller And Key Groove
Follow these steps to adjust the position of the roller and key groove. With the turnstile motor and arm fully attached, locate the Nyloc nut beneath the bracket to the right of the motor and arm. 3/32-inch Allen key Nyloc nut APR/2017 TECHNICAL OPERATIONS AND MAINTENANCE GUIDE | NEXUS STATION... - Page 55 Allen key, and adjust the roller up or down as necessary to achieve proper alignment. Correct alignment: upper edge of roller matches the upper edge of the turnstile base. Set-screw location NEXUS STATION | TECHNICAL OPERATIONS AND MAINTENANCE GUIDE APR/2017...
-
Page 56: Core-Turnstile Assembly
The one-person installation kit can be ordered from Swisslog. Designed specifically for use with the Nexus Station core assembly, it includes two rails and a separate trolley that includes the winch that raises and lowers the core assembly as required to place it into or remove it from the station. -
Page 57: Attach The Installation Rails And Trolley To The Station
TURNSTILE ASSEMBLY TTACH THE INSTALLATION RAILS AND TROLLEY TO THE STATION Nexus Station One-Person Installation Kit Trolley and winch Right and left rails Attach the installation rails and trolley to the station The installation rails and trolley are installed onto bolts on the left side of the station and on the outside of the storage-rail assembly that is installed on the upper-right side of the station. -
Page 58: Adjust The Fit Of The Trolley Within The Rails
No. 3 Phillips screwdriver, as shown. Then move the wheels inward or outward to fit the rail spacing at the station. Wheel-adjustment screws APR/2017 TECHNICAL OPERATIONS AND MAINTENANCE GUIDE | NEXUS STATION... -
Page 59: Lift The Core-Turnstile Assembly Into Place
If the rails pull in either direction as you move the trolley, go back and readjust the fit of the trolley within the rails, as outlined previously. Pin engaged Wheel stops at bolted bracket Keyhole opening seated on shoulder screws NEXUS STATION | TECHNICAL OPERATIONS AND MAINTENANCE GUIDE APR/2017... - Page 60 Open the carabiner clips at each end of the horizontal bar, and place the loop from the corresponding cable onto the clip, as shown. Verify that both carabiner clips are securely attached to the cable loops on each side. APR/2017 TECHNICAL OPERATIONS AND MAINTENANCE GUIDE | NEXUS STATION...
- Page 61 Then, begin straightening the core-assembly while gently pushing it toward the back of the station until the lower frame rests on the alumi- num base-fascia frame, as shown. NEXUS STATION | TECHNICAL OPERATIONS AND MAINTENANCE GUIDE APR/2017...
- Page 62 If you are installing, guide the motor at the right front into the portion of the fascia frame that has been cut out for it, and slide the bundled cables into the cutout at the back of the frame, as shown. APR/2017 TECHNICAL OPERATIONS AND MAINTENANCE GUIDE | NEXUS STATION...
-
Page 63: Secure The Core-Assembly Frame To The Base Frame
You may need to adjust the position of the lower turnstile frame slightly to get the holes in the upper frame to line up with the holes in the aluminum frame below. NEXUS STATION | TECHNICAL OPERATIONS AND MAINTENANCE GUIDE... -
Page 64: Electronics
Primary control board The primary control board contains the electronic connections that control motors, encoders, and sensors in the station. TABLE 1. Nexus Station circuit board connections—primary control board Ref. Board # Label Controls the . - Page 65 LECTRONICS RIMARY CONTROL BOARD TABLE 1. Nexus Station circuit board connections—primary control board Ref. Board # Label Controls the . Component # — Not used — (Not labeled) HMI display power (Not labeled) Main power supply Nexus Station primary control board – upper left side Nexus Station primary control board –...
-
Page 66: Hmi Assembly Control Board
The HMI control board is mounted at the center of the primary circuit board. Many of the pin and cable con- nections available on the board are not used for the Nexus Station. The ones that are used are listed next. -
Page 67: Nexus Station Sensors
See “Outer door” on page 34. With the security door down, place an empty carrier into the front load position, and initiate a dis- patch (send) transaction from the Nexus Station control panel. Observe the LED on the sensor, as follows: If the LED is green and remains lighted while the carrier is sent through the coupler tube, the sen- ... -
Page 68: Turnstile Maintenance And Operation
Phillips-head screws. Turnstile maintenance and operation When the Nexus Station is initially set up, and when maintenance operations are performed, the turnstile may require alignment and/or calibration, which include physically aligning the turnstile to set it up for operation and then running a process that sets up an index for the turnstile within the station’s software. -
Page 69: Align The Turnstile
To verify that the pin is engaged, gently press the compartment edge to the left or right. NEXUS STATION | TECHNICAL OPERATIONS AND MAINTENANCE GUIDE APR/2017... - Page 70 URNSTILE MAINTENANCE AND OPERATION LIGN THE TURNSTILE A properly engaged pin keeps the turnstile from moving until an operation requiring the turnstile to rotate is initiated for the station. APR/2017 TECHNICAL OPERATIONS AND MAINTENANCE GUIDE | NEXUS STATION...
-
Page 71: Commission The Station At The Nexus Panel
The station displays a message if commissioning is required. It is not always required after the station has been shut down or repaired. Follow these steps to commission a Nexus station. On the Commissioning Required screen, press Set Turntable Index. -
Page 72: Cleaning Procedures
Spill container When a spill or leak occurs at a Nexus Station, immediately shut down the system and/or affected zones as necessary to contain the spill. Follow your organization’s decontamination policy, and begin cleaning out affected components of the pneumatic tube system as soon as possible. -
Page 73: Prepare To Clean The Station
Prepare to clean the station To clean inside the Nexus Station, you must remove the outer door and storage panel. While the station is designed to keep spills contained within the interior, before you begin removing the outer door and storage panel, look for signs of the leak on those outer surfaces, and clean them as necessary. - Page 74 LEAN INSIDE THE STATION Upper station While the Nexus Station is designed in a way that makes it unlikely for spilled materials to escape to the upper portion of the station, you should inspect the upper portion for evidence of leaked material.
- Page 75 For a smaller spill or leak, you can reach through the filter opening to wipe down the lower portion of the station, including the push-rod. Wipe down the inside and outside sides of the security door. NEXUS STATION | TECHNICAL OPERATIONS AND MAINTENANCE GUIDE APR/2017...
-
Page 76: Clean Behind The Core-Turnstile Assembly
Follow the instructions elsewhere in this guide for setting up the rails and trolley from the Nexus Station One-Person Installation Kit to help you remove the core-turnstile assembly from the station. - Page 77 “Core-turnstile assembly” on page 50. If any electronic components appear to have been damaged as a result of a spill, the core assembly and/or the electronic components may require replacement. Contact Swisslog Technical Support for further information and support. NEXUS STATION...
-
Page 78: Maintenance Schedule
40. Test all motors for functionality 90 days From the Nexus Station control panel, go to Settings > Sta- tion Test > Diagnostics. Complete the following equipment tests from the Nexus Sta- tion Diagnostics Menu. -
Page 79: Problems And Solutions
©2016 Swisslog Healthcare. This document contains confidential and proprietary information intended for use by Swisslog and its customers only. Transfer to third parties is permissible only with the written consent of Swisslog. Transfer without consent may result in civil penalties. -
Page 80: Instruction Details And Expected Conditions
CAUTION! To avoid electrical shock, turn off the station at the power source before beginning any inspection of the interior components of the Nexus Station. Turn on power to the station when you are ready to run the diagnostic procedures from the station control panel. -
Page 81: Reference Diagrams
Reference diagrams The following diagrams show locations of the power-source and encoder connections and designated LEDs for each of the Nexus Station components that commonly malfunction. Use these diagrams to locate the connections and LEDs as you complete the troubleshooting procedures. - Page 82 Load and unload (front carrier) sensor (J33) Send-receive (back of turnstile) sensor (J34) Connection to the HMI board (J77) Coupler / brake sensor (J35) Control panel (HMI) power Primary station power APR/2017 TECHNICAL OPERATIONS AND MAINTENANCE GUIDE | NEXUS STATION...
- Page 83 EFERENCE DIAGRAMS Signal diodes Locations of the signal diodes for the primary Nexus Station components are shown in the next illustration. Use this illustration to locate the diodes that will help you determine whether a communications signal is traveling between the circuit board and the affected component. The diodes work in pairs, usually to indi- cate position and/or movement of the component, such as open/closed, up/down, left/right, locked/ unlocked, clockwise/counter-clockwise.
-
Page 84: Nexus Station Diagnostics Menu
LED lights (test each color) Follow these steps to open the Nexus Station Diagnostics menu to open the Settings menu. Tap Station Test; then tap Diagnostics to display the Diagnostics menu, as shown next Nexus Station diagnostics screen page 1... -
Page 85: Instructions For Troubleshooting Common Component Errors
NSTRUCTIONS FOR TROUBLESHOOTING COMMON COMPONENT ERRORS IR VALVE AND SLIDE PLATE ERRORS Instructions for troubleshooting common component errors Common Nexus Station errors are listed by component. For each error, first follow the overall Instruction details and expected conditions, and then consult the table containing specific details for each component. - Page 86 NSTRUCTIONS FOR TROUBLESHOOTING COMMON COMPONENT ERRORS IR VALVE AND SLIDE PLATE ERRORS FIGURE 1. Troubleshoot Nexus Station-valve errors Air-valve closed (AVC) sensor Air-valve sensor magnet; triggers air-valve status as it moves. Air-valve open (AVO) sensor Motor turning mechanism Soldered wires at air-valve...
- Page 87 Before you begin, remove the outer door, and turn off the station at the power switch. See Outer door.. TABLE 3. Troubleshoot Nexus Station slide-plate errors Action | component Details | expected condition | next steps Inspect power harness PCB connection.
-
Page 88: Turnstile Errors
6 Set the turnstile index (“commission the station”). Turnstile completes the commissioning process, and a mes- See Commission the station at the Nexus panel sage at the display indicates that the power must be cycled. the Maintenance chapter of this Guide. - Page 89 NSTRUCTIONS FOR TROUBLESHOOTING COMMON COMPONENT ERRORS URNSTILE ERRORS FIGURE 3. Troubleshoot Nexus Station turnstile errors Pin actuator encoder prop- erly connected with bracket oriented so that encoder is fully upright. “CMotor1” harness Brown wire connection Black wire connection “TE” harness Push-rod errors The most common push-rod errors result from the rod having failed to extend or retract.
- Page 90 NSTRUCTIONS FOR TROUBLESHOOTING COMMON COMPONENT ERRORS URNSTILE ERRORS TABLE 5. Troubleshoot Nexus Station push-rod errors Action | component Details | expected condition | next steps Inspect the turnstile motor and connections to Turnstile rotates to the left and right to advance carriers to verify that it is operational.
-
Page 91: Security Door Errors
Security door open/close failure Security door errors are investigated similarly to errors for other moving parts, TABLE 6. Troubleshoot Nexus Station security door errors Action | component Details | expected condition | next steps Inspect power harness PCB connection. - Page 92 NSTRUCTIONS FOR TROUBLESHOOTING COMMON COMPONENT ERRORS ECURITY DOOR ERRORS TABLE 6. Troubleshoot Nexus Station security door errors Action | component Details | expected condition | next steps Inspect the lead screw that controls the move- Lead screw is in place and properly lubricated.
-
Page 93: Brake Errors
Review the instructions for installing the brake assembly if necessary to verify that the brake com- ponents are properly in place. See “Coupler tube and brake motor (brake actuator assembly)” on page 40. TABLE 7. Troubleshoot Nexus Station brake errors Action | component Details | expected condition | next steps 1 Inspect power harness PCB connection. -
Page 94: Carrier And Sensor Errors
Designated carrier position occupied Occurs when delivery of a carrier is being attempted into a turnstile position that is already occupied. 4228 Carrier not sighted above station A carrier has not arrived at the station as expected. It may be lost in the pneumatic tube system. APR/2017 TECHNICAL OPERATIONS AND MAINTENANCE GUIDE | NEXUS STATION... - Page 95 Carrier sensor clear / retry failure The carrier sensor, located where the upper system pipe attaches to the Nexus Station upper-turnstile assembly, can fail if the it is incorrectly attached between the system pipe and the Nexus Station valve where it connects.
- Page 96 “Core-turnstile assembly” on page 50. for instructions. TABLE 9. Troubleshoot Nexus Station error: “Arriving carrier not detected at back sensor.” Action | component Details | expected condition | next steps Inspect the sensor harness connection at the PCB assembly.
- Page 97 This error does not stop the station from operating. If it occurs regularly, the sensor may require replacement or adjust- ment. TABLE 10. Troubleshoot Nexus Station error “Carrier not detected in load position at delivery.” Action | component Details | expected condition | next steps Inspect harness PCB connection.
- Page 98 FIGURE 9. Troubleshoot Nexus Station load/unload sensor errors Loosen screws to remove sensor board DIP switches FIGURE 10. DIP-switch settings for the Nexus Station front-load sensor Set a lower threshold to decrease sensitivity; set a higher threshold to increase sensitivity of the sensor.
-
Page 99: Station Errors
Carrier not sighted above station This error suggests that a carrier expected to arrive at the station has not been delivered and is likely lost in the system. TABLE 12. Troubleshoot Nexus Station error “Carrier not sighted above station.” Action | component... - Page 100 This error generally clears itself. If it does not clear on its own, follow the steps in the next table to correct the error. TABLE 13. Troubleshoot Nexus Station error: “”User interface is resetting.” Action | component Details | expected condition | next steps...
- Page 101 NSTRUCTIONS FOR TROUBLESHOOTING COMMON COMPONENT ERRORS TATION ERRORS TABLE 14. Troubleshoot Nexus Station error: “I/O board communications failure.” Action | component Details | expected condition | next steps 4 Verify that I/O board connection is in place at J119. Harness is firmly connected and latched.
-
Page 102: Other Problems And Solutions
THER PROBLEMS AND SOLUTIONS TATION ERRORS Nexus position timeout A Nexus position timeout is usually a result of a carrier that is stuck and preventing the slide plate from operating. TABLE 15. Troubleshoot Nexus Station error: “Nexus position timeout.” Action | component... - Page 103 Open the brake assembly and verify that nothing is indicator remains way of the detector in the way of the photo-diode lighted Sensor thresholds may See sensor-adjustment documentation and proce- require adjustment (see dures. above) NEXUS STATION | TECHNICAL OPERATIONS AND MAINTENANCE GUIDE APR/2017...
- Page 104 THER PROBLEMS AND SOLUTIONS TATION ERRORS APR/2017 TECHNICAL OPERATIONS AND MAINTENANCE GUIDE | NEXUS STATION...
Need help?
Do you have a question about the Nexus and is the answer not in the manual?
Questions and answers
we need parts for Turn Units such as #62284508 (plastic rotor sleeve). Also we have numerous stations with failed user interface touch screens.
@Richard Bell