Table of Contents
Advertisement
INSTALLATION
USER'S
MANUAL
270º AWNING (LHS) INSTALLATION / USER'S MANUAL
OFW27AWLHA
© Oztent Australia Pty Ltd 2018 | 1 July 2018
Except as permitted by the copyright law applicable to you, you may not reproduce or communicate any of the content on
this document, without the permission of the copyright owner. The Australian Copyright Act allows certain uses of content
without the copyright owner's permission. This includes uses by educational institutions and by Commonwealth and State
governments, provided fair compensation is paid. For more information, see www.copyright.com.au and www.copyright.
org.au. The owners of copyright in the content on this document may receive compensation for the use of their content by
educational institutions and governments, including from licensing schemes managed by Copyright Agency. We may change
these terms of use from time to time. Check before re-using any content from this document.
Oztent Australia Pty Ltd
www.oztent.com
These instructions remain the property of Oztent Australia Pty Ltd and may not be used or changed for any other purposed
than intended.
Document No. 20180510
Prepared by: Isaac Viglione
Authorised by: Peter Long
Issue No. 0001
Issue date: 1/6/2018
Advertisement
Table of Contents

Summary of Contents for OZTENT Foxwing 270 Awning
- Page 1 Document No. 20180510 Issue No. 0001 www.oztent.com Prepared by: Isaac Viglione Issue date: 1/6/2018 Authorised by: Peter Long These instructions remain the property of Oztent Australia Pty Ltd and may not be used or changed for any other purposed than intended.
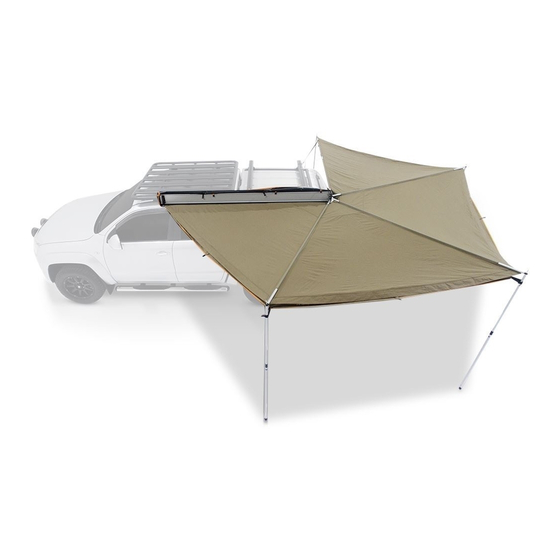
- Page 2 Congratulations and thank you for choosing the original Foxwing 270º Awning (LHS) Installation / User’s Manual OFW27AWLHA Foxwing 270º Awning. We are sure that you will find your new 270º Awning a pleasure to use. Before you install or use the awning, we recommend that you read through this entire manual which provides installation and user instructions.
-
Page 3: Table Of Contents
Foxwing 270º Awning (LHS) Installation / User’s Manual OFW27AWLHA Contents Parts Identification ..............................Installation ..................................Installation checklist ....................................Minimum crossbar distance ................................. Fitting instructions ....................................... Operating Instructions ............................Unfold ........................................... Retraction ......................................... Repair ....................................Replacing the spar hinge ..................................Windy Conditions .............................. -
Page 4: Parts Identification
Foxwing 270º Awning (LHS) Installation / User’s Manual OFW27AWLHA Parts Identification Item General Part Name Part No. Foxwing 270º Awning OFW27ACEXA Crossbar Bracket FOXBRACK Crossbar Bracket Plate FOXPLATE M8 x 23mm T-Bolt OXTBOLT23 M8 x 17mm Flat Washer FOXWO20 M8 Nylock Nut FOXNO28 Sportz/Aero Crossbar Insert FOXINSA... - Page 5 Foxwing 270º Awning (LHS) Installation / User’s Manual OFW27AWLHA For Sportz / Aero Crossbar For Heavy Duty Crossbar Page 4 of 30...
- Page 6 Foxwing 270º Awning (LHS) Installation / User’s Manual OFW27AWLHA Item Foxwing 270º Awning Component Name Part No. End Cap FOXLC Rubber Strap FOXRS Rivet (1661 – 0613) FOXH004 Pole Holder FOXPH Rivet (1661 – 0619) FOXH008 Backing Extrusion FOXC786 M8 x 150mm Bolt FOXC775 M8 Flat Washer FOXW020...
-
Page 7: Installation
Foxwing 270º Awning (LHS) Installation / User’s Manual OFW27AWLHA Installation Checklist Tape measure Step Ladder (Optional) 13mm spanner Padded panel guard or rug (Optional) 14mm spanner Installation/User’s Manual Knife Suitably illuminated, clean, dry workspace that is out of the wind Phillips tip screwdriver (Optional –... -
Page 8: Fitting Instructions
Item 2 Foxwing 270º Awning (LHS) Installation / User’s Manual OFW27AWLHA Minimum 800 mm Fitting Instructions Item 3 Distance measured from 1. Insert the four (4) M8 x 23mm T-Bolts onto the Backing Extrusion as shown in Item A of Diagram 1 bar center to bar center Ensure that you don’t drop the T-Bolts into the Backing Extrusion Position T-Bolts, Crossbar Bracket and Crossbar Bracket Plate as shown in Diagram 1... - Page 9 Foxwing 270º Awning (LHS) Installation / User’s Manual OFW27AWLHA 3. Do not fully tighten the six (6) nuts and bolts at this stage 4. Using a knife cut the rubber buffer strips on the left-hand side of each roof rack to size, as shown in Diagrams 4A or 4B (as applicable) Cut buffer strip to size Cut buffer strip to size...
- Page 10 Foxwing 270º Awning (LHS) Installation / User’s Manual OFW27AWLHA 5. Adjust the position of the Crossbar Bracket and assembly to suit the Roof Racks on the vehicle as shown in Diagrams 5A or 5B (as applicable) Channel nut must sit across the bar when tightened 6.
-
Page 11: Operating Instructions
Foxwing 270º Awning (LHS) Installation / User’s Manual OFW27AWLHA Operating Instructions Unfold 1. Park the vehicle (ensuring that the handbrake is applied) in a suitable location and ensure that the awning when fully extended will not interfere with the flow of traffic If the awning is to be extended in windy conditions it is recommended that a second person assists in setting-up the awning Do not extend the awning in strong winds or a gale or during heavy rain as it could damage the... - Page 12 Foxwing 270º Awning (LHS) Installation / User’s Manual OFW27AWLHA 3. Locate the large outer Velcro flap and lift it out towards the rear of the awning, refer to Diagram 3 Diagram 3 4. Locate the top of the smaller inner Velcro flap and lift it out and down towards the vehicle, refer to Diagram 4 Diagram 4 Page 11 of 30...
- Page 13 Foxwing 270º Awning (LHS) Installation / User’s Manual OFW27AWLHA 5. Locate the remaining Velcro strap at the top of the awning cover and fold it up and away from the awning, refer to Diagram 5 Diagram 5 6. From the rear of the vehicle unzip the awning cover all the way to the front of the vehicle, refer to Diagram 6 Unclip the pole bag and the guy rope/pegs bag and set aside for later use Diagram 6...
- Page 14 Foxwing 270º Awning (LHS) Installation / User’s Manual OFW27AWLHA 7. Fold the awning cover over the awning Backing Extrusion, refer to Diagram 7 Ensure that the awning cover is well clear of the hinged area of the awning Diagram 7 8.
- Page 15 Foxwing 270º Awning (LHS) Installation / User’s Manual OFW27AWLHA 9. Commence to open the awning beginning with the top Awning Spar then each Awning Spar in order from top to bottom, refer to Diagram 9 Ensure that the Drain Panel is set towards the rear of the vehicle Diagram 9 Start to open awning from the top pole...
- Page 16 Foxwing 270º Awning (LHS) Installation / User’s Manual OFW27AWLHA 11. Attach the Tensioning Strap by looping the male clip Tensioning Strap around the nearest cross bar of the Roof Rack and looping the female socket Tensioning Strap around the end of the awning. Refer to Diagram 11 Diagram 11 12.
- Page 17 Foxwing 270º Awning (LHS) Installation / User’s Manual OFW27AWLHA 14. Insert the Telescopic Support Poles into each Awning Pole, refer to Diagram 14A 14.1 Secure each Awning Pole to the awning using the fitted Velcro straps, refer to Diagram 14B 15.
-
Page 18: Retraction
Foxwing 270º Awning (LHS) Installation / User’s Manual OFW27AWLHA Retraction 17. Loosen and remove Guy Ropes, remove Metal Pegs, remove Telescopic Support Poles and undo and remove tensioning straps 17.1 Store Guy Ropes, Metal Pegs, Telescopic Support Poles and tensioning straps in the applicable carry bag Important Note: If there is any possibility of a prevailing wind it is recommended that each segment of the awning is de-pegged and de-poled as the awning is closed to prevent any possible damage to... - Page 19 Foxwing 270º Awning (LHS) Installation / User’s Manual OFW27AWLHA 18. Swing the Awning Poles (rear to front) so that they recess into the Backing Extrusion 18.1 Secure the Awning Poles using the Rubber Strap prior to folding the awning material, refer to Diagram 18A 18.2 Fold the awning material, refer to Diagram 18 Diagram 18...
-
Page 20: Repair
Foxwing 270º Awning (LHS) Installation / User’s Manual OFW27AWLHA 20. Fold the awning cover over the top of the Backing Extrusion ensuring that any loose material does not protrude beyond the awning cover 20.1 Zip the awning cover from the front of the vehicle to the rear ensuring that any loose material is pushed away from the zipper before zipping the awning cover closed, refer to Diagram 20 20.2 Secure the awning cover Velcro flaps in the reverse order to that as shown in Sections 2 –... - Page 21 Foxwing 270º Awning (LHS) Installation / User’s Manual OFW27AWLHA 2. Using a 17mm spanner and a 6mm Allen key undo the bolt on the Spar Hinge, refer to Diagram 2 Diagram 2 17mm hex head 3. Remove the bolt, nut and washer’s assembly (and retain) as shown, refer to Diagram 3 Diagram 3 Page 20 of 30...
- Page 22 Foxwing 270º Awning (LHS) Installation / User’s Manual OFW27AWLHA 4. Identify which Spar Hinge needs to be replaced Remove the Hinge Pin (and retain) that correspond to the Spar Hinge that needs to be replaced, refer to Diagram 4 Diagram 4 5.
- Page 23 Foxwing 270º Awning (LHS) Installation / User’s Manual OFW27AWLHA 6. Insert replacement Spar Hinge into Awning Pole and secure using the previously removed self- tapping screw, refer to Diagram 6 Diagram 6 7. Reinsert associated Hinge Pin into Spar Hinge, refer to Diagram 7 Diagram 7 8.
-
Page 24: Windy Conditions
Foxwing 270º Awning (LHS) Installation / User’s Manual OFW27AWLHA Unfolding (Windy Conditions) 1. Should it be necessary to extend the awning in windy conditions, the following procedure should be followed in conjunction with the previously mentioned Operating Instructions, refer to Diagram 1 It is recommended that if the awning it to be extended in windy conditions that a second person is used to assist in this purpose Position the Telescopic Support Poles, Guy Ropes and Metal Pegs near their corresponding final... - Page 25 Foxwing 270º Awning (LHS) Installation / User’s Manual OFW27AWLHA 3. Repeat Instruction 2 for the remaining awning segments, one segment at a time, securing each segment one at a time with a Telescopic Support Pole, Guy Rope and Metal Peg, refer to Diagrams 3, 4 and 5 Diagram 3 4.
- Page 26 Foxwing 270º Awning (LHS) Installation / User’s Manual OFW27AWLHA 5. The last segment of the awning must be secured in place to the nearest cross bar of the Roof Rack using the supplied Tension Strap before securing with a Telescopic Support Pole, Guy Rope and Metal Peg, refer to Diagram 5 Diagram 5 6.
-
Page 27: Retraction
Foxwing 270º Awning (LHS) Installation / User’s Manual OFW27AWLHA 7. Secure the awning by clipping the male clip into the female socket 8. Pull the tail of the Tensioning Strap to tension as required to maintain the correct shape of the awning, refer to Diagram 8 Diagram 8 Retraction (Windy Conditions) - Page 28 Foxwing 270º Awning (LHS) Installation / User’s Manual OFW27AWLHA 2. Retract the last segment of the awning only, and while this segment is being held in place by a second person remove the associated Telescopic Support Pole, Guy Rope and Metal Peg, refer to Diagram 2 Remove the Telescopic Support Pole to the awning and release the Velcro strap, refer to Diagram 2 Remove the two (2) Metal Pegs securing the Drain Panel...
- Page 29 Foxwing 270º Awning (LHS) Installation / User’s Manual OFW27AWLHA 4. As per Instruction 3, refer to Diagram 4 Make sure to collect all Telescopic Support Poles, Guy Ropes and Metal Pegs and place them in their individual storage bags for future use Refer to previously mentioned Operation Instructions for further information Diagram 4 Page 28 of 30...
-
Page 30: Storage
Foxwing 270º Awning (LHS) Installation / User’s Manual OFW27AWLHA Storage 1. Do not store the awning when it is wet 2. Do not store the awning in a wet or humid environment 3. Do not store the awning where it may be subject to damage or abuse 4. -
Page 31: Warranty
To the extent permitted by law, the liability of Oztent months; (if any) arising out of or in relation to the Product or any services supplied by Oztent (iii) for Furniture (e.g. Chairs) and Furniture Accessories used for personal, shall be limited (where it is fair and reasonable to do so),: domestic or household purposes the period of ‘60’... - Page 32 AUSTRALIA INTERNATIONAL www.oztent.com.au www.oztent.com/us www.oztent.com Ph: 02 8706 5100 Ph: +8555 OZTENT Ph: +61 2 8706 5100 Toll Free: 1800 OZTENT or +855 569 8368 or 1800 698 368...
Need help?
Do you have a question about the Foxwing 270 Awning and is the answer not in the manual?
Questions and answers