Table of Contents
Advertisement
SWAURS
OWNER'S
MANUAL
MODEL NO,
917.299642
Caution:
Read and follow
all Safety Rules
and Instructions
Before Operating
This Equipment
£RI:IFTSMI:IN
4.0 HORSEPOWER
14 INCH TINE WIDTH
COUNTER ROTATING TINES
REAR TINE TILLER
Assembly
Operation
Maintenance
Service and Adjustment
Repair Parts
Sears, Roebuck and Co., Chicago, IL 60684 U.S.A.
Advertisement
Table of Contents

Related Manuals for Craftsman 917.299642


Summary of Contents for Craftsman 917.299642
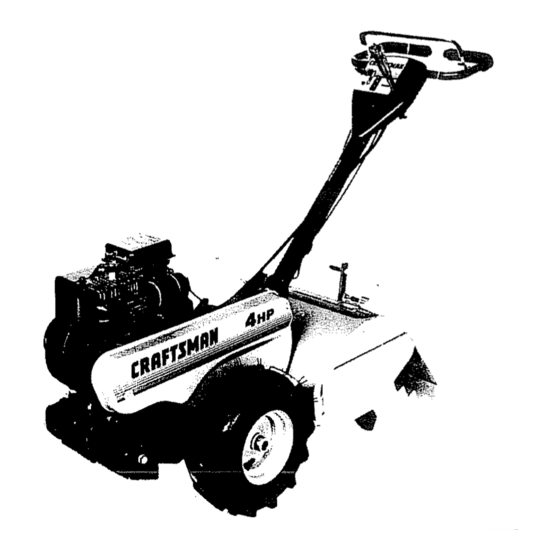
- Page 1 4.0 HORSEPOWER Read and follow all Safety Rules 14 INCH TINE WIDTH and Instructions Before Operating COUNTER ROTATING TINES This Equipment REAR TINE TILLER Sears, Roebuck and Co., Chicago, IL 60684 U.S.A. Assembly Operation Maintenance Service and Adjustment Repair Parts...
- Page 2 Allowthe engine to cool before storingin any enclosure., . Always refer to the Owner's Manual instructionsfor im- portant details if the tiller is to be stored for an extend- ed period. -IMPORTANT...
- Page 3 LIMITED ONE YEAR LIMITED WARRANTY ON CRAFTSMAN TILLER For one year from date of purchase, when this Craftsman Tiller is maintained, lubricated, and tuned up ac- cording to the instructions in the owner s manual, Sears wilt repair, free of charge, any detect in material and workmanship,, If this Craftsman Tiller is used for commercial or rental purposes, this Warranty applies for only 30 days from the date of purchase.
-
Page 4: Table Of Contents
Fill Fuel Tank ... 1 2 Start Engine ... Stopping Tine & Engine ... 11 Tilling ... Tilling Hints ... t2 Tine Operation ... Transporting Tiller ... 11 Winter Operation ... 23-28 29-33 back page Repair Parts: Illustrated Breakdown ... 23 - 33 Rules for Safe Operation: List of Rules ... - Page 5 THESE ACCESSORIES WERE AVAILABLE MOST SEARS RETAIL OUTLETS, CATALOG PARTS FOR YOU, WHEN YOU PROVIDE THE MODEL NUMBER OF YOUR TILLER, ENGINE MUFFLER SPARK PLUG TILLER PERFORMANCE FURROW OPENER TILLER MAINTENANCE BELT TILLER ACCESSORIES WHEN THE TILLER WAS PURCHASED. AND SERVICE CENTERS.
- Page 6 (2) Carriage Bolts 3/8 - 16 UNC x 1 Gr.. 5 (1) Handle Lock Lever ASSEMBLY OPERATOR'S The right hand (RH.) and left hand (LH,) sides of your Tiller are determined from the Operator's Position while standing beilind Tiller (2) Hairpin Clips IIIIIIIIIIIlUlIIIIIIIIIIIIIlUlUlIII III1'11'11'111111 (1) Fiat Washer 13/32 x 1 x 11 Ga.
- Page 7 • Rotate Handle Assembly down to install two Carriage Bolts and Lock Nuts, Insert rear Carriage Bolt (Fig,,5) first, with head of Bolt on L.H. side of Tiller, Lower the Handle Assembly,, Tighten Bolts so Handle moves with some resistance.
- Page 8 , Insert one end of Shift Rod (Fig 6) into hole of Shift Lever Indicator.. • Swing Shift Rod to the right side of Tiller and insert one of two Hairpin Clips through hole of Shift Rod. ATTACH THIS END...
- Page 9 LEVELING SHIELD MEETS Sears Rear Tine Tillers conform to the safety standards of the American National Standards Institute (Reference ANSI/0PE! B71.8-1986 American National Standard for outdoor power equipment - walk-behind powered rotary tillers - safety specifications), DRIVE CONTROL BAR - is used to engage Tiller,...
- Page 10 The operationof any Tiller can resultin foreign objectsthrown intothe eyes, whichcan resultin severe eye damage. Always wear safety glasses or eye shields before starting your Tiller and while tilling. We recommend Wide Vision Safety Mask for over the spectacles or standard safety glasses, available at Sears Retail or Catalog Stores°...
- Page 11 TRANSPORTING . Release the Depth Stake Pin, Move the Depth Stake down to the top hole for transporting the Tiller. Place Depth Stake Pin in hole of Depth Stake to lock in position. This prevents Tines from scuffing the ground,, •...
-
Page 12: Carburetor
Tilling is digging into, turning over', and breaking up packed soil before planting_ Loose, unpacked soil helps root growth_ Best tilling depth is 4" to 6'L A Tiller will also clear the soil of unwanted vegetation, The decom- position of this ve._etable matter enriches the soil. De- pending on the chmate (rainfall and wind), it may be advisable to till the soil at the end of the growing sea. -
Page 13: Depth Stake
. For easier handling of your Tiller, leave about 8 inches of untilled soil between the first and second tilling passes. The third pass will be between the first and second (Fig. 17). FIGURE 17 • Do not lean on the Handle. This takes weight off the Wheels and reduces traction. - Page 14 • Install new Air Cleaner Cartridge_ Clean and replace Cover, Tighten Screws secureiy_ MUFFLER BLOWER Do not operate Tiller without Muffler (Fig. 21),, Do not HOUSING tamper with exhaust system, Damaged Mufflers or Spark Arresters could create a fire hazard. Inspect periodically and replace _fnecessary.
- Page 15 • Refill with fresh SAE 30 or SAE 10W-30 weight oil. DRAIN PLUG OIL FILLER PLUG FIGURE 24 MAINTENANCE TRANSMISSION Your Transmission is sealed and will only require lubri- cation if serviced_ FINISH Keep your Tiller finish and Wheels free of gasoline, oil, etc_ Protectpainted surfaceswith automotive type wax. LEVEL...
- Page 16 SERVICE RECOMMENDATIONS LUBRICATION CHART- OIL PIVOT POINTS WHEEL Ill NN MAINTENANCE CHECK LIST SERVICE RECORD FILL IN DATES AS YOU COMPLETE REGULAR SERVICE Check Engine Oil Level Change Engine Oil Oil Pivot points Inspect Spark Arrester Muffler inspect Air Screen Clean Air Cleaner Clean Engine Cylinder Fins llll...
- Page 17 • Keep Tires free of gasoline or oil which can damage rubber,, WHEEL REMOVAL To remove Wheel and Tire for repair: • Place blocks under the Transmission to keep Tiller from tipping° • Remove Hairpin Clip and Retaining Pin from Wheel (Fig., 27).
-
Page 18: Ground Drive Belt
REPLACEMENT - Remove Hairpin Clip and Retaining Pin from Hub of left hand Wheel Pull Wheel out from Tiller about I inc_h__ - Remove Belt Guard by removing two (2) Cap Nuts, one (1) Hex Nut and three (3) Washers so that the Belt Guard can slide straight out away from the Engine (Fig. - Page 19 OUT THE TINES BY HAND. USE CAU* TION : TINES ARE SHARP. A badly worn Tine causes your Tiller to work harder and dig more shallow.. Most important, worn Tines cannot chop and shred organic matter as effectively nor bury it as deeply as good Tines.
- Page 20 SERVICE AND ADJUSTMENT CARBURETOR NOTE: A dirty Air Cleaner will cause the Engine to run rough. Be sure Air Cleaner is clean before adjustments_ Factory settings are satisfactory for most applications and conditions, if adjustments are needed, proceed as follows: Never attempt to change maximum Engine speed.
-
Page 21: Carburetor Adjustment
STORAGE Keep your Tiller in a weatherproof, dry building_ To avoid Engine problems, the fuel system should be emptied be- fore storage of 30 days or longer° • Drain Fuel Tank; run Engine until gasoline in Carbure- tor is used.. - Page 23 16 STD624003" Clip, Hairpin Bolt, Shoulder 17 81328 Rod, Shift 18 110702X TILLER - MODEL NUMBER 917.299642 "%::.', 32---_ 19 STD541437" Nut, Centedock - 3/8 - 16 20 109229X 21 STD533710" Bolt, Rd. Hd Sq Neck Carr. 3/8 - 16 x...
- Page 24 104214X Nut, Cap 5/16 - 18 110804X Decal, Belt Guard Tire 102190X 109208X 795R Tire Valve TILLER - MODEL NUMBER 917.299642 PART 26 126875X 27 STD624003" Clip, Hairpin 28 102148X361 Guard, Belt 29 102143X 30 104679X 31 12000032 32 102384X...
- Page 25 5 74760524 Bolt, Hex 5/I6- 18 x 1-1/2 6 102173X Counter Weight, RH 7 STD551137" Washer, Lock 3/8 TILLER - MODEL NUMBER 917.299642 PART DESCRIPTION STD541037" Nut Hex 3/8 - 16 STD624003" Clip, Hairpin 102841X Rivet, Drilled 102! 90X Tire...
-
Page 26: Tine
102114X key 21 & 22) 102115X Gear, Reverse Idler Bearing, Needle 6803J Shaft, Reverse Idler 102111X Washer, Lock 7/16 STD551143" TILLER - MODEL NUMBER 917.299642 PART 25 STD541143" 102128X 27 102100X 28 !06390X "51 29 102134X 30 109204X 102106X 106388X... - Page 27 Bolt, Carriage 5/t6 - 18 x 1 14 124343X Bracket, Shield Tine 15 10410tX361 Shield, Side Outer RH 16 STD541025" Nut Hex 1/4 - 20 TILLER - MODEL NUMBER 917.299642 PART STD551125" Washer, Lock 1/4 1 t0805X 102701X STD541037 102156X...
- Page 28 Bolt, Hex 3/8 - 24 x 1 STD551137" Washer, Lock 3/8 73610600 Nut, Hex 3/8 - 24 4929H Retaining 102170X Hub, Assembly L. H.. TILLER - MODEL NUMBER 917.299642 PART 7 6554J 8 6555J 9 4460J 10 STD624008" Clip, Hairpin 11 102172X * STANDARD HARDWARE--PURCHASE DESCRIPTION Tine L, H Inner Tine, R.
- Page 29 221661 Screen, Rotating 13 94153 Screw, Sere 16 397316 Armature, Magneto 17 93381 Screw, Armature Mounting Sem 20 398808 Wire, Ground TILLER - MODEL NUMBER 917.299642 MODEL NUMBER 112202, PART 22 220865 25 393862 26 293708 27 395970 30 490828...
- Page 30 REPAIR PARTS 4 H.P. CRAFTSMAN ENGINE - BRIGGS & STRATTON ENGINE, REAR (_29 TILLER - MODEL NUMBER 917.299642 -- MODEL NUMBER 112202, Assemblies include all pads shown in frames, TYPE NUMBER 0847-01...
-
Page 31: Throttle
Spring - Fuel Pump Diaphragm 26 391813 Fuel Pipe and Clip Assembly 27 262359 Link - Choke 28 93543 Screw- Fil_Hd,. TILLER - MODEL NUMBER 917.299642 - MODEL NUMBER 112202, TYPE NUMBER 0847-01 PART DESCRIPTION 29 93357 Screw - Hex_Hd, 30 490589... - Page 32 & STRATTON ENGINE, INTERNAL PARTS * SPECIAL TOOLS REQUIRED TO INSTALL, SEE REPAIR INSTRUCTION MANUAL DECAL KIT 1 Assemblies include all parts shown in frames,, TILLER - MODEL NUMBER 917.299642 -- MODEL NUMBER 112202, 24 25 26.._ 134 GASKET SET]...
-
Page 33: Spark Plug
Gasket _ Crankcase - O05" thick 270895 Gasket - Crankcase - 009" thick 270896 43 394820 Cover Assembty- Crankcase Gear- Cam 44 392171 TILLER - MODEL NUMBER 917.299642 -- MODEL NUMBER 112202, PART 45 391737 46 221551 47 261250 48 261416... - Page 34 1II@?!i8 lll£Vl@l...
- Page 35 IIIi£VIGII 111)1118...
-
Page 36: Transmission
The model numberfor the Engine will be found on the Blower Housing of the Engine adjacent to the Spark Plug,, All parts listed herein may be ordered from any Sears, Roebuck and Co. Service Centers and most Retail Stores WHEN ORDERING REPAIR PARTS, ALWAYS GIVE THE FOLLOWING INFORMATION: o PRODUCT - "REAR TINE TILLER"...
Need help?
Do you have a question about the 917.299642 and is the answer not in the manual?
Questions and answers