Advertisement
Model: SR-F2W
Wireless Remote Controller
English Instruction Manual
Thanks for your purchase of a JJC SR-F2W Wireless Remote Controller. For the best
performance, please read this instruction carefully before using. You must read it
thoroughly and fully understand this manual to avoid improper operation which may result
in damage to the product.
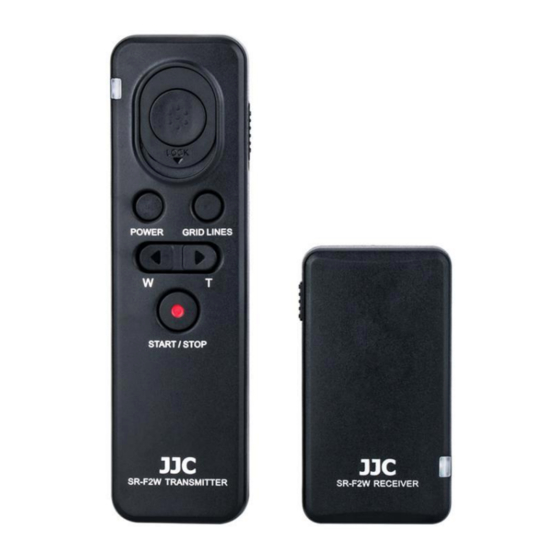
JJC SR-F2W Wireless Remote Controller is specially designed for Sony cameras and
camcorders. You can use the wireless remote controller to operate a camera or a
camcorder that has a Sony Multi Terminal. The wireless remote controller allows you to
control the camera or camcorder from afar when shooting, so it also prevents camera
shaking. The working distance of SR-F2W is up to 100 meters. The unit includes three
parts: transmitter, receiver and a connecting cable. It powers easily. The transmitter and
receiver are respectively powered by two AAA batteries. The wireless remote controller
has basic recording functions (power on / off, video start / stop, focusing / shooting,
zooming and displaying grid lines). With locking function, JJC SR-F2W is ideal for Bulb
long exposure and continuous shots. The receiver has a universal 1/4"-20 tripod socket
on the bottom, so you can even mount it onto a tripod. Moreover, equipped with a 1/4"-20
tripod socket in the backside, the transmittercan attach to any object with a 1/4"-20 male
screw. JJC SR-F2W replaces Sony RMT-VP1K and RM-VPR1 Remote Commander.
Advertisement
Table of Contents

Related Manuals for JJC SR-F2W


Summary of Contents for JJC SR-F2W
-
Page 1: Wireless Remote Controller
The working distance of SR-F2W is up to 100 meters. The unit includes three parts: transmitter, receiver and a connecting cable. It powers easily. The transmitter and receiver are respectively powered by two AAA batteries. -
Page 2: Package Including
Package including SR-F2W transmitter x 1 SR-F2W receiver x 1 Cable for Multi Terminal x 1 Instruction manual x 1 Warranty card x 1 A string for receiver x 1 Specifications SR-F2W Transmitter: Battery type: AAA battery x 2 ... - Page 3 Identify the Transmitter and Receiver Transmitter 1. Power Switch 2. Indicator Lamp 3. Shutter Release Button 4. Camera Power Button 5. Grid Lines Button 6. Wide Angle Button 7. Telephoto Button 8. Video Recording Button 1/4"-20 Tripod Mount Socket 10.
-
Page 4: Transmitter Batteries
Receiver 1. Power Switch 2. Status Lamp 3. Locking Disk 4. Cold Shoe Mount 5. 1/4"-20 Tripod Mount Socket 6. Battery Compartment 7. Mini USB Socket 8. String Hole 9. Connecting Cable 10. Multi Terminal Plug 11. Mini USB Plug Replace Batteries (The batteries are not included in the package.) ... - Page 5 2. Insert the fresh battery, and please ensure the batteries are put in a correct direction. Do not install the batteries in the reverse direction as this could cause the batteries to leak corrosive liquids, generate heat or explode. 3. Put the battery cover back towards the opposite direction of the “OPEN” sign. ...
- Page 6 2. Insert the fresh battery, and please ensure the batteries are put in a correct direction. Do not install the batteries in the reverse direction as this could cause the batteries to leak corrosive liquids, generate heat or explode. 3. Put the battery cover back towards the opposite direction of the “OPEN” sign. Smart Pairing First, turn on the power switch on the transmitter.
- Page 7 Then press and hold the video recording button. After that, turn on the power switch on the receiver. Until the indicator lamp on the transmitter flashes alternately between red and green, which means successful pairing. Now you can release the video recording button. The Displaying of Status Lamp The status lamp will flash three times when the transmitter triggers the receiver.
- Page 8 The status lamp is yellow when the receiver is not connected to the camera or some other troubles appear. When the receiver connects to the camera properly, the status lamp will show red or green according to the mode of the camera. Standby mode: When recording a video:...
- Page 9 Besides, some camcorders can not compatible with the standard hot shoe, you can choose our another product JJC MSA-MIS Shoe Adapter to attach the receiver to your camcorder. Please refer to our...
- Page 10 4. Turn on the camera / camcorder and the status lamp on the receiver lights in green. 5. If the camera stays in standby mode, press the camera power button of SR-F2W to wake it. Using the Wireless Remote Controller ...
- Page 11 Long Exposure Shot 1. Set the camera to manual mode and adjust the shutter speed to BLUB. Then slide the shutter release button down to lock the shutter. 2. Slide the shutter release button upwards to end the shooting, and you will get a long exposure picture.
-
Page 12: Video Recording
ContinuousShots 1. Set the camera to continuous shooting mode. Then slide the shutter release button down to lock the shutter. 2. Slide the shutter release button upwards to end the shooting. Video Recording 1. Press the video recording button. The status lamp lights in red and recording starts. - Page 13 2. To stop recording, press the video recording button again.The status lamp lights in green. Zooming Telephoto Button: Subject appears closer. Wide Angle Button: Subject appears farther away.
-
Page 14: Grid Lines
Note: The zooming speed is slow when you press the zoom button lightly, and quick when you press the button all the way down. Grid Lines You can set the grid lines by pressingthe grid lines button. Rule of 3rds Grid: Place main subjects close to one of the grid lines that divide the image into thirds for a well-balanced composition. -
Page 15: After Recording
JJC is a trademark of JJC Company ONE YEAR GUARANTEE If for quality factor, this JJC product fails within ONE YEAR of the date of purchase, return this product to your JJC dealer or contact service@jjc.ccand it will be exchanged for you at no charge (not including shipping cost). -
Page 16: Fcc Statement
FCC Statement This equipment has been tested and found to comply with the limits for a Class B digital device, pursuant to Part 15 of the FCC Rules. These limits are designed to provide reasonable protection against harmful interference in a residential installation. This equipment generates uses and can radiate radio frequency energy and, if not installed and used in accordance with the instructions, may cause harmful interference to radio communications.
Need help?
Do you have a question about the SR-F2W and is the answer not in the manual?
Questions and answers