
Summary of Contents for EASYHOME MS-201
- Page 1 User Manual Manual del usuario MINI SEWING MACHINE MINIMÁQUINA DE COSER English……3 Español…..18...
-
Page 2: Table Of Contents
Contents Parts list ................3 Contents ..............3 General information ............4 Safety instructions ............. 5 User instructions ............. 6 Before first use ............7 Operating the machine ..........7 With the foot pedal ..........7 Without the foot pedal ........8 Winding the bobbin ........... -
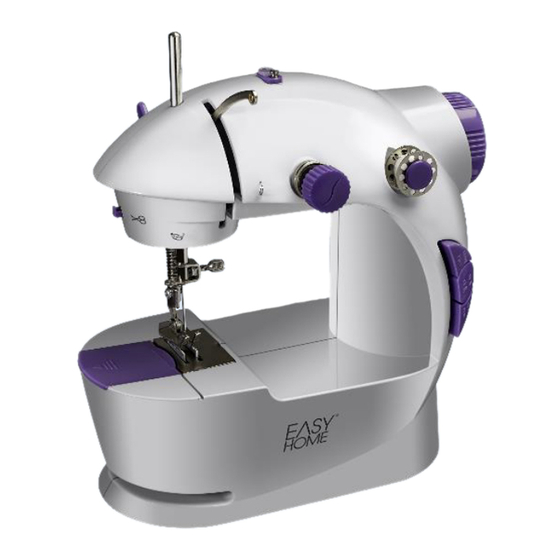
Page 3: Parts List
Parts list Main parts Pre-threaded Sewing Machine Foot Pedal Power Adapter Sewing Accessories (in separate bag) a. 4 Bobbins b. 3 Needles c. 1 Needle Threader Contents of packaging Pre-threaded Sewing Machine with 2 bobbins and 1 needle Power Adapter ... -
Page 4: General Information
General information General information When using the Mini Sewing Machine, basic safety precautions should be observed. PLEASE READ AND SAVE ALL INSTRUCTIONS BEFORE USING THE MINI SEWING MACHINE. Close supervision is necessary when any appliance is used near children. The Mini Sewing Machine is not intended for use by children. -
Page 5: Safety Instructions
User instructions Safety instructions WARNING: Read and understand all instructions. Failure to follow all instructions listed below may result in electric shock, fire or serious personal injury. The warnings, cautions, and instruction discussed in this instruction manual cannot cover all possible conditions and situations that may occur. It must be understood by the operator that common sense and caution are a factor which cannot be built into this product, but must be supplied by the operator. -
Page 6: User Instructions
User instructions User instructions Thread Guide 1 (K1) Thread Takeup Spindle (J) Tension Adjusting Lever (I) Screw (L) Thread Guide 1 (K2) Thread Guide 2 (H) Bobbin Holder (M) Bobbin Spindle (N) Needle Clamp (G) Light Button (O) Thread Guide 3 (F) Needle (E) Power Button (P) Presser Foot (D) -
Page 7: Before First Use
User instructions Before first use: 1. Read ALL instructions carefully. 2. Place Mini Sewing Machine on a flat, stable surface. 3. Make sure sewing machine is in the ‘OFF’ position before attaching any accessories. The ON/OFF button will be flush with the other buttons. It will not be pushed in. -
Page 8: Operating The Machine
User instructions Operating the sewing machine With the foot pedal: 1. Make sure the machine is in the ‘OFF’ position. Please Note: When using the foot pedal, the Power Button (P) should always be in the ‘OFF’ position. 2. Plug the foot pedal plug into the Foot Pedal Jack (Z) located on the side of machine. -
Page 9: Without The Foot Pedal
User instructions Without the foot pedal: 1. Make sure the sewing machine is in the ‘OFF’ position. 2. Lift the needle above the presser foot by turning the Hand Wheel (W) slightly in a clockwise direction (away from you). 3. Raise the Presser Foot (D) by lifting up the Presser Foot Lever (V) on the back of the machine. -
Page 10: Winding The Bobbin
User instructions Winding the bobbin Please Note: For safety precautions, always remove the bobbin from the Bobbin Compartment (B). 1. Raise Thread Spindle (J) by grasping the notch on the top of the spindle and pulling upward until thread spindle is fully extended. 2. -
Page 11: Threading The Sewing Machine
User instructions Threading the sewing machine NOTE: The machine comes pre-threaded from the factory. Look at this threading carefully before removing it to replace the thread or bobbin with different thread. Then follow the instructions to re-thread. Using side bobbin: Note: When threading machine, use above numbered image for reference. -
Page 12: Using Thread Spindle
User instructions 5. Bring thread over and across the Tension Adjusting Screw (3), positioning thread between the 2 washers behind the tension adjusting screw. This is what provides the lock stitch tension to the thread. 6. Pull thread from the Tension Adjusting Screw (3) guide through the 2 Thread Guide (4) pulling thread from right to left. -
Page 13: Bottom Bobbin Placement
User instructions 4. Bring thread over and across the Tension Adjusting Screw (3), positioning thread between the 2 washers behind the tension adjusting screw. This is what provides the lock stitch tension to the thread. 5. Pull thread from the Tension Adjusting Screw (3) guide through the 2 Thread Guide (4) pulling thread from right to left. -
Page 14: Adjusting Tension
User instructions when needle starts to go down again. Needle will go down, picking up the bobbin thread. Note: The bobbin thread will not get pulled through if the hand wheel is turned clockwise (away from you). 5. Pull the spool thread gently towards you, seeing it has caught the bottom bobbin thread. -
Page 15: Helpful Hints
Helpful hints / cleaning and maintenance Helpful hints 1. To replace batteries, remove the Battery Compartment Cover (T) and insert new batteries. Pay close attention to the polarity and make sure the batteries are inserted properly as the machine will not function and it could cause damage to the machine. -
Page 16: Other Useful Information
Other useful information Other useful information Technical specifications Model Number MS-201 Rating Voltage Output 12V Nominal Power 4.8W Storing Store the Mini Sewing Machine in a dry location. Do not place any heavy items on top of the Mini Sewing Machine during storage as this may result in possible damage. -
Page 17: Fcc
FCC PART 15 This device complies with Part 15 of the FCC Rules. Operation is subject to the following two conditions: (1) this device may cause harmful interference, and (2) this device must accept any interference received, including interferences that may cause undesired operation. - Page 18 Lista de componentes Contenido Lista de componentes ..........19 Contenido ............19 Información general ..........20 Instrucciones de seguridad ........22 Modo de empleo ............23 Antes del primer uso ........... 23 Uso de la máquina ..........24 Con el pedal ............ 25 Sin el pedal .............
-
Page 19: Lista De Componentes
Lista de componentes Componentes principales Máquina de coser enhebrada Pedal Adaptador de alimentación Accesorios de cosido (en una bolsa aparte) a. 4 bobinas b. 3 agujas c. 1 enhebrador Contenido del embalaje Máquina de coser enhebrada con 2 bobinas y 1 aguja ... -
Page 20: Información General
Información general Información general Al utilizar la minimáquina de coser, es necesario seguir unas precauciones de seguridad básicas. POR FAVOR, LEA Y GUARDE TODAS LAS INSTRUCCIONES ANTES DE UTILIZAR LA MINIMÁQUINA DE COSER. 1. Es necesaria una atenta supervisión cuando el aparato se usa cerca de los niños. - Page 21 Información general 17. Desenchufe o desconecte la fuente de alimentación siempre antes y después de usar este aparato. 18. Desenchufe o desconecte la fuente de alimentación siempre al cambiar las agujas o al enhebrar la máquina. 19. Esta máquina de coser no es un juguete y no está diseñada para ser usada por o cerca de los niños.
-
Page 22: Instrucciones De Seguridad
Instrucciones de seguridad Instrucciones de seguridad ADVERTENCIA: Lea y comprenda todas las instrucciones. Si no se cumplen todas las instrucciones indicadas a continuación se pueden producir descargas eléctricas, incendios o lesiones graves. Las advertencias, precauciones e instrucciones que se detallan en este manual de instrucciones no cubren todas las condiciones y situaciones posibles que podrían suceder. -
Page 23: Modo De Empleo
Modo de empleo Modo de empleo Guía de hilo 1 (K1) Portahilo (J) Palanca del Tornillo de ajuste tirahilo (I) de la tensión (L) Guía de hilo 1 (K2) Guía de hilo 2 (H) Portabobina (M) Eje del portabobina (N) Cierre de la aguja (G) Botón de Guía de hilo 3 (F) -
Page 24: Antes Del Primer Uso
Modo de empleo Antes del primer uso: 1. Lea TODAS las instrucciones atentamente. 2. Coloque la minimáquina de coser en una superficie plana y estable. 3. Asegúrese de que la máquina de coser esté apagada antes de conectar cualquier accesorio. El botón de encendido/apagado (ON/OFF) debe estar al mismo nivel que el resto de los botones. -
Page 25: Uso De La Máquina
Modo de empleo Uso de la máquina de coser Con el pedal: 1. Asegúrese que la máquina esté apagada (OFF). Importante: Cuando use el pedal, el botón de encendido (P) siempre debe estar en la posición de apagado (OFF). 2. Inserte el enchufe del pedal en la conexión del pedal (Z) situada en el lateral de la máquina. -
Page 26: Sin El Pedal
Modo de empleo Sin el pedal: 1. Asegúrese que la máquina de coser esté apagada (OFF). 2. Eleve la aguja por encima del pie prensatelas girando la rueda de mano (W) ligeramente en sentido horario (alejándose de usted). 3. Suba la palanca del pie prensatelas (V) situada en la parte posterior de la máquina para elevar el pie prensatelas (D). -
Page 27: Enrollado De La Bobina
Modo de empleo Enrollado de la bobina Importante: Por seguridad, quite siempre la bobina del compartimento de la bobina (B). 1. Ayudándose con la muesca situada en la parte superior del portahilo (J), tire de él y elévelo hasta que quede completamente extendido. 2. -
Page 28: Enhebrado De La Máquina De Coser
Modo de empleo Enhebrado de la máquina de coser NOTA: La máquina viene enhebrada de fábrica. Observe el enhebrado atentamente antes de quitarlo para reemplazar el hilo o la bobina con hilo de otro tipo. A continuación, siga las instrucciones para volver a enhebrarla. Uso de la bobina lateral: Nota: Siga la imagen numerada previa a modo de guía para enhebrar la máquina. - Page 29 Modo de empleo 4. Tire del hilo de la bobina en el eje del portabobina (1A) e introdúzcalo en la 1. guía de hilo (2) llevando el hilo de derecha a izquierda. 5. Pase el hilo por encima y a través del tornillo de ajuste de la tensión (3), colocando el hilo entre las 2 arandelas detrás del tornillo de ajuste de la tensión.
-
Page 30: Uso Del Portahilo
Modo de empleo Uso del portahilo: Nota: Siga la imagen numerada previa a modo de guía para enhebrar la máquina. 1. Ayudándose con la muesca situada en la parte superior del portahilo, tire de él y elévelo hasta que quede completamente extendido. 2. -
Page 31: Colocación De La Bobina Inferior
Modo de empleo Colocación de la bobina inferior 1. Quite la cubierta del compartimento de la bobina (C) deslizándola hacia la izquierda. 2. Ponga una bobina con el hilo que haya elegido en el compartimento de la bobina (B), dejando unas 5 pulgadas de hilo fuera del soporte de la bobina y colóquelo en la muesca para hilo (A). -
Page 32: Cambio De La Aguja
Modo de empleo Cambio de la aguja 1. Gire la rueda de mano (W) para elevar la aguja a su posición más alta. 2. Afloje el tornillo de ajuste de la aguja (R) girándolo en sentido antihorario (hacia usted). Quizá necesite usar un pequeño destornillador plano o unos alicates pequeños. -
Page 33: Consejos Útiles
Consejos útiles / Limpieza y mantenimiento Consejos útiles 1. Para cambiar las pilas, quite la tapa del compartimento de las pilas (T) y ponga pilas nuevas. Preste atención a la polaridad y asegúrese de insertar las pilas correctamente, ya que de lo contrario la máquina no funcionará y podría sufrir algún daño. -
Page 34: Información Adicional De Utilidad
Información adicional de utilidad Información adicional de utilidad Especificaciones técnicas Número de modelo MS-201 Voltaje nominal Salida 12 V Potencia nominal 4.8 W Almacenamiento Guarde la minimáquina de coser en un lugar seco. No coloque objetos pesados sobre la minimáquina de coser durante el almacenamiento, ya que esto puede dar lugar a posibles daños. -
Page 35: Fcc
FCC Parte 15 Este dispositivo cumple la Parte 15 de las Normas de la FCC. Su funcionamiento está sujeto a las dos condiciones siguientes: (1) este dispositivo no puede causar interferencias perjudiciales, y (2) este dispositivo debe aceptar cualquier interferencia recibida, incluyendo interferencias que puedan causar un funcionamiento no deseado. - Page 37 Description of malfunction: Return your completed warranty card to: AFTER SALES SUPPORT 50714 888 367 7373 Wachsmuth & Krogmann, Inc. help@myproduct.care 1015 Hawthorn Drive MODEL: MS-201 11/2017 Itasca, IL 60143 Hotline: 888-367-7373 help@myproduct.care Operating hours: Monday – Friday 10:00am – 5:00pm EST...
- Page 38 ALDI INC. FULL WARRANTY CONDITIONS Dear Customer: The ALDI warranty is a fully warranty offering you the following benefits: Warranty period: 2 years from date of purchase. 6 months for movable parts and consumables under normal and proper conditions of use (e.g. rechargeable batteries). Costs: Free repair/exchange or refund.
- Page 39 50714 Envie la tarjeta de garantía completada a: 888 367 7373 help@myproduct.care Wachsmuth & Krogmann, Inc. NO. DEL MODELO: 1015 Hawthorn Drive MS-201 11/2017 Itasca, IL 60143 Horario de Servicio al cliente de lunes a viernes help@myproduct.care de 10:00a.m. – 5:00p.m.
- Page 40 CONDICIONES DE LA GARANTÍA COMPLETA DE ALDI INC. Estimado cliente: La Garantía ALDI es una garantía completa que le ofrece los siguientes beneficios: Período de garantía: 2 años a partir de la fecha de la compra. 6 meses para las piezas de recambio y consumibles en condiciones normales y adecuadas de uso (por ejemplo, baterías recargables).
- Page 42 DISTRIBUTED BY • DISTRIBUIDO POR: ALDI INC., BATAVIA, IL 60510 WWW.ALDI.US 50714 MODEL: MS-201 11/2017...
Need help?
Do you have a question about the MS-201 and is the answer not in the manual?
Questions and answers