
Related Manuals for Craftsman 917.25591


Summary of Contents for Craftsman 917.25591
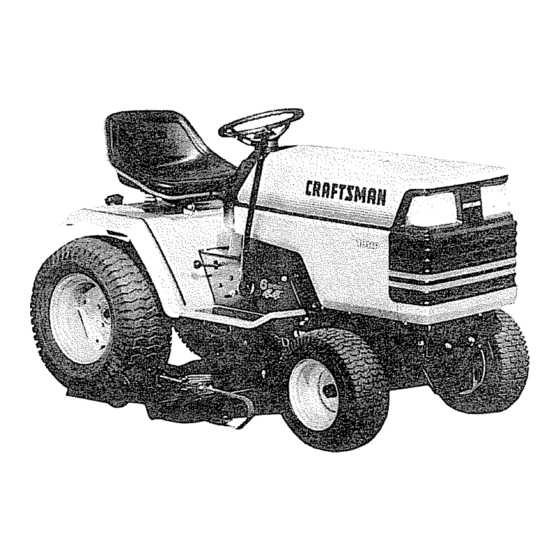
- Page 1 8EA/RS OWNERS MANUAL Caution: Read Rules for Safe Operation and Instruction Carefully Sears, Roebuck and Con,Chicago, IL 60684 U.S_A. GT 18 TWIN TRACTOR Assembly Installation Operation Repair Parts...
- Page 2 ONE YEAR WARRANTY START RIDING EQUIPMENT in the owner s manual, Sears will repair free of charge any defect in material or' contained tn the owner s manual; and WARRANTY BY CONTACTING THE NEAREST AND SERIAL...
- Page 3 RULES FOR SAFE OPERATION ASSEMBLY INSTRUCTIONS OPERATION INSTRUCTIONS RULES 1_ Know controls and how to stop quickly. OWNERIS MANUAL. 2. Do- not allow children to operate the vehicle. adults operate it without proper out having read the owners manual. 3. Do not carry passengers.
- Page 4 AWAY VIEW FIGURE BATTERY COMPARTMENT FIGURE 2 FIGURE 3 ASSEMBLY To assemble and adjust your Tractor VENT 7/16" wrenches, one 3/4" wrench NOTE: RIGHT HAND DETERMINED FROM TUBE SEATED ON THE TRACTOR 1. Remove Fasteners holding Tractor and Mower Deck to skid. Also remove Battery,...
- Page 5 5o Install Battery using: two Int./Exto Lockwashers, two Wing Nuts {shown full size below) and Battery Bolts and one Terminal Guard Parts. a, Using the square hole on one side of the Battew (Fig, 4") insert Battery Bolt, Fasten Battery Bolt the Terminal into/Exto...
- Page 6 ENGINE FIGURE7 PARKING "CLUTCH/BRAKE" "ENGAGED" POSITION "CLUTCH" POSITION SHAFT FIGURE 8 ATTACHMENT IGI_ GEAR SHIFT CONTROL LEVER FIGURE 9 8NUTIIAL SERVICE 1. This engine hag been shipped filled with oil. Check Engine Oil Level with Tractor (Fig, 7) clean, push it in tight for a few seconds, remove and read Oil Level.
- Page 7 4. Pull C hoke o ut(Fig. 9 ). 5 Move T hrottle Control tomiddle position ( Fig° 9 )o 6.TurnIgnition Key to "START" p osition u ntilEngine s tarts (Fig,9). NOTE: D ONOTRUNSTARTER CONTINU- OUSLYFORMORE THANFIFTEEN SECONDS PER MINUTE° I f engine d oes notstartafterseveral attempts, move Throttle Control t o "F"...
- Page 8 NEGATIVE (BLACK CABLE) TERMINAL POSITIVE (RED CABLE) TERMINAL FIGURE FIGURE CLUTCH LEVER TENSION PUt_,LEY FIGURE 12 STARTING A LOW if your Battery is too low to start the engine, it should be recharged. If follow this procedure: PED WITH A 12 VOLT NEGATIVE THE OTHER VEHICLE T1VE GROUNDED Connect each end of the RED cable to the POSITIVE...
- Page 9 4, TheMower S uspension ArmsandFasteners (shown full size below) are found inBag of Parts, LOCKWASHER WASHER RETAINING CL|P 5. The Mower Suspension Arms have "FRONT" between holes. Place the Suspension Arms on Brackets on both sides of Frame. Retain with Retaining Clip (Fig°...
- Page 10 FIAIRPIN CLIP GAUGE WHEEL CLEVIS FIGURE FIGURE REAR FLANGE FIGURE 19 MOWER ADJUSTMENT Adjust the mower while tractor is parked on level ground or POSITION driveway, Make sure tire pressures are 14 PSI in front; PSI in rear. ATTACHMENT HANDLE SiDE TO SLIDE ADJUSTMENT 1, Use a ruler to make sure Flanges at rear of mower deck...
- Page 11 1. TO RAISE FRONT_OF MOWER Loosen Nuts "D _, Screw Nuts "C" Arms (Fig. 20). NOTE; SCREW NUTS "C" SUSPENSION ARMS THE SAME NUMBER SO MOWER WILL REMAIN LEVEL. securely. 2. TO LOWER FRONT OF MOWER Loosen Nuts "C'L Screw Nuts "D" down Suspension Arms, NOTE: SCREW NUTS "D"...
- Page 12 FIGURE 23 FIGURE 24 DEPTH ADJUSTMENT KNOB FIGURE 25' Use the Runner on the right hand side as a guide; the blade cuts approximately NEVER -,_-,-RoH,RUNNER HANDS AND FEET FROM UNDER MOW- DEFLECTOR Before leaving operator s position: a, Shift transmission to neutral, b, Set parking brake°...
- Page 13 Mower blades can be purchased at any Sears Service Center/Departments most Sears Retail Stores= BLADE REPLACEMENT It is not necessary...
- Page 14 Mower Housing (Fig° 28)° Wipe fitting clean before greasing, Use high performance, extreme lubricating grease. Amdex No, I EP or equlvalent. This grease may be obtained by ordering thru your nearest Sears Repair Parts Department, Part No, 2557R or equivalent° POWER TA/KE=...
- Page 15 OUTER BLADES DRIVE (CENTER TO OUTER MANDRELS) BELT ROUTING DECAL UNDER MOWER 1o Remove Mower from Tractor(see below)° 2, Remove Top Cover Self Tapping Screws, and Nut from Idler Arm Bolt,. 3, Ro!l Belt over the top of the R.H. Mandrel° 4.
- Page 16 Use high performance ex- treme pressure lubricating " lent), Wipe mandrel dean of excess grease. This grease may be LOCKWASHER obtained by ordering thru your nearest Sears Repair Parts De- partment. Part No. 2557R ATTACHMENT SPRING Due to different...
- Page 17 1, CHANGE ENGINE OIL Changing Oil after the first two hours will help eliminate break*in residue which might be damaging to your Engine. NOTE: BE CAREFUL NOT TO ALLOW DIRT TO ENTER THE ENGINE WHEN CHANGING OIL. ao Drain oil with Engine warm. Remove Hood and Grill (see page 24).
- Page 18 There are four Grease Fittings on your Tractor FRONT Using a Grease Gun. give each Grease Fitting AXLE Extreme Pressure Lubricating PIVOT equivalent (available through Sears Part No,. 2557R. FRONT SPINDLE 6_ OIL PIVOT (GREASE FITTING) Place several LEFT 8= RIGHT) move against a.
- Page 19 SPINDLE C'2_ WHEEL BEARINGS-- BOTH ENDS OF FOOT PEDAL SHAFI' SAE MOTOR OIL EXTREME PRESSURE LUBRICATING GREASE AMDEX NO, t, SEARS PART NO. 2557R REFER TO ENGINE OIL SPEC'S. (UNDER INITIAL PREPARATION IN OWNERS MANUAL) 7. CHECK BATTERY a, Electrolyte...
- Page 20 FIGURE GAUGE PLUG FIGURE 42 BALL JOINTS TIE ROD STEERING BOOT FIGURE 43 FIGURE 44 svs.vI]®®.o..s 1. REPLACE SPARK PLUGS Replace Spark Plugs at the beginning of each season or every 100 hours_ whichever comas first. Gap should be set at .030 inch (Fig.
- Page 21 AS NEEDED 1, Make sure all nuts on bolts are tight cure° Observe safety precautions, lubricated (refer to page 18),, 2o TOE-IN ADJUSTMENT If any parts in Front Axle or Steering replaced, Toe-In adjustment is required. a, Loosen .Jam Nuts (Fig_ at each Adjustment...
- Page 22 _HROTTLE i _CABLE HOLE"A" FIGURE 50 FIGURE 51 R.H. SIDE OF TRACTOR IDLER BRACKET 1-1/16" i NUT "A" CLUTCH TAKE. UP IDLER " ,FIGURE 5:2 5o CARBURETOR ADJUSTMENT Never attempt to change maximum preset at the factory and should only be changed by a quali- fied service technician who has the necessary equipment.
- Page 23 7, V-BELT REPLACEMENT BELT REMOVAL belt this tractor is special Always replace with Sears belt list. It is not necessary to remove mower° a, Raise hood disconnect negative cable. b° Set parking brake (to get belt stack), c_ Loosen (do not...
- Page 24 WiRE CONNECTION FIGURE 58 FIGURE 59 i AS YOU COMPLETE Check Engine Oil Level (_hange Engine Oil (see chart, page 6) Lubricate Pivot Points (see page 19) Check Brake Operation Clean Air Screen Clean Air Filter Replace Air Cleaner Paper Cartridge Clean Engine Cooling Fins Replace Spark Plug Check Battery Level...
- Page 25 EFFECT- 5. GENERAL CLEANING Clean engine, battery, seat, finish, etc. of all foreign matter, 6, STORE IN A CLEAN AND DRY AREA. ctean engine oil. Sears, Roebuck and Co. reserves the right in design or improvements 25-t° install the same upon...
- Page 26 GT 18 TWIN GARDEN SCHEMATIC, REDt RED_ AMMETER* FUSE 30 AMP IGNITION SWITCH STD365402 POSITION CIRCUIT E3-L START *INDUCTIVE ED AS SEEN FROM DASHBOARD_ LIGHTS WILL REGISTER AMMETER° YOUR TRACTOR IS EQUIPPED WITH A SPECIAL ALTERNATOR SYSTEM. LIGHTS ARE NOT CONNECTED TO THE BATTERY, HAVE...
- Page 27 REPAIR PARTS GT 18 TWIN GARDEN ELECTRICAL PART DESCRIPTION STD365410 KeySet '_S-T4;_654_0" * Switch - Ignition ._k$_3 11151000 Washer- Lock- Int, Tooth 5t8 3258J Nut - Hex 5/8- 32 105791X Ammeter I05382X Switch- Light 913BR Battery 7603J Tray - Battery 9 C_,,W_.!00541K Tube - Drain - ,,-,_,_ '3(_,.',_) 6999R...
- Page 28 REPAIR PARTS GT 18 TWIN GARDEN CHASSIS AND ENCLOSURES 67 E TRACTOR.-MODEL NUMBER - 28- 917.255910...
- Page 29 REPAIR PARTS GT 18 TWIN GARDEN CHASSIS AND ENCLOSURES PART DESCRIPTION 105515X Seat 105516X Pan Seat 105529X Bolt ° Shoulder 105536X Washer - Spring 73680500 Nut- Lock 5/16- 19171912 Washer t7/32 x 13/16 x 12 Ga. STD551150 *Washer- Lock 1/2 STD525010 *Bolt _ Hex 1/2 - 13 x 1 t05513X...
- Page 30 REP M PAaT8 GT 18 TWIN GARDEN GROUND DRIVE d#11 Spark Attester Muffler 106664X OPTtONAt. EQUIPMENT TRACTOR-MODEL NUMBER @_11 - 30 - 917.255910 •...
- Page 31 RmPAUR PARTS GT 18 TWIN GROUND DRIVE PART DESCRIPTION 1 J'_-106B37X Bracket, Support 106035X Engine, 18 H.P., Model No. 422437 Type Noo0721-0t 13240200 Elbow, Street 4 _,_ 9767H Valve, Oil Drain 5 ,_--_-:_:t3260302; :: ; B_sliing 105574X Muffler, L H I05575X Muffler_ R.H.
- Page 32 REPA|R PARTS GT 18 TWIN GARDEN STEERING ._52 21_,,_ '_'39 TRACTOR--MODEL NUMBER / 48 - 32 - 917.255910...
- Page 33 RE PAiR PARTS GT 18 TWIN STEERING PART DESCRIPTION 106230X Tire, t6 x 6,50 8134H Tube, Front (not furnished with tractor) 106228X Front Wheel (inc. Key No. 3 and 2 of Key No. 4) 278H Fitting, Grease 9040H Bearing 106045X Spindle, R.H_ 6266H Bearing, Thrust...
- Page 34 REPAM PART8 GT 18 TWIN GARDEN TRACTOR-MODEL NUMBER 917.255910 MOWER L ! FT 24 23...
- Page 35 REPAIR PART8 MOWER LIFT PART DESCRIPTION 100734K Handle. Adiust, STD541237 *Nut, He× Jam, 3/B - 16 1063!8X Rod, Adiust, STD570907 *Pin, Cotter, 3/32 x 3/4 2876H Spring 19131016 Washer 13/32 x 5/8 x 16 Ga. 105505X Cover_ Access 105559X Shield, Heat, Rear STD523107 *Bolt, Hex, 5/16 - 18 x 3/4 73680500...
- Page 36 REPAIR P_T8 GT 18 TWiN GARDEN TRACTOR--MODEL NUMBER 917.255910 MOWER 44 55 35 35 _!/6 - 36 +...
- Page 37 a ,RT8 GT 18 TWIN GARDEN MOWER PART DESCRIPTION 106579X Housing, Mower 106022X Cover - Drive, Deck 17490508 Screw - Hex Washer Thd. Rot! 5/t6 - 18 x 1/2 7631J Runner, L.H. 72110505 Bolt, Cam 5/t6- STD551131 *Washer-Lock, 5/16 STD54t031 *Nut-Hex 5/16 - 18 8418J...
- Page 38 REPAmR PARTS GT 18 TWIN GARDEN TRACTOR-oMODEL NUMBER 917.255910 TRANSAXLE 59 5_ "...
- Page 39 REPAmR PARTS GT 18 TWIN TRANSAXLE PART DESCRIPTtO"J NO,, 4197R Axle Shaft 6845R Retaining Ring 4199R Final Drive Gear 4216R Differential Gear 4215R Differential Pinion 4217R Differential Carrier 6256H Axle Thrust Washer 74020652 Hex Bob 3/8 ..24 x 3- 1/4 (t"...
- Page 40 REPAHR PARTS GT 18 TWIN GARDEN TRACTOR--MODEL NUMBER 917.255910 ENGINE-MODEL NUMBER 422437, TYPE NUMBER 0721-01 CYLINDER, CRANKSHAFT AND ENGINE BASE GROUP - 40 -...
- Page 41 REPAIR PARTS GT 18 TWIN ENGINE_-MODEL CYLINDER, CRANKSHAFT PART DESCRIPTION 394900 Cylinder Assembly 391086 Seal- Oil 212461 Head- Cylinder No. t 212462 Head- Cylinder No. 2 270984 *Gasket ..Cylinder Head No 1 270983 *Gasket - Cylinder Head No, 2 393243 Breather Assembly NoD 1 393153 Breather Auembly No, 2...
- Page 42 R_PAIR PARTS GT 18 TWIN GARDEN ENGINE..M TRACTOR. ODEL Nit InA_,,,,,,,. _ "MODEL NUMBER "',==H 422437, TYPE 917.255910 AIR CLEANER-CARBURETOR GROUp NUMBER 0721-01...
- Page 43 $ EPABR PARTS GT 18 TWIN GARDEN ENGINE-MODEL AIR CLEANER-CARBURETOR GROUP PART DESCRIPTION Tube - Breather 280185 280168 Tube- Intake _2970 Manifold ASs'y. - Intake 271412 +=Gasket- Carb, Mtg. 270B84 *Gasket ° Intake Manifold Mtg. 93415 Screw _Carb_ Mt9. Sere 032O8 Sctow - Intake Manifold Mt9, Sam 398620...
- Page 44 REPAIR PARTS GT 18 TWIN GARDEN ENGINE-MODEL STARTER MOTOR GROUP 2_23 PART DESCRIPTION NC)_ 394891 Armature Group (Inc_ Key No_s. 2,3 & 5) 394970 Trigger Coil Assay Magnatron Ignition 221798 Terminaf - Ignition Coils 93381 Screw Armature Mtg Sere 394988 Armature Ass'y.
- Page 45 RI IR PARTS GT 18 TWIN ENGINE-MODEL MUFFLER, GUIDE HOUSING PART DESCRIPTION 222848 Cover - Air Guide 222849 Cover - Air Guide 93163 Screw- Sere 392681 Housing- Blower 93158 Screw. Sere GARDEN TRACTOR--MODEL NUMBER NUMBER 422437, TYPE NUMBER GROUP PART 222847 222846 93777...
- Page 46 SERVICS NOTES - 46...
- Page 47 SIGHT Operate your greater than ally prevent caution when changing direction HOLD THSS LEVEL WITH LaNE OR TREE Tractor up and down face of slopes (not 15°); never across the face, Make turns gradu* tipping or toss of control. Exercise extreme on slopes.
- Page 48 S__S OWNERS MANUAL MODEL 917.255910 HOW TO ORDER REPAIR PARTS Sears, Roebuck and Co., Chicago, IL 63684 U.&A. GT 18 TWIN 6 SPEED GARDEN TRACTOR The Model Number will be found to the Drawbar. Always mention questing service or repair parts for your Garden Tractor.