Advertisement
Z9 mini Server
Installation Guide
© Copyright Bitmaintech Pte.Ltd. 2007 – 2018. All rights reserved.
Bitmaintech Pte.Ltd. (Bitmain) reserves the right to make corrections, modifications, enhancements,
improvements, and other changes to its products and services at any time and to discontinue any
product or service without notice.
Customers should obtain the latest relevant information before placing orders and should verify that
such information is current and complete. All products are sold subject to Bitmain's terms and
conditions of sale supplied at the time of order acknowledgment.
Bitmain warrants performance of its products to the specifications applicable at the time of sale in
accordance with Bitmain's standard warranty. Testing and other quality control techniques are used to
the extent Bitmain deems necessary to support this warranty. Except where mandated by government
requirements, testing of all parameters of each product is not necessarily performed.
Document Version 0.1
June 2018
Advertisement
Table of Contents

Related Manuals for Antminer Z9 mini


Summary of Contents for Antminer Z9 mini
- Page 1 Z9 mini Server Installation Guide Document Version 0.1 June 2018 © Copyright Bitmaintech Pte.Ltd. 2007 – 2018. All rights reserved. Bitmaintech Pte.Ltd. (Bitmain) reserves the right to make corrections, modifications, enhancements, improvements, and other changes to its products and services at any time and to discontinue any product or service without notice.
- Page 2 Z9 mini Server Installation Guide Bitmain assumes no liability for third‐party applications assistance. Customers are responsible for their products and applications using Bitmain components. To minimize the risks associated with customer products and applications, customers should provide adequate design and operating safeguards.
-
Page 3: Table Of Contents
Z9 mini Server Installation Guide Table of Contents 1.Overview 1.1 Z9 mini Server Components 1.2 Specifications 2.Connecting the Power Supply 3.Setting Up the Server 4.Configuring the Server . .Monitoring Your Server 6 .Administering Your Server 6.1 Checking Your Firmware Version 6.2 Upgrading Your System... - Page 4 1.Overview 1. Overview The Z9 mini server is Bitmain’s newest version in the Z9 mini series. All Z9 mini servers are tested and configured prior to shipping to ensure easy set up. You must provide your own ATX power supply.
-
Page 5: Z9 Mini Server Components
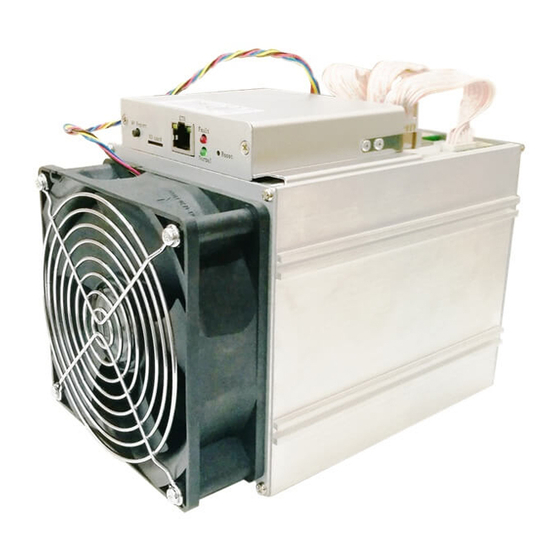
Z9 mini Server Installation Guide 1.Overview Z9 mini Server Components The Z9 mini server main components and controller front panel are shown in the following figure: ‐ 5 ‐... -
Page 6: Specifications
Z9 mini Server Installation Guide 1.Overview 1.2 Specifications Parameters of Z9 mini Server NO. Parameters Value Product model Z9 mini Quantity of hash chips per server 12 PCS Total quantity of hash boards 3 PCS Total hash rate 10.0k Sol/s±5% DC voltage input 11.60~13.00 V... -
Page 7: Connecting The Power Supply
One PCI‐e connector located on the controller. To connect the power supply: 1. Connect PSU power cable connectors to each of the three PCI‐e connectors on the top of the Z9 mini server. 2. Connect a PSU power cable connector to the Z9 mini PCI‐e connector on the controller. -
Page 8: Setting Up The Server
Z9 mini Server Installation Guide 3.Setting Up the Server Setting Up the Server To set up the server: The file IPReporter.zip is supported by Microsoft Windows only. Go to the following site: https://shop.bitmain.com/support.htm?pid=00720160906053730999PVD2K0vz0693 2. Download the following file: IPReporter.zip 3. Extract the file. - Page 9 Z9 mini Server Installation Guide 3. Setting Up the server 7. On the controller board, click the IP Report button. Hold it down until it beeps (about 5 seconds). The IP address will be displayed in a window on your computer screen.
-
Page 10: Configuring The Server
Pool URL Enter the URL of your desired pool. The Z9 mini server can be set up with three mining pools, with decreasing priority from the first pool (pool 1) to the third pool (pool 3). The pools with low priority will only be used if all higher priority pools are offline. -
Page 11: Monitoring Your Server
Z9 mini Server Installation Guide 5. Monitoring Your Server Monitoring Your server To check the operating status of your server: 1. Click the status marked below. 2. Monitor your server according to the descriptions in the following table: Option Description ASIC# Number of chips detected in the chain. -
Page 12: Administering Your Server
20180526. 6.2 Upgrading Your System Make sure that the Z9 mini server remains powered during the upgrade process. If power fails before the upgrade is completed, you will need to return it to Bitmain for repair. To upgrade the server’s firmware: 1. -
Page 13: Modifying Your Password
3. Click the (Browse) button and navigate to the upgrade file. Select the upgrade file, then click Flash image. A message appears notifying you if the Z9 mini firmware can be upgraded and if yes, will then proceed to flash the image. - Page 14 Z9 mini Server Installation Guide ‐ 14 ‐...
Need help?
Do you have a question about the Z9 mini and is the answer not in the manual?
Questions and answers