Crivit Z31433 Operation And Safety Notes
Hide thumbs
Also See for Z31433:
- User manual ,
- Operation and safety notes (2 pages) ,
- Operation and safety notes (2 pages)
Advertisement
Quick Links
1a
2a
3
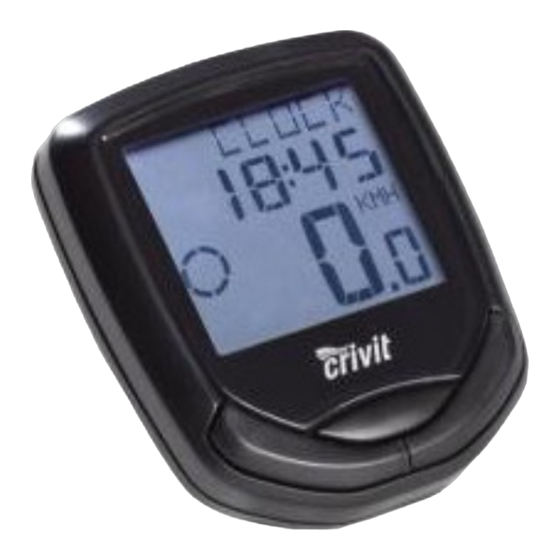
BIKE COMPUTER
Operation and Safety Notes
KOMPUTER ROWEROWY
1b
Wskazówki dotyczące obsługi i bezpieczeństwa
4
5
KERÉKPÁR COMPUTER
Kezelési és biztonsági utalások
A
6b
2b
5
5
2a
6a
Z31433
Included items
supervision or instruction by a person responsible
for their safety. Children must be supervised so
1 Bike computer
that they do not play with the product.
1 Bike computer bracket
Please note that the warranty does not cover
1 Magnet
damage arising from improper treatment, non-
1 Sensor
observance of the operating instructions and
4 Cable ties
safety advice or unauthorised use.
2 Batteries 3 V
, type CR2032 button cell
Safety advice concerning
1 Operating instructions
batteries
General safety advice
RISK OF LOSS OF LIFE!
If batteries are swallowed, it can lead to loss of
KEEP ALL THE SAFETY ADVICE AND INSTRUC-
life. Seek medical attention if a battery is swallowed.
TIONS IN A SAFE PLACE FOR FUTURE REFERENCE!
Remove the battery if the product is not to be
used for a long period.
Children or persons who lack the knowledge or
CAUTION! RISK OF EXPLO-
SION! Never recharge single-use
experience to use the device or whose physical,
sensory or intellectual capacities are limited must
batteries!
never be allowed to use the device without
GB
GB
Using functions
Press the SET button and keep it pressed for
Note: All the functions and secondary functions
3 seconds to reset the maximum speed display
are described in the following list.
to 0.
CLOCK: - Displays the time
AVGSPEED: Average speed
Press the SET button
and keep it pressed for
TRIPTIME: Trip time
13
3 seconds to access the time settings.
TEMP: Thermometer
TOTALODO: - Total odometer
Press the SET button and keep it pressed to
Press the SET button and keep it pressed for
switch between °C and °F.
3 seconds to access the wheel size settings
Press the SET button to display the highest tem-
and total distance.
perature (HI) measured so far.
TOTAL-TM: Total time cycling
Press the SET button again to display the low-
Press the SET button and keep it pressed for
est temperature (LO) measured so far.
3 seconds to make changes to the saved total
Press and hold down the SET button while the
time cycling.
highest or lowest temperature is displayed to
TRIPDIST: Trip distance
switch back to the current temperature to
Press the SET button and keep it pressed for
reset the saved data.
3 seconds to reset the trip distance, the
STPWATCH: Stopwatch
average speed and the trip time displays to 0.
Press the SET button to start the stopwatch.
MAXSPEED: Highest speed
Press the SET button again to stop the stop-
watch.
GB
GB
Cleaning and care
Speed or distance are
Adjust magnet and
not displayed.
sensor correctly.
- Check that the battery
Do not use any liquids or cleaning agents for
is inserted with the
cleaning. Otherwise there is a risk of damaging
poles arranged the
the device.
right way round.
The device should only be cleaned on the out-
side with a soft dry cloth.
Display is black
The ambient temperature
Disposal
is too high or the bicycle
computer was exposed
to direct sunlight for too
The packaging is wholly composed of
long. Remove appliance
environmentally friendly materials that can
be disposed of at a local recycling centre.
from direct sunlight and
let it cool off for a while.
The LC-display shows
Remove battery and
Contact your local refuse disposal authority for more
irregular symbols.
replace it again.
details of how to dispose of your worn-out product.
In the interest of the environment, do not
throw out your product with your house-
hold refuse. Take it to a suitable centre
GB
GB
Przed uruchomieniem
jednocześnie i używać wyłącznie baterii tego
samego typu.
Wyczerpaną baterię należy natychmiast wyjąć
Przed pierwszym użyciem zdjąć folię ochronną
z urządzenia. W przeciwnym wypadku istnieje
z wyświetlacza LCD
.
7
niebezpieczeństwo wycieku!
Wkładanie baterii
Umieszczając baterie w urządzeniu zwrócić
uwagę na prawidłowe ułożenie biegunów!
Baterie
wkładać w sposób przedstawiony
5
Baterie przechowywać w miejscu niedostępnym
na rys. A.
dla dzieci, nie wrzucać ich do ognia, nie zwie-
Montaż komputera
rać biegunów i nie rozbierać baterii na części.
rowerowego
W przypadku wystąpienia wycieku z baterii
znajdującej się w urządzeniu należy ją natych-
Zamontować urządzenie w sposób przedsta-
miast wyjąć, aby zapobiec uszkodzeniu urzą-
wiony na rysunkach od B do G.
dzenia!
Uruchomienie
Unikać kontaktu ze skórą, oczami i błonami
śluzowymi. W razie kontaktu z elektrolitem
Ustawienia podstawowe
przemyć dane miejsce dużą ilością wody i / lub
zasięgnąć porady lekarza!
Wskazówka: Po upływie ok. 2 sekund od wło-
żenia baterii
wyświetlacz LCD
włączy się
5
7
PL
PL
87309_cri_Fahrradcomputer_PL-HU.indd 1
B
C
6a
1a
4
Fig. C
1b
Fig. D
2a
Fig. E
3
CAUTION! DANGER OF EXPLO-
affected area with water and / or seek the
SION! Always replace all batteries
advice of a doctor!
at the same time and only use batteries
Before use
of the same type.
If the battery is exhausted, remove it from the
device immediately. Otherwise the battery is
Remove the protective foil from the LC display
7
more likely to leak.
before first use.
Make sure you insert the battery the right way
Inserting the battery
round (polarity).
Keep the battery away from children. Do not
To insert the battery
, proceed as shown in
5
throw the battery into a fire. Never short-circuit
Fig. A.
it or take it apart.
Attaching the bike computer
If your battery leaks, remove it from the device
immediately to prevent the device from being
To attach the device, proceed as shown in
damaged.
Figs. B to G.
Do not let the fluid from a leaking battery come
into contact with your skin, eyes or mucous
membranes. In the event of contact with fluid
leaking from a battery, thoroughly flush the
GB
GB
Press the SET button and keep it pressed to
A 5-digit number appears in the LC display. Enter
reset the stopwatch to 0.
the desired distance. Press the MODE button
CAL RATE: Current calorie consumption
repeatedly until the desired number appears
CALORIE: Calorie meter
as the first digit.
Press the SET button and keep it pressed to
Confirm your choice by pressing the SET button.
reset the calorie counter to 0.
Repeat this process for all the remaining digits.
FAT-BURN: Fat burning in grams
TIME: Timer
Press the SET button and keep it pressed to
Press the SET button and keep it pressed to
reset the fat burning value to 0.
change the timer settings.
KM: Odometer
The LC display shows the symbol for counting
Press the SET button and keep it pressed to
forwards or backwards (+ or - respectively).
change the odometer settings.
Press the MODE button repeatedly until the
The LC display
shows the symbol for count-
desired symbol is shown.
7
ing forwards or backwards (+ or - respectively).
Confirm your choice by pressing the SET button.
Press the MODE button
11
repeatedly until the
You move on to the time settings of the timer.
desired symbol is shown.
A 5-digit number appears in the LC display.
Confirm your choice by pressing the SET button.
Enter the desired time. Press the MODE button
You move on to setting the distance on the
repeatedly until the desired number appears
odometer.
as the first digit.
Confirm your choice by pressing the SET button.
GB
GB
EMC
where it can be disposed of properly.
Your local council will be able to tell you
where the collection centres are located
and their opening times.
Defective or exhausted batteries must be recycled
in accordance with Directive 2006 / 66 / EC. Return
the batteries and / or the device through the appro-
priate collection facilities.
Improper disposal of batteries
can damage the environment!
Batteries must not be disposed of with the house-
hold refuse. They may contain toxic heavy metals
and require to be handled as special waste. The
chemical symbols of heavy metals are: Cd = cad-
mium, Hg = mercury, Pb = lead For this reason,
you must dispose of discarded batteries at a com-
munal disposal centre.
GB
GB
automatycznie. Wyświetlone zostanie menu
Powtórzyć czynność dla pozostałych trzech
wyboru języka.
cyfr.
Kilkakrotnie naciskać przycisk MODE
11
, aż
Wskazówka: Obwód opony można obliczyć,
wyświetlony zostanie żądany język.
mnożąc jej średnicę przez 3,1416. Poniższy spis
Potwierdzić wybór, naciskając przycisk SET
.
zawiera obwody typowych opon rowerowych.
13
Wyświetlone zostanie menu wyboru profilu
Średnica opony
Obwód opony
użytkownika.
20"
1598 mm
Kilkakrotnie naciskać przycisk MODE, aż
22"
1759 mm
wyświetlony zostanie żądany profil użytkow-
24"
1916 mm
nika (ADVANCE lub EASY).
26" (650 A)
2073 mm
Potwierdzić wybór, naciskając przycisk SET.
26,5" (tubular)
2117 mm
Wyświetlone zostanie pytanie o wielkość opon
26,6" (700x25C)
2124 mm
(SET WS).
26,8" (700x28C)
2136 mm
Na wyświetlaczu pojawi się czterocyfrowa
27" (700x32C)
2155 mm
liczba. W tym miejscu wprowadzić obwód
28" (700B)
2237 mm
opony w mm. Kilkakrotnie naciskać przycisk
ATB24"x1,75
1888 mm
MODE, aż pierwsza cyfra ustawiona zostanie
ATB26 x1,4
1995 mm
na odpowiednią wartość.
ATB26 x1,5
2030 mm
Potwierdzić wybór, naciskając przycisk SET.
ATB26 x1,75
2045 mm
ATB26x2 (650B)
2099 mm
PL
PL
D
F
3
2a
4
2 mm max.
2a
E
G
2a
3
3
Preparing for use
in mm. Press the MODE button repeatedly until
the desired number appears as the first digit.
Basic settings
Confirm your choice by pressing the SET button.
Note: The LC display
7
comes on automatically
Repeat this process for each of the three
approx. 2 seconds after the battery
5
is inserted.
remaining digits.
You are immediately offered a choice of languages.
Note: You can calculate your tyre circumference
Press the MODE-button
repeatedly until the
by multiplying your tyre diameter by 3.1416.
11
desired language appears.
The following list contains the tyre circumferences
Confirm your choice by pressing the SET but-
of the most common cycle tyres.
ton
. You move on automatically to select
Tyre diameter
Tyre circumference
13
the user profile.
20"
1598 mm
Press the MODE button repeatedly until the
22"
1759 mm
desired user profile (ADVANCE or EASY)
24"
1916 mm
appears.
26" (650 A)
2073 mm
Confirm your choice by pressing the SET but-
26.5" (tubular)
2117 mm
ton. Now you can choose the wheel size (SET
26.6" (700x25C)
2124 mm
WS).
26.8" (700x28C)
2136 mm
A four-digit number appears in the LC display.
27" (700x32C)
2155 mm
Now enter the tyre circumference of your wheel
28" (700B)
2237 mm
ATB24"x1.75
1888 mm
GB
GB
Repeat this process for all the remaining digits.
the settings on or off (e.g. time). Choose „On",
SCAN: Scan
to add the chosen adjustment to the EASY
Note: The scan mode automatically switches
modes. Choose „Off", if you do not want to
between the trip distance, highest speed, average
add the adjustments.
speed and trip time displays.
Press the SET button, to confirm your entry.
Note: Refer to the section on "Basic settings" to
see how you make or change settings.
CUSTOMIZE mode
Apart from the ADVANCE and EASY mode, you
can make your individual adjustments in the
CUSTOMIZE mode (see procedure).
12
Press and hold the light button
to enter the
CUSTOMIZE mode.
Note: By repeatedly pressing the MODE
button
11
, you can toggle between the
ADVANCE and EASY modes.
In the EASY mode, press and hold the SET
button
13
. Press the MODE button to switch
GB
GB
Komputer rowerowy
– Wskaźnik przyspieszenia i spowolnienia
– Timer czasu jazdy (maks. 9:59:59) (liczenie
Przeznaczenie
malejąco lub narastająco)
– Licznik kilometrów (liczenie malejąco lub
Produkt przeznaczony jest do użytku jako komputer
narastająco)
rowerowy. Produkt nie jest przeznaczony do użytku
– Wskaźnik wszystkich przebytych kilometrów
komercyjnego.
i całkowitego czasu jazdy
– Licznik kalorii
Funkcje
– Wskaźnik spalania tłuszczu
– Scan (wyświetlanie kolejno wszystkich funkcji)
– Języki menu: GB, DE, FR, NL, IT, ES
– Automatyczne przełączanie w tryb zegara
– Zegar
– Podświetlenie
– Stoper
Opis części
– Termometr °C / °F
– Pamięć temperatury min. i maks.
– Wskaźnik prędkości (0–99,9 km / h)
Uchwyt
1a
– Wskaźnik prędkości średniej (0–99,9 km / h)
1b
Wyściełanie do uchwytu
– Wskaźnik prędkości maksymalnej
2a
Czujnik
(0–99,9 km / h)
Pokrywa komory na baterie czujnika
2b
– Porównywanie prędkości
Magnes
3
PL
PL
27"x1
2138 mm
Potwierdzić wybór, naciskając przycisk SET.
27"x1 1 / 4
2155 mm
Wyświetlone zostanie menu wprowadzania
Następnie wybrać jednostkę długości. Naciskać
masy ciała.
kilkakrotnie przycisk MODE, aż na wyświetlaczu
Na wyświetlaczu ukaże się trzycyfrowa liczba.
pojawi się wskazanie „SET KM" lub „SET MILE".
W tym miejscu wprowadzić swoją masę ciała.
Potwierdzić wybór, naciskając przycisk SET.
Kilkakrotnie naciskać przycisk MODE, aż pierw-
Wyświetlone zostanie menu wprowadzania
sza cyfra ustawiona zostanie na odpowiednią
wieku.
wartość.
Na wyświetlaczu pojawi się dwucyfrowa liczba.
Potwierdzić wybór, naciskając przycisk SET.
W tym miejscu należy wprowadzić swój wiek.
Powtórzyć czynność dla pozostałych cyfr.
Kilkakrotnie naciskać przycisk MODE, aż
Wyświetlone zostanie menu wyboru formatu
pierwsza cyfra ustawiona zostanie na odpo-
czasu.
wiednią wartość.
Naciskać przycisk MODE, aż na wyświetlaczu
Potwierdzić wybór, naciskając przycisk SET.
pojawi się wskazanie „12", oznaczające
Powtórzyć czynność dla drugiej cyfry. Wyświe-
format 12-godzinny, lub „24", oznaczające
tlone zostanie menu wyboru jednostki masy
format 24-godzinny.
ciała.
Potwierdzić wybór, naciskając przycisk SET.
Naciskać przycisk MODE, aż na wyświetlaczu
Wyświetlone zostanie menu ustawiania czasu.
pojawi się wskazanie „SET KG" lub „SET LB".
Na wyświetlaczu ukaże się czterocyfrowa
liczba. W tym miejscu wprowadzić aktualny
PL
PL
H
Bike Computer
7
Proper use
The product is intended for use as a cycle computer.
8
Not for commercial use.
18
9
17
Functions
16
– Menu languages: GB, DE, FR, NL, IT, ES
15
– Clock
10
14
– Stopwatch
– Temperature °C / °F
– Memory function for min. and max. temperature
13
11
– Current speed (0–99.9 km / h)
– Mean speed (0–99.9 km / h)
– Highest speed (0–99.9 km / h)
– Speed comparison
12
– Acceleration and deceleration
– Trip timer (max. 9:59:59) (countdown or forwards)
GB
ATB26 x1.4
1995 mm
Confirm your choice by pressing the SET button.
ATB26 x1.5
2030 mm
You move on to entering your weight.
ATB26 x1.75
2045 mm
A three-digit number appears in the LC display.
ATB26x2 (650B)
2099 mm
Now enter your weight. Press the MODE button
27"x1
2138 mm
repeatedly until the desired number appears
27"x1 1 / 4
2155 mm
as the first digit.
Now select your desired unit of distance. Press
Confirm your choice by pressing the SET button.
the MODE button repeatedly until SET KM or
Repeat this process for all the remaining digits.
SET MILE appears in the LC display.
You move on to selecting the time format.
Confirm your choice by pressing the SET button.
Press the MODE button repeatedly until 12 for
You move on to entering your age.
the 12-hour format or 24 for the 24-hour format
A two-digit number appears in the LC display.
appears in the LC display.
Now enter your age. Press the MODE button
Confirm your choice by pressing the SET button.
repeatedly until the desired number appears
You move on to setting the time.
as the first digit.
A four-digit number appears in the LC display.
Confirm your choice by pressing the SET button.
Enter the current time. Press the MODE button
Repeat this process for the remaining digit. You
repeatedly until the desired number appears
move on to selecting the unit of weight.
as the first digit.
Press the MODE button repeatedly until SET
Confirm your choice by pressing the SET button.
KG or SET LB appears in the LC display.
GB
GB
Using the backlight
Resetting the bike computer
Press the light button
to switch on the back-
Press the MODE button
and SET button
12
11
13
light temporarily. The backlight automatically
at the same time and keep them pressed until
extinguishes after a short period.
{{----}} appears in the LC display
7
.
Now press the MODE button and keep it
pressed. This resets all the settings.
Note: All stored data will be deleted.
Changing the battery
Note: The battery of the bike computer must be
replaced when the battery symbol
18
appears on
the LC display
.
7
Note: The battery of the sensor must be replaced
when the speed symbol
17
of the LC display can
no longer or hardly be seen when riding the bicycle.
Press the MODE key
and the SET key
11
13
at the same time and keep them pressed until
the {{-----}} symbol appears in the LC display
7
.
To replace the battery, proceed as shown in
figure A. Make sure you fit the battery the right
GB
GB
Opaska kablowa
Wskaźnik przyspieszenia / spowolnienia:
4
17
Bateria 3 V
, typ CR2032 (bateria guzikowa)
Przyspieszenie – obroty w kierunku przeciwnym
5
6a
Komputer rowerowy
do ruchu wskazówek zegara
Pokrywa komory na baterie komputera
Spowolnienie – obroty w kierunku ruchu
6b
rowerowego
wskazówek zegara
7
Wyświetlacz LCD
18
Wskaźnik baterii
8
Wskaźnik funkcji
Dane techniczne
Wskaźnik wartości funkcji drugorzędnej
9
Wskaźnik wartości funkcji głównej
10
11
Przycisk MODE
Bateria:
3 V
(bateria guzikowa CR2032)
12
Przycisk podświetlenia
Zawartość zestawu
Przycisk SET
13
Wskaźnik funkcji SCAN
14
15
Wskaźnik konserwacji
1 komputer rowerowy
Wskaźnik porównania prędkości
1 mocowanie komputera rowerowego
16
1 magnes
1 czujnik
4 opaski kablowe
2 baterie 3 V
, typ CR2032 bateria guzikowa
1 instrukcja obsługi
PL
PL
czas. Kilkakrotnie naciskać przycisk MODE,
Potwierdzić wybór, naciskając przycisk SET.
aż pierwsza cyfra ustawiona zostanie na
Wprowadzanie ustawień podstawowych
odpowiednią wartość.
zostanie zakończone.
Potwierdzić wybór, naciskając przycisk SET.
Używanie komputera
Powtórzyć czynność dla pozostałych cyfr.
rowerowego
Wyświetli się menu wyboru częstotliwości
konserwacji.
Wskazówka: Jeżeli komputer rowerowy nie
Naciskać przycisk MODE, aż wyświetlona
jest używany przez czas dłuższy niż 5 minuty,
zostanie żądana liczba kilometrów, po osią-
przełącza się automatycznie w tryb czuwania.
gnięciu której powinna nastąpić kolejna kon-
W celu ponownej aktywacji komputera naci-
serwacja roweru.
snąć dowolny przycisk. Wskaźnik funkcji
8
Wskazówka: Można wybrać 200, 400,
wyświetla aktywny tryb.
600 i 800 km wzgl. mil.
Naciskać kilkakrotnie przycisk MODE
11
, by
Potwierdzić wybór, naciskając przycisk SET.
przeglądać różne tryby.
Wyświetlone zostanie menu wyboru jednostki
Nacisnąć przycisk SET
, aby przejść do
13
temperatury.
funkcji drugorzędnej każdej funkcji.
Naciskać przycisk MODE, aż na wyświetlaczu
Nacisnąć i przytrzymać przycisk SET, aby
pojawi się wskazanie „°C" lub „°F".
przejrzeć lub zresetować zapisane dane.
PL
PL
– Odometer (countdown or forwards)
7
LC display
– Total odometer and total cycling time display
8
Function indicator
– Calories
Secondary function value display
9
– Fat-burning
Primary function value display
10
– Scan indicator (functions displayed in
11
MODE button
continuous loop)
Light button
12
– Automatic switch to clock mode
SET button
13
– Backlight
14
SCAN indicator
15
Servicing interval indicator
Description of parts
Speed comparison indicator
16
Acceleration / deceleration indicator:
17
1a
Bracket
Acceleration – anticlockwise rotation
Bracket cushion plate
Deceleration – clockwise rotation
1b
Sensor
Battery state indicator
2a
18
2b
Sensor battery compartment cover
Technical data
3
Magnet
Cable tie
4
Battery 3 V
, type CR2032 button cell
Battery:
3 V
(CR2032 button cell)
5
6a
Bike computer
Bike computer's battery compartment cover
6b
GB
GB
Repeat this process for all the remaining digits.
reactivate the computer. The function indicator
You move on to selecting the servicing interval.
shows the current mode.
8
Press the MODE button repeatedly until the
Press the MODE button
repeatedly to
11
desired number of units of distance to your next
page through the various modes.
intended bicycle service appears in the LC
Press the SET button
13
to change into the sec-
display.
ondary function for any function.
Note: You have the choice of 200, 400, 600
Press the SET button and keep it pressed to call
or 800 km or miles.
or reset up any saved values.
Confirm your choice by pressing the SET button.
You move on to selecting the unit of temperature.
The bike computer has the following
Press the MODE button repeatedly until °C or
functions:
°F appears in the LC display.
Confirm your choice by pressing the SET button.
Advanced users' functions:
You have now completed the the basic settings.
CLOCK > TOTALODO > TOTAL-TM > TRIPDIST >
MAXSPEED > AVGSPEED > TRIPTIME > TEMP >
Using the bike computer
STPWATCH > CAL RATE > CALORIE > FAT-BURN >
Note: If the bike computer remains unused for
KM+/- > TIME+/- > SCAN
more than 5 minutes, it automatically switches
Beginners' functions:
into the stand-by mode. Press any button to
TRIPDIST > AVGSPEED > TRIPTIME
GB
GB
way round (polarity). This is shown inside the
Problem
Solution
battery compartment.
Press the SET key and keep it pressed to return
Empty LC-display or no
Remove battery. In the
to normal operating mode.
response after putting
area marked RESET of
Note: Once the batteries are removed, all stored
the battery in again
the battery compartment,
data will be erased after approx. 20 seconds.
touch the plus and minus
terminals at the same
+
-
Troubleshooting
time using a screwdriver.
Note: This device has delicate electronic compo-
Insert a 3V battery into
RESET
nents. Therefore interference may occur when it is
the battery compartment
near devices which transmit radio signals.
in such a way that the +
- If errors occur in the display, remove any such
terminal points upwards.
devices from the vicinity of the product. In the case
Replace the battery cover
of such malfunctions, remove the battery briefly and
on the battery compart-
then reinsert again.
ment. The microprocessor
is reset and restarted.
GB
GB
Wskazówki ogólne
stwa oraz użytkowania przez osoby nieupraw-
dotyczące bezpieczeństwa
nione.
Wskazówki dotyczące
NALEŻY ZACHOWAĆ WSZYSTKIE WSKA-
bezpieczeństwa
ZÓWKI DOTYCZĄCE BEZPIECZEŃSTWA ORAZ
związane z bateriami
INSTRUKCJE!
Niedozwolone jest używanie urządzenia
ZAGROŻENIE
przez osoby nieposiadające odpowiedniej
ŻYCIA! Połknięcie baterii może być groźne
wiedzy i doświadczenia, przez dzieci i osoby
dla życia. W przypadku połknięcia baterii
o ograniczonej sprawności fizycznej, senso-
natychmiast zasiegnąć porady lekarza.
rycznej bądź umysłowej, chyba że odbywać
Jeżeli urządzenie nie będzie użytkowane
się to będzie pod nadzorem osoby odpowie-
przez dłuższy czas, należy wyjąć z niego
dzialnej za ich bezpieczeństwo. Dopilnować
baterie.
by, dzieci nie bawiły się produktem.
OSTROŻNIE! NIEBEZPIECZEŃ-
Należy pamiętać, że gwarancją nie są objęte
STWO WYBUCHU! Nigdy nie
szkody powstałe w wyniku nieprawidłowej
ładować baterii!
obsługi, nieprzestrzegania niniejszej instrukcji
OSTROŻNIE! NIEBEZPIECZEŃ-
obsługi i wskazówek dotyczących bezpieczeń-
STWO WYBUCHU! Zawsze
wymieniać wszystkie baterie
PL
PL
Licznik rowerowy posiada następujące
Aby przejść do ustawienia wielkości opon
funkcje:
i liczby przebytych kilometrów ogółem, nacisnąć
i przytrzymać przez 3 sekundy przycisk SET.
Funkcje dla zaawansowanych:
TOTAL-TM: całkowity czas jazdy
CLOCK > TOTALODO > TOTAL-TM > TRIPDIST >
Aby zmienić zapisany całkowity czas jazdy,
MAXSPEED > AVGSPEED > TRIPTIME > TEMP >
nacisnąć i przytrzymać przez 3 sekundy przy-
STPWATCH > CAL RATE > CALORIE > FAT-BURN >
cisk SET.
KM+/- > TIME+/- > SCAN
TRIPDIST: liczba kilometrów przebytych w danym
Funkcje dla początkujących:
dniu
TRIPDIST > AVGSPEED > TRIPTIME
Aby wyzerować wskaźnik liczby przebytych
kilometrów, prędkości średniej i czasu jazdy,
Korzystanie z funkcji
nacisnąć i przytrzymać przez 3 sekundy przy-
Wskazówka: Poniższa lista zawiera opis
cisk SET.
wszystkich funkcji głównych i drugorzędnych.
MAXSPEED: prędkość maksymalna
CLOCK: – wskaźnik czasu
Aby wyzerować wskaźnik prędkości maksymal-
Aby przejść do ustawienia czasu, nacisnąć
nej, nacisnąć i przytrzymać przez 3 sekundy
i przytrzymać przez 3 sekundy przycisk SET
13
.
przycisk SET.
TOTALODO: – liczba przebytych kilometrów
AVGSPEED: prędkość średnia
ogółem
TRIPTIME: czas jazdy
TEMP: termometr
PL
PL
04.02.13 09:49
Advertisement

Related Manuals for Crivit Z31433


Summary of Contents for Crivit Z31433
- Page 1 Cable tie – Speed comparison Battery 3 V , type CR2032 button cell Battery: (CR2032 button cell) Z31433 – Acceleration and deceleration Bike computer – Trip timer (max. 9:59:59) (countdown or forwards) Bike computer’s battery compartment cover Included items Preparing for use...
- Page 2 A csomagolás környezetbarát anyagok- éri közvetlen napfény, ból áll, melyeket a helyi újrahasznosító Az elemek helytelen megsemmi- Model No. Z31433 majd hagyja lehűlni. telepeken semmisíthet meg. sítése miatt környezeti károso- Version: 03 / 2013 dások keletkeznek! ©...
Need help?
Do you have a question about the Z31433 and is the answer not in the manual?
Questions and answers