
Related Manuals for SHOWTEC 42233


Summary of Contents for SHOWTEC 42233
- Page 1 MANUAL ENGLISH Controller for Octostrip MKII Ordercode: 42233 Highlite International B.V. – Vestastraat 2 – 6468 EX – Kerkrade – the Netherlands...
-
Page 2: Table Of Contents
7. Static Colors ................................21 8. Settings ...................................21 8.1. LED Mode ................................21 8.2. DMX Error Menu ..............................21 8.3. Display Settings ..............................21 8.4. Reset ...................................21 9. Software Information ............................22 DMX Channels ................................22 6 channels .................................22 8 channels .................................23 14 channels ................................25 Ordercode: 42233... - Page 3 192 channels (only when using the 100 cm LED strips) ..................46 208 channels (only when using the 100 cm LED strips) ..................47 Maintenance ..................................49 Replacing the Fuse ..............................49 Troubleshooting ................................49 No Light ..................................49 No Response to DMX..............................50 Product Specifications ..............................51 Dimensions ..................................52 Notes ....................................53 Ordercode: 42233...
-
Page 4: Warning
Save the carton and all packing materials. In the event that a fixture must be returned to the factory, it is important that the fixture be returned in the original factory box and packing. Your shipment includes: ● Showtec Controller for Octostrip MKII ● Pro power cable (1,5 m) ●... - Page 5 ● If your Showtec device fails to work properly, discontinue the use immediately. Pack the unit securely (preferably in the original packing material), and return it to your Showtec dealer for service.
-
Page 6: Operating Determinations
Always let the installation be carried out by an authorized dealer! Improper installation can cause serious injuries and/or damage of property! The Controller can be placed on a flat stage floor or be mounted to any kind of truss, with a clamp and the included quick locks. Ordercode: 42233... -
Page 7: Connection With The Mains
After this period complaints will not be handled anymore. Complaints will only then be considered if the client has so far complied with all parts of the agreement, regardless of the agreement from which the obligation is resulting. Ordercode: 42233... -
Page 8: Description Of The Device
Note: In order to use the Controller, it is necessary to purchase one of the 2 separate LED Octostrip sets. Optional accessories: 42232 – LED Octostrip Set MKII (100 cm) 42235 – LED Octostrip Set MKII (50 cm) 42234 – Octostrip bracket Overview Fig. 01 Ordercode: 42233... -
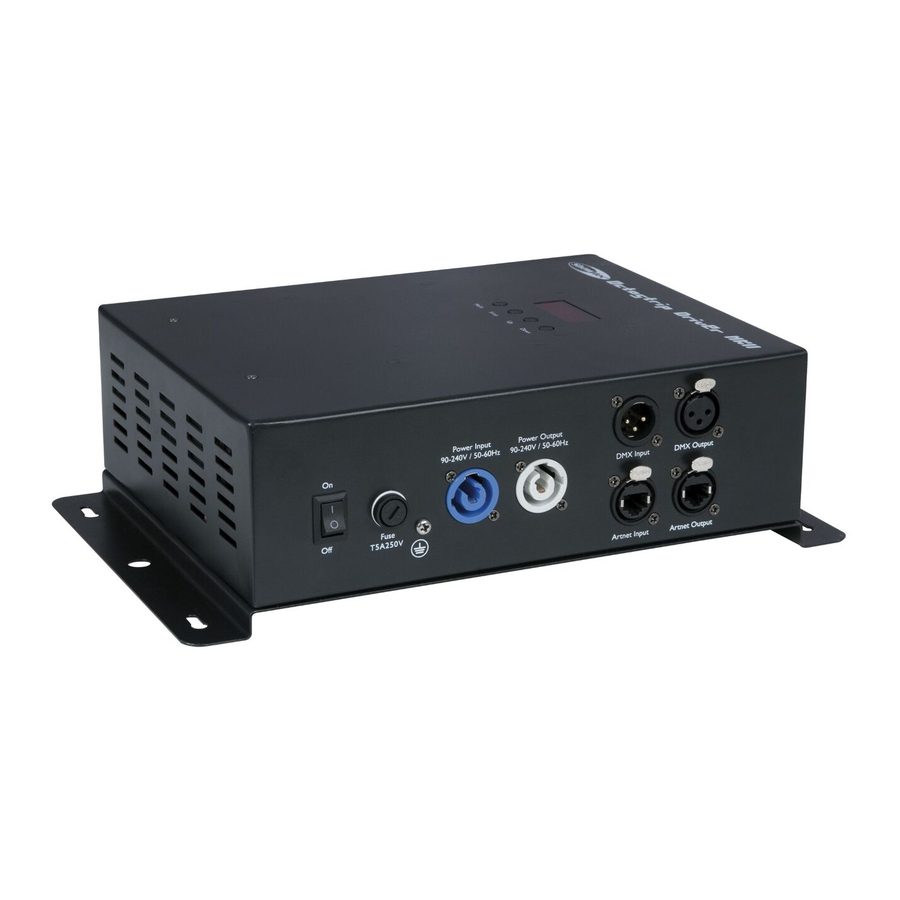
Page 9: Frontside
05) Pro power connector Blue 100-240V IN 06) Pro power connector Grey 100-240V OUT 07) 3-pin DMX signal connector IN 08) RJ45 ArtNet signal connector IN 09) RJ45 ArtNet signal connector OUT 10) 3-pin DMX signal connector OUT 11) LED display + control buttons Ordercode: 42233... -
Page 10: Backside
Before plugging the unit in, always make sure that the power supply matches the product specification voltage. Do not attempt to operate a 120V specification product on 230V power, or vice versa. Connect the device to the main power supply. Ordercode: 42233... -
Page 11: Control Modes
05) You can use the same functions on the master device as described on pages 18, 20, 21 (Auto, Built- in programs, Sound-controlled and Static Colors). You can set your desired operation mode on the master device and all slave devices will react the same as the master device. Multiple Octostrips (Master/Slave control) Fig. 04 Ordercode: 42233... -
Page 12: Multiple Octostrips (Dmx Control)
Do not supply power before the whole system is set up and connected properly. Multiple Octostrips DMX Set Up Fig. 05 Note : Link all cables before connecting electric power Ordercode: 42233... -
Page 13: Multiple Octostrips (Artnet Control)
Do not supply power before the whole system is set up and connected properly. Multiple Octostrips ArtNet Set Up Fig. 06 Note : Link all cables before connecting electric power Ordercode: 42233... -
Page 14: Connecting To A Network
102101 - Arkaos Media Master Express), map all the connected devices, using the settings described above. 10) The Octostrips are now ready for use. 11) When creating large setups, it is recommended to use a 16-bit, high speed ethernet switch to distribute the ArtNet data signal. Ordercode: 42233... -
Page 15: How To Make A Data Cable
You only have to connect all the Octostrips and run your software. 102101 Arkaos Media Master Express 5.0 The latest update of the successful media server software. 102201 Arkaos Media Master Pro 5.0 PRO DMX video software for lighting designers. Ordercode: 42233... -
Page 16: Fixture Linking
CAT-5 cable 7,6 mm Matte blue PVC. Ordercode FL55150 (1,5 m), FL553 (3 m), FL556 (6 m), FL5510 (10 m), FL5515 (15 m), FL5520 (20 m). ● CAT-6 cable (recommended for best data transfer). Ordercode FL563 (3 m), FL566 (6 m), FL5610 (10 m), FL5615 (15 m), FL5640 (40 m). Ordercode: 42233... -
Page 17: Control Panel
When no button is pressed for 60 seconds, the display will turn off. To light up the display, you have to press the MODE, SETUP, UP or DOWN button. Once you have pressed the button, the display will light up. Ordercode: 42233... -
Page 18: Menu Overview
Controller for Octostrip MKII Menu Overview Ordercode: 42233... -
Page 19: Main Menu Options
Strobe (Press the UP/DOWN buttons to set strobe frequency. The adjustment range is between 0-99, from OFF to high frequency.) 06) Once you have adjusted the settings, press the SETUP button to confirm. 07) Return to step 4 and choose one of the programs from the range: Ordercode: 42233... -
Page 20: Master/Slave
Otherwise, the device will not function in ArtNet mode. 5.2. IP Address With this menu you can set the IP address. 01) Press the UP/DOWN buttons until the display shows 02) Press the SETUP button to open the menu. The display will show Ordercode: 42233... -
Page 21: Net Mask
05) Repeatedly press the SETUP button to skip to the desired section of the MAC address (the currently selected section will blink). 06) Press the UP/DOWN buttons to set the values. 07) Press the SETUP button to confirm. 08) Keep pressing the SETUP button until the display returns to the previous menu. Ordercode: 42233... -
Page 22: Sound-Controlled
02) Press the UP/DOWN buttons to choose between YES and NO. 03) If you have chosen YES, press the SETUP button to confirm. The device will now restore the default settings and will return to the main menu. Ordercode: 42233... -
Page 23: Software Information
Color 27 168-173 Color 28 174-179 Color 29 180-185 Color 30 186-191 Color 31 192-197 Color 32 198-203 Color 33 204-209 Color 34 210-215 Color 35 216-221 Color 36 222-227 Color 37 228-233 Color 38 234-255 Color 39 Ordercode: 42233... -
Page 24: Channels
Channel 4 – Program speed CH3 must be set between 11-250 0-255 Speed adjustment, from slow to fast Channel 4 – Sound sensitivity CH3 must be set between 251-255 0-255 Sound sensitivity adjustment, from low to high sensitivity Ordercode: 42233... - Page 25 CH1 must be open and CH3 and CH5 must be closed 0-255 Gradual adjustment Green, from 0-100% Channel 8 – Blue CH1 must be open and CH3 and CH5 must be closed 0-255 Gradual adjustment Blue, from 0-100% Ordercode: 42233...
-
Page 26: Channels
Color 4 30-35 Color 5 36-41 Color 6 42-47 Color 7 48-53 Color 8 54-59 Color 9 60-65 Color 10 66-71 Color 11 72-77 Color 12 78-83 Color 13 84-89 Color 14 90-95 Color 15 96-101 Color 16 Ordercode: 42233... - Page 27 Color 2 18-23 Color 3 24-29 Color 4 30-35 Color 5 36-41 Color 6 42-47 Color 7 48-53 Color 8 54-59 Color 9 60-65 Color 10 66-71 Color 11 72-77 Color 12 78-83 Color 13 84-89 Color 14 Ordercode: 42233...
- Page 28 Channel 13 – Green, LED strips 5–8 CH9 must be open, CH11 must be closed 0-255 Gradual adjustment Green, from 0-100% Channel 14 – Blue, LED strips 5–8 CH9 must be open, CH11 must be closed 0-255 Gradual adjustment Blue, from 0-100% Ordercode: 42233...
-
Page 29: Channels
Channel 22 – Red, LED strip 8 0-255 Gradual adjustment Red, from 0-100% Channel 23 – Green, LED strip 8 0-255 Gradual adjustment Green, from 0-100% Channel 24 – Blue, LED strip 8 0-255 Gradual adjustment Blue, from 0-100% Ordercode: 42233... -
Page 30: Channels
Color 4 30-35 Color 5 36-41 Color 6 42-47 Color 7 48-53 Color 8 54-59 Color 9 60-65 Color 10 66-71 Color 11 72-77 Color 12 78-83 Color 13 84-89 Color 14 90-95 Color 15 96-101 Color 16 Ordercode: 42233... - Page 31 Color 2 18-23 Color 3 24-29 Color 4 30-35 Color 5 36-41 Color 6 42-47 Color 7 48-53 Color 8 54-59 Color 9 60-65 Color 10 66-71 Color 11 72-77 Color 12 78-83 Color 13 84-89 Color 14 Ordercode: 42233...
- Page 32 Not functional 6-11 Color 1 12-17 Color 2 18-23 Color 3 24-29 Color 4 30-35 Color 5 36-41 Color 6 42-47 Color 7 48-53 Color 8 54-59 Color 9 60-65 Color 10 66-71 Color 11 72-77 Color 12 Ordercode: 42233...
- Page 33 CH21 must be open and CH1 must be closed Not functional 6-11 Color 1 12-17 Color 2 18-23 Color 3 24-29 Color 4 30-35 Color 5 36-41 Color 6 42-47 Color 7 48-53 Color 8 54-59 Color 9 60-65 Color 10 Ordercode: 42233...
- Page 34 CH21 must be open, CH1 and CH23 must be closed 0-255 Gradual adjustment Green, from 0-100% Channel 26 – Blue, LED strips 7–8 CH21 must be open, CH1 and CH23 must be closed 0-255 Gradual adjustment Blue, from 0-100% Ordercode: 42233...
-
Page 35: Channels
Color 4 30-35 Color 5 36-41 Color 6 42-47 Color 7 48-53 Color 8 54-59 Color 9 60-65 Color 10 66-71 Color 11 72-77 Color 12 78-83 Color 13 84-89 Color 14 90-95 Color 15 96-101 Color 16 Ordercode: 42233... - Page 36 Color 2 18-23 Color 3 24-29 Color 4 30-35 Color 5 36-41 Color 6 42-47 Color 7 48-53 Color 8 54-59 Color 9 60-65 Color 10 66-71 Color 11 72-77 Color 12 78-83 Color 13 84-89 Color 14 Ordercode: 42233...
- Page 37 Not functional 6-11 Color 1 12-17 Color 2 18-23 Color 3 24-29 Color 4 30-35 Color 5 36-41 Color 6 42-47 Color 7 48-53 Color 8 54-59 Color 9 60-65 Color 10 66-71 Color 11 72-77 Color 12 Ordercode: 42233...
- Page 38 CH21 must be open and CH1 must be closed Not functional 6-11 Color 1 12-17 Color 2 18-23 Color 3 24-29 Color 4 30-35 Color 5 36-41 Color 6 42-47 Color 7 48-53 Color 8 54-59 Color 9 60-65 Color 10 Ordercode: 42233...
- Page 39 Channel 29 – Color Macros, LED strip 5 CH27 must be open and CH1 must be closed Not functional 6-11 Color 1 12-17 Color 2 18-23 Color 3 24-29 Color 4 30-35 Color 5 36-41 Color 6 42-47 Color 7 48-53 Color 8 Ordercode: 42233...
- Page 40 Strobe frequency, from low to high frequency Channel 35 – Color Macros, LED strip 6 CH33 must be open and CH1 must be closed Not functional 6-11 Color 1 12-17 Color 2 18-23 Color 3 24-29 Color 4 30-35 Color 5 36-41 Color 6 Ordercode: 42233...
- Page 41 Strobe frequency, from low to high frequency Channel 41 – Color Macros, LED strip 7 CH39 must be open and CH1 must be closed Not functional 6-11 Color 1 12-17 Color 2 18-23 Color 3 24-29 Color 4 Ordercode: 42233...
- Page 42 CH39 must be open, CH1 and CH41 must be closed 0-255 Gradual adjustment Blue, from 0-100% Channel 45 – Dimmer, LED strip 8 0-255 Dimmer intensity, from dark to brightest Channel 46 – Strobe, LED strip 8 Not functional 5-255 Strobe frequency, from low to high frequency Ordercode: 42233...
- Page 43 CH45 must be open, CH1 and CH47 must be closed 0-255 Gradual adjustment Green, from 0-100% Channel 50 – Blue, LED strip 8 CH45 must be open, CH1 and CH47 must be closed 0-255 Gradual adjustment Blue, from 0-100% Ordercode: 42233...
-
Page 44: Channels (Only When Using The 50 Cm Led Strips)
Channel 94 – Red, LED strip 8, section 4 0-255 Gradual adjustment Red, from 0-100% Channel 95 – Green, LED strip 8, section 4 0-255 Gradual adjustment Green, from 0-100% Channel 96 – Blue, LED strip 8, section 4 0-255 Gradual adjustment Blue, from 0-100% Ordercode: 42233... -
Page 45: 112 Channels (Only When Using The 50 Cm Led Strips)
0-255 Dimmer intensity, from dark to brightest Channel 12 – Strobe, LED strip 6 Not functional 5-255 Strobe frequency, from low to high frequency Channel 13 – Dimmer, LED strip 7 0-255 Dimmer intensity, from dark to brightest Ordercode: 42233... - Page 46 Channel 111 – Green, LED strip 8, section 4 CH15 must be open 0-255 Gradual adjustment Green, from 0-100% Channel 112 – Blue, LED strip 8, section 4 CH15 must be open 0-255 Gradual adjustment Blue, from 0-100% Ordercode: 42233...
-
Page 47: 192 Channels (Only When Using The 100 Cm Led Strips)
Channel 190 – Red, LED strip 8, section 8 0-255 Gradual adjustment Red, from 0-100% Channel 191 – Green, LED strip 8, section 8 0-255 Gradual adjustment Green, from 0-100% Channel 192 – Blue, LED strip 8, section 8 0-255 Gradual adjustment Blue, from 0-100% Ordercode: 42233... -
Page 48: 208 Channels (Only When Using The 100 Cm Led Strips)
0-255 Dimmer intensity, from dark to brightest Channel 12 – Strobe, LED strip 6 Not functional 5-255 Strobe frequency, from low to high frequency Channel 13 – Dimmer, LED strip 7 0-255 Dimmer intensity, from dark to brightest Ordercode: 42233... - Page 49 Channel 207 – Green, LED strip 8, section 8 CH15 must be open 0-255 Gradual adjustment Green, from 0-100% Channel 208 – Blue, LED strip 8, section 8 CH15 must be open 0-255 Gradual adjustment Blue, from 0-100% Ordercode: 42233...
-
Page 50: Maintenance
02) The fuse. Replace the fuse. See page 49 for replacing the fuse. 03) The Controller. Return the Controller to your Showtec dealer. 04) The LEDs. Return the LED Octostrip Set MKII to your Showtec dealer. 05) If all of the above appears to be O.K., plug the unit in again. -
Page 51: No Response To Dmx
Turn up the air conditioning cut out • Disconnect the fixture and return it intermittently LEDs damaged to your dealer The power supply settings do not • Disconnect fixture. Check settings match local AC voltage and and correct if necessary frequency Ordercode: 42233... -
Page 52: Product Specifications
Controller for Octostrip MKII Product Specifications Model: Showtec Controller for Octostrip MKII Input voltage: 100-240V AC, 50/60Hz Power consumption: 90W (full output) DMX linking: 30pcs Fuse: T2L/250V Dimensions: 200 x 315 x 92 mm (LxWxH) Weight: 2,5 kg Operating and Programming:... -
Page 53: Dimensions
Controller for Octostrip MKII Dimensions Ordercode: 42233... -
Page 54: Notes
Controller for Octostrip MKII Notes Ordercode: 42233... - Page 55 Controller for Octostrip MKII Ordercode: 42233...
- Page 56 ©2018 Showtec...
Need help?
Do you have a question about the 42233 and is the answer not in the manual?
Questions and answers