
Summary of Contents for THERACYCLE 200
- Page 1 Theracycle 200 & 300 User’s Manual The Theracycle Company 31 Hayward Street, Franklin MA 02038 1-800-367-6712 www.theracycle.com...
-
Page 2: Table Of Contents
For More Experienced Theracyclists ..........15 Cleveland Clinic Protocol ..............15 Maintenance of your Theracycle ............16 Theracycle 200 & 300 Model Oil Change ..........16 Limited Warranty for the Theracycle ............ 22 Theracyclist User’s Log ..............23 ... -
Page 3: Important: For Your Safety
Never attempt to get off the Theracycle until it has come to a complete stop. Use only genuine Theracycle parts when making repairs. Never operate a Theracycle if it has a damaged cord or plug, if it is not working properly, if it has been dropped or damaged or any of the electrical components have been exposed to water or other fluids, or if it has been in the presence of combustible gases such as oxygen or aerosol sprays. - Page 4 Theracycle’s electronics. 16. Wear shoes when riding the Theracycle. Be certain laces are tied tightly. It is not safe to ride barefoot or only in socks. 17. Always keep the safety magnet attached to your clothing while riding the Theracycle.
-
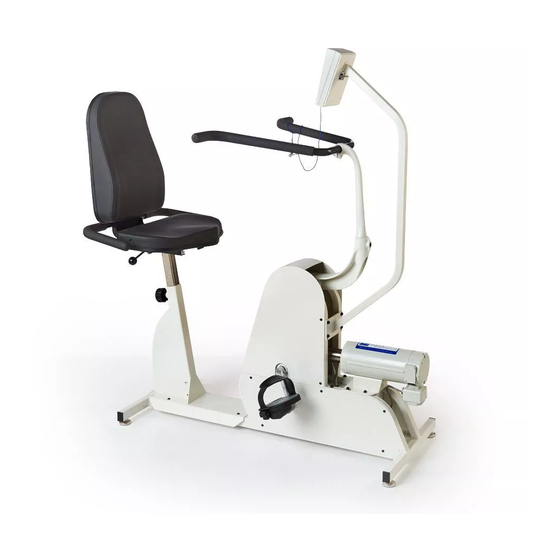
Page 5: Theracycle Parts And Components
Theracycle Parts and Components Seat and Back Support Outrigger Handles Seat Adjustment Latch for forward and backward settings Seat Height Adjustment Knob Top Shroud & Oil Filler Cap Handlebar Assembly Computer Display Arm Computer Display Box Pedals, Pedal Crank and Link... -
Page 6: Unpacking And Assembling Your Theracycle
Lift off the two sides of the carton and fold flat. Put aside for final storage. Remove the seat by cutting the plastic cable tie. Lift the Theracycle out of the bottom tray carton by using the legs of the frame. This will require two people. NEVER LIFT WITH THE MOTOR! Doing so will take the unit out of alignment immediately. - Page 7 Tighten the locking screw using the 5/16” allen wrench. Mount the computer display stand to the front frame of the Theracycle. • Locate the four screws mounted on the frame above the motor. • Remove the top two screws.
-
Page 8: Adjusting Your Theracycle
Now that you have assembled the Theracycle, you will need to adjust it for a customized fit. In the section labeled, “Adjusting Your Theracycle,” you will find the directions to do this. Please contact our customer service department with questions about assembly or about the use of your Theracycle, Monday-Friday, 9:00AM –... -
Page 9: Customizing The Space Between The Seat And The Back Support
2. Remove the seat by pulling up on the latch knob while pulling the it away from the Theracycle. 3. Turn the seat over and remove the four bolts on the bottom of the seat with the allen wrench, reposition in the desired holes, and replace the bolts. -
Page 10: Handlebar Adjustment
Pedal Strap and Pedal Crank Adjustment On the Theracycle you can adjust the size of the pedal arc by adjusting the angle of the pedal link. You can also adjust the size of the pedal strap. -
Page 11: Theracycle Computer Display
Theracycle Computer Display Up Button Computer Display Screen Set Button Start Button Pause Button Down Button Safety Magnet On Button Sensor Off Button Remove the plastic protective covering before using. 1-800-367-6712... -
Page 12: Quick Start Guide
Quick Start Guide 1. Plug the Theracycle power cord into a three prong, grounded outlet. We recommend the use of a surge protector with the Theracycle. 2. Turn on the main power switch located underneath the front right bottom of the Theracycle, underneath the motor. This can be left on 3. -
Page 13: Change Of Speed /Time While Riding
“start” button again. The Value of Exercise If you are like many of our Theracycle owners, exercise is very important to you. If it has been a while since you were able to get the kind of exercise you want, you will need to start slowly and work up to longer sessions at a faster pace. -
Page 14: Basic Guidelines For Theracyclists
Basic Guidelines for Theracyclists The Theracycle is designed so that you can choose to let the motor move your legs and arms for you, and, when you choose, you can push the pedals for resistance. The handlebars can be used by resting your fingers on the handle and letting the movement work your upper body. -
Page 15: For More Experienced Theracyclists
• Experiment with the two variables: time and speed, as you gain experience with the Theracycle. Remember, you can program the Theracycle for rides lasting up to 99 minutes and at speeds up to 15 miles per hour, which equals 90 rotations per minute. Each mile per hour is equal to 6 RPM’s on the Theracycle. -
Page 16: Maintenance Of Your Theracycle
You should never “top off” the oil in the gearbox. Moving? The oil should be drained and the Theracycle must never be tipped on its side. Call us for directions on how to break down the unit for transport. - Page 17 • After removing the lower shroud(s), locate the oil drain plug at the bottom of the gearbox. In the open area under the gearbox drain plug, place an oil catch pan. You can even use a disposable foil loaf baking pan capable of holding 1 quart of fluid.
- Page 18 • Let the gear box drain for about 15 – 20 minutes. After the gearbox has been drained, re-insert the oil drain plug into the gear box and wipe any excess oil with a paper towel or rag from the bottom of the gear box. •...
- Page 19 • Locate and remove the plastic press fit cap located on the top of the upper bike shroud. Gently pry the cap out or push it out from under the cap. • Insert the Flat-Head Screwdriver into the hole and use it to remove the gearbox fill plug.
- Page 20 • Once the fill plug is removed, insert the funnel through the top hole of the upper shroud and into the oil fill hole. 1-800-367-6712...
- Page 21 • Once you fill the gear box with the quart of oil, use the flat-head screwdriver to re-install the oil fill plug to the gearbox. Lastly, re-install the plastic press fit cap to the top shroud. If your machine should ever require service, contact the Theracycle Division of RSS Industries at 1-800-367-6712. 1-800-367-6712...
-
Page 22: Limited Warranty For The Theracycle
• All other parts of the Theracycle are covered for three years from the date of original purchase. This warranty does not cover: •... -
Page 23: Theracyclist User's Log
Theracyclist User’s Log (note: we recommend that you make extra copies for your future use) Date Time Miles Average Speed Comments Monday Tuesday Wednesday Thursday Friday Saturday Sunday Date Time Miles Average Speed Comments Monday Tuesday Wednesday Thursday Friday Saturday... - Page 24 Theracyclist User’s Log Date Time Miles Average Speed Comments Monday Tuesday Wednesday Thursday Friday Saturday Sunday Date Time Miles Average Speed Comments Monday Tuesday Wednesday Thursday Friday Saturday Sunday...
Need help?
Do you have a question about the 200 and is the answer not in the manual?
Questions and answers