Table of Contents
Advertisement
Quick Links
Advertisement
Table of Contents

Summary of Contents for meteocontrol blue’Log X-1000
- Page 1 blue’Log X series (X-1000 | X-3000 | X-6000) Operating Manual Version 20150922...
- Page 2 All information in this operating manual has been compiled and checked with the greatest care and diligence. Nevertheless, the possibility of errors cannot be entirely excluded. meteocontrol GmbH therefore cannot accept any liability for errors or their consequences. Subject to technical alterations.
-
Page 3: Table Of Contents
Contents General notes ....................5 Safety instructions ..................5 Warning symbols ..................5 Additional information ................. 6 Text display ....................6 Notes on this operating manual ................7 Warranty and liability ................... 8 Safety instructions for operation ................. 9 Intended use ....................9 Personnel .................... - Page 4 RS485/422 interface ................. 25 CAN interface ................... 25 USB interface.................... 25 Commissioning, configuration................26 Requirements ................... 26 Commissioning ..................26 Establishing / checking connections ............26 7.3.1 Ethernet connection ..............26 7.3.2 Connecting bus devices .............. 27 7.3.3 Connections to analog and digital inputs ........27 Log-on via display ..................
- Page 5 12.6.1 Diagrams ..................63 12.6.2 Real-time values ................63 13. Messages......................64 13.1 Logbook ....................64 14. meteocontrol Power Control ................65 14.1 General notes .................... 65 14.1.1 Functions ..................65 14.1.2 Receiving specifications from the grid operator ......66 14.1.3...
- Page 6 14.3.1 P(DI) procedure ................76 14.3.2 P(AI) procedure ................78 14.3.3 P(fix) procedure................79 14.3.4 Intelligent Power Limit (IPL) ............80 14.3.5 Gradient limitation active power (P) procedure ......82 14.3.6 Limitation to agreed connection power P ........ 84 14.3.7 Preset for fallback value ..............
-
Page 7: General Notes
General notes Safety instructions Safety instructions warn of dangers when using the devices and explain how they can be avoided. The safety instructions are classified according to the severity of the risk and are subdivided into four groups: DANGER Imminent danger Failure to comply with the warning notice will lead to an imminent risk of death or serious physical injury! WARNING... -
Page 8: Additional Information
Additional information This symbol can be found next to notes, additional information and tips. Text display Emphasized points are shown in bold and indicate important information. Lists are shown with bullet points (level 1) and dashes (level 2): List 1 Point A ... -
Page 9: Notes On This Operating Manual
The manual and documentation must be kept by the system and be available at all times as required. meteocontrol GmbH accepts no liability for personal injury, damage to property, or system malfunctions and their consequences, insofar as these result from non- observance of this operating manual. -
Page 10: Warranty And Liability
Details of the scope and form of the warranty as well as the warranty period are given in the meteocontrol GmbH General Terms and Conditions. meteocontrol GmbH rejects any liability for damage arising from the non-observance of the operating manual. -
Page 11: Safety Instructions For Operation
Safety instructions for operation Intended use Only the permitted signals and signal strengths may be applied to the connections of the data logger (blue’Log) and the expansion modules (MX modules) used here. Installation is only permitted indoors. For installation outdoors or in a dusty environment, the device must be installed in a standardized protective enclosure. -
Page 12: Protection Concepts
Protection concepts The memory card (SD memory) must not be removed while the blue’Log is in operation The blue’Log may not be opened The blue’Log may not be modified Damaged devices must be taken out of operation immediately and checked by a qualified electrician ... -
Page 13: Internal Battery
ATTENTION Lithium battery The battery may only be replaced by the meteocontrol repair service, since the blue’Log housing needs to be opened. meteocontrol GmbH accepts no liability for material damage owing to non-... -
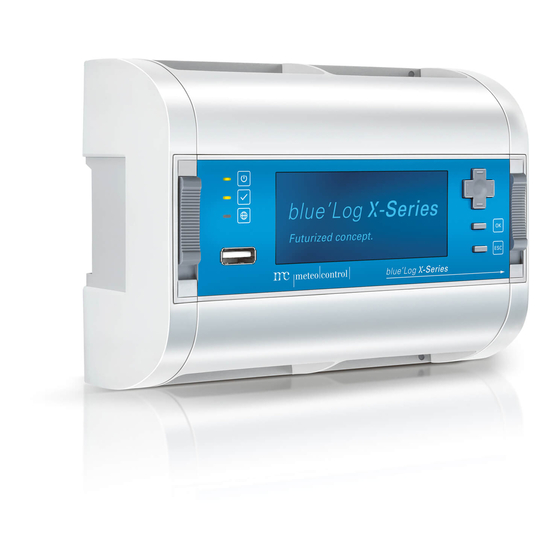
Page 14: Device Overview
Device overview Overview of product versions blue’Log X-1000 blue’Log X-3000 blue’Log X-6000 Max. feed-in power in kWp 1000 unlimited Storage capacity 16 GB 16 GB 32 GB blue’Log front panel Fig. 1: Overview of the blue’Log front panel Digital input (DI1–DI4) RS485/422 termination –... -
Page 15: Blue'log Rear Panel
blue’Log rear panel Fig. 2: Overview of the blue’Log rear panel Clamp for DIN rail Status LEDs The front panel features three LED displays with the following meanings. Symbol Meaning Green: blue‘Log is supplied with power Off: No power supply Green: System loaded successfully, normal operation Orange: System booting, boot phase... -
Page 16: Installation
Installation Safety instructions for installation DANGER Risk of electrocution! Fatal injuries or death from contact with cables and terminals. Only connect or disconnect cables while the power supply is switched off. Provide a safeguard to prevent unintentional restart. ATTENTION Damage due to incorrect cabling! Incorrectly connected cables can lead to damage or destruction of the... -
Page 17: Cables And Wiring
Cables and wiring Recommended cable types for wiring the individual system components are given below. The restrictions resulting from the wiring are also listed. 5.2.1 Permitted cable types for the blue’Log power supply Connecting cable Voltage range Cable cross Type section ... -
Page 18: Maximum Recommended Cable Lengths
5.2.3 Maximum recommended cable lengths 2) 3) Bus cabling (data cable RS485) 1200 m 100 m Sensors (voltage signal 0 V – 10 V) 600 m Sensors (current signal 4 mA – 20 mA) 30 m Meters 100 m ... -
Page 19: Installation
Installation 5.3.1 Installing device on DIN rail Hang the blue’Log on the DIN rail using the provided clamp (rear panel). Push the DIN rail latch on the front side of the device from bottom (latch open) to top (latch closed). This will fix the blue’Log to the DIN rail. The symbols (open/closed lock) above and below the DIN rail latch indicate whether or not the device is fixed. -
Page 20: Expanding The Blue'log
Expanding the blue’Log The blue’Log can be expanded to provide additional interfaces using various expansion modules (MX modules). Fig. 4: MX modules (example: RS485/422) ATTENTION Risk of damage when installing expansion modules Installing MX modules during operation of the blue’Log can damage or destroy the blue’Log and the expansion modules. -
Page 21: Connecting Expansion Modules
5.4.1 Connecting expansion modules In order to expand the blue’Log by installing MX modules, remove the right-hand side- cover. To do this, unlock the four fasteners and pull off the right-hand side cap. Fig. 5: Unlocking the fasteners Fig. 6: Pulling off right-hand side cap Keep the side cap at hand, as you will need to reattach it to the right-hand side of the expansion module later on to fasten the blue’Log and MX modules to the DIN rail again. - Page 22 Fig. 8: Plugging expansion module into the blue’Log. Now close the blue’Log's fasteners again in order to fix the expansion module to the preceding device. Fig. 9: Attached expansion module 20 | 120 blue’Log X series...
- Page 23 Reattach the side cap to the right-hand side of the expansion module and close the case locks. Fig. 10: blue’Log and MX module connected and side cap attached blue’Log X series 21 | 120...
- Page 24 The blue’Log can be expanded with several MX modules of the same type or with different MX modules. Please see the data sheet for your basic device for details of the maximum number of expansion modules. Fig. 11: blue’Log with various MX modules ATTENTION Order of installed MX modules When connecting MX modules to the basic device, the prescribed order has...
-
Page 25: Interfaces
Interfaces Power supply The power supply of the data logger must comply with requirements below. Power supply: 20 V DC, 4.0 A … 60 V DC, 1.3 A max. 80 W CAUTION Complying with limit values You should ensure that alternatively the following limit values are complied with. -
Page 26: Voltage Output
Voltage output Voltage: 24 V DC The blue’Log can supply sensors (e.g. i'checker) with a maximum current consumption of 500 mA. For sensors with a current consumption totaling more than 500 mA, please use an external power supply. Ethernet ... -
Page 27: Digital Output
Digital output The digital outputs are freely configurable as: Open collector: max. 60 V DC / 200 mA Voltage output: 20…60 V DC (corresponding to supply voltage), max. 45 W, in total of all digital outputs (basic module and MX modules), max. -
Page 28: Commissioning, Configuration
Commissioning, configuration Requirements In order to start up the blue’Log, the device must be securely mounted and all cables must be connected correctly. Commissioning Switch on the power supply Wait until the blue‘Log has finished booting. The status LED on the device will light up. ... -
Page 29: Connecting Bus Devices
7.3.2 Connecting bus devices The blue’Log is equipped with two RS485/422 interfaces to connect bus devices. Connect your bus devices to the data logger via the RS485/422 interfaces. Please note the respective requirements in the "Device connection plans" document. ... -
Page 30: Log-On Via Display
Log-on via display 7.4.1 Start menu The device license is shown in the display start menu. The "OK" and "ESC" buttons take you to the blue’Log display menus. Fig. 13: blue’Log display: Start menu 7.4.2 Setting language via quick access To access the language settings, press the "ESC"... -
Page 31: User Selection
7.4.3 User selection To get to the user selection via the display, press the "OK" button. If no user is logged on, you will be taken to the user selection menu. Otherwise, you will access the main menu immediately. The available users registered in the blue’Log are shown in the user selection menu. -
Page 32: Network Configuration On The Display
Network configuration on the display 7.5.1 DHCP setting If a DHCP server in connected to the blue’Log's network, the network parameters such as the IP address can be retrieved automatically. DHCP must be enabled on the data logger for this purpose. Navigate to the network settings using the directional pad and the buttons: Main menu ... -
Page 33: Firmware Update Via Usb
Firmware update via USB Insert a USB stick containing the update file (file extension = img) into the USB socket. The file must be in the USB stick's root directory. Navigate to the system settings using the directional pad and the buttons: Main menu ... -
Page 34: Logging On To Device Websites
Logging on to device websites Further configuration is possible via the device websites. Information regarding the operating status of the PV system can also be retrieved. In order to address your blue’Log, enter the IP address in the address line of your web browser. - Page 35 After the first successful log in on the device websites, the set-up wizard pop-up window will appear. Fig. 21: blue’Log wizard information window The wizard guides you step by step through the main set-up points necessary for proper device operation. The relevant set-up step is shown in the navigation bar. You can switch between the individual menu items using the arrows (left and right) or the numbered points in the navigation bar.
- Page 36 After you close the wizard, you will be taken to the blue’Log's start page, the so-called "Dashboard", in the "Cockpit" menu. Fig. 23: Device websites: Dashboard 34 | 120 blue’Log X series...
-
Page 37: Logger Master Data
Logger master data The data logger basic or master data are shown in the "Master data" menu or can be changed here. To get to the "Master data" menu, perform the following steps: Navigate to the "PV system" area via the top navigation bar and then click on "Master data". -
Page 38: Ethernet
7.10 Ethernet In the "Ethernet" menu, all network settings described in Section 7.5 can be configured. Navigate to the "System" area via the top navigation bar and then click on "Ethernet". The following network settings can be configured: Enable DHCP ... -
Page 39: User Management
7.12 User management In the user management, access data for various users with various rights can be set up and managed. Navigate to the "System" area via the top navigation bar. Navigate to the "Users" area via the left-hand navigation menu. By default, two users are preset. -
Page 40: Date / Time
7.14.1 Time synchronization with system settings If "System settings" is set, the blue’Log will synchronize its system time with the meteocontrol safer’Sun Portal. Only the time zone needs to be given so the correct time can be assigned to the data logger. -
Page 41: Registering On The Safer'sun Portal
7.15 Registering on the safer’Sun Portal Navigate to the "PV system" area via the top navigation bar. Navigate to the "Online portal" area via the left-hand navigation menu and click on "Registration". You now have a choice (via a radio button) between adding your blue’Log ... -
Page 42: Portal Communication
7.16 Portal communication In the "Online portal" "Communication" menu, the interval at which the data logger is to report to the portal can be set. Navigate to the "PV system" area via the top navigation bar. Navigate to the "Online portal" area via the left-hand navigation menu and then click on "Communication". -
Page 43: Ftp Push
If you would like to send your measurement data to an independent FTP server in addition to the meteocontrol Internet portal, set the radio button on this page to "Active" and make the following server settings: FTP server name (example: ftp.meteocontrol.de) -
Page 44: Firmware Update
Firmware update At first start-up you should check whether a new firmware update is available for your blue’Log. Navigate to the "System" area via the top navigation bar. Navigate to the "Firmware" area via the left-hand navigation menu. Fig. 24: Device websites: Firmware update Select the latest update (highlighted in green) in order to ensure your blue’Log remaining up to date. -
Page 45: Licenses
Licenses FTP PUSH INTRADAY Even in their standard versions, the data loggers in the blue’Log X series offer the option to send measurement data to an external or independent FTP server on a daily basis. (See 7.17 for details of configuration). By acquiring the "FTP Push Intraday X series"... - Page 46 Via the drop-down menu, select a sensor model you connected to the input of the blue’Log data logger (e.g. Si-12TC-T). After selection the entry menu expands with further settings for this sensor. If the sensor to be connected is not included in the list, you can select a generic template and configure the sensor manually.
-
Page 47: Modbus Sensors
10.1.2 Modbus sensors Navigate to the "Devices" area via the top navigation bar. Navigate to the "Sensors" area via the left-hand navigation menu. Fig. 27: Device websites: Adding new modbus sensor Via the drop-down menu, select a sensor model connected to the input of the blue’Log data logger (e.g. - Page 48 Clicking on the gear button will take you to the configuration settings for the relevant RS485/422 interface. Configure the interface. Fig. 28: Device websites: RS485/422 sensor interface configuration Give the bus address of the sensor in the address box. By selecting "Save", the sensor will be recorded and listed in the "Sensor overview". Fig.
-
Page 49: Adding Meters
10.2 Adding meters 10.2.1 S0 meter Navigate to the "Devices" area via the top navigation bar. Navigate to the "Meters" area via the left-hand navigation menu. Fig. 30: Device websites: Adding a new S0 meter Via the drop-down menu, select S0 energy meter. After selection the configuration menu expands with further settings. - Page 50 Via the drop-down menu, select a role for the meter so the blue’Log can assign the meter values properly. The following roles are available for selection: Sourcing Recording of energy sourced from the electricity network Grid feed-in Recording of energy fed into the electricity grid ...
-
Page 51: Modbus Meter
10.2.2 Modbus meter Navigate to the "Devices" area via the top navigation bar. Navigate to the "Meters" area via the left-hand navigation menu. Fig. 32: Device websites: Adding new modbus meter Via the drop-down menu, select a modbus energy meter. After selection the configuration menu expands with further settings. - Page 52 Clicking on the cog button will take you to the configuration settings for the relevant RS485/422 interface. Configure the interface. Fig. 33: Device websites: RS485/422 meter interface configuration Via the drop-down menu, select the count arrow direction (generator count arrow system) in which the meter is connected.
-
Page 53: Adding Inverters
10.3 Adding inverters Navigate to the "Devices" area via the top navigation bar. Navigate to the "Inverters" area via the left-hand navigation menu. Fig. 35: Device websites: Adding a new inverter Select the manufacturer of your inverters (e.g. Kaco). Select the interface of the blue’Log data logger to which the inverter is connected (e.g. -
Page 54: Adding String Measuring Systems
10.4 Adding string measuring systems Navigate to the "Devices" area via the top navigation bar. Navigate to the "String measuring systems" area via the left-hand navigation menu. Fig. 37: Device websites: String measuring system settings Via the drop-down menu, select a model. After selection the configuration menu expands with further settings. -
Page 55: Adding Battery System
10.5 Adding battery system Navigate to the "Devices" area via the top navigation bar. Navigate to the "Battery systems" area via the left-hand navigation menu. Fig. 39: Device websites: Adding new battery system Via the drop-down menu, select a model. After selection the configuration menu expands with further settings. -
Page 56: Alarms
11. Alarms 11.1 Latest alarms Navigate to the "Cockpit" area via the top navigation bar. Navigate to the "Alarms" area via the left-hand navigation menu. Fig. 41: Device websites: Latest alarms In this window, all alarms registered by the blue’Log are listed. Time, device ... -
Page 57: Contact Addresses
11.2 Contact addresses Navigate to the "Monitoring" area via the top navigation bar. Navigate to the "Contact addresses" area via the left-hand navigation menu. Fig. 42: Device websites: Updating contact addresses By clicking on the "+" button, you can create a new contact address in the blue’Log. Enter a contact (name) and an e-mail address and confirm the details by clicking on the disk symbol in the very top-right column. -
Page 58: Alarm Configuration
11.3 Alarm configuration Navigate to the "Monitoring" area via the top navigation bar. Navigate to the "Contact addresses" area via the left-hand navigation menu. Fig. 43: Device websites: Alarm configuration Enable monitoring. By selecting "+" in the "Contact(s) for e-mail notification" field, a previously created contact (see Section 11.2 Contact addresses) can be selected. -
Page 59: Visualization
12. Visualization 12.1 Showing sensor values 12.1.1 Diagrams Navigate to the "Cockpit" area via the top navigation bar. Navigate to the "Charts" area via the left-hand navigation menu and select "Sensors". Fig. 44: Device websites: Selecting sensor diagram options Select those sensor(s) of which the measured values should be included in the visualization. -
Page 60: Showing Meter Values
12.2 Showing meter values 12.2.1 Diagrams Navigate to the "Cockpit" area via the top navigation bar. Navigate to the "Diagrams" area via the left-hand navigation menu and select "Meters". Fig. 45: Device websites: Selecting meter diagram options Select the meter(s) from which to visualize the measured values. Select the available measured values. -
Page 61: Showing Inverter Values
12.3 Showing inverter values 12.3.1 Diagrams Navigate to the "Cockpit" area via the top navigation bar. Navigate to the "Charts" area via the left-hand navigation menu and select "Inverters". Fig. 46: Device websites: Selecting inverter diagram options Select the inverter(s) from which to visualize the measured values. Select the available measured values. -
Page 62: Real-Time Values
By selecting "Show diagram", the visualization configuration will close and the diagram view will appear in the same window. Fig. 47: Device websites: Visualizing the measured data 12.3.2 Real-time values Navigate to the "Cockpit" area via the top navigation bar. Navigate to the "Real-time values"... -
Page 63: Showing String Measuring System Measured Values
12.4 Showing string measuring system measured values 12.4.1 Diagrams Navigate to the "Cockpit" area via the top navigation bar. Navigate to the "Diagrams" area via the left-hand navigation menu and select "String measuring system". Fig. 49: Device websites: String measuring system Select the string measuring system from which to visualize the measured values. -
Page 64: Showing Battery System Values
12.5 Showing battery system values 12.5.1 Diagrams Navigate to the "Cockpit" area via the top navigation bar. Navigate to the "Diagrams" area via the left-hand navigation menu and select "Battery systems". Fig. 50: Device websites: Selecting battery system diagram options Select the battery systems from which to visualize the measured values. -
Page 65: Showing Power Control Values
12.6 Showing Power Control values 12.6.1 Diagrams Navigate to the "Cockpit" area via the top navigation bar. Navigate to the "Diagrams" area via the left-hand navigation menu and select "Power Control". Fig. 51: Device websites: Selecting Power Control diagram options Select the category from which to visualize the measured values. -
Page 66: Messages
13. Messages 13.1 Logbook Navigate to the "Cockpit" area via the top navigation bar. Navigate to the "Logbook" area via the left-hand navigation menu. Fig. 52: Device websites: Logbook System events (max. 500 entries) are listed in the logbook. Entries can be sorted according to "Time", "Error code", "Error type" and "Description"... -
Page 67: Meteocontrol Power Control
14. meteocontrol Power Control 14.1 General notes Power Control is a system allowing grid feed-in management for photovoltaic systems. meteocontrol Power Control enables meeting national and international requirements of grid operators as well as any country-specific feed-in regulations according to the system size. -
Page 68: Receiving Specifications From The Grid Operator
14.1.2 Receiving specifications from the grid operator The specifications for calculating target values for active power are transferred by the grid operator via the remote control system. Depending on the remote control system used, these are transferred to the blue’Log via digital or analog signals. Fig. -
Page 69: Processing The Data
14.1.3 Processing the data In order to satisfy the grid operator's specifications, the blue’Log has various procedures allowing grid feed-in management for your PV system. The respective method is determined by the procedure used in each case and has to be selected according to the specific requirements of the grid operator. - Page 70 Reactive power procedures cosφ(DI) Q(DI) Q(cosφ(DI)) cosφ(AI) Q(AI) Q(cosφ(AI)) cosφ(fix) Q(fix) Q(cosφ(fix)) cosφ(P) Q(U) Q(cosφ(P)) cosφ(U) tanφ(fix)) Q(cosφ(U)) For a more detailed description of the reactive power procedure, see Section 14.4 Reactive power procedure.
-
Page 71: Navigating To The Power Control Website
14.1.4 Navigating to the Power Control website Navigate to the "PV system" area via the top navigation bar. Navigate to the "Power Control" area via the left-hand navigation menu. Fig. 55: Power Control: Overview blue’Log X series 69 | 120... -
Page 72: General Settings
14.2 General settings 14.2.1 Selecting data logger mode The data logger mode indicates the blue’Log’s role at passing on specified control values. Standalone No specified control values are sent to other blue’Logs. This setting is recommended if the specified control values apply exclusively to the inverters operated on this data logger. - Page 73 Slave The data logger receives the specified control values from its master and transfers the data to the connected inverters. The remote control system is not connected to this blue’Log. Fig. 57: Power Control: Slave data logger mode Input box Meaning Receives general Specified control values are received from the blue’Logs...
- Page 74 Input box Meaning Active power fallback In the event of an error in the transfer of the control value values, a configurable, constant P fallback value is specified as the control value. Procedure in the event In the event of an error in the transfer of the control of an error values, a configurable, constant cosφ...
-
Page 75: Entering System Data
14.2.2 Entering system data The system data are basic values which are essential in order to determine the inverter control values. Missing or incorrect details lead to incorrect control values. Fig. 58: Power Control: System data It is imperative for the parameters in this section to be correct in order to ensure the Power Control procedures functioning properly. -
Page 76: Active Power Procedure
14.3 Active power procedure Control values for inverter active power control or active power regulation can be determined using various procedures. In addition to the procedures, options are made available which allow further settings to be specified (e.g. the Intelligent Power Limit function allows a closed control loop to be enabled). - Page 77 Input box Meaning Limitation to agreed If enabled, the active power is limited at the grid connection power P connection point to the agreed upon connection power Fallback value Set fallback value as target value in the event of an error blue’Log X series 75 | 120...
-
Page 78: P(Di) Procedure
14.3.1 P(DI) procedure With this procedure, the active power P is used as the control value. The specified target value is provided by the grid operator as a digital input signal. This is possible for example via a remote control system connected to the digital inputs of the blue’Log. - Page 79 Step 2 In Step 2, bitmasks are assigned to percentage target control values. Boxes highlighted in blue represent a combination of active signals at the digital interfaces of the blue’Log. If a corresponding combination of active signals is enabled at the digital inputs, the percentage control value assigned in each case will come into force.
-
Page 80: P(Ai) Procedure
14.3.2 P(AI) procedure With this procedure, the active power P is used as the control value. The specified target value is provided by the grid operator as an analog input signal. This is possible for example via a remote control system with an analog output connected to an analog input of the blue’Log. -
Page 81: P(Fix) Procedure
14.3.3 P(fix) procedure With this procedure, a fixed active power limit is used as the control value. The specified target value (for example 60 or 70 percent) is set as the permanent active power limit. The PV yield active power can be limited with this procedure. Fig. -
Page 82: Intelligent Power Limit (Ipl)
14.3.4 Intelligent Power Limit (IPL) With the help of the Intelligent Power Limit (IPL) function, active power regulation (closed control loop) can be enabled. As a result, cabling and transformer losses in PV power plants can be taken into account in order to provide the maximum permitted feed-in power at the grid connection point in accordance with the permitted stationary control deviation. - Page 83 Fig. 64: Power Control: Example IPL set-up PV generator Power quality analyzer / feed-in meter blue’Log Consumption meter Inverter Public electricity grid RS485 bus Grid connection point S0 bus (10) Consumer blue’Log X series 81 | 120...
-
Page 84: Gradient Limitation Active Power (P) Procedure
14.3.5 Gradient limitation active power (P) procedure Gradient limitation for active power procedures is a function designed to limit the maximum change in active power within a specified period of time. The change in active power should follow a specific linear course (target trajectory). This linear course is defined via the gradient which is given as the maximum change in active power per second. - Page 85 The configurable gradient is determined using the following formula: Active power share for determining the gradient in % P Time parameter for gradient limitation in s blue’Log X series 83 | 120...
-
Page 86: Limitation To Agreed Connection Power Pav
14.3.6 Limitation to agreed connection power P If this function is enabled, the feed-in active power is limited to the agreed upon connection power P . Taking readings from a power quality analyzer or a feed-in meter provides the blue’Log with measured values used as basis for calculating dynamic inverter activation. -
Page 87: Reactive Power Procedure
14.4 Reactive power procedure Target values for inverter reactive power control or reactive power regulation can be determined using various procedures. In addition to the procedures, further options allow for more settings to be specified (e.g. the reactive power system control loop function allows a closed control loop to be enabled). - Page 88 Input box Meaning Change of procedure Enables setting options to switch the reactive power procedure during operation using digital signals Standard procedure Input Description of the digital input for switching procedure on the blue’Log Procedure Selects the reactive power procedures Cog button Brings up the configuration settings for the selected reactive power procedure...
-
Page 89: Cosφ(Di) Procedure
14.4.1 cosφ(DI) procedure In this procedure the displacement factor cos φ is used as control value. The specified target value is provided by the grid operator as a digital input signal. This is possible for example via a remote control system connected to the digital inputs of the blue’Log. - Page 90 Step 2 In Step 2, bitmasks are assigned to specified control values. Boxes highlighted in blue represent a combination of active signals at the digital interfaces of the blue’Log. If a corresponding combination of active signals is enabled at the digital inputs, the control value assigned in each case will take effect.
-
Page 91: Cosφ(Ai) Procedure
14.4.2 cosφ(AI) procedure In this procedure, the displacement factor cos φ is used as the control value. The specified target value is provided by the grid operator as an analog input signal. This is possible for example via a remote control system with an analog output connected to an analog input of the blue’Log. -
Page 92: Cosφ(Fix) Procedure
14.4.3 cosφ(fix) procedure In this procedure a constant cosϕ displacement factor is used as control value. The target value is specified as a constant displacement factor value. To this end, a configurable, constant value is saved. Fig. 71: cosφ(fix) Power Control procedure: Setting the constant specified value Input box Meaning cosϕ... -
Page 93: Cosφ(P) Procedure
14.4.4 cosφ(P) procedure In this procedure the cosφ displacement factor is used as control value. Changing the displacement factor enables influencing the power fed in at the grid connection point. The selected measuring device records the power P fed in at the grid connection point and transfers the measurements to the data logger for this purpose. - Page 94 Fig. 73: cosφ (P) Power Control procedure: 4 point with hysteresis Input box Meaning Curve Selects the type of curve 2 point without hysteresis Curve with 2 interpolation points without hysteresis 2 point with hysteresis Curve with 2 interpolation points with hysteresis 4 point without hysteresis Curve with 4 interpolation points without hysteresis...
-
Page 95: Cosφ(U) Procedure
14.4.5 cosφ(U) procedure In this procedure the cosφ displacement factor is used as control value. By changing the displacement factor, it is possible to influence the voltage at the grid connection point by recording the voltage U at the grid connection point by the selected measuring device and transferring the results to the data logger. - Page 96 Fig. 75: cosφ (U) Power Control procedure: 4 point with hysteresis Input box Meaning Curve Selects the type of curve 2 point without hysteresis Curve with 2 interpolation points without hysteresis 2 point with hysteresis Curve with 2 interpolation points with hysteresis 4 point without hysteresis Curve with 4 interpolation points without hysteresis 4 point with hysteresis...
-
Page 97: Q(Di) Procedure
14.4.6 Q(DI) procedure In this procedure the reactive power Q is used as control value. The specified target value is provided by the grid operator as a digital input signal, for example via a remote control system connected to the digital inputs of the blue’Log. The digital signals are assigned to the percentage specified control values via a bitmask. - Page 98 Step 2 In Step 2, bitmasks are assigned to percentage specified control values. Boxes highlighted in blue represent a combination of active signals at the digital interfaces of the blue’Log. If a corresponding combination of active signals is enabled at the digital inputs, the percentage control value assigned in each case will take effect.
-
Page 99: Q(Ai) Procedure
14.4.7 Q(AI) procedure In this procedure the percentage reactive power Q is used as control value. The specified target value is provided by the grid operator as an analog input signal, for example via a remote control system with an analog output connected to an analog input of the blue’Log. -
Page 100: Q(Fix) Procedure
14.4.8 Q(fix) procedure In this procedure a constant percentage reactive power Q is used as control value. The control value is specified as a constant percentage reactive power value. To this end, a configurable, constant value is saved. Fig. 79: Q(fix) Power Control procedure: Setting the constant specified value Input box Meaning Reactive power Q... -
Page 101: Q(U) Procedure
14.4.9 Q(U) procedure In this procedure the percentage reactive power Q is used as control value. By changing the reactive power, it is possible to influence the voltage by recording the voltage U at the grid connection point by the selected measuring device and transferring the data to the data logger. - Page 102 Fig. 81: Q(U) Power Control procedure: 2 point with hysteresis Input box Meaning Curve Selects the type of curve 2 point without hysteresis Curve with 2 interpolation points without hysteresis 2 point with hysteresis Curve with 2 interpolation points with hysteresis 4 point without hysteresis Curve with 4 interpolation points without hysteresis 4 point with hysteresis...
-
Page 103: Q(P Tanφ(Fix)) Procedure
14.4.10 Q(P tanφ(fix)) procedure In this procedure the reactive power Q is used as control value. Here the reactive power is set according to the power fed in by recording the active power P at the grid connection point by the selected measuring device and transferring the measurements to the data logger. -
Page 104: Q(Cosφ(Di)) Procedure
14.4.11 Q(cosφ(DI)) procedure In this procedure the reactive power Q is used as control value. The input signal of the grid operator here relates to the cosφ displacement factor to allow use of the generally greater inverter setting range with reactive power(Q) values. As a result, the inverters can be regulated within greater range. -
Page 105: Q(Cosφ(Fix)) Procedure
14.4.13 Q(cosφ(fix)) procedure In this procedure the reactive power Q is used as control value. A constant cosφ displacement factor is used as the input value/target value. This input value is converted into a specified percentage reactive power(Q) control value to allow use of the generally greater inverter setting range with reactive power(Q) values. -
Page 106: Q(Cosφ(U)) Procedure
14.4.15 Q(cosφ(U)) procedure In this procedure a cosφ value is derived from the target value and is converted into the reactive power Q as control value to allow use of the generally greater inverter setting range with reactive power(Q) values. As a result, the inverters can be regulated within a greater range. -
Page 107: Procedure In The Event Of An Error
14.4.16 Procedure in the event of an error The procedure describes what happens in the event of an error. Different procedures can be configured for different errors. Fig. 83: Power Control reactive power procedure: Failover methods Procedure in the event of invalid procedure switch The fallback procedure in the event of an invalid procedure switch takes effect if the specifications for switching the reactive power procedures are incorrect (e.g. - Page 108 Standard values in the event of errors in all procedures In the event of an error in the reactive power procedure or in the configured fallback procedures, the configured cosϕ or Q fallback value will be specified as the target value according to the reactive power procedure (cosϕ...
-
Page 109: Gradient Limitation Reactive Power(Q) Procedure
14.4.17 Gradient limitation reactive power(Q) procedure Gradient limitation for reactive power procedures is a function designed to limit the maximum change in reactive power within a specified period. The change in reactive power should follow a specific linear course (target trajectory). This linear course is defined via the gradient which is given as maximum change in reactive power per second. - Page 110 The configurable gradient is determined using the following formula: Target value specification range for reactive power regulation in % Max. inductive reactive power capacity of the inverters in % S Max. capacitive reactive power capacity of the inverters in % S ...
-
Page 111: System Control Loop
14.4.18 System control loop With the help of the "System control loop" setting option, the relevant reactive power procedure can be used for control purposes (open control loop; selection of control loop "OFF") or regulation purposes (closed control loop; selection of system control loop ... - Page 112 The system control loop is only active if the reactive power procedure is selected. For correct functionality of the system control loop, the following parameters have to be properly configured. Agreed upon connection power P [kW] AC nominal voltage U [kV] ...
-
Page 113: Power Control Checklist
14.5 Power Control checklist Is the chosen Power Control procedure suitable for the grid operator's specified target values? Is the chosen Power Control procedure supported by the inverters? Are the grid operator's remote control system interfaces compatible with the blue’Log interfaces? Are there any specific features to be taken into account using the chosen active power procedure? Are all necessary meters or a power quality analyzer installed in the PV system? -
Page 114: Technical Data
15. Technical data TECHNICAL DATA Power supply 20-60 V DC Power consumption Typically 5 W max. 80 W, incl. MX module ESD protection Tested in accordance with DIN EN 61000-4-2 (4 kV contact discharge, 8 kV air discharge) Operating temperature -20°C to 70°C Storage and transport temperature -20°C to 85°C... - Page 115 Digital inputs 4 x digital inputs (mode configurable via software for each port) The following options are available for each input: Type Usage Range Digital Potential-free contact 24 V DC / 20 mA Digital S0-compliant Digital outputs/multi inputs The four ports each have a pin for a digital output, a multi input and a ground: 4 x digital outputs (mode configurable via software for each port) 4 x multi inputs (mode configurable via software for each port) The following options are available for each digital output:...
- Page 116 The system is supplied with all inverter drivers available at Supported inverters the time of production. The number of supported inverter manufacturers is increasing all the time. For further information please visit the blue’Log driver data sheets at http://www.meteocontrol.com/de/downloads/. SOFTWARE FEATURES X-1000 X-3000 X-6000 Maximum recordable power ≤...
-
Page 117: Environmental Protection And Disposal
MEMORY SD card Type: X-1000: 16 GB X-3000: 16 GB X-6000: 32 GB Size: 16. Environmental protection and disposal Old and defective devices should be disposed of in accordance with national and local environmental and recycling regulations. Electronic components may not be disposed of along with household waste. blue’Log X series 115 | 120... -
Page 118: Ce Certificate
Konformitätserklärung gemäß dem Gesetz über Funkanlagen und Telekommunikationsend- einrichtungen (FTEG) und der Richtlinie 1999/5/EG (R&TTE) Declaration of Conformity in accordance with the Radio and Telecommunications Terminal Equipment Act (FTEG) and Directive 1999/5/EC (R&TTE Directive) Hersteller: meteocontrol GmbH Manufacturer: Anschrift: Spichererstrasse 48 Address: D –... -
Page 119: Rohs Statement
DECLARATION OF CONFORMITY 2011/65/EU (ROHS) meteocontrol GmbH declares that all manufactured products are RoHS compliant according to the Directive 2011/65/EU of the European Parliament and the Council from 8 June 2011 on restriction of the use of certain hazardous substances in electrical and electronic appliances. This concerns the... -
Page 120: List Of Figures
19. List of figures Fig. 1: Overview of the blue’Log front panel ..............12 Fig. 2: Overview of the blue’Log rear panel ..............13 Fig. 3: Secure mounting on a DIN rail ................17 Fig. 4: MX modules (example: RS485/422) ..............18 Fig. - Page 121 Fig. 34: Device websites: Modbus meter overview ............. 50 Fig. 35: Device websites: Adding a new inverter ............51 Fig. 36: Device websites: Inverter overview ..............51 Fig. 37: Device websites: String measuring system settings ........52 Fig. 38: Device websites: String measuring system overview ........52 Fig.
- Page 122 Fig. 69: cosφ(DI) Power Control procedure: Specifications bitmask ......88 Fig. 70: cosφ(AI) Power Control procedure: Setting measured values ......89 Fig. 71: cosφ(fix) Power Control procedure: Setting the constant specified value ..90 Fig. 72: cosφ (P) Power Control procedure: 2 point without hysteresis ....... 91 Fig.
- Page 124 Spicherer Str. 48 D-86157 Augsburg Phone +49 (0) 821 / 3 46 66-88 Fax +49 (0) 821 / 3 46 66-11 technics@meteocontrol.de www.meteocontrol.de/en Text and illustrations represent state-of-the-art technology at time of printing Subject to technical modifications We assume no liability for printing errors.
Need help?
Do you have a question about the blue’Log X-1000 and is the answer not in the manual?
Questions and answers