
Related Manuals for Smartwares CIP-39901


Summary of Contents for Smartwares CIP-39901
- Page 1 CIP-39901 Installation and Operating Instructions PLEASE READ THESE INSTRUCTIONS CAREFULLY BEFORE USING THIS PRODUCT AND KEEP THIS MANUAL FOR FUTURE REFERENCE.
-
Page 2: Table Of Contents
ETHERNET CONNECTION (OPTIONAL) ............7 CAMERA SETUP INSTRUCTION ..............8 GUARDIAN APP DOWNLOAD AND INSTALL ..........11 Guardian app Setup ....................11 SMARTWARES VIEW APP OVERVIEW ............15 LIVE VIEW......................19 EVENT VIDEO PLAYBACK .................. 20 ADVANCED SETTINGS ..................23 TROUBLE SHOOTING ..................27... -
Page 3: Overview
OVERVIEW The outdoor camera which is equipped with powerful LED light illuminates. The light can be switched on manually in the app or set to switch on when motion is detected. You can also control the camera via the app remotely from anywhere. 1Mbps (upload/ download speed) is suggested. -
Page 4: Please Read Before You Start
PLEASE READ BEFORE YOU START perceived policy. of video recording/surveillance. WIRELESS DEVICES OPERATING RANGE reception distance between the performance. Wireless CCTV operating on a secure interference from product such IMPORTANT SAFETY PRECAUTIONS Damages caused by non-compliance with this operating manual will void the warranty! We will not assume any liability for damages to items or persons caused by improper handling or non- compliance with the safety notices! Any warranty claim will be null and void in such cases. -
Page 5: Kit Content
KIT CONTENT WAPP-LSE Wall mount bracket Hex Key Antenna Screw Pack Positioning Card Reset Pin Quick Start Guide Tools Required: (not included) •Electric drill •5mm masonry drill bit •15mm masonry drill bit •No. 2 Philips screwdriver • For best system performance: iOS: iPhone6 / iPad2 / Mini iPad with iOS 10.0 or above. -
Page 6: Safety And Installation Tips
SAFETY AND INSTALLATION TIPS use of cable/pipe detector is advisable. video/power extension cables from being exposed externally and to prevent/reduce the chances of the hole is sealed up around the cable using a sealant to prevent drafts. branches or moving objects that might unnecessarily cause the camera to record. -
Page 7: Product Overview
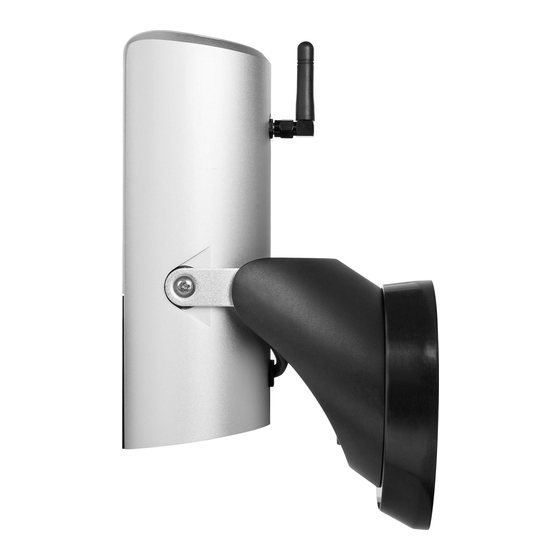
PRODUCT OVERVIEW Antenna LED Light FHD Camera Motion Sensor Light Sensor Microphone Wall Mount Bracket Speaker Reset Button Power LED Indicator Link LED Indicator Memory Card Micro USB Port for Slot “only” Wi-Fi Setup Note: to factory default and you may set up the camera again. -
Page 8: Install Your Device
INSTALL YOUR DEVICE For optimal performance install the lighting camera at a hight between 2.5 and 4 meters. Disconnect power at fuse or circuit breaker before proceeding to the installtion. Motion Detection 90˚ 2.5m Height ETHERNET CONNECTION (OPTIONAL) I/O Pin Connector RX+/RX-/TX+/TX-: Ethernet Cable I/O* *Ethernet cable not included in the package. -
Page 9: Camera Setup Instruction
CAMERA SETUP INSTRUCTION Put the terminal blocks back into the base properly to protect it against water. - Page 10 Connect to here...
- Page 11 when you done. Wait for 1 minute for camera to connet to internet. adjust the brightness to prefer level once the camera has setup completed. have better waterproof protection.
-
Page 12: Guardian App Download And Install
2. Connect your smartphone with the Wi-Fi signal (SSID) of the camera. It always starts with HD- **** and corresponds with the QR-code number on the Guardian. The default password is 12345678 3. Open the Smartwares view app and press the + button in the bottom. 4. You need to in fill 3 fields:... - Page 13 5. You can now open the live view of the camera, by pressing below Icon. You are now directly being forced to change the default password to your own password: 6. To connect the Guardian to your own Wi-Fi network, press the ‘gear wheel’ icon twice...
- Page 14 Press ‘Advanced’ in this screen: 7. The advanced setting are protected by an Admin password. Insert the Admin password, which is default: 123456 You are now directly being forced to change the default admin password to your own admin password:...
- Page 15 8. When you have accessed the advanced settings, go to WiFi setting and press Manage WiFi network: 9. Choose the Wi-Fi network name (SSID) where you want to connect to and insert the password. 10. The Guardian will restart and after approx. 1 minute your camera is restarted. Now the setup is done.
-
Page 16: Smartwares View App Overview
This is because there are different versions of the app for iOS and Android, and because the app is updated regularly. Start screen The start screen offers you an overview of your Smartwares camera and other compatible Smartwares products you may have installed. From this screen you have access to different functions: •... - Page 17 Adding a camera to add a camera or other compatible Smartwares product. Advanced Settings . The additional setup selection icons will appear. Now tap to access the advanced settings. Tap again to exit. Device settings: Change the device name, reset the Wi-Fi settings and access the advanced settings section.
- Page 18 If you want to enable/disable notifications, please follow the steps below: 1. Launch Settings from your Home screen. 2. Tap “ Notifications”. 3. Scroll down to find the Smartwares View app and tap on it. 4. Adjust the notification settings, such as On/Off, Sounds, banners, etc. Note:...
- Page 19 For Android If you want to enable/disable notifications, please follow the steps below. Note: The internet connection and wireless network speed may influence the performance of the push notification service. Video hardware acceleration Turn video hardware acceleration on for faster performance. Please turn this off if you experience any graphical glitches.
-
Page 20: Live View
Live view page Tap to switch between: ON / OFF / AUTO Auto mode: The light will turn on when motion is detected and Light button only when it is dark. The light will stay on for 1 minute after motion detection. -
Page 21: Event Video Playback
Event video playback The recorded video is automatically saved to the memory card. You can access the files for playback. on the main page. and the date/time filter will appear. You can define the period to display all available recorded files for playback. - Page 22 For playback, select the file from the event section. During the playback you can tap the pause button to pause/resume the playback. The local network conditions may cause improper video playback, resulting in a black screen. If this happens please leave the playback mode and try again later when the internet conditions have improved.
- Page 23 Delete Select the file(s) and tap the delete icon. It’s possible to delete multiple files at once. Check the video clip Then tap the trash can icon...
-
Page 24: Advanced Settings
Advanced settings This chapter explains the advanced settings for the administrator. The administrator is the one who owns the administration password and has full control over the camera. The administrator can access all functions and settings, while normal users can only receive the surveillance images for live view, capture video recordings and cannot manage the camera settings. - Page 25 Admin password The Admin Password is a specific security code for the administrator to edit the advanced settings. The default admin password is 123456. This function allows you to change the default admin password into your personal admin password. For the protection of your system configuration, you need to enter the admin password when changing the advanced settings.
- Page 26 SD card overwrite This function will overwrite the old files when the MicroSD card is full. Turning on this function will enable the system to start overwriting oldest files when the available memory card capacity is not sufficient. This ensures the most recent video recordings can be saved so that you won’t miss any important footage.
- Page 27 Video resolution This section allows you to change the resolution of recorded video. There are two options you can select, VGA (640*480) or HD (1280*720). To get better quality you should select HD video. It will however consume more storage space, cause longer upload times, and higher power consumption. Android Video Brightness This setting allows you adjust the brightness level of the recorded video for the best results, with level...
-
Page 28: Trouble Shooting
Trouble shooting SOLUTION You are not able to · Please put the device in close proximity to the Wi-Fi router. connect the camera to · The device only supports 2.4GHz, it does NOT support a 5GHz your Wi-Fi network… network. Please make sure that the Wi-Fi network is on a 2.4G frequency.
Need help?
Do you have a question about the CIP-39901 and is the answer not in the manual?
Questions and answers