Table of Contents
Advertisement
Advertisement
Table of Contents

Related Manuals for LifeWalker Mobility Products Upwalker


Summary of Contents for LifeWalker Mobility Products Upwalker
- Page 1 User Guide Designed by LifeWalker Mobility Products San Diego, California...
-
Page 2: Table Of Contents
TABLE OF CONTENTS Page Safety Warnings Set-Up Instructions Product Features Opening the UPWalker Setting Desired Armrest Height Setting Handgrip Angle Setting Length of Handgrip Arm How to Use Parking Brakes How to Adjust Brakes Positioning the Seat Using Sit-to-Stand Assist Handles... -
Page 3: Safety Warnings
• User assistance is recommended for customers with fall risk. • DO NOT use the UPWalker if there is apparent damage or if any parts • (other than accessories) are missing. Care should be taken to ensure that all height adjustment locks, handles, •... -
Page 4: Set-Up Instructions
Retain shipping materials in the event of customer return of product. 2. Stand the UPWalker up on all four wheels (see Fig A1 on page 6). 3. Push the front wheel gray lock tabs down to release the front wheels from locked position (see “Locking and Unlocking Wheels”... -
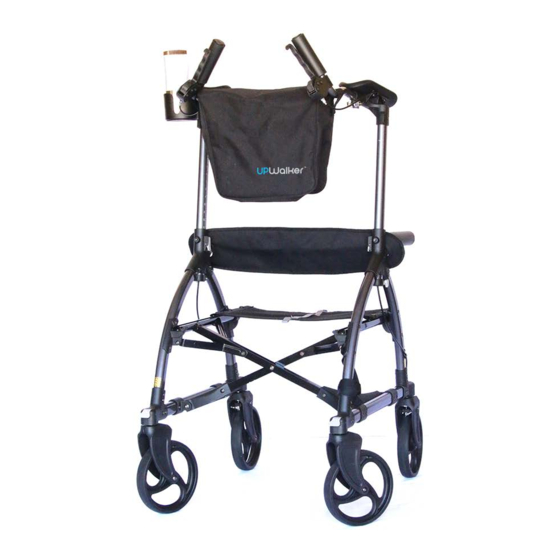
Page 5: Product Features
UPWalker ® Product Features Adjustable Foam Parking / Handgrip Hand Brake Armrest Pad Beverage Holder Height Adjustment Personal Item Bag Tube Sit-to-Stand Assist Handles Backrest Support Moveable Seat Height Adjustment Memory Stop Seat Rail Sturdy Metal Frame Front Wheel Locks... -
Page 6: Opening The Upwalker
CAUTION: THE UPWALKER IS NOT SECURE FOR USE IF SEAT RAILS ARE NOT PUSHED FIRMLY INTO THE FRAME BRACKETS AS DEMONSTRATED IN FIG A6. DO NOT USE THE UPWALKER IF SEAT RAILS ARE OUT OF FRAME BRACKETS (FIG A7). Fig A5... -
Page 7: Setting Desired Armrest Height
UPWalker but not so high as to cause your shoulders to “hunch.” Put equal weight on each forearm while using the UPWalker. You may find it beneficial to displace some of your body weight on your forearms while walking. -
Page 8: Setting Handgrip Angle
5. The UPWalker includes a convenient height adjustment memory stop on the bottom of each height adjustment tube (Fig B3). After you have established your preferred height setting, unlock the height adjustment memory stop using the gray knob, turning it in a counterclockwise Fig B3 direction. -
Page 9: Setting Length Of Handgrip Arm
4. To close the UPWalker to its most compact size for storage or transport, point handgrips directly downward or upward in a vertical position so they don’t conflict when folding (Fig C5 or C3). Fig C4 Fig C5 Fig C6 D. -
Page 10: How To Use Parking Brakes
2. To unlock brakes, simply pull brake handles back toward you. 3. It is strongly recommended that the parking brakes be set in the locked position when the user is sitting down in the UPWalker or standing from a seated position and when the user is making adjustments to the UPWalker’s settings. - Page 11 wheel (Fig F2). Before attempting to adjust the brakes, ensure that the parking brake is disengaged (see "How to Use Parking Brakes" page 10). Brake is Too Loose Use fingers or pliers to turn the barrel adjuster nut counterclockwise a half rotation (Fig F3).
-
Page 12: Positioning The Seat
UPWalker, including brake adjustments. G. Positioning the Seat 1. To walk in the UPWalker, pull the seat to the most forward position by lifting up and pulling forward the tab on the front of the seat (Fig G1). 2. To sit on the seat, set the parking brake, pull the seat fully backward using the rear pull tab (Fig G2), and sit with legs facing the rear. -
Page 13: Locking And Unlocking The Wheels
(see “Setting Desired Armrest Height” on page 7). Lift the seat up by seat lift handle (Fig J1) and allow UPWalker to fold in (Fig J2). Stand the UPWalker on all four wheels to roll or stow. Use the Velcro strap on front of the UPWalker to secure folded unit for storage or transport. -
Page 14: Using Your Upwalker
K. Using Your UPWalker 1. Once standing in the UPWalker move forward so your body is between the armrest pads, standing in an upright position with good posture. 2. Put equal arm pressure on the left and right armrest pads. Put hands on handgrips with fingers around the brake handles. -
Page 15: Accessories
M6) close to armrest pad with hole on bottom and flat side of “U” facing inward. Make sure rubber sleeve remains inside the “U”. Slide the bolt on beverage holder through the hole on “U” with beverage holder positioned on the outside and the knob on the inside of the UPWalker (Fig M7). Note... - Page 16 With the UPWalker logo facing forward, place support straps in the bend in the handgrip tubes at the base of each handgrip and secure using Velcro at the ends of the straps (Fig M11).
- Page 17 Untighten/tighten the adjuster knob at the end of the arm to pivot the phone holder. ● Cane/Umbrella Holder (Fig M15) attaches to the side of the UPWalker for the convenience Fig M14 of holding a cane or umbrella handsfree. The cup attaches to the lower horizontal frame tube facing outward near front wheels (Fig M16).
- Page 18 outside and the retaining nut on the inside. Slide bolt with knob back through the holes on clamp and turn the knob clockwise to seat the bolt in the retaining nut and tighten clamp against frame. Re-attach the cup and turn to desired position. The upper retaining clamp attaches to the curved front leg tube of frame, with clamp and gray knob on the outside of the frame (Fig M17).
-
Page 19: Warranty Information
Our standard warranties represent our confidence in the materials and workmanship of your new UPWalker. The frame of the UPWalker is warrantied to be free from defects in material and workmanship, under NORMAL use, for the lifetime of the original consumer purchaser when purchased from LifeWalker Mobility Products or an authorized LifeWalker Mobility Products dealer. -
Page 20: Customer Support
● A description of the defect or problem requiring service. ● DO NOT return any products to LifeWalker Mobility Products without our prior authorization. If you purchased your UPWalker from an authorized LifeWalker Mobility Products dealer, please contact that dealer. If you do not receive satisfactory service from the dealer, please call LifeWalker Mobility Products.
Need help?
Do you have a question about the Upwalker and is the answer not in the manual?
Questions and answers