Table of Contents
Advertisement
Quick Links
Advertisement
Table of Contents

Related Manuals for ARRI MAXIMA QL


Summary of Contents for ARRI MAXIMA QL
- Page 1 ! 1 MAXIMA QL USER MANUAL Date: 29. Jan. 2018...
- Page 2 This manual is only focusing on the components and the setup of the MAXIMA QL. The Control Software the so called GUI is available as a separate manual. You can find this manual on the USB stick or on the ARRI CSS web page in the download area. ...
-
Page 3: Table Of Contents
! 3 Table of contents Table of contents 1 For your safety 2 System Components 3 General Safety Instructions 4 Camera Preparation 5 MAXIMA Preparation 6 Changing from Standard to Advanced Mode 7 Default User Presets 8 Troubleshooting 9 MAXIMA Accessories 10 Pin Out 11 CE / FCC... -
Page 4: For Your Safety
! 4 For your safety For your safety Before use, please ensure that all users comprehensively read, understand, and follow the instructions in this document. Risk levels and alert symbols Safety warnings, safety alert symbols, and signal words in these instructions indicate different risk levels: ... -
Page 5: System Components
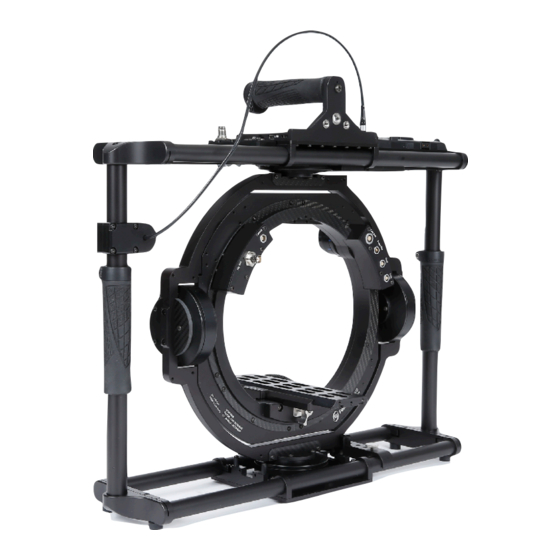
! 5 System Components System Components 2.1 Functions / Front Top Handle Battery Mount Gold Mount or V-Mount Outer Frame Upper Pan Axis Motor Joystick Rubber Handle Rubber Handle Pan Axis Motor Pan Axis Motor QL Camera Mount Inner Ring... - Page 6 ! 6 Functions & Connectors 2.3 Functions / Top Joystick Socket Control Socket Power Indicator Main Power USB On/Off Connector Control Knobs HD SDI Out Fine adjustment Display Roll Axis ...
-
Page 7: General Safety Instructions
! 7 Functions & Connectors 2.6 Focus Pwr: The 12V Focus Power (max 10Amp) socket can be used with: Focus Power / ARRI & cmotion K2.0010548 2.7 HD SDI BNC: The 3GHz HD SDI BNC socket can be used with: ... - Page 8 Place the batteries into the holder provided cautiously and with care. Check the contacts for damage beforehand. Do not subject the MAXIMA QL to humidity and do not immerse it into water. Do not short any contacts or modify the power supply or the electronics under...
-
Page 9: Camera Preparation
The camera preparation must meet the following requirements: Compact length You should keep the COG (center of gravity) of the MAXIMA QL as low as possible and the total length of the camera should be as compact as possible. ... - Page 10 CAUTION Keep in mind the MAXIMA QL head is a fully stabilized Gimbal with a payload capacity of 30kg / 66 lb. The amount of available torque is very high. - EU 04/2017 ...
-
Page 11: Maxima Preparation
NOTE It may be necessary to detach some accessories to mount the camera inside the MAXIMA QL ring. These can be reattached after the camera is mounted. NOTE ... - Page 12 The MAXIMA QL is available with Gold Mound and with V-Mount battery mounts. NOTE Do not use any low quality batteries from unknown manufactures To power the MAXIMA QL, the camera and accessories, minimum a 150 Watt battery is needed. ...
-
Page 13: Changing From Standard To Advanced Mode
On-Board Interface Controls and adjustments operated directly on the MAXIMA QL 6.1 Changing Profiles By pressing MODE one time, you will recall profile number ONE. By pressing MODE twice, you will recall profile ... -
Page 14: Default User Presets
To be able to change any of this adjustment, you need to install the FoMa Control software and you need to read the User Manual GUI. The manual is available on the USB stick and on the ARRI CSS web page in the download area. ... -
Page 15: Troubleshooting
The service team can remotely access the MAXIMA or TRINITY. To enable us to access your MAXIMA or TRINITY, you need to install the „TeamViewer“ software on your PC first. https://www.teamviewer.com Then you need to contact the ARRI service. NOTE You will need a stable internet connection. ... -
Page 16: Maxima Accessories
NOTE A 4mm 5/32” hex key is needed. Open and remove the screw on the top of MAXIMA QL, which secures the top handle. Remove the Top Handle. Engage both hooks of the Top Mount with the ... - Page 17 9.3 Cone Mount If you want to use the MAXIMA QL with an artemis spring arm or any other arm using a Ø 5/8'' (15.8 mm) arm posts, you need to attached the included Cone Mount. ...
- Page 18 9.7 Pan Lock From time to time you might need a more „handheld“ look. So it will be necessary to lock the pan axis of the MAXIMA QL. The Maxima Pan Lock (K2.0014908) will allow you to lock ...
-
Page 19: Pin Out
Power Out Ext. Power In Ext / Control Lemo 0B 306 Lemo 0B 304 Lemo 1S 304 Pin 1 Can Low ARRI Pin 1 Ground Pin 1 12V plus Pin 2 Can High ARRI Pin 2 12V plus Pin 2 Ground... -
Page 20: Ce / Fcc
CE / FCC CE / FCC ISO 9001:2009 Hard- und Software Entwicklung Foltyn Industriesystemelektronik GmbH • Strengenbergstraße 24 • D-90607 Rückersdorf Declaration of Conformity Product Type Camera Stabilizer Systems Brand Name MAXIMA Product Name SMX20 / SMX30 (maybe followed by suffixes) Address Foltyn Industriesystemelektronik GmbH... - Page 21 CE / FCC ...
Need help?
Do you have a question about the MAXIMA QL and is the answer not in the manual?
Questions and answers