Advertisement
PROTON 180 DEGREE IP54 PIR, WHITE, COMPLETE WITH ACCESSORY
SHIELD TO REDUCE DETECTION ANGLE, MANUAL OVERRIDE
RPR180PIR-01
PLEASE READ INSTRUCTION BEFORE COMMENCING INSTALLATION AND RETAIN FOR FUTURE REFERENCES.
! Electrical products can cause death or injury, or damage to property. If in any doubt about the installation or use of
this product, consult a competent electrician
Product technical information and specification may change over time without prior notification. For the latest technical
information please visit our web site www.ledgrouprobus.com.au
-20°C < Ta < +40°C, 220-240V~50/60Hz, Class II, IP54
Rated load:
Incandescent: Max. 1200W, Fluorescent / LED: Max. 300W
Mounting Height:
Detection Range:
Installation
1. Ensure mains supply is switched off before commencing work.
2. Select suitable location for mounting the sensor.
3. Remove the screw and then remove back plate.
4. Introduce cables.
5. Mark appropriate fixing hole positions on the wall, check location of buried cables, pipes and other building services before
drilling.
6. Attach plate to the wall using screws provided, ensure it is secure. When corner mounting please see pictogram 3.
7. Connect the cables as per figure 5. Live In (Brown) to L, Live Out (Brown) to L' and Neutrals to N.
8. Attach sensor to back plate, ensure it is secure .
9. Adjust the angle of sensor and sensor settings.
Test:
Walk testing can be carried out to determine detection area with slow walking pace. When the sensor detects movement, the
load will be switched on for the pre-set time. For the walk test turn Lux control toward the Sun position (Max) and set time delay
to 10s. When finished, set controls to desired levels. Note: Once sensor has been triggered, subsequent detection restarts
timing period from beginning, so light stays on until set time elapses after last triggering.
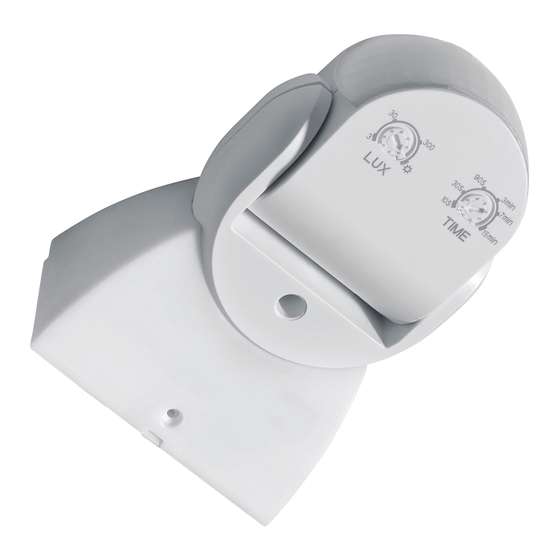
ADJUSTING THE LUX CONTROL LEVEL:
The Sun position (2000 Lux) denotes that when there is movement the load will be switched on during the day and at night. The
minimum Lux setting 3 Lux means that the load will be turned on by sensor only at night. Lux settings can be adjusted from 3 –
2000 Lux by rotating the dial.
ADJUSTING THE TIME DELAY:
The Time Delay is "the length of time that the sensor switches the load 'on' after
activation". The duration time can be adjusted from 10 (±3) seconds to 15 (±2) minutes.
Manual Override Function
The PIR can be on permanently for 8 hours. Using the switch on the wall perform 2 Off/ On, Operations within 4 seconds, the
light will stay on for 8 hours. In order to revert to AUTO detect mode, turn the sensor off and then, the light will turn off (AUTO).
LED Group Australasia
9/210 Queensport Road North
Murarrie
QLD 4172
Australia
Issue 1 080818
RPR180PIR-04
1.8m to 2.5m
12m
The Installation must be carried out by a qualified electrician
Tel: 07 3890 5444
Fax: 07 3890 4777
Email: purchases@ledgrouprobus.com.au
Website: www.ledgrouprobus.com.au
INSTRUCTION MANUAL
Note:
Lux Level Adjustment:
Time Delay:
Suitable for mounting on a normally flammable surface.
3-2,000 Lux
10 (±3) Seconds - 15 (±2) Minutes
EN
Page 1
Advertisement
Table of Contents

Related Manuals for Robus RPR180PIR-01


Summary of Contents for Robus RPR180PIR-01
- Page 1 INSTRUCTION MANUAL PROTON 180 DEGREE IP54 PIR, WHITE, COMPLETE WITH ACCESSORY SHIELD TO REDUCE DETECTION ANGLE, MANUAL OVERRIDE RPR180PIR-01 RPR180PIR-04 PLEASE READ INSTRUCTION BEFORE COMMENCING INSTALLATION AND RETAIN FOR FUTURE REFERENCES. ! Electrical products can cause death or injury, or damage to property. If in any doubt about the installation or use of...
- Page 2 80mm 51mm Accessory shield RPRBRK-01 RPRBRK-04 3Min 1.8-2.5m 7Min 15Min Time Max 12m Page 2...
Need help?
Do you have a question about the RPR180PIR-01 and is the answer not in the manual?
Questions and answers