Welch Allyn Connex Spot Monitor Directions For Use Manual
Hide thumbs
Also See for Connex Spot Monitor:
- Disassembly and reassembly (263 pages) ,
- Service manual (214 pages) ,
- Startup manual (8 pages)
Table of Contents
Advertisement
Quick Links
Advertisement
Table of Contents

Related Manuals for Welch Allyn Connex Spot Monitor


Summary of Contents for Welch Allyn Connex Spot Monitor
- Page 1 ® Connex Spot Monitor Directions for use...
- Page 2 © 2017 Welch Allyn. All rights are reserved. To support the intended use of the product described in this publication, the purchaser of the product is permitted to copy this publication, for internal distribution only, from the media provided by Welch Allyn. No other use, reproduction, or distribution of this publication, or any part of it, is permitted without written permission from Welch Allyn.
-
Page 3: Table Of Contents
Contents Introduction ..................... 1 Intended use ......................1 Contraindications ....................1 Symbols and definitions ................. 3 About warnings and cautions ..............7 General warnings and cautions ................7 Controls, indicators, and connectors ........... 13 Setup ...................... 19 Supplies and accessories ................... 19 Connect the battery ................... - Page 4 ® iv Contents Connex Spot Monitor Alarms ....................47 Vital sign summary view ..................47 Alarm limits ......................47 Alarm reminder signal ..................47 Alarm types ......................47 Alarm notification locations ................48 Icons on the Home tab ..................48 Reset (pause or turn off) audio alarms ...............
- Page 5 Directions for use Contents v Guidance and manufacturer's declaration ........147 EMC compliance ....................147 Emissions and immunity information ............... 147 Appendices ..................151 Approved accessories ..................151 Warranty ......................159...
- Page 6 ® vi Contents Connex Spot Monitor...
-
Page 7: Introduction
Introduction This manual describes the capabilities and operation of the Connex Spot Monitor (monitor). The information, including the illustrations, pertains to a monitor configured with noninvasive blood pressure (NIBP), body temperature, pulse oximetry (SpO2), and pulse rate. If your monitor configuration lacks any of these options, some information in this manual might not apply. - Page 8 ® 2 Introduction Connex Spot Monitor...
-
Page 9: Symbols And Definitions
Follow instructions/directions for use (DFU) -- mandatory action. A copy of the DFU is available on this website. A printed copy of the DFU can be ordered from Welch Allyn for delivery within 7 calendar days. Power symbols... - Page 10 ® 4 Symbols and definitions Connex Spot Monitor Rated power input, DC Rated power input, AC Lithium-ion battery Direct current (DC) Connectivity symbols Ethernet ® Bluetooth Nurse call Wireless signal strength • Best (4 bars) • Good (3 bars) • Fair (2 bars) •...
- Page 11 Directions for use Symbols and definitions 5 Task Light Prescription only or "For Use by or on the order of a licensed medical professional" This way up Fragile Authorized Representative in the Meets essential requirements of European Community European Medical Device Directive 93/42/EEC IPX1 IP = International Protection...
- Page 12 ® 6 Symbols and definitions Connex Spot Monitor...
-
Page 13: About Warnings And Cautions
About warnings and cautions Warning and caution statements can appear on the monitor, on the packaging, on the shipping container, or in this document. The monitor is safe for patients and clinicians when used in accordance with the instructions and the warning and caution statements presented in this manual. Before using the monitor, familiarize yourself with the sections of this directions for use that pertain to your use of the monitor. - Page 14 WARNING Equipment damage and personal injury risk. No modifications to the monitor are allowed by anyone other than a qualified Welch Allyn service representative. Modification of the monitor could be hazardous to patients and personnel.
- Page 15 Directions for use About warnings and cautions 9 WARNING Fire and shock hazard. Only connect LAN cables contained within the perimeter of a single building. Conductive LAN cables spanning multiple buildings may introduce fire or shock hazards unless they are fitted with fiber optic cables, lightning arresters, or other applicable safety features.
- Page 16 WARNING Wall mounted equipment and accessories must be installed in accordance with accompanying instructions. Welch Allyn is not responsible for the integrity of any installation not performed by authorized Welch Allyn service personnel. Contact an authorized Welch Allyn service representative or other qualified service personnel to ensure professional installation for safety and reliability of any mounting accessory.
- Page 17 CAUTION Use only the Welch Allyn USB client cable to connect a laptop computer to the USB client port. Any laptop connected to the monitor must be running on a battery, a 60601-1 compliant power supply, or a 60601-1 compliant isolation transformer.
- Page 18 ® 12 About warnings and cautions Connex Spot Monitor...
-
Page 19: Controls, Indicators, And Connectors
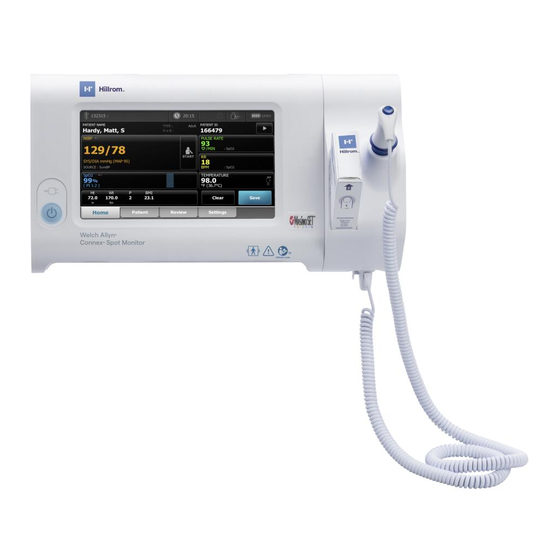
Controls, indicators, and connectors Note Your model might not contain all of these features. Front-Left view No. Feature Description LCD screen 7" color touchscreen provides a graphical user interface. Thermometry Secures the SureTemp unit to the monitor Battery charge and power-up status indicator The LED indicates the charging and power-up status when connected to AC power: •... - Page 20 ® 14 Controls, indicators, and connectors Connex Spot Monitor No. Feature Description • Wakes up the monitor from Sleep mode...
- Page 21 Directions for use Controls, indicators, and connectors 15 Back-Bottom-Left view No. Feature Description Battery compartment (behind cover) Houses the battery (captive screw secures cover to monitor) NIBP Connects NIBP cable to monitor USB client port Provides a connection to an external computer for testing and software upgrades USB port Connects APM work surface to monitor...
- Page 22 ® 16 Controls, indicators, and connectors Connex Spot Monitor This section applies only to devices with an Accessory Power Management (APM) stand. The APM is an accessory stand with work surface, power supply for enhanced device run time, and organizational bins to arrange sensors and cables for available parameters. Front-Top-Left view No.
- Page 23 Directions for use Controls, indicators, and connectors 17 Back-Bottom-Right view No. Feature Description Printer port Connect a printer (future use) USB ports (2) Connect optional accessories USB cable Connects APM work surface to monitor APM power cable Connects APM work surface to monitor Power connection Provides an external AC power connection Ground lug (equipotential terminal)
- Page 24 ® 18 Controls, indicators, and connectors Connex Spot Monitor...
-
Page 25: Setup
Always recycle batteries according to national or local regulations. WARNING Use only Welch Allyn approved accessories, and use them according to the manufacturer’s directions for use. Using unapproved accessories with the monitor can affect patient and operator safety and can compromise product performance and accuracy, and void the product warranty. -
Page 26: Mount The Monitor
Do not over-tighten the screw. Mount the monitor The Connex Spot Monitor can be mounted on either the MS3 Connex Spot Classic Mobile Stand, Accessory Power Management (APM) stand, or wall mount. When mounted on an MS3 stand, a separate power supply is required. This power supply connects directly to the mains outlet. - Page 27 Directions for use Setup 21 Connect AC power to MS3 Classic stand and monitor This section applies only to devices with Classic (MS3) stands. 1. Thread the power cable from the power supply through one of the spaces next to the pole to reach the monitor.
-
Page 28: Attach The Probe Well And Temperature Probe
2. Attach the SureTemp probe connector to the bottom of the monitor. 3. Insert the SureTemp probe into the probe well. 4. In the compartment to the left of the probe well, insert a Welch Allyn probe cover carton. Additional cartons of probe covers can be stored in the lower compartments of the cart if a cart is used. -
Page 29: Connect The Spo2 Cable
Directions for use Setup 23 Always grasp the hose by the connector spring tabs. Do not Note pull on the hose itself. 2. Squeeze and pull the spring tabs until the connector releases. Connect the SpO2 cable WARNING Patient injury risk. Do not use a damaged sensor or pulse oximetry cable or a sensor with exposed electrical or optical components. - Page 30 ® 24 Setup Connex Spot Monitor...
-
Page 31: Startup
Startup Power The Power button, located on the lower-left corner of the monitor, performs multiple functions. • Powers up the monitor • Wakes the monitor from Sleep mode • Opens a pop-up dialog with controls to sign out, power down, and enter Sleep mode (except when an alarm condition is active) CAUTION Do not use a long press of the Power button to power down the monitor when it is functioning normally. - Page 32 Press to power up the monitor. When the device is powering up, the LED flashes until the monitor displays the Welch Allyn logo and a power-up tone sounds. A pop-up screen appears, depending on your configuration and functionality. • On initial power-up, the monitor prompts you to set the language, date, and time.
- Page 33 Directions for use Startup 27 Bluetooth status A monitor with Bluetooth wireless technology displays the status between the monitor and the laptop in the Status area. Image Description No image Bluetooth radio is OFF Bluetooth icon appears in Status area Bluetooth radio is ON Bluetooth icon is blinking on / off slowly The monitor is pairing with the laptop...
- Page 34 ® 28 Startup Connex Spot Monitor 2. As the laptop downloads data, the progress indicator spins in the connection area. The Bluetooth connection remains active until the download is complete. After a successful download, the system clears data from the monitor and disconnects the monitor from the laptop.
- Page 35 Directions for use Startup 29 • Sleep • Cancel 4. Touch one of the options. The monitor will either sign you out as a clinician so that another clinician can sign in, power down, go into Sleep mode, or return to the prior screen, depending on the option you choose.
-
Page 36: Login Methods
® 30 Startup Connex Spot Monitor Exit Sleep mode 1. Press either or tap the screen. The Login dialog box appears. 2. If you are the current user and are in a facility-specific login format, use the scanner or keypad to enter your ID and password. If you are logging back into the monitor, the monitor returns to the screen that previously was visible, keeps the patient's context, and maintains the vital signs that could have been previously captured. - Page 37 Directions for use Startup 31 The Clinician ID appears in the Clinician ID field on this tab and in the Status area on the Home tab. Use a barcode scanner The monitor enables the scanning of patient and clinician barcodes to enter ID information.
-
Page 38: Profiles
® 32 Startup Connex Spot Monitor Profiles The monitor offers multiple profiles, including Spot, Office, and Intervals. Note Your model might not contain all of these features. Spot profile The Spot profile is optimized for rapid multi-patient vitals capture with custom and additional parameters, facility-specific login format, vital sign capture, and multiple patient review. - Page 39 Directions for use Startup 33 • Temperature • SpO2 • • Height, weight, pain • ® USB and Bluetooth capability Intervals profile The Intervals profile is optimized for unattended episodic interval monitoring of a single patient with single patient review and alarms. The Intervals profile Home tab displays the following parameters and features: •...
- Page 40 ® 34 Startup Connex Spot Monitor...
- Page 41 Directions for use Startup 35 Profile feature comparison The monitor offers multiple profiles, including Spot, Office, and Interval. Your model might not contain all of these features. Note Profile feature comparison The following table compares the features of the profiles. Feature Spot Office...
-
Page 42: Common Screen Functionality
® 36 Startup Connex Spot Monitor Select a profile from the log in area If your facility has configured the Connex Spot Monitors with a facility-specific format, the Log in screen appears when the monitor is powered up. 1. Sign in to the monitor. The Profile selection screen appears and displays up to three profiles. -
Page 43: Primary Screens
Directions for use Startup 37 Icon Description OK key captures entered data and closes keypad or keyboard being used to enter data. Cancel key closes the keypad or keyboard without capturing entered data. Alpha key in the upper-left corner returns the keyboard to the basic alpha layout. - Page 44 ® 38 Startup Connex Spot Monitor Item Description 3 Primary navigation Based on which profile is in use, the primary navigation tabs for that profile appear at the bottom of the screen. Battery status The battery status indicator displays the state of the battery. The battery status is represented by icons in the upper-right corner of the monitor display.
- Page 45 Directions for use Startup 39 Alarm and information messages The Device Status area provides alarm and information messages that are either temporary or exist as long as the condition to which the message applies remains. Alarm or information messages may also include controls or behavior that you can use to manage alarm and information messages.
-
Page 46: Pop-Up Screens
® 40 Startup Connex Spot Monitor Manual entry and parameter modifiers You can change parameters manually by toggling between parameter values or using a pop-up screen to enter specific values. Change a parameter unit The units of measure for NIBP can be manually changed on the Home tab. Touch the NIBP frame. - Page 47 Directions for use Startup 41 • Patient • Alarms • Review • Settings Vertical tabs The vertical tabs on the left side of the screen enable you to navigate to additional areas of a primary tab. The vertical tabs displayed are determined by the primary tab chosen. Command buttons Command buttons, such as the Start Intervals button, enable you to navigate and perform actions.
- Page 48 ® 42 Startup Connex Spot Monitor Alarms tab The Alarms tab contains vertical tabs. • General • NIBP • Pulse rate • SpO2 • Temperature. The General tab contains parameter controls for alarm limits, volume controls, audio controls, and alarm reset. Review tab The Review tab displays patient data that has been previously captured.
-
Page 49: Patient Data Management
Patient data management Patient data is managed through the Patient tab. From the Patient tab, you can do the following: • Scan a patient ID with the barcode scanner and return an Admit/Discharge/Transfer (ADT) patient name match. • Enter additional patient information. •... -
Page 50: Manage Patient Records
® 44 Patient data management Connex Spot Monitor 1. Touch the Patient tab. 2. Touch in any field and then enter patient information. 3. Touch Next to cycle through the patient data fields. You can use a barcode scanner to enter a patient ID in the Note Patient ID field. -
Page 51: Modifiers
Directions for use Patient data management 45 Modifying the date and time on the device modifies the date Note and time on all saved readings on the device. Modifiers The Modifiers tab enables you to enter additional information for current measurements. Set modifiers 1. - Page 52 ® 46 Patient data management Connex Spot Monitor The Patient List screen appears. b. If the monitor is connected to the network, touch Retrieve list to update the onscreen patient list. The monitor retrieves the patient list from the network. c.
-
Page 53: Alarms
Alarms The monitor presents physiological alarms and technical alarms. Physiological alarms occur when vital sign measurements fall outside of set alarm limits, but they occur only in the Intervals profile. Technical alarms occur in all profiles. If the alarm system is powered down, the alarm log is maintained on the monitor for 14 days. -
Page 54: Alarm Notification Locations
® 48 Alarms Connex Spot Monitor Type Priority Color Alarm audio tone • Some technical alarms Alarm notification locations WARNING Patient injury risk. If you are relying on visual alarm notifications, maintain a clear line of sight with the monitor and/or Nurse Call. - Page 55 Directions for use Alarms 49 Icons in parameter frames Icon Name and status Alarm off. No visual or audio alarms or Nurse Call notification will occur for this parameter. Alarm on. Audio and visual notifications and Nurse Call are enabled. Alarm audio off.
-
Page 56: Reset (Pause Or Turn Off) Audio Alarms
® 50 Alarms Connex Spot Monitor Reset (pause or turn off) audio alarms Audio alarm characteristics • After you reset an audio alarm, some tones do not return, but others return after a pause interval if the condition that caused the alarm persists. Settings in the Advanced tab determine the length of the pause interval. -
Page 57: Adjust Vital Sign Alarm Limits
Directions for use Alarms 51 Adjust vital sign alarm limits You can adjust vital sign alarm limits or turn off alarm limit checking for individual parameters. WARNING Alarm limits are user adjustable. All alarm limit settings should take into account the patient's condition and acute care needs. Appropriate alarm limits should be set accordingly for each patient. -
Page 58: Alarm Messages And Priorities
® 52 Alarms Connex Spot Monitor in the Device Status area indicates alarm audio turned off, and a similar bell will appear in the parameter frames . If an alarm condition occurs, the bell will be red or amber in the alarming frame, according to the priority of the alarm, as shown here: •... -
Page 59: Nurse Call
Directions for use Alarms 53 Alarm messages Priority Alarm limit exceeded. Temperature LOW. High Nurse Call The monitor can be connected to a Nurse Call system through a cable that connects to the Nurse Call connector. When the Nurse Call cable is connected and Nurse Call is enabled, the monitor immediately notifies the Nurse Call system when any alarm condition occurs that exceeds the preset threshold. - Page 60 ® 54 Alarms Connex Spot Monitor...
-
Page 61: Patient Monitoring
Patient monitoring Required parameters If a parameter is required, a Skip button appears at the bottom of the parameters, and a Next button appears in the lower-right corner of the screen. Parameters may require three types of inputs. • Numerics •... -
Page 62: Intervals
® 56 Patient monitoring Connex Spot Monitor 3. Proceed to the additional parameter and enter the required information either manually or enter the data with the format presented. 4. If there is a required parameter that you choose not to complete, then touch Skip. An override dialog box appears explaining that it is a required parameter and the EMR will note that it was not captured. - Page 63 Directions for use Patient monitoring 57 WARNING Patient harm risk. Do not use intervals on neonates out of your hearing range. Verify that the audio can be heard from where you intend to Automatic intervals You can configure the monitor to take automatic NIBP measurements at consistent intervals.
- Page 64 ® 58 Patient monitoring Connex Spot Monitor Stat intervals You can configure the monitor to take NIBP measurements continuously. When you select Stat on the Intervals tab in Settings, the monitor takes repeated NIBP measurements for 5 minutes, starting a new cycle each time the cuff deflates below safe venous return pressure (SVRP) for 2 seconds.
-
Page 65: Nibp
WARNING Patient injury risk. Do not place the cuff on the arm on the same side of a mastectomy. If necessary, use the femoral artery in the thigh to take a measurement. WARNING Possible measurement error. Use only Welch Allyn blood pressure cuffs and accessories; substitution may result in measurement error. - Page 66 ® 60 Patient monitoring Connex Spot Monitor WARNING Inaccurate measurement risk. Properly position the blood pressure cuff to ensure blood pressure accuracy. WARNING Inaccurate measurement risk. Only use the cuff when the artery index marker falls within the printed range indicated on the cuff; otherwise, erroneous readings will result.
- Page 67 Directions for use Patient monitoring 61 CAUTION Correct sizing of the blood pressure cuff is important for accurate blood pressure readings. A cuff that is too small might provide false high readings, while a cuff that is too large might provide false low readings.
- Page 68 ® 62 Patient monitoring Connex Spot Monitor Obtain a single NIBP measurement 1. Touch START to begin a single measurement. The START button becomes an orange STOP button. NIBP always displays the current inflation rate. When complete, the NIBP parameter displays the completed NIBP measurement.
-
Page 69: Temperature
Directions for use Patient monitoring 63 Temperature Configure temperature alarms You must be in the Intervals profile to set alarm limits. 1. Touch the Alarms tab. 2. Touch the Temperature vertical tab. 3. Using either the keypad or ▲ or ▼, enter the desired upper and lower alarm limits. 4. - Page 70 ® 64 Patient monitoring Connex Spot Monitor Site selection Remove the temperature probe and touch the Temperature site control to toggle between sites. Icon Description Pediatric axillary Adult axillary Oral Rectal. Monitors configured with the temperature module and the red rectal probe well and probe default to the rectal mode.
- Page 71 Carefully place the probe in the axilla, avoiding contact with other objects or material. WARNING Patient injury risk. Always take a temperature measurement with a Welch Allyn single-use probe cover securely attached. Failure to use a probe cover can cause patient discomfort from a heated probe, patient cross-contamination, and inaccurate temperature readings.
- Page 72 ® 66 Patient monitoring Connex Spot Monitor WARNING Never use a damaged temperature probe. The thermometer consists of high-quality precision parts and should be protected from severe impact or shock. Do not use the thermometer if you notice any signs of damage to the probe or monitor. If the thermometer probe is dropped or damaged, remove it from use and have it inspected by qualified service personnel.
- Page 73 Directions for use Patient monitoring 67 CAUTION The monitor does not retain Direct mode temperatures in memory unless there is a physiological temperature alarm condition. If there is a physiological temperature alarm condition, the monitor automatically saves the measurement in the patient record. For temperature measurements that are within normal range, it is important to note the temperature before removing the thermometer probe from the measurement site and then manually record it in the patient record.
- Page 74 ® 68 Patient monitoring Connex Spot Monitor • Remove the probe from the probe well, load a probe cover, select a temperature site, and expose the probe to ambient air for more than 60 seconds. The temperature frame changes to "MODE: Direct...". •...
- Page 75 Directions for use Patient monitoring 69 Take a temperature at the rectal site WARNING Patient injury risk. When taking rectal temperatures, insert the probe tip only 5/8 inch (approximately 1.5 cm) inside the rectum of adults and only 3/8 inch (approximately 1 cm) inside the rectum of children to avoid the risk of bowel perforation.
- Page 76 Ensure that probe covers are disposed of according to facility requirements or local regulations. CAUTION The thermometer has no user-serviceable parts. If service is required, call your nearest Welch Allyn Customer Service or Technical Support facility. CAUTION Store the thermometer and probe covers in a dry location, free from dust and contamination and away from direct sunlight.
- Page 77 Directions for use Patient monitoring 71 CAUTION Inaccurate measurement risk. If ear drops or other ear medications have been placed in one ear canal, take the temperature in the untreated ear. Note A temperature measurement taken in the right ear might differ from a measurement taken in the left ear.
-
Page 78: Spo2
The battery pack continues to charge while the monitor is in Display power Note saving mode. Note It is strongly recommended that you use only the Welch Allyn rechargeable battery pack in the thermometer because the dock cannot charge other batteries. SpO2 SpO2 and pulse rate monitoring continuously measures functional oxygen saturation of arteriolar hemoglobin as well as the pulse rate in a patient through a pulse oximeter. - Page 79 Directions for use Patient monitoring 73 and varies between monitoring sites and from patient to patient, as physiological conditions vary. Masimo displays the LofP as a numeric value and refers to it as Perfusion Index. Nonin displays the LofP as a color value (yellow or red) only when the LofP is low, based on the sensor's algorithm.
- Page 80 ® 74 Patient monitoring Connex Spot Monitor WARNING Inaccurate measurement risk. Misapplied sensors or sensors that become partially dislodged may cause either over or under reading of actual arterial oxygen saturation. WARNING Inaccurate measurement risk. Venous congestion may cause under reading of actual arterial oxygen saturation. Therefore, assure proper venous outflow from monitored site.
- Page 81 Directions for use Patient monitoring 75 WARNING The accuracy of SpO2 measurements can be affected by any of the following: • elevated levels of total bilirubin • elevated levels of Methemoglobin (MetHb) • elevated levels of Carboxyhemoglobin (COHb) • hemoglobin synthesis disorders •...
- Page 82 ® 76 Patient monitoring Connex Spot Monitor WARNING Patient injury risk. The sensor and extension cable are intended only for connection to pulse oximetry equipment. Do not attempt to connect these cables to a PC or any similar device. Always follow the sensor manufacturer's directions for care and use of the sensor.
-
Page 83: Modifiers And Manual Parameters
Directions for use Patient monitoring 77 WARNING Inaccurate measurement risk. Pulse rate measurements generated through the blood pressure cuff or through SpO2 are subject to artifact and might not be as accurate as heart rate measurements generated through ECG or manual palpation. Configure pulse rate alarms You must be in the Intervals profile to configure the pulse rate alarms. -
Page 84: Configuration Tool
Manual parameters frame. Configuration tool The configuration tool is a web-based tool on the Welch Allyn website. The configuration tool enables you to set the device settings for your facility. For more information, visit the Connex Spot Monitor page on the Welch Allyn website. -
Page 85: Advanced Settings
Directions for use Patient monitoring 79 Advanced settings Consult the Connex Spot Monitor Service manual for Advanced settings. - Page 86 ® 80 Patient monitoring Connex Spot Monitor...
-
Page 87: Maintenance And Service
Always recycle batteries according to national or local regulations. WARNING Use only Welch Allyn approved accessories, and use them according to the manufacturer’s directions for use. Using unapproved accessories with the monitor can affect patient and operator safety and can compromise product performance and accuracy, and void the product warranty. -
Page 88: Replace The Apm Work Surface Battery
® 82 Maintenance and service Connex Spot Monitor 1. Set the monitor on a flat surface with the screen facing downward to access the battery cover. 2. Locate the battery cover, indicated by 3. Using a double-slotted screwdriver, loosen the captive screw at the base of the battery cover, and then remove the cover. - Page 89 Directions for use Maintenance and service 83 2. Remove the battery cover and put it aside. 3. Gently lift the latch with one hand and pull the tab on the top of the battery with your other hand to remove the battery from its slot. 4.
-
Page 90: Cleaning Requirements
Spot Monitor Cleaning requirements This section presents procedures for cleaning the Connex Spot Monitor (including the monitor, stand, APM work surface, accessories, and accessory basket and bins). Welch Allyn has validated these instructions to be capable of preparing your Connex Spot Monitor devices and above accessories for re-use. - Page 91 Super Sani-Cloth 70 percent isopropyl alcohol solution Applied to a clean cloth Section 2. Not approved for all Connex Spot Monitor components The following cleaning agents are NOT approved for cleaning Connex Spot Note Monitors equipped with the Braun ThermoScan PRO 6000...
- Page 92 ® 86 Maintenance and service Connex Spot Monitor 7. Power on the monitor and verify that the monitor functions normally before using it. If liquids possibly entered the monitor, remove the monitor from use until it has been properly dried, inspected, and tested by qualified service personnel. Clean the equipment The screen lock blocks the display of patient information and prevents any input, which may be useful when cleaning the display.
- Page 93 Clean the Braun ThermoScan PRO 6000 contacts Debris that accumulates on the Braun ThermoScan PRO 6000 electrical contacts can interfere with data transmission. Welch Allyn recommends cleaning the contacts on the thermometer and the dock once every 4 months to maintain optimal performance.
- Page 94 ® 88 Maintenance and service Connex Spot Monitor 5. Allow the contacts to air dry for 1 minute. 6. Optional step to improve performance: On the dock only, apply DeoxIT Gold® to the tip of each electrical contact. Do not apply DeoxIT Gold to the thermometer. No drying time is required.
-
Page 95: Troubleshooting
Troubleshooting This section presents tables of technical alarm and information messages, as well as problem descriptions that do not generate messages, to help you troubleshoot issues on the monitor. Note Problem descriptions without messages appear at the end of this section. When the monitor detects certain events, a message appears in the Device Status area at the top of the screen. - Page 96 ® 90 Troubleshooting Connex Spot Monitor Message Possible cause Suggested action Alarm priority Unable to determine The NIBP measurement may be Make sure the NIBP settings/patient Medium NIBP; check inaccurate, patient motion mode is appropriate. If the problem connections; limit occurred, or the settings for persists, replace the module.
- Page 97 Directions for use Troubleshooting 91 Message Possible cause Suggested action Alarm priority patient movement. 05000F NIBP not functional. WACP message CRC mismatch on Internal malfunction. If the problem Very low 050105 NIBP module persists, replace the module. NIBP not functional. This message is not implemented Internal malfunction.
- Page 98 ® 92 Troubleshooting Connex Spot Monitor Message Possible cause Suggested action Alarm priority Invalid algorithm. Select Invalid NIBP Algorithm. NIBP Verify the algorithm. If the problem Very low correct algorithm and component software tried to persists, replace the module. retry. 05050A configure the sensor in an illegal manner NIBP not functional.
- Page 99 Directions for use Troubleshooting 93 Message Possible cause Suggested action Alarm priority Stat mode requested too NIBP excessive stat mode time. Internal malfunction. If the problem Very low soon. Clear to retry. The time between readings is less persists, replace the module. 050609 than one minute and the readings plus time between readings result...
- Page 100 ® 94 Troubleshooting Connex Spot Monitor Message Possible cause Suggested action Alarm priority Check cuff inflation Cuff inflation target was Change cuff inflation target or Information settings. overridden due to max pressure maximum pressure so that the cuff being too low inflation target is at least 20 mmHg lower than maximum pressure.
-
Page 101: Spo2 Messages
Directions for use Troubleshooting 95 Message Possible cause Suggested action Alarm priority Tube type does not The tube type settings and the Change the tube type setting to Information match device actual tube type do not match match the actual tube type. configuration. - Page 102 ® 96 Troubleshooting Connex Spot Monitor Message Possible cause Suggested action Alarm priority tester. If the message persists, replace the module. Replace the SpO2 cable. The SpO2 cable is incompatible Replace the SpO2 cable. If the Very low 040800 with the monitor problem is still present, verify module functionality by replacing the sensor with an applicable SpO2...
- Page 103 Directions for use Troubleshooting 97 Message Possible cause Suggested action Alarm priority Replace the SpO2 The SpO2 sensor is defective Replace SpO2 sensor. If the problem Very low sensor. 040f00 is still present, replace the SpO2 cable. If the problem is still present, verify the module functionality by replacing the sensor with an applicable SpO2 tester.
- Page 104 ® 98 Troubleshooting Connex Spot Monitor Message Possible cause Suggested action Alarm priority applicable SpO2 tester. If the message persists, replace the module. Searching for pulse SpO2 pulse search Pulse search is part of normal High signal. 041800 operation, and does not have an associated corrective action.
- Page 105 Directions for use Troubleshooting 99 Message Possible cause Suggested action Alarm priority SpO2 parameter Interference detected exception. 041900 SpO2 rebooting. 042000 There is an SpO2 MCU failure A malfunction is detected. There are Very low two possible causes of these failures.
- Page 106 ® 100 Troubleshooting Connex Spot Monitor Message Possible cause Suggested action Alarm priority removed. Second, the board has an actual hardware failure and recovery is not possible. It is recommended that the SpO2 module be replaced, and if problem is still present replace the monitor's main board.
- Page 107 Directions for use Troubleshooting 101 Message Possible cause Suggested action Alarm priority the board is out of specification. In this case, the failure may be cleared once the underlying cause is removed. Second, the board has an actual hardware failure and recovery is not possible.
- Page 108 ® 102 Troubleshooting Connex Spot Monitor Message Possible cause Suggested action Alarm priority SpO2 rebooting. 042e00 There is a problem with the SpO2 A malfunction is detected. There are Very low DSP I/O voltage two possible causes of these failures. First, the power provided to the board is out of specification.
- Page 109 Directions for use Troubleshooting 103 Message Possible cause Suggested action Alarm priority that the SpO2 module be replaced, and if problem is still present replace the monitor's main board. SpO2 rebooting. 043300 There is a problem with the SpO2 A malfunction is detected. There are Very low positive preamp voltage two possible causes of these...
- Page 110 ® 104 Troubleshooting Connex Spot Monitor Message Possible cause Suggested action Alarm priority removed. Second, the board has an actual hardware failure and recovery is not possible. It is recommended that the SpO2 module be replaced, and if problem is still present replace the monitor's main board.
- Page 111 Directions for use Troubleshooting 105 Message Possible cause Suggested action Alarm priority Searching for pulse None High None signal 043900 SpO2 interference SpO2 module interference Reapply the sensor to the patient. If Very low detected. Clear to retry. detected. the problem is still present, replace 043b00 the SpO2 Sensor.
-
Page 112: Temperature Messages
® 106 Troubleshooting Connex Spot Monitor Message Possible cause Suggested action Alarm priority SpO2 interference The SpO2 interference detected. Reapply the sensor to the patient. If Very low detected. Clear to retry. the problem is still present, replace 040400 the SpO2 Sensor. If the problem is still present, replace the cable. - Page 113 Directions for use Troubleshooting 107 Message Possible cause Suggested action Alarm priority requires an object, but did not contain one. Temperature not functional. The temperature Internal malfunction. If the problem Very low 30208 module object provided persists, replace the module. with the message could not be deserialized.
- Page 114 ® 108 Troubleshooting Connex Spot Monitor Message Possible cause Suggested action Alarm priority detected to be under voltage or unstable. Ambient temperature out of The temperature Verify conditions are greater than 50 °F or Very low range. Clear to retry. 30801 module measurement is 10 °C.
- Page 115 Directions for use Troubleshooting 109 Message Possible cause Suggested action Alarm priority Insert correct color-coded probe The temperature Insert the probe well Very low well. 30809 module is missing the probe well Temperature not functional. The temperature Internal malfunction. If the problem Very low 3080A module has a problem...
- Page 116 ® 110 Troubleshooting Connex Spot Monitor Message Possible cause Suggested action Alarm priority Temperature not functional. The temperature Internal malfunction. If the problem Very low 30814 module TEMP CONFIG persists, replace the module. ACQUIRE FAILURE Temperature not functional. The temperature Internal malfunction.
- Page 117 Directions for use Troubleshooting 111 Message Possible cause Suggested action Alarm priority Ambient temperature out of The temperature Verify conditions are less than 104 °F or Very low range. Clear to retry. 30821 module over ambient 40 °C. If conditions are valid and the 45 °C temp problem persists, replace the probe.
- Page 118 ® 112 Troubleshooting Connex Spot Monitor Message Possible cause Suggested action Alarm priority Temperature not functional. Unsupported message Internal malfunction. If the problem Very low 03CA00 received from the persists, replace the module. Temperature module Temperature not functional. Unable to send Internal malfunction.
- Page 119 Directions for use Troubleshooting 113 Alarm Message Possible cause Suggested action priority Temperature not functional. No parameter provided Internal malfunction. If the problem Very low 3F0204 for the specified persists, replace the module. message. Temperature not functional. The parameter provided Internal malfunction.
- Page 120 ® 114 Troubleshooting Connex Spot Monitor Alarm Message Possible cause Suggested action priority Temperature not functional. The reference voltage Internal malfunction. If the problem Very low 3F051A circuit was detected to persists, replace the module. be under voltage or unstable. Temperature not functional.
-
Page 121: Patient And Clinician Data Messages
Directions for use Troubleshooting 115 Patient and clinician data messages Alarm Message Possible cause Suggested action priority Unable to identify Clinician authentication failure Information status message; press OK button Information clinician. No provider to dismiss. configured at host. Unable to identify Clinician authentication failure Information status message;... - Page 122 ® 116 Troubleshooting Connex Spot Monitor Alarm Message Possible cause Suggested action priority Information status message; press OK button Information No data saved. A manual save is not allowed to dismiss. Information status message; press OK button Information Save successful. A manual record was saved to dismiss.
-
Page 123: Radio Messages
Directions for use Troubleshooting 117 Alarm Message Possible cause Suggested action priority Invalid SpO2 interval An invalid interval parameter was If SpO2 intervals are enabled and SpO2 clip Information parameter during detected. was removed, either stop the intervals or interval capture. reattach the SpO2 clip. - Page 124 ® 118 Troubleshooting Connex Spot Monitor Alarm Message Possible cause Suggested action priority Reconfigure and try check for software update and apply it. If again. 35000d still present, replace the radio. Radio not functional. Unrecognized. There is a version Check for a software update and apply it. Very low 35000e compatibility error if the radio or...
- Page 125 Directions for use Troubleshooting 119 Alarm Message Possible cause Suggested action priority Reconfigure and try certificate and no certificate is check for software update and apply it. If again. 350018 installed still present, replace the radio. Invalid radio Missing CA certification. The radio Check the radio configuration.
- Page 126 ® 120 Troubleshooting Connex Spot Monitor Alarm Message Possible cause Suggested action priority Radio not functional. Socket error. There is a software Check for a software update and apply it. Very low 35002c communication issue between the If still present, replace the radio. host and the radio Radio not functional.
- Page 127 Directions for use Troubleshooting 121 Alarm Message Possible cause Suggested action priority Reconfigure and try WPA-Personal or WPA2- check for software update and apply it. If again. 35003c Enterprise modes still present, replace the radio. Radio not functional. Send failure. The radio failed to Check for a software update and apply it.
-
Page 128: Connectivity Messages
® 122 Troubleshooting Connex Spot Monitor Alarm Message Possible cause Suggested action priority Certificate load The radio customer certificate was None. Information successful. successfully loaded from the host Certificate load failed. The radio customer certificate was Try again. Information not loaded Connectivity messages Alarm Message... -
Page 129: System Messages
Directions for use Troubleshooting 123 Alarm Message Possible cause Suggested action priority Unable to establish No network connection is Connect the device to an active network so Very low network available that the clinician ID can be imported. communications. 1A0009 No connection for send. - Page 130 ® 124 Troubleshooting Connex Spot Monitor Alarm Message Possible cause Suggested action priority Low battery 5 minutes The battery power is extremely Connect the power supply to AC power to High or less remaining. charge the monitor. 1C1006 Battery is critically low; The battery power is critically low Connect the power supply to AC power to High plug into outlet.
- Page 131 Directions for use Troubleshooting 125 Alarm Message Possible cause Suggested action priority monitor. If the problem persists, replace the main PCBA. Device shutdown is not System shutdown failure Monitor cannot perform an immediate Information available at this time shutdown. Disconnect AC power and remove battery.
-
Page 132: Software Update Messages
® 126 Troubleshooting Connex Spot Monitor Software update messages Alarm Message Possible cause Suggested action priority Software Update: The manifest file transfer timed Verify the connection and retry. Information Manifest transfer timed out or connection was lost during out. Verify connection download and retry. -
Page 133: Bluetooth® Messages
Directions for use Troubleshooting 127 ® Bluetooth messages Alarm Message Possible cause Suggested action priority Bluetooth not functional. The monitor detected a Bluetooth Reboot the monitor. If the problem persists, Very low 370001 device that is not functional replace the Bluetooth radio. If the problem persists, replace the main PCBA. - Page 134 ® 128 Troubleshooting Connex Spot Monitor Alarm Message Possible cause Suggested action priority APM is plugged in. The APM was plugged in while Restart the monitor and the APM. If the Information the monitor is powered on. problem is still present, check the cable connections from the monitor to APM.
- Page 135 Directions for use Troubleshooting 129 Alarm Message Possible cause Suggested action priority Display lock is Lockout is not allowed without Enter patient information Information unavailable. Missing active patient information patient context. Power cable is The APM communication cable is Restart the monitor and the APM. If the Very low disconnected.
- Page 136 ® 130 Troubleshooting Connex Spot Monitor...
-
Page 137: Specifications
Specifications Physical specifications Protection classifications, all monitor configurations Characteristic Specification Electrical rating 100 – 240 V AC, 50 – 60 Hz, 0.8X– 1.5 A Duty cycle Continuous operation Type of protection against electric shock Class I internally powered Type BF defibrillator proof Degree of protection against electric shock, for parts applied to patients IEC EN 60601-1, 2nd and 3rd Editions... - Page 138 ® 132 Specifications Connex Spot Monitor Protection classifications, all monitor configurations Graphical display resolution Dimensional outline 6.5 in. (W) x 4.1 in. (H) x 0.13 in. (D) (164.9 mm [H] x 103.8 mm [W] x 3.40 mm [D] ) Active area 6.1 in.
- Page 139 Directions for use Specifications 133 Hours of use 2 Cell battery specifications Acute care continuous 10 minute cycles - 49 patient cycles - BP, temp, SpO2, no radio, 8.22 no scanner (Nellcor) Acute care continuous 10 minute cycles - 50 patient cycles - BP, temp, SpO2, no radio, 8.37 no scanner (Nonin) Acute care continuous 10 minute cycles - 49 patient cycles - BP, temp, SpO2, no radio,...
- Page 140 ® 134 Specifications Connex Spot Monitor NIBP specifications Blood pressure determination time Typical: 15 seconds Maximum: 150 seconds Blood pressure accuracy Meets or exceeds ANSI.AAMI SP10:2002 standards for noninvasive blood pressure accuracy (±5 mmHg mean error, 8 mmHg standard deviation) Mean Arterial Pressure (MAP) range Adult: 23 to 230 mmHg (StepBP, SureBP) The formula used to calculate MAP yields an approximate...
- Page 141 Directions for use Specifications 135 SpO2 specifications Refer to sensor manufacturer's directions for use for additional information. WARNING Functional testers cannot be used to assess the accuracy of a pulse oximeter monitor. While functional testers may be useful for verifying that the pulse oximeter sensor, cabling, and monitor are functional, they are incapable of providing the data required to properly evaluate the accuracy of a system's SpO2 measurements.
- Page 142 ® 136 Specifications Connex Spot Monitor SpO2 specifications (Masimo specifications, see footnotes 1, 2, 3, 4, 5, and 6) No motion: ± 3 digits Motion: ± 5 digits Saturation 60% to 70% Adults, Neonates: ± 3 digits Note Saturation accuracy varies by sensor type. Refer to the sensor Directions for use for additional accuracy information.
- Page 143 Directions for use Specifications 137 SpO2 specifications (Masimo specifications, see footnotes 1, 2, 3, 4, 5, and 6) Finger Clip: ± 2 digits Flex: ± 3 digits Flex: ± 3 digits Soft Sensor: N/A Soft Sensor: ± 2 digits 8000R: N/A 8000R: ±...
-
Page 144: Environmental Specifications
® 138 Specifications Connex Spot Monitor Some models of commercially available bench-top functional testers and patient simulators can be used to verify the proper functionality of Nellcor pulse oximeter sensors, cables and monitors. See the individual testing device's operator's directions for use for the procedures specific to the model of tester being used. -
Page 145: Bluetooth® Module
Directions for use Specifications 139 802.11n (OFDM,HT20,MCS 0-7): 6.5,13,19.5, 26, 39,52, 58.5, 72.2 Mbps Agency approvals US: FCC Part 15.247 Subpart C, FCC Part 15.407 Subpart E Europe: Radio Equipment Directive 2014/53/EU Canada: (IC) RSS-210 standard. IC 3147A-WB45NBT for Wi-Fi devices, IC 3147A-BT800 for Bluetooth devices Singapore: Model BT800. -
Page 146: Configuration Options
® 140 Specifications Connex Spot Monitor GPIO Four configurable lines (1.8V/3.3V configurable by VDD_PADS Operational modes Host Controller Interface over USB HID proxy mode Human Interface Device EEPROM 2-wire 64K bits Coexistence 802.11 (WiFi) Three wire CSR schemes supported (Unity-3, Unity-3e, and Unity+) Supply voltage Supply 5V ±... -
Page 147: Standards And Compliance
Standards and compliance General compliance and standards The monitor complies with the following standards: 21 CFR Subchapter H – Medical Devices – US Food and Drug Administration 2002 No. 236 – Australian Therapeutic Goods Act 93/42/EEC – European Economic Community Medical Devices Directive 2007/47/EC –... -
Page 148: Regulatory Radio Compliance
This booklet is available from the U.S. Government Printing Office, Washington, D.C. 20402. Stock No. 004-000-0034504. Welch Allyn is not responsible for any radio or television interference caused by unauthorized modification of the devices included with this Welch Allyn product, or the substitution or attachment of connecting cables and equipment other than specified by Welch Allyn. - Page 149 Undertegnede Welch Allyn erklærer herved, at følgende udstyr RLAN device overholder de væsentlige krav og øvrige relevante krav i direktiv 2014/53/EF Dutch Bij deze verklaart Welch Allyn dat deze RLAN device voldoet aan de essentiële eisen en aan de overige relevante bepalingen van Richtlijn 2014/53/EC. English Hereby, Welch Allyn, declares that this RLAN device is in compliance with the essential requirements and other relevant provisions of Directive 2014/53/EC.
- Page 150 Alulírott, Welch Allyn nyilatkozom, hogy a RLAN device megfelel a vonatkozó alapvetõ követelményeknek és az 2014/53/EC irányelv egyéb elõírásainak. Italian Con la presente Welch Allyn dichiara che questo RLAN device è conforme ai requisiti essenziali ed alle altre disposizioni pertinenti stabilite dalla direttiva 2014/53/CE. Latvian Ar šo Welch Allyn deklarē, ka RLAN device atbilst Direktīvas 2014/53/EK būtiskajām prasībām un...
- Page 151 Directions for use Standards and compliance 145 新加坡资讯通信发 展管理局 Independent TA2016/2122 South Africa Communications Authority of South Africa South Korea Korea Class A Equipment This equipment is Industrial (Class A) Communications (Industrial Broadcasting electromagnetic wave suitability equipment and Commission (대한민 &...
- Page 152 ® 146 Standards and compliance Connex Spot Monitor...
-
Page 153: Guidance And Manufacturer's Declaration
Guidance and manufacturer's declaration EMC compliance Special precautions concerning electromagnetic compatibility (EMC) must be taken for all medical electrical equipment. This device complies with IEC EN 60601-1-2:2007. • All medical electrical equipment must be installed and put into service in accordance with the EMC information provided in this Directions for use. - Page 154 ® 148 Guidance and manufacturer's declaration Connex Spot Monitor Electromagnetic emissions Voltage fluctuations/ Complies WARNING This equipment/system is intended for flicker emissions use by healthcare professionals only. This IEC 61000-3-3 equipment/ system may cause radio interference or may disrupt the operation of nearby equipment .
- Page 155 Directions for use Guidance and manufacturer's declaration 149 Electromagnetic immunity from the equation applicable to the frequency of the transmitter. Recommended separation distance Conducted RF 3 Vrms 3 Vrms d= (1.17) IEC 61000-4-6 150 kHz to 80 MHz Radiated RF 3 V/m 80 MHz to 1 GHz 3 V/m d= (1.17) 80 to 800 MHz...
- Page 156 ® 150 Guidance and manufacturer's declaration Connex Spot Monitor Recommended separation distances between portable and mobile RF communications equipment and the monitor 0.36894 0.36894 0.73785 1.1667 1.1667 2.3333 3.6894 3.6894 7.3785 11.667 11.667 23.3333 For transmitters rated at a maximum output power not listed above, the recommended separation distanced in meters (m) can be estimated using the equation applicable to the frequency of the transmitter, where P is the maximum output power rating of the transmitter in watts (W) according to the transmitter manufacturer.
-
Page 157: Appendices
The following tables list approved monitor accessories and applied parts. For information about options, upgrades, and licenses, refer to the service manual. WARNING Use only Welch Allyn approved accessories and applied parts, and use them according to the manufacturer’s directions for use. Using... - Page 158 ® 152 Appendices Connex Spot Monitor Nellcor pulse oximetry Part number Model Description DS-100A OxiMax Durasensor adult oxygen transducer DOC-10 OxiMax Extension cable (10 feet) DOC-8 OxiMax Extension cable (8 feet) DOC-4 OxiMax Extension cable (4 feet) Nonin pulse oximetry Part number Model Description...
- Page 159 Directions for use Appendices 153 Mounting options Part number Description 7000-APM Accessory Power Management (APM) — organized mobile stand with battery and basket 7000-MWS Mobile Work Surface — organized mobile stand with work surface and bins 7000-MS3 Connex Spot Classic Mobile Stand, MS3 Miscellaneous items Part number Description...
- Page 160 ® 154 Appendices Connex Spot Monitor Part number Description PWCD-Y Line cord Y, Italy PWCD-K Line cord K, South Korea PWCD-T Line cord T, Taiwan PWCD-P Line cord P, Thailand PWCD-Z Line cord Z, Brazil 6000-NC Nurse call cable 7000-916HS Jadak 2D Scanner 7000-916HSR Jadak 2D/RFID Scanner...
- Page 161 CUFF, Welch Allyn, REUSABLE, ADULT Reusable Reuse-11L CUFF, Welch Allyn, REUSABLE ADULT LONG Reusable Reuse-12 CUFF, Welch Allyn, REUSABLE, LG ADULT Reusable Reuse-12L CUFF, Welch Allyn, REUSABLE, LG ADULT LONG Reusable Reuse-13 CUFF, Welch Allyn, REUSABLE, THIGH Disposable Soft-08 CUFF, Welch Allyn, SMALL CHILD...
- Page 162 CUFF, Welch Allyn, ADULT Disposable Soft-11L CUFF, Welch Allyn, ADULT LONG Disposable Soft-12 CUFF, Welch Allyn, LG ADULT Disposable Soft-12L CUFF, Welch Allyn, LG ADULT LONG Disposable Soft-13 CUFF, Welch Allyn, THIGH Disposable ECOCUFF-09 EcoCuff, Child, 1521 cm Disposable ECOCUFF-10...
- Page 163 Directions for use Appendices 157 Part number Model Description YI-AD LNCS Multisite adhesive wrap adult/pediatric/neonatal for YI sensor (100 per case) YI-FM LNCS Multisite foam wrap adult/pediatric/neonatal for YI sensor (12 per case) Nellcor pulse oximetry Part number Model Description DS-100A OxiMax Durasensor adult oxygen transducer...
- Page 164 ® 158 Appendices Connex Spot Monitor Part number Description 7426-001 6000CA NONIN ADULT CLOTH DISPOSABLE 24/BX 7426-002 6000CP NONIN PEDIATRIC CLOTH DISPOSABLE 24/BX 7426-003 6000CI NONIN INFANT CLOTH DISPOSABLE 24/BX 7426-004 6000CN NONIN NEONATE CLOTH DISPOSABLE 24/BOX Braun thermometry Part number Description 06000-005 Disposable probe covers (5,000 covers, packaged 200/box)
-
Page 165: Warranty
Appendices 159 Warranty Welch Allyn warrants the product to be free of defects in material and workmanship and to perform in accordance with manufacturer's specifications for the period of two years from the date of purchase from Welch Allyn or its authorized distributors or agents.
Need help?
Do you have a question about the Connex Spot Monitor and is the answer not in the manual?
Questions and answers