
Related Manuals for LSI MegaRAID SAS 9260-16i RAID Controller


Summary of Contents for LSI MegaRAID SAS 9260-16i RAID Controller
- Page 1 MegaRAID® SAS 9260-16i RAID Controller Quick Installation Guide 47841-00, Revision A, June 2010 47841- 00A...
-
Page 2: Revision History
LSI Corporation to make a commercial release of the product. LSI Corporation reserves the right to make changes to the product(s) or information disclosed herein at any time without notice. LSI Corporation does not assume any responsibility or liability arising out of the application or use of any product or service described herein, except as expressly agreed to in writing by LSI Corporation;... -
Page 3: Megaraid Sas 9260-16I Raid Controller
RAID controller that offers a 6 Gb/s transfer rate. The controller contains 16 internal SAS/SATA ports through four SFF-8087 x4 internal connectors. Thank you for purchasing the LSI™ MegaRAID 6Gb/s SAS 9260-16i RAID controller. Your MegaRAID controller provides reliability, high performance, and fault-tolerant drive subsystem management. -
Page 4: Controller Installation
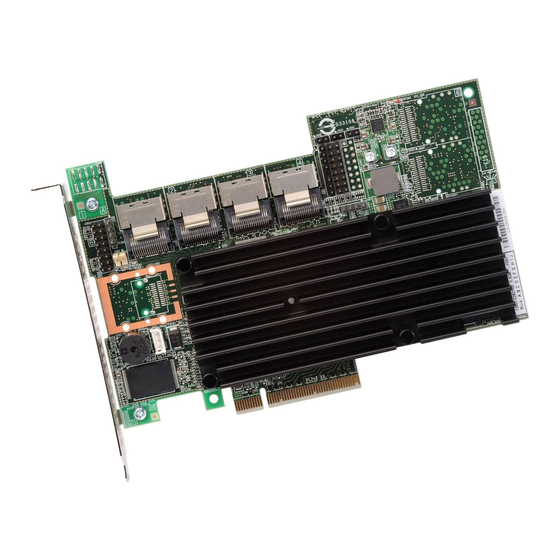
LSI. NOTE: SATA II is the only type of SATA supported by this RAID controller. You can connect your MegaRAID SAS 9260-16i RAID controller remotely to the LSI intelligent Battery Backup Unit 07 (LSIiBBU07) and the LSI intelligent Battery Backup Unit 08 (LSIiBBU08). - Page 5 MegaRAID SAS 9260-16i RAID Controller Quick Installation Guide Controller Installation Figure 2: Layout of the SAS 9260-16i RAID Controller J4A1 J4A3 J4A4 J4A2 J5A2 J5B3 J3B1 J4B2 J2B1 J2B2 Ports Ports Ports Ports 8-11 12-15 J1L1 J1A2 back J1B1 J1B3...
- Page 6 Controller Installation MegaRAID SAS 9260-16i RAID Controller Quick Installation Guide Table 1: Jumpers and Connectors Jumper/ Type Description Connector J1A2 Universal Asynchronous 4-pin connector Receiver/Transmitter (UART) for the Reserved for LSI use. Expander J1B1 LED Locate and Fault Indication 2x8-pin connector...
- Page 7 MegaRAID SAS 9260-16i RAID Controller Quick Installation Guide Controller Installation Table 1: Jumpers and Connectors (Continued) Jumper/ Type Description Connector J2D1 Standard edge card connector The RAID controller interfaces with the host system though a standard edge card. This interface provides power to the board...
- Page 8 Controller Installation MegaRAID SAS 9260-16i RAID Controller Quick Installation Guide Table 1: Jumpers and Connectors (Continued) Jumper/ Type Description Connector J4A4 LED Locate and Fault Indication 2x8-pin header header Connects to an LED that indicates whether Ports 8-11 a drive is in a fault condition. There is one LED per port.
- Page 9 PCIe slots support only PCIe graphics cards; if a RAID controller is installed, it will not function. NOTE: Refer to the guide for your motherboard for information about the PCI Express slot. Figure 3: Installing the MegaRAID SAS 9260-16i RAID Controller Press Here Screw...
-
Page 10: Supported Raid Levels
Supported RAID Levels MegaRAID SAS 9260-16i RAID Controller Quick Installation Guide Reinstall the computer cover, and reconnect the power cords. Turn on the power to the computer. Make sure that the power is turned on to the SAS devices and the SATA II devices before or at the same time that the power to the host computer is turned on. -
Page 11: Technical Support
Technical Support For assistance in installing, configuring, or running the SAS 9260-16i RAID controller, contact an LSI Technical Support representative. Click the following link to access the LSI Technical Support page for storage and board support: http://www.lsi.com/support/storage/tech_support/index.html From this page, you can send an email or call Technical Support, or submit a new service request and view its status.
Need help?
Do you have a question about the MegaRAID SAS 9260-16i RAID Controller and is the answer not in the manual?
Questions and answers