Advertisement
Quick Links
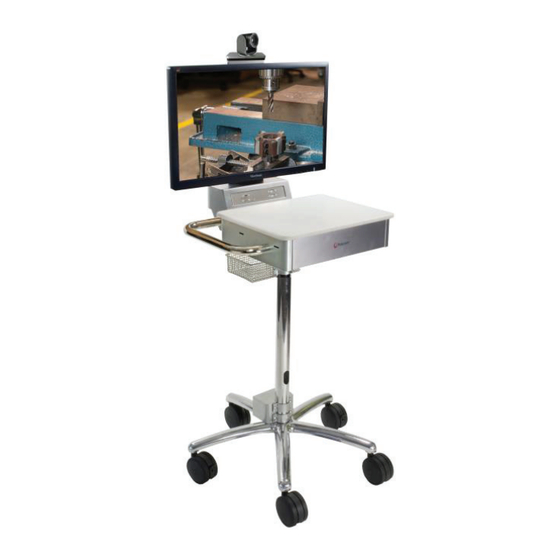
Setting Up the Polycom®
RealPresence® Utility Cart 500
Single 27" System
1
Dual 22" Displays
Attach a 22" display on each side of the display bracket,
using four M4 x 10 Phillips pan head screws per display,
as shown circled in red below.
Use this equipment only with the display(s) supplied
by Polycom.
© 2014, Polycom, Inc. All rights reserved. POLYCOM® and the names and marks associated with Polycom's products are trademarks and/or service marks of
Polycom, Inc. and are registered and/or common law marks in the United States and various other countries. No portion hereof may be reproduced
or transmitted in any form or by any means, for any purpose other than the recipient's personal use, without the express written permission of Polycom.
Dual 22" System
6001 America Center Drive
San Jose, CA 95002, USA
Polycom EagleEye
IV camera
TM
27" display or (2) 22" displays
Microphone and 25' cable
Base cart with laptop/accessory shelf
Storage drawer
Accessory basket
Polycom RealPresence Group 500 system
AC and RJ45 jack
1
Single 27" Display
For a single 27" display, remove the dual display bracket
by opening the rear column cover and removing the
nuts holding the bracket, as shown circled in red below.
Then, attach the 27" display, using four M4 x 10 Phillips
pan head screws.
Use this equipment only with the display(s) supplied
by Polycom.
www.polycom.com
Polycom, Inc.
1725-08455-001/D
3" 2-way powered
monitor speaker system
External 120V or 240V
power supply and
34Ah battery (lasts
approximately 4 hours)
Optional
Accessories
Advertisement

Related Manuals for Polycom RealPresence Utility Cart 500


Summary of Contents for Polycom RealPresence Utility Cart 500
- Page 1 Polycom, Inc. and are registered and/or common law marks in the United States and various other countries. No portion hereof may be reproduced or transmitted in any form or by any means, for any purpose other than the recipient’s personal use, without the express written permission of Polycom.
- Page 2 Phillips pan head screws. Open the drawer to allow the screws. easier access for mounting the system. Neatly route and connect the pre-installed cables, which are labeled. Refer to the wiring diagram at the end of this document for details. Setting up the Polycom® RealPresence® Utility Cart 500...
- Page 3 Connect the AC and network cables from the that attach the U-shaped brackets and connection box system to the wall outlets. You are now ready to to the base of the cart. use the system. Setting up the Polycom® RealPresence® Utility Cart 500...
- Page 4 Attach the power supply cover, using the U-shaped bracket and the supplied screws. Tighten the screws. Attach the RJ45 connector to the connector panel, using the previously removed hardware. Setting up the Polycom® RealPresence® Utility Cart 500...
- Page 5 Pass the cables into the speaker assembly and attach the speaker assembly to the pole. Reinstall the cable clamps removed in step 9. Setting up the Polycom® RealPresence® Utility Cart 500...
- Page 6 Weight of Displays: 1x Viewsonic 27” LED Display (Model VS14818) Weight: 10.9 lbs (4.9 kg) or 2x Viewsonic 22” LED Display (Model VA15451) Weight: 6.9 lbs (3.1 kg) each Setting up the Polycom® RealPresence® Utility Cart 500...
- Page 7 Always apply the liquid first to a static-free cloth. For further information concerning the individual components of this equipment, please refer to the respective product literature. For support or service, please contact your Polycom® distributor or go to Polycom Support at www.polycom.com/support. Child Safety Warnings: ...
- Page 8 30%, the user should save open files and safely shut down connected equipment immedi- ately. If the cart is unattended and PowerAlert Software is loaded on a computer connected to the Power Supply Module, PowerAlert will automatically save open files prior to automatic shutdown. Setting up the Polycom® RealPresence® Utility Cart 500...
- Page 9 The battery should be charged as often as possible by plugging the Power Supply into a wall outlet. Charging the batteries for brief intervals does not adversely a ect battery performance. However, leaving the batteries fully discharged for long periods of time does adversely a ect battery performance. Setting up the Polycom® RealPresence® Utility Cart 500...
- Page 10 Utility Cart 500 Wiring Diagram Setting up the Polycom® RealPresence® Utility Cart 500...
Need help?
Do you have a question about the RealPresence Utility Cart 500 and is the answer not in the manual?
Questions and answers