Table of Contents
Advertisement
Advertisement
Table of Contents

Summary of Contents for Thermorail TRTS
- Page 1 TRTS / TRTSB 7 Day Programmable Timer Installation & User Guide...
-
Page 2: Table Of Contents
Contents Installing the timer ..………………… User Interface ..…………..….… Setting the date & time ..…………… Heating modes ..…………………..… Advanced settings ..……………….… Setup your heating schedule ……….. Technical data ..……………………... Key lock ..…………………………..… Temporary override ….…………….… Service and support ..……………..…... -
Page 3: Installing The Timer
Unplug the cable connector from the back of the timer screen. Connect the Thermorail towel rail to the timer as seen in the below wiring diagram. - Page 4 Installing the timer Screw the back plate of the timer to the electrical plate. Plug the cable connector into the back of the timer screen and connect the screen to the back of the timer.
-
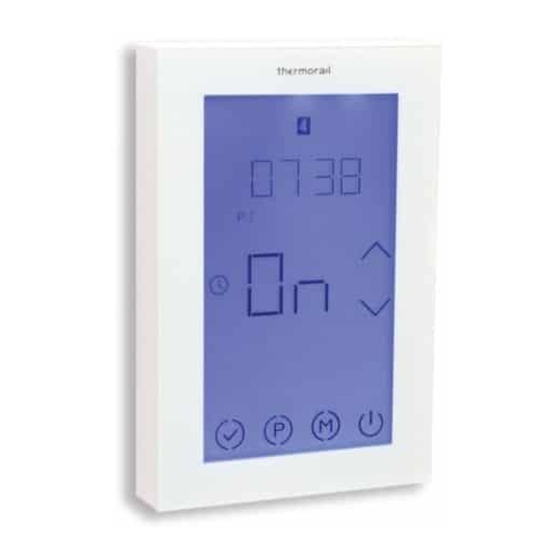
Page 5: User Interface
User Interface 1. Day indicator 2. Key lock icon 3. Schedule mode icon 4. Manual mode icon 5. ON/OFF indicator 6. Confirm settings 7. Program button 8. Mode button 9. Power button 10. Up & down arrows 11. Time... -
Page 6: Setting The Date & Time
Setting the date and time Press and the time will begin to flash to select the correct time Press until the day begins to flash (Note: Monday is Day 1) to select the correct day Press to save the settings... -
Page 7: Heating Modes
Heating Modes When the timer is on, press the to switch between manual and schedule modes. Manual Mode In manual mode press the to set the ON/OFF status. Schedule Mode In the schedule mode the timer will follow the heating schedule that is set. Refer to page 9 for programming instructions. -
Page 8: Advanced Settings
Advanced Settings To access the advanced settings, turn the timer off by pressing Press to display setting 01 Use the to adjust the settings Press to cycle between setting 01 to 03 Press to save the settings Menu Description Range Default Clock Format 12 or 24... -
Page 9: Setup Your Heating Schedule
Set up your heating schedule (For 5+2 Day Program) Turn the timer on by pressing To set up the heating schedule for Monday to Friday press The time for P1 will flash. This is the first ON period for the day. Use the to adjust the time to when the heated towel rail will turn on in the morning. - Page 10 Set up your heating schedule (For 5+2 Day Program) Press and the ON / OF will flash. Using the select OF for P2. Repeat above steps for P3 and P4 and then press (Note: P3 is turning the heated towel rail on in the evening and P4 is turning it off in the evening) If the heated towel rail is only required to be on...
- Page 11 Set up your heating schedule (For 5+2 Day Program) The time for P1 will flash. This is the first ON period for Saturday and Sunday. Use the to adjust the time to when the heated towel rail will turn on in the morning. Press and the ON / OF will flash.
- Page 12 Set up your heating schedule (For 7 Day Program) Turn the timer on by pressing Change the menu option 02 to setting 02 (7 Day Program) as per instructions on page 8. The 7 day program option means that all 7 days are programmed to the same schedule or all 7 days are programmed individually.
- Page 13 Set up your heating schedule (For 7 Day Program) To set up the heating schedule press The time for P1 will flash. This is the first ON period for the day. Use the to adjust the time the heated towel rail will turn on in the morning. Press and the ON / OF will flash.
- Page 14 Set up your heating schedule (For 7 Day Program) Repeat above steps for P3 and P4 and then press (Note: P3 is turning the heated towel rail on in the evening and P4 is turning it off in the evening) If programming all 7 days to the same schedule, the program is now set up.
-
Page 15: Technical Data
Technical data Supply voltage 230 - 240VAC Maximum Load IP Rating IP30 Warranty 2 Years Width 80mm Height 120mm Depth 45mm (27mm in wall) -
Page 16: Key Lock
Key Lock To lock the key pad, press and hold the for 5 seconds or until the displays. To unlock press and hold the until the disappears. -
Page 17: Temporary Override
Temporary override Turning the timer onto temporary override will allow the timer to be operated on manual until the next programmed period In schedule mode, press the and the ON/OFF display will flash. to adjust the desired setting and press to confirm. - Page 18 Factory Reset Press to turn the timer off Press and the hold until is displayed Press and hold for approx. 5 seconds will display on the screen and then the timer has been reset. Notes Turn the timer back on to setup the program...
- Page 19 Notes...
-
Page 20: Service And Support
Service and support Thermogroup AU PO Box 822 Leeton NSW 2705 1300 368 631 sales@thermogroup.com.au www.thermogroup.com.au...
Need help?
Do you have a question about the TRTS and is the answer not in the manual?
Questions and answers