Zagg Folio Instructions Manual
Hide thumbs
Also See for Folio:
- Instruction manual (13 pages) ,
- Instructions manual (9 pages) ,
- Manual (5 pages)
Table of Contents
Advertisement
Quick Links
ZAGG
Bluetooth Keyboard
ZAGG Folio For LG G Pad 8.3 LTE
Keyboard Instructions
*WARRANTY REGISTRATION
Your Keyboard Caser comes with a one‐year manufacturer's warranty. In order to activate
the warranty, you must register your Keyboard Case as well as keep your purchase receipt.
If you purchased your Keyboard Case from ZAGG.com, ZAGG. has already registered it
and has a copy of your proof of purchase.
NEED MORE HELP? PLEASE SEE OUR FAQ SECTION AT: www.ZAGG.com/faq
INTRODUCTION
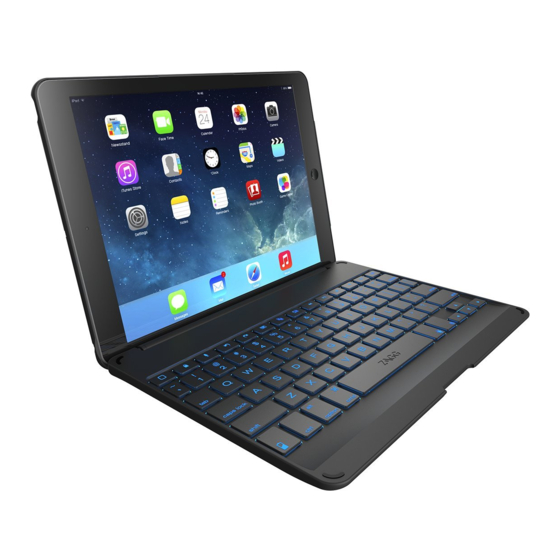
Congratulations on being the proud new owner of the ZAGG Keyboard Case,
made exclusively for the LG G Pad. The Keyboard Case has been designed to
make your mobile typing needs fast and easy. Its spacious keyboard layout
and island‐style keys give you the room you need to type naturally, with fewer
typos. And with its full‐body protective case that doubles as a stand, you can go
anywhere knowing your G Pad is safe and ready for work and play.
Advertisement
Table of Contents

Related Manuals for Zagg Folio


Summary of Contents for Zagg Folio
- Page 1 ZAGG Bluetooth Keyboard ZAGG Folio For LG G Pad 8.3 LTE Keyboard Instructions *WARRANTY REGISTRATION Your Keyboard Caser comes with a one‐year manufacturer’s warranty. In order to activate the warranty, you must register your Keyboard Case as well as keep your purchase receipt. If you purchased your Keyboard Case from ZAGG.com, ZAGG. has already registered it and has a copy of your proof of purchase. NEED MORE HELP? PLEASE SEE OUR FAQ SECTION AT: www.ZAGG.com/faq INTRODUCTION Congratulations on being the proud new owner of the ZAGG Keyboard Case, made exclusively for the LG G Pad. The Keyboard Case has been designed to make your mobile typing needs fast and easy. Its spacious keyboard layout and island‐style keys give you the room you need to type naturally, with fewer typos. And with its full‐body protective case that doubles as a stand, you can go anywhere knowing your G Pad is safe and ready for work and play. ...
- Page 2 Bluetooth Specification: Bluetooth Spec.: 3.0 Bluetooth protocals: A2DP 1.2, AVRCP 1.0, HFPV1.5 Transmission range: 10m Transmission speed: 1~3M/S Receiving sensitivity: ‐80dBm Bit error rate: 0.1% Products Specification: Operating parameter: Voltage: DC 3.1V~4.2V; current: <3mA Charging parameter: DC 5V Li‐ion battery: 3.7V/190mAh Environmental parameters: ‐20~+70℃, Relative Humidity: 10%~80% INSERTING/REMOVING YOUR G Pad To insert your G Pad into the Keyboard Case open the cover and position the Keyboard Case so that its keyboard is facing you. Then, with your G Pad in landscape mode and the volume controls facing up, set the bottom half of your tablet in the cover. Ensure your G Pad is settled on the cover’s bottom (you may need to apply light downward pressure on your tablet). Next, snap the top half of your tablet into the cover. You should be able to feel when your tablet is secured. Check all of your tablet’s corners to make sure they have seated properly. To easily remove your G Pad, simply open the cover and apply a light pressure to the back of it. This will unseat your G Pad ...
- Page 3 POWERING ON AND OFF To turn your Keyboard Case on, press the POWER button located in the upper right corner of the keyboard. A blue LED will illuminate briefly while the keyboard powers up. To turn your Keyboard Case off, simply press the POWER button again. PAIRING YOUR ZAGG Keyboard Case Pairing the Keyboard Case with your G Pad is easy. The Keyboard Case should only need to be paired once, using the following directions. If the connection between your tablet and Keyboard Case is ever lost, simply repeat these steps. 1. On your tablet select: SETTINGS > BLUETOOTH > ON. 2. Press the PAIR button on your Keyboard Case keyboard — the PAIR button is located in the upper right corner next to the POWER button. A blue LED above the PAIR button will begin fl ashing and will continue to fl ash until your Keyboard Case and tablet are paired.. 3. Your tablet’s Bluetooth menu will display “ZAGG Folio” as an available device. Select it to complete pairing. If your G Pad doesn’t show “ZAGG Folio”, select SCAN on your tablet’s Bluetooth menu to search for it. ...
- Page 4 CHARGING Your Keyboard Case features a powerful lithium polymer battery that lasts for up to three months of normal use between charges*. It comes with a charging cable you can use to charge it quickly and conveniently. To charge your Keyboard Case, simply follow these steps: 1. Plug the micro USB end of the charging cable into the charging port located on the side of the keyboard, just under the POWER button. 2. Plug the USB end of the cable into any USB outlet (including a ZAGGsparq, your computer, a wall outlet converter, etc.). 3. The LED above the POWER button will illuminate to indicate the Keyboard Case is charging. Wait until this light turns off , indicating a full charge. It usually takes 2‐4 hours to completely charge your Keyboard Case. 4. When your Keyboard Case is fully charged, remove the micro USB connector and enjoy your Keyboard Case for up to three months before you need to charge it again*. * Based on normal use of approximately 2‐3 hours per day. BATTERY LIFE As mentioned, the Keyboard Case features a powerful, rechargeable battery that lasts up to three months between charges*. To check your Keyboard Case’s remaining battery power, simply hold down the function (fn) key and press the battery key (also the alt key). The LED above the PAIR button will fl ash one of three ways. 1. Three green fl ashes indicate 50% or more battery life remaining. 2. Three yellow fl ashes indicate between 25%‐49% battery life remaining. 3. Three red fl ashes indicate less than 25% battery life remaining. When your Keyboard Case reaches critical battery level, the red light will fl ash once every fi ve minutes. To help preserve battery life, your Keyboard Case will enter sleep mode if left on and not used for several minutes. To awaken your Keyboard Case, press any key. The Keyboard Case’s battery has no memory and therefore may be charged whenever you wish. For optimal battery life, we recommend turning your Keyboard Case off when it will sit unused for a prolonged time. ...
- Page 5 SPECIAL FUNCTION KEYS Your Keyboard Case has been designed with the following special function keys to give you more control of your tablet. HOME ‐ Displays your tablet’ ’s home screen. RETURN ‐ Returns to the app or program that was last open. LOCK – Activates and deactivates your tablet’s sleep mode. CUT – Cuts selected text and saves it to your clipboard. COPY – Copies selected text to your clipboard. PASTE – Pastes clipboard content in your selected fi eld. TRACK BACK – Skips to the previous track on your current playlist. PLAY/PAUSE – Starts or pauses your current playlist. TRACK FORWARD – Skips to the next track on your current playlist. MUTE – Mutes your tablet’s audio. VOLUME DOWN – Decreases your tablet’s volume. VOLUME UP – Increases your tablet’s volume. THE FUNCTION (fn) KEY The fn key operates many of the functions that appear at the top of a key that features two symbols. To activate these functions, hold the fn key down and press the desired key. A list of special fn keys and their operations is listed below. CAPS – Activates the Caps Lock feature. To turn Caps Lock off , simply hold the fn key and press caps again. VOICE – Activates your tablet’s voice feature. BATTERY SYMBOL – Indicates remaining battery life. FN + DELETE – Forward Delete. ...
-
Page 6: Troubleshooting
Keyboard Case. 3. After charging, turn your Keyboard Case on. If the LED above the POWER button does not illuminate, and your keyboard doesn’t operate correctly, please contact ZAGG’s customer service. 4. Forget and re‐pair your Keyboard Case. On your tablet select: SETTINGS > BLUETOOTH > ON. If you see “ZAGG Keyboard Case” listed as an available device, touch the arrow to the right of it and choose to have your tablet forget the device. 5. Press the PAIR button on your Keyboard Case and watch for the LED above it to fl ash blue. 6. Your tablet should display “ZAGG Keyboard Case” as an available device. Select it. 7. If your tablet gives you an error message, repeat the pairing process*. * If you continually receive the same error message during pairing, or the above steps don’t work, please contact ZAGG’s customer service for assistance. For more help please see our FAQ at: www.ZAGG.com/faq To reach a trained customer service representative, please use one of the following: ZAGG.com/support/contact.php | questions@zagg.com 1‐800‐700‐ZAGG [9244] | 00‐1‐801‐839‐3906 for international customers For unparalleled scratch protection for your tablet, we recommend ZAGG’s invisibleSHIELD?. ... - Page 7 Warning This equipment has been tested and found to comply with the limits for a Class B digital device, pursuant to part 15 of the FCC Rules. These limits are designed to provide reasonable protection against harmful interference in a residential installation. This equipment generates, uses and can radiate radio frequency energy and, if not installed and used in accordance with the instructions, may cause harmful interference to radio communications. However, there is no guarantee that interference will not occur in a particular installation. If this equipment does cause harmful interference to radio or television reception, which can be determined by turning the equipment off and on, the user is encouraged to try to correct the interference by one or more of the following measures: • Reorient or relocate the receiving antenna. ...
Need help?
Do you have a question about the Folio and is the answer not in the manual?
Questions and answers