AL-KO Robolinho 500 Service Manual
Hide thumbs
Also See for Robolinho 500:
- Manual (652 pages) ,
- Original instructions for use (504 pages) ,
- Translation of the original instructions for use (484 pages)
Table of Contents
Advertisement
Quick Links
Advertisement
Table of Contents

Related Manuals for AL-KO Robolinho 500


Summary of Contents for AL-KO Robolinho 500
-
Page 1: Service Manual
Service Manual ROBOLINHO 500 / 700 ® Art. Nr.: 119833, 119834, 127446, 127447... - Page 2 All information, illustrations, guidelines and descriptions provided in this document correspond to the latest data at the time of publication. AL-KO reserves the right to make changes at any time without notice and without incurring any obligation. Components of this document may not be reproduced without the prior written consent of AL-KO.
- Page 3 Disassembly / Assembly of base station Page 33 Base station elements Page 34 Disassembly / Assembly Page 35 Charging contacts base station Transportation / Shipment Page 36 Packaging All rights reserved. Reproduction, including excerpts © 2018 AL-KO Geräte GmbH, Ichenhauserstr. 14, 89359 Koetz, Germany...
- Page 4 General product information General product information for every repair - Repair work may only be carried out by authorized AL-KO service partners. - Safety devices should not be bypassed, manipulated or removed. - Always place the device on a soft and clean surface (risk of scratching).
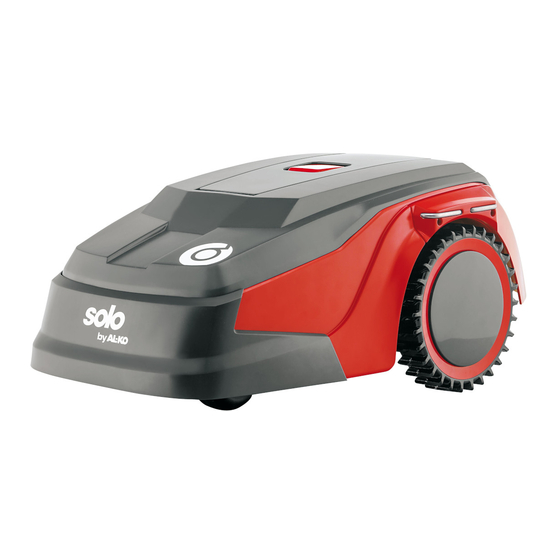
- Page 5 1 - “Hidden“ front carrying handle (underneath the cover) 2 - Cover (fold away) 3 - STOP button 4 - Charging contacts for base station 5 - Drive wheels All rights reserved. Reproduction, including excerpts © 2018 AL-KO Geräte GmbH, Ichenhauserstr. 14, 89359 Koetz, Germany...
- Page 6 1 - “Hidden“ backside carrying handle (underneath the cover) 2 - Display 3 - STOP button 4 - Rotary knob for stepless cutting height adjustment All rights reserved. Reproduction, including excerpts © 2018 AL-KO Geräte GmbH, Ichenhauserstr. 14, 89359 Koetz, Germany...
- Page 7 4 - Battery compartment 5 - Mower deck / Mower deck cover 6 - Blade disc & knives Attention: Risk of injury! 7 - Drive wheels All rights reserved. Reproduction, including excerpts © 2018 AL-KO Geräte GmbH, Ichenhauserstr. 14, 89359 Koetz, Germany...
- Page 8 Pull up and lever at the same time. Carefully loosen the clips with a long screwdriver. info For mounting the design cover, first clip them at the front. All rights reserved. Reproduction, including excerpts © 2018 AL-KO Geräte GmbH, Ichenhauserstr. 14, 89359 Koetz, Germany...
- Page 9 T20 / 1,2 Nm Carefully separate cable lugs with needle-nose pliers. Release 2x screws at the charging contacts. Remove charging contact element. Charging contact element. All rights reserved. Reproduction, including excerpts © 2018 AL-KO Geräte GmbH, Ichenhauserstr. 14, 89359 Koetz, Germany...
-
Page 10: Drive Wheels
13 mm / 5 Nm Loosen the screw. Remove the wheel. info Screw is provided with a coating against loosening. It can be used multiple times. All rights reserved. Reproduction, including excerpts © 2018 AL-KO Geräte GmbH, Ichenhauserstr. 14, 89359 Koetz, Germany... - Page 11 Turn the device over. Fix screw head and loosen the nut. Remove axle. Remove the wheel. Front wheel. T20 / 1,5 Nm Loosen 2x screws. Suspension. All rights reserved. Reproduction, including excerpts © 2018 AL-KO Geräte GmbH, Ichenhauserstr. 14, 89359 Koetz, Germany...
- Page 12 Cover including sealing ring. When installing, USB connection. please use some grease. info 2 Nm When screwing in, be sure to screw the screw cap straight. Hand-tight. All rights reserved. Reproduction, including excerpts © 2018 AL-KO Geräte GmbH, Ichenhauserstr. 14, 89359 Koetz, Germany...
- Page 13 Push the plug to the battery pack on the right Rated voltage: 18V / charging voltage: 21V. and left side and pull it off. All rights reserved. Reproduction, including excerpts © 2018 AL-KO Geräte GmbH, Ichenhauserstr. 14, 89359 Koetz, Germany...
- Page 14 Attention risk of injury! Attention risk of injury! Blade disc. Mower deck 4 Min T20 / 1,5 Nm Loosen 3x screws and remove mower deck. Mower deck. All rights reserved. Reproduction, including excerpts © 2018 AL-KO Geräte GmbH, Ichenhauserstr. 14, 89359 Koetz, Germany...
-
Page 15: Blade Replacement
Loosen 3x nuts with a wrench. Attention risk of injury! 7 mm / 2 Nm Remove blade disc. Release knives with wrench. info Use a washer. Cutting blade. All rights reserved. Reproduction, including excerpts © 2018 AL-KO Geräte GmbH, Ichenhauserstr. 14, 89359 Koetz, Germany... - Page 16 Loosen the screw and remove it from the magnet holder. info Detailed picture of the magnet holder. Installation hint: Fix the magnet holder during calibration. All rights reserved. Reproduction, including excerpts © 2018 AL-KO Geräte GmbH, Ichenhauserstr. 14, 89359 Koetz, Germany...
- Page 17 T20 / 1,5 Nm Positions of the deviation domes. Loosen 3x screws to remove single deviation dome. Only necessary if broken! Pull deviation dome upwards. Deviation dome. All rights reserved. Reproduction, including excerpts © 2018 AL-KO Geräte GmbH, Ichenhauserstr. 14, 89359 Koetz, Germany...
- Page 18 (2.9.3) then loosen 12x screws. Carefully remove the top of the chassis. Detail view of chassis hooks. info Chassis upper part can be hooked on the back. All rights reserved. Reproduction, including excerpts © 2018 AL-KO Geräte GmbH, Ichenhauserstr. 14, 89359 Koetz, Germany...
- Page 19 7 - Deviation sensor board 11 - STOP button 4 - 2x wheel motors 8 - Cutting height adjustment 12 - Battery 13 - Sealing gasket All rights reserved. Reproduction, including excerpts © 2018 AL-KO Geräte GmbH, Ichenhauserstr. 14, 89359 Koetz, Germany...
- Page 20 7 - Loop sensor 11 - Keyboard slide 4 - Drive motor - left 8 - Deviation sensor board 12 - Display 13 - STOP button All rights reserved. Reproduction, including excerpts © 2018 AL-KO Geräte GmbH, Ichenhauserstr. 14, 89359 Koetz, Germany...
- Page 21 Disconnect the power to the motherboard before any electronics repair. To do this, push in and remove the connector on the right and left side. All rights reserved. Reproduction, including excerpts © 2018 AL-KO Geräte GmbH, Ichenhauserstr. 14, 89359 Koetz, Germany...
- Page 22 Release connector on main board. info T20 / 1,5 Nm Loosen 2x screws and remove the board. Radio board Installation note: Always use insulating washers. All rights reserved. Reproduction, including excerpts © 2018 AL-KO Geräte GmbH, Ichenhauserstr. 14, 89359 Koetz, Germany...
- Page 23 Disassembly / Assembly of electronic components Display 15 Min Position of the display board. Release plug. 1,5 Nm Release plug. Loosen 2x screws. Carefully unclip the display. Display board. All rights reserved. Reproduction, including excerpts © 2018 AL-KO Geräte GmbH, Ichenhauserstr. 14, 89359 Koetz, Germany...
- Page 24 Cover deviation sensor 15 Min Position of the deviation sensor board. Release connector on mainboard. T20 / 1,5 Nm Loosen 2x screws. Remove the cover. All rights reserved. Reproduction, including excerpts © 2018 AL-KO Geräte GmbH, Ichenhauserstr. 14, 89359 Koetz, Germany...
- Page 25 Disassembly / Assembly of electronic components Wiring harness for charging contacts 5 Min Position of charging contacts Release cable lugs with pliers. All rights reserved. Reproduction, including excerpts © 2018 AL-KO Geräte GmbH, Ichenhauserstr. 14, 89359 Koetz, Germany...
- Page 26 Set cutting height to minimum before disassembly. Note the position of the height adjustment wheel. Unscrew height adjustment wheel. Remove mower motor including mower can. Mowing motor. All rights reserved. Reproduction, including excerpts © 2018 AL-KO Geräte GmbH, Ichenhauserstr. 14, 89359 Koetz, Germany...
- Page 27 Position of the USB socket Disconnect micro USB connection to motherboard. 1,5 Nm Unscrew USB protection cap. Loosen 2x screws. Remove the USB socket. USB socket. All rights reserved. Reproduction, including excerpts © 2018 AL-KO Geräte GmbH, Ichenhauserstr. 14, 89359 Koetz, Germany...
- Page 28 When assembling pay attention to color coding. info When mounting, Attention: Risk of damage! be sure to press in the loop sensors with a soft pin (such as wood). All rights reserved. Reproduction, including excerpts © 2018 AL-KO Geräte GmbH, Ichenhauserstr. 14, 89359 Koetz, Germany...
- Page 29 Loosen the screw with a wrench. Loosen 2x screws (wheel motor bracket) T20 / 1,5 Nm Remove wheel motor holder. Loosen 4x screws (continue on next page). All rights reserved. Reproduction, including excerpts © 2018 AL-KO Geräte GmbH, Ichenhauserstr. 14, 89359 Koetz, Germany...
- Page 30 Wheel motors Wheel motor and gasket. Remove wheel motor and gasket. info info Installation note: Detailed view. During assembly, align sealing ring and screw guide. All rights reserved. Reproduction, including excerpts © 2018 AL-KO Geräte GmbH, Ichenhauserstr. 14, 89359 Koetz, Germany...
-
Page 31: Cutting Height Adjustment
T20 / 1,5 Nm Remove design cover and function cover. Release 1x screw. Remove the cover with a small screwdriver. Remove rotary knob with rubber gasket ring. All rights reserved. Reproduction, including excerpts © 2018 AL-KO Geräte GmbH, Ichenhauserstr. 14, 89359 Koetz, Germany... - Page 32 4 Min 7 mm / 2 Nm Turn the device over. Release knife with wrench. Attention: Risk of injury! Insert new cutting knives. Cutting knife. All rights reserved. Reproduction, including excerpts © 2018 AL-KO Geräte GmbH, Ichenhauserstr. 14, 89359 Koetz, Germany...
- Page 33 1 - Base station plate 2 - Connections for loop cable 3 - Charging contacts 4 - Connection for power supply cable 5 - Power supply All rights reserved. Reproduction, including excerpts © 2018 AL-KO Geräte GmbH, Ichenhauserstr. 14, 89359 Koetz, Germany...
- Page 34 T20 / 1,5 Nm Release cable connector. Loosen 6x screws. info Base station with circuit board. Note: Home button / Do not loose spring. All rights reserved. Reproduction, including excerpts © 2018 AL-KO Geräte GmbH, Ichenhauserstr. 14, 89359 Koetz, Germany...
- Page 35 Demontage / Montage der Basistation- Komponenten Charging contacts base station 5 Min T20 / 1,5 Nm Pull off cable lugs with pliers. Release 1x screw. Charging contacts. All rights reserved. Reproduction, including excerpts © 2018 AL-KO Geräte GmbH, Ichenhauserstr. 14, 89359 Koetz, Germany...
- Page 36 Packaging Carton wedge (left) and cardboard insert (right). Insert cardboard insert into cardboard box. Insert robot. Secure with cardboard wedge and insert protective foil. All rights reserved. Reproduction, including excerpts © 2018 AL-KO Geräte GmbH, Ichenhauserstr. 14, 89359 Koetz, Germany...
Need help?
Do you have a question about the Robolinho 500 and is the answer not in the manual?
Questions and answers
Good morning, do you have spare parts of Robolino 450 Alko? I need a mainboard n. 442132 and his battery. Can you let me know the price?