Table of Contents
Advertisement
Aruba 303H Series Hospitality Access Point
Installation Guide
The Aruba AP-303H Series Hospitality Access Points are high-performance dual-radio wireless devices for
hospitality and branch deployments.
These access points use Multiple-Input, Multiple-Output (MIMO) technology to provide secure wireless
connectivity for both 2.4GHz 802.11 b/g/n and 5GHz 802.11 a/n/ac WiFi.
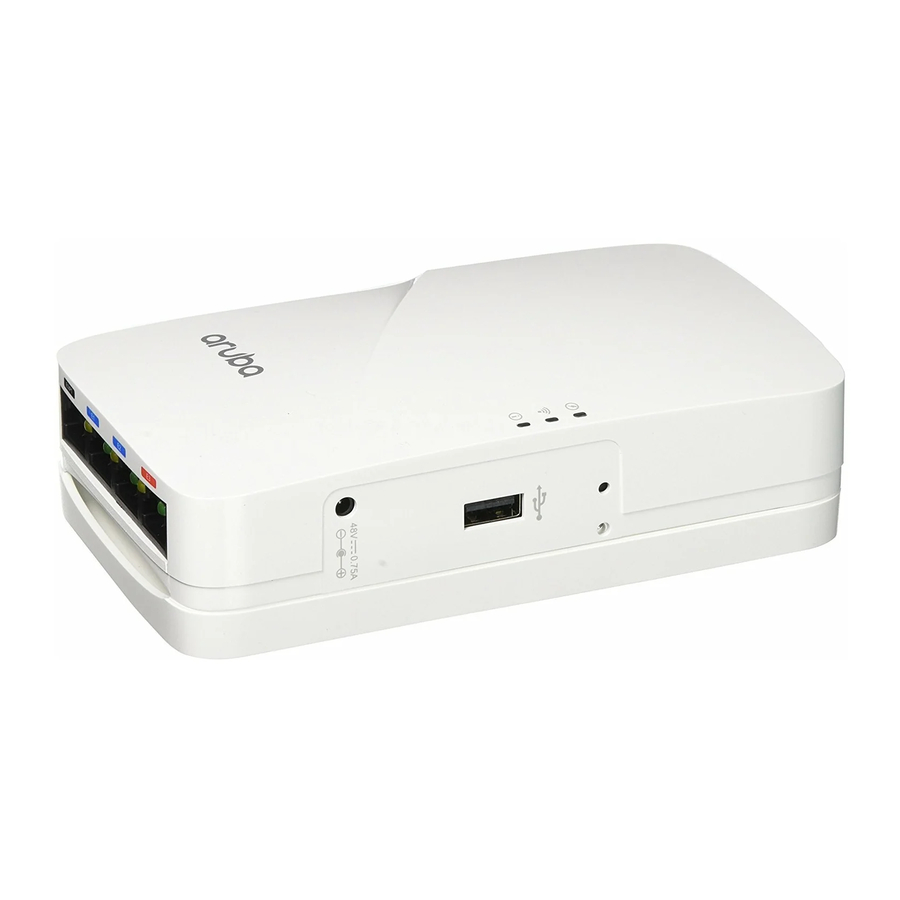
Alternatively, the wired Ethernet ports located on the bottom of this access point allow users to connect directly
to the device when physically linked by an Ethernet cable.
The AP-303H can be attached to a standard single-gang wall box using the mount provided, or converted into a
desk-mounted remote access point for branch office deployments using the AP-303H-MNTW mount kit (sold
separately).
The AP-303H access point provides the following capabilities:
Dual wireless transceivers
IEEE 802.11a/b/g/n/ac operation as a wireless access point
IEEE 802.11a/b/g/n/ac operation as a wireless air monitor
Compatibility with IEEE 802.3af/at PoE
Central management configuration
Supports PoE-in (E0 port)/PoE-out (E3 port)
Support for selected USB peripherals
Integrated Bluetooth Low Energy (BLE) radio
Package Contents
AP-303H Access Point
Single gang wall-box mounting bracket
(2x) #6-32 slotted screws
T8H Torx security screw
Inform your supplier if there are any incorrect, missing, or damaged parts. If possible, retain the carton, including
the original packing materials. Use these materials to repack and return the unit to the supplier if needed.
Software
The AP-303H access point requires ArubaOS 6.5.2 or higher. For additional information, refer to the ArubaOS User
Guide and ArubaOS Quick Start Guide.
Hardware Overview
The following sections outline the hardware components of the AP-303H access point.
LED
The LED displays located on the front and bottom of the access point indicate the following functions:
0511xxx-01 | November 2016
1
Advertisement
Table of Contents

Related Manuals for Aruba AP-303H Series


Summary of Contents for Aruba AP-303H Series
-
Page 1: Installation Guide
Aruba 303H Series Hospitality Access Point Installation Guide The Aruba AP-303H Series Hospitality Access Points are high-performance dual-radio wireless devices for hospitality and branch deployments. These access points use Multiple-Input, Multiple-Output (MIMO) technology to provide secure wireless connectivity for both 2.4GHz 802.11 b/g/n and 5GHz 802.11 a/n/ac WiFi. -
Page 2: System Status
1 blinking: 1s on/1s off 2 flashing: on/off repeated in less than 1s Radio Status The Radio Status LED indicates the operating mode of the access point’s radios, as shown in Table Aruba 303H Series Hospitality Access Point | Installation Guide... -
Page 3: Network Status
LED Display Settings The LEDs have three operating modes that can be selected in the system management software: Default mode: Refer to Tables 1-3 Off mode: LEDs are off | Installation Guide Aruba 303H Series Hospitality Access Point... -
Page 4: Console Port
2 3 4 5 1: NC 2: RX 3: TX 4: GND 5: GND USB Micro-B Ethernet Ports The AP-303H access point is equipped with four active Ethernet ports (E0-E3). Refer to Figure Aruba 303H Series Hospitality Access Point | Installation Guide... -
Page 5: Usb Interface
During the normal operation of the access point, press the push button using a small, narrow object, such as a paperclip. The system status LED will be turned off/on immediately. | Installation Guide Aruba 303H Series Hospitality Access Point... -
Page 6: Before You Begin
Tous les points d’accès Aruba doivent être installés professionnellement par un Professionnel en mobilité certifié par Aruba (ACMP). Il incombe au technicien d’installation de veiller à ce qu’une borne de raccordement à la terre conforme avec tous les codes électriques nationaux applicables puisse être utilisée. -
Page 7: Installing The Access Point
The installer is responsible for ensuring that grounding is available and meets applicable national and electrical codes. Tous les points d'accès Aruba doivent impérativement être installés par un professionnel agréé. Ce dernier doit s'assurer que l'appareil est mis à la terre et que le circuit de mise à la terre est conforme aux codes électriques nationaux en vigueur. - Page 8 7. Align the mounting slots on the back of the AP-303H with the corresponding mounting posts on the wall mount as shown in Figure 8. Push the access point against the posts and downward until the posts engage the slots at the top of the slots. Aruba 303H Series Hospitality Access Point | Installation Guide...
-
Page 9: Verifying Post-Installation Connectivity
If a power adapter other than the Aruba-approved adapter is used in the US or Canada, it should be NRTL listed, without an output rated 48VDC, minimum 2A, marked “LPS” and “Class 2”, and suitable for plugging into a standard power receptacle in the US and Canada. -
Page 10: Regulatory Information
The regulatory model name for AP-303H/IAP-303H access point is APINH303. Aruba provides a multi-language document that contains country-specific restrictions and additional safety and regulatory information for all Aruba access points. This document can be viewed or downloaded at www.arubanetworks.com RF Radiation Exposure Statement: This equipment complies with FCC RF radiation exposure limits. This equipment should be installed and operated with a minimum distance of 10.63 inches (27cm) between the... -
Page 11: Proper Disposal Of Aruba Equipment
Proper Disposal of Aruba Equipment Dispose of Aruba products per local regulation. For the most current information about Global Environmental Compliance and Aruba products, see our website at www.arubanetworks.com © Copyright 2017 Hewlett Packard Enterprise Development LP a Hewlett Packard Enterprise company www.arubanetworks.com...
Need help?
Do you have a question about the AP-303H Series and is the answer not in the manual?
Questions and answers