Table of Contents
Advertisement
Quick Links
Owner's Manual / Installation Guide
System Description
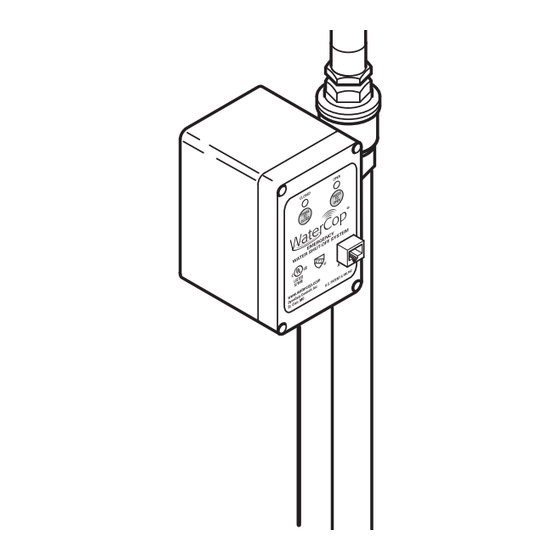
The WaterCop
PRO System is designed to detect
®
leaks in your plumbing system at predetermined
locations, and automatically shut off the water supply
to help effectively reduce the chances of major water
damage associated with a leak.
System Components
Brass Valve: Full Port, brass, 125psi cold water,
designed for placement on incoming water main.
WaterCop
Actuator:
NEMA
4
(weatherproof)
Polycarbonate enclosure for indoor/outdoor installation,
AC/DC power converter with 20' cord included, Liquid
crystal display with back light for sensor/trouble status,
ambient temperature 35°F to 105°F, for cold water
applications. Manual override, Local open/close water
control.
Flood Sensor: Power using 2 AA Alkaline Batteries
NEED NEW PHOTO
or optional AC/DC power converter (sold separately).
Batteries will provide back up power upon loss of
electricity. Wireless sensors are addressable and
supervised for conditions such as water detection,
power lost, sensor short/open and low battery. Ten foot
sensor cord allows optimal sensor placement. Flood
sensors can support one or two sensor wires. Each
WaterCop
PRO actuator valve can support up to 45
®
wireless sensors.
Range Enhancing Repeater: Enhances transmission
range of wireless sensors. Plugs into any standard wall
outlet. Receives and re-transmits sensor signals from
outlying sensors to the WaterCop
PRO actuator.
®
Monitoring Station-Standard: LCD display with back
light provides instant feedback of sensor alarm and
trouble conditions as well as open/close status of water
supply. Local push button water controls for instant on/
off of water supply. Audible alarm sounds when any
sensor detects flooding. Internal mounting bracket
mounts to standard wall boxes for aesthetics and cord
management. AC/DC power converter with 20' cord
included.
Monitoring Station-Hardwired (pictured above):
Accommodates up to 8 zones for WPSC hardwired
flood sensors (sold separately).
www.watercop.com
800-545-3636
Advertisement
Table of Contents

Summary of Contents for WaterCop PRO
-
Page 1: System Description
Ten foot sensor cord allows optimal sensor placement. Flood sensors can support one or two sensor wires. Each WaterCop PRO actuator valve can support up to 45 ® wireless sensors. Range Enhancing Repeater: Enhances transmission range of wireless sensors. -
Page 2: How The System Works
Hard Wired Sensors: Ten foot white cord with single use an extension cord. sensor. PRO sensors are easily secured to floor using The shut-off valve must be mounting holes. Sensors provide the same feedback installed to monitoring station as the wireless WaterCop ®... - Page 3 WaterCop ® case of an emergency. When power is restored, the PRO is a full port ball valve which does not restrict the WaterCop PRO will remain in its last known position ®...
-
Page 4: Installation Guide
To the extent permitted by law, the foregoing is exclusive and in lieu of all other warranties or representations whether expressed or implied, including any implied These are the text display codes on both the WaterCop ® warranty of merchantability or fitness. In no event shall PRO valve and monitoring station (optional). - Page 5 (low batteries, lost connection). It is ‘MODE’ important that you introduce each wireless sensor to TO ADD DEVICE: the WaterCop PRO shutoff valve and document the ® SENSORS: sensor number on the sensor. Once placed in location Press ‘MODE’ twice (Device Add) on WaterCop ®...
- Page 6 The WaterCop ® the wall, two to three feet above the floor. This will PRO motor will turn to a closed position (LCD will help avoid damage to the sensor and provide a strong display WaterCop...
-
Page 7: Troubleshooting
WaterCop accompanying Owner’s Manual should be read and ® PRO (about 5 seconds). This test simulates a leak, completely understood. and lets you check for interference between the Review Location and Type sensor and the WaterCop PRO. -
Page 8: Compression Fittings
12. Unplug unit, turn water back on and carefully check for leaks. 13. Tighten fittings if needed to stop any leaks. 14. Plug unit back into power source. Installation is complete. DynaQuip Contols 10 Harris Ind. Pk., St. Clair, MO 63077 • 800-545-3636 • www.watercop.com 192261 revC...
Need help?
Do you have a question about the PRO and is the answer not in the manual?
Questions and answers