
Related Manuals for PTZOptics PT-JOY-G2


Summary of Contents for PTZOptics PT-JOY-G2
- Page 1 ® PTZOptics IP Joystick Controller Second Generation IP Joystick Controller Installation & Operation Manual Please visit www.ptzoptics.com for the most up to date version of this manual Ver. 1.0 – 8.29.2017...
-
Page 2: Table Of Contents
® Table of Contents Precautions Safety Tips…………………..……………..……………..……………..……………..……………..……………... Page 3 Requirements……………..……………..……………..……………..……………..……………..……………... Page 3 What’s in the Box……………..……………..………..…..……………..……………..……………..……………………… Page 3 Physical Descriptions Top View of Joystick………………..……………..……………..……………..……………..…………………………. Page 4 Back View of Joystick…..……………..……………..……………..……………..……………..……………………… Page 5 Hardware Setup Power……………..……………..…………………..……..……………..……………..……………..……………..….….. Page 6 Network……………..……………..……………..………………….……..……………..……………..………………..… Page 6 “Quick Start”... -
Page 3: Safety Tips
ONVIF capabilities enabled, or the joystick will not properly control the camera. o When being used with a PTZOptics camera please make sure that in the web interface of the camera you have enabled “ONVIF:” to “On” under the “Network” section. -
Page 4: Physical Descriptions
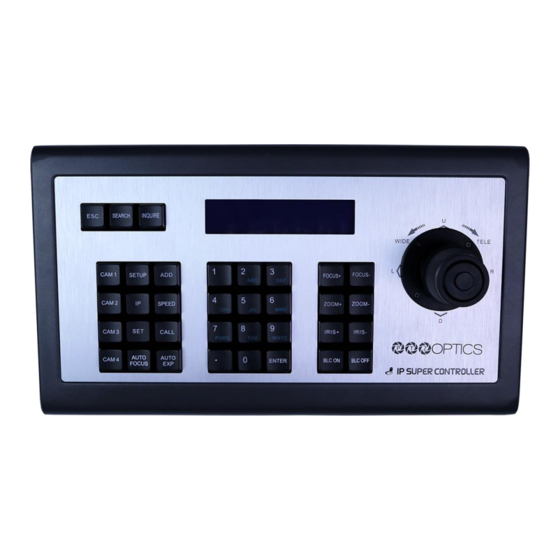
® Physical Descriptions Top View of Joystick Controller 1. Status / Menu LCD 2. Command Keypad 3. Alpha-numeric Keypad 4. Tuning Keypad 5. 4D Joystick Ver. 1.0 – 8.29.2017... -
Page 5: Back View Of Joystick
® Back View of Joystick Controller 1. Power LED Light (red) and Connection LED Light (green) 2. RS-232 Port (Not active on this model) 3. LAN Port (PoE enabled to power joystick controller from an 802.3af switch) 4. RS-485 Port (Not active on this model) 5. -
Page 6: Hardware Setup Power
® Hardware Setup Power Note: the joystick controller has a long boot-up procedure that can sometimes take up to 60 seconds to complete • Standard Outlet o Using the supplied power adaptor connected the 12 VDC Power Input port • Power over Ethernet (PoE) complying with the 802.3af standard via the RJ45 port on the joystick controller Network... -
Page 7: Quick Start" Basic Operation
® “Quick Start” Basic Operation Initial setup for joystick controller on a LAN Please ensure you have followed the steps on the previous pages for properly connecting your joystick controller to a proper power source (outlet or PoE) Please ensure you have followed the steps on the previous pages for properly connecting your joystick controller to a LAN that has a DHCP server present •... -
Page 8: Assigning A Static Ip To The Joystick Controller
® Assigning a static IP to the joystick controller Using the joystick controller Note: When using the joystick controller with a static IP address you must ensure that the joystick controller is assigned to the same subnet as the IP cameras to be controlled •... - Page 9 ® Using the web interface Please ensure you have followed the steps on the previous pages for properly connecting your joystick controller to a LAN; in this instance, your PC must also be in the same subnet as your joystick controller on the LAN. •...
- Page 10 ® • Using the drop down menu labled “Network Type” set that option to “Static Address” to enable the static IP capabilities of the joystick controller • Once you have entered all the necessary network credentials please click the “Save” button •...
-
Page 11: Search, Add And Inquire
Press the “ADD” button when you have found the device you wish to use Note: The device username and password may be required Example: For a PTZOptics camera with default credentials you would use a username of “admin” and a password of “admin”... - Page 12 ® Using the web interface Please ensure you have followed the steps on the previous pages for properly connecting your joystick controller to a LAN; in this instance you PC must also be in the same subnet as your joystick controller on the LAN. •...
- Page 13 Enter the IP address of the device o Enter the ONVIF port that the device uses Note: each device may use a unique ONVIF port a PTZOptics camera will use port 81 by default o Enter any login credentials required for an ONVIF connection...
-
Page 14: Switching Between Cameras
Note: If the LCD displays “Username or Password Error”, please check that the added device’s user name and password have been added in that device’s configuration. For PTZOptics cameras please ensure that the “ONVIF AUTH:” is set to “Off” in the “Network” settings found on thwe web interface. -
Page 15: Controlling Cameras
® Controlling cameras Please ensure you have followed the steps on the previous pages for properly connecting your joystick controller to a LAN and then for properly adding cameras to the joystick controller with unique addresses / IDs provided for each device •... -
Page 16: Setting And Calling Presets
® Setting and Calling Presets Please ensure you have followed the steps on the previous pages for properly connecting your joystick controller to a LAN and then for properly adding cameras to the joystick controller with unique addresses / IDs provided for each device •... -
Page 17: Logging In
® Web interface Logging in Please ensure you have followed the steps on the previous pages for properly connecting your joystick controller to a LAN; in this instance, your PC must also be in the same subnet as your joystick controller on the LAN. •... - Page 18 ® • You will be greeted with the “main page” as displayed below • We have covered the operation of the “main page” in the earlier section for “Adding Cameras” and will now look into the “Setup” page in more detail •...
-
Page 19: Lan
® • Click on “LAN” on the left side of the page • You can modify the IP address type and parameters in LAN settings, as follows: • Select the network type (Static IP or Dynamic Addressing / DHCP) from the drop down menu o Dynamic addressing (or DHCP, is the default): The keyboard will automatically request an IP address from a DHCP server on the connected LAN. -
Page 20: Users
® User management • Click on “Users” on the left side of the page • You can store up to ten (10) unique accounts on the joystick controller; below we will discuss the attributes of each set of access rights. The default user is “Admin” with “Super Admin”... -
Page 21: Upgrade
• Click the “Choose File” button o Browse your computer to select the appropriate firmware file CAUTION: Only select a file provided directly from PTZOptics for this keyboard o Click the “Start” button to initiate the file transfer o The keyboard will automatically reboot after successfully updating CAUTION: During update, please do not attempt to operate, shut off the keyboard’s power... -
Page 22: Reboot
® Reboot • Click on “Reboot” on the left side of the page • Click the “Reboot” button to restart the keyboard • Click “OK” to confirm Note: Joystick controller takes approximately 60 seconds to completely reboot. Note: This is useful when changing IP settings of the keyboard Ver. -
Page 23: Troubleshooting
This can occur when the joystick controller is not properly connected to a network o Please check that the network jack you are using is active o Please check that the network cable is not failing Please contact PTZOptics support https://help.ptzoptics.com/ for futher help •... -
Page 24: Notes
® Notes Ver. 1.0 – 8.29.2017...
Need help?
Do you have a question about the PT-JOY-G2 and is the answer not in the manual?
Questions and answers