Table of Contents
Advertisement
Advertisement
Table of Contents

Related Manuals for Coxo C-SMART-1 Pro


Summary of Contents for Coxo C-SMART-1 Pro
- Page 1 service@adae.store...
- Page 2 C-SMART-1 &I User Manual ( E:o197...
- Page 3 Introduction Congratulations on your purchase of the endo motor. Read this operation Manual carefully before use for operating instructions, care and maintenance.Keep this manual for future reference.
-
Page 4: Table Of Contents
C-SMART-I Pro U11er Manual 11 Guarantee Contents • Product and technical services are in charge of our company,the technical General information······························· · 1 department will provide technical support for you when there are technical ·1 Symbols used in these operation manual······················· problems. - Page 5 Sound Volume and Screen Brightness Adjustment- ....-14 8.2.1 Sound Volume Adjustment·....·········..14 8.2.2 Screen Brightness Adjustment·....·········..14...
- Page 6 C-SMART-1 Pro Uoer Manual Operation·......·······......···14 Troubleshooting 8.3.1 M2 Apex locator only(without motor.)·......14 If the device is not working properly, please check the following table before ·22 8.3.2 M2 Motor only (without apex locator)·························· calling our service center. ·28 8.3.3 Motor and Apex locator (Dual mode)······················...
-
Page 7: General Information
C-SMART-IPro U11er Manual C-SMART-1 Pro Uoer Manual • The rapid Sterilization method or the Sterilization method of unpacked 1 General Information accessories is not permitted. • Also do not use any hot air Sterilization,no radiation Sterilization, no 1.1Symbols used in these operation manual formaldehyde or ethylene oxide Sterilization and no plasma Sterilization. -
Page 8: Indications For Use
C·SMART· IPro Usar Manual C-SMART-1 Pro User Manual 2 Indications for use Then remove the accessories from the disinfection bath and rinse them thoroughly with water for at least five times for 1 min.and press and release the file clip five times. Inspect, dry and pack the accessories as quickly as... - Page 9 C-SMART-IPro U11er Manual C-SMART·IPro Uoer Manual 9.2 Cleaning,Disinfection and Sterilization (according to DIN EN ISO 17664) WARNINGS The procedure for cleaning, disinfection and Sterilization applies only to the • Do not disassemble or alter the motor handpiece. accessories lip hook, file clip and contra-angle. •...
-
Page 10: Precautions
C-SMART-1 Pro Uaer Menual C-SMAI[J-J Pro r M•nuel 5 Precautions 9 Maintenance, Cleaning and Disinfection • Read these safety precautions thoroughly prior to use.These precautions allow 9.1 General you to use the product safely, preventing harm to you and others. -
Page 11: Components, Installation And Charging
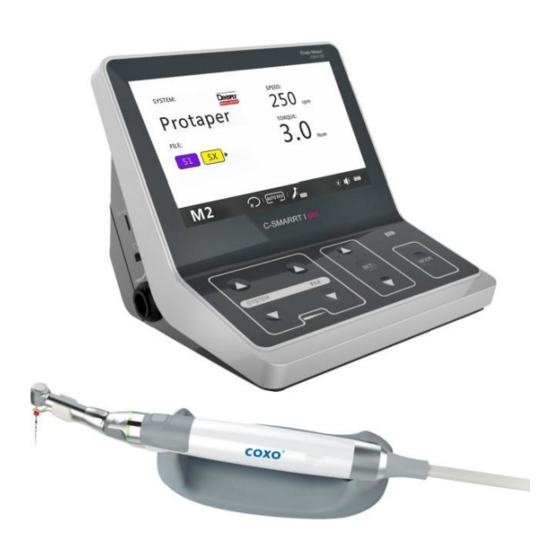
C-SMART-IPro Usar Manual C-SMART-1 Pro Uoar Manual 8.6 Factory Default Parameters Components, installation and charging To return to the original default parameters, follow the general reset instructions: 7.1 Standard Components SETUP Engliah • EI. Intlllhnml•r gu•l• : :! '!!IIAute-n•IIKMM •... - Page 12 Fig.1...
-
Page 13: Howtoconnecteachpart
C-SMART-IPro Usar Manual C-SMART-1 Pro Uoar Manual 7.3 How to connect each part error CAUTIONS Do not pull on the wire when removing the part with the wire. 7.3.1Connecting and Disconnecting the Motor Handpiece Fig. 40 Contra-angle is ERROR Fig.39 Contra-angle is OK a. - Page 14 C-SMART·l Pro Uaar Manual C-SMART·IPro Uoar Manual b. Removing Calibration Sliding it in the direction of the socket and then removed with contra-angle, This function is to decrease fluctuation in the rotation speed of the motor Otherwise it will be damaged. handpiece and the difference in torque by the contra angle.
-
Page 15: M1 Mode Connection (Only Apex Locator Function)
C-SMART-IPro Uaer Manual C-SMART-1 Pro Uoer Manual 7.3.5 M1 mode connection (only apex locator function) Fig.36 Accessories are ERROR Fig. 35 Accessories are OK Fig.6 Fig.7 Connect the test wire with lip hook and the File clip to the Control unit, test wire's plug must be fully inserted into the test wire socket. -
Page 16: Changing The Battery
C-SMART·IPro User Manual C-SMART-I Pro U11er Manual Test Wire Functional CHECK • Connect the motor cable to the Control unit's motor socket. • Connect the contra angle to the motor handpiece and insert the file. • Install the lighting device and catch the file. NOTE •... -
Page 17: Charging
C-SMART-1 Pro User Manual C-SMART-I Pro U11er Manual 7.5 Charging 8.4 Functional check of the apex locator It is recommended to check the performance of the Apex Locator once a week. Charge the battery according to the following steps: With the built-in inspection function, the special test plug can automatically •... -
Page 18: Step By Step Instructions
C-SMART-IPro U11er Manual C-SMART·IPro Uoer Manual Torque bar 8 Step by step instructions When the motor handpiece starts and its load reaches approximately half of the preset torque limit value, the torque bar display••••• ,when the load Language,LCD Paneland Operation Panel approaches the torque limit value, the torque bar displaY•••••... -
Page 19: Panel
C-SMART-l Pro Uaar Manual C-SMART-lPro Uoar Manual 8.3.3.5 Changing Speed, Torque and set Changing Speed and Torque 8.1.3 LCD Panel • See 8.3.2.5 Changing Speed and Torque ,---------------- ---------------- Set the DR'S CHOICE apex position CI!Mwo SYSTEM: SPEED: 150 .. Wave 0 Follow these steps to set the DR'S CHOICE apex position: FlU:... - Page 20 C-SMART-IPro U11er Manual C-SMART-1 Pro User Manual 8.3.3 M3 Motor and Apex locator {Dualmode) Screen Brightness display the Brightness of the Press mode key to enter M3 mode. In this mode, as a combined unit screen (see chapter 8.2.2.Screen Brightness Adjustment).
- Page 21 C-SMART-l Pro Uaar Manual C-SMART·lPro Uoar Manual 8.2 Sound Volume and Screen Brightness Adjustment r::7' NOTE When turning off the LED lighting function, the LED delay time function 8.2.1Sound Volume Adjustment can't be selected. The sound volume can be adjusted to 4 different levels: high. low,Minimum and limited off_ Motor option area shows the state of LED lighting: [._Ill,>]...
- Page 22 C·SMART·IPro Uoer Manual C-SMART-IPro U11er Manual ·Press the MODE key for 2 seconds (A) to enter setting interface; 8.3.1.2 Working area ·Press Up or Down key to select AUTO REVERSE (B); • Press SET key to on/off AUTO REVERSE function; ·The change will be saved automatically.
- Page 23 C-SMART-l Pro Uaar Manual C-SMART·lPro Uoer Manual &. 8-3.1.3 working 1) Starting Length Measurement CAUTION • Connect the File clip and the lip hook to the test wire. Before using the motor handpiece, verify the correctness of the changed • Place the lip hook on the patient's lip on the opposite side of the tooth to be parameters.
- Page 24 C-SMART-l Pro Uaar Manual C-SMART-lPro Uoar Manual Selecting a File System To choose a different file system, press the SYSTEM key. The file .& system shown in the display is the selected system. 1) Continuous Rotary File Systems When a file system has been selected, the first file of the system will automatically be shown in the display.
- Page 25 C·SMART-l Pro Uaar Manual C-SMART-lPro Uoar Manual Displays the AUTO REVERSE function (disabled for reciprocating systems). AUTO AUTO REVERSE on REVERSE AUTO REVERSE off: •11 • See8.3.2.6 Auto Reverse <· •., ,f.. •., The motor handpiece is not connected to the Control unit Fig.23 Beyond the apex foramen E;jl...
- Page 26 C-SMART-IPro U11er Manual C-SMART-1 Pro Uoer Manual 8.3.2 M2 Motor only (without apex locator) 8.3.1.4 Tips for SuccessfulLength measurement Condition of inaccurate measurement Press mode key to enter M2 mode. In this mode, has Motor only, without Too fast movement or even jumping to the apex directly is indicated for the apex locator function.
- Page 27 C-SMART-I Pro U11er Manual C-SMART-1 Pro Uoer Manual • The changed value will be saved automatically. Press any key other than SET Symptom Solution and Up or Down key to exit the setting, or exit the setting automatically after 3 seconds.
Need help?
Do you have a question about the C-SMART-1 Pro and is the answer not in the manual?
Questions and answers