Cadac Safari Chef 2 User Instructions
High pressure
Hide thumbs
Also See for Safari Chef 2:
- User instructions (89 pages) ,
- Replacement (9 pages) ,
- Quick manual (2 pages)

Related Manuals for Cadac Safari Chef 2


Summary of Contents for Cadac Safari Chef 2
- Page 1 LIVE THE BRAAI LIFE SAFARI CHEF MODEL No 6540H0, 6540H1 High Pressure USER INSTRUCTIONS NOTE! PRODUCT MAY VARY FROM ILLUSTRATIONS - FOR PICTORIAL PURPOSES ONLY! 503-0454 LEV18...
- Page 2 • The unit is easy to switch on, and to operate (Section 6) and the user can control the heat Nominal Usage 132g/hr input with an adjustable valve. Gross nom. heat input 1.82kW • The unit is supplied with a convenient carry bag. • This appliance complies with EN521:2006 and SANS 1539:2012 • This appliance may only be used with a CADAC 500g, 445g, or 220g Disposable Threaded Resealable Gas Cartridge (Model CA500, CA445 or CA220) or the same type threaded resealable cartridges complying with EN417 • The gas supply is to be used only in an upright position. • Warning: Accessible parts may be very hot. Keep young children away. • Gas appliances require ventilation for efficient performance and to ensure the safety of users and other persons in close proximity, therefor do not use the appliance in an unventilated area. It is intended for use outdoors only. Read these instructions carefully before using the appliance. • Use outdoors only! Country Name and Abbreviations AE = United Arab Emirates AL = Albania AT = Austria...
- Page 3 • If there is a leak on your appliance (smell of gas), close the appliance valve immediately, and take it into a fl ame free location where the leak may be detected and stopped. If you wish to check for leaks on your appliance, do it outside. Do not try to detect leaks using a fl ame; use soapy water. • The correct way is to smear the joints e.g. where the cartridge screws onto the appliance, with soapy water. • If bubbles form, then there is a gas leak. Immediately remove the gas cartridge from the appliance. Check that all the connections are properly fi tted. Check that the seal is in place and in good condition before connecting a gas cartridge(Fig. 4b). Re-check with soapy water after refi tting the cartridge. • If a gas leak persists, return the product to your CADAC dealer for inspection / repair. • Use Outdoors Only. 3. Assembly Instructions Fig. 1 • WARNING: The legs are spring loaded. Opening and closing of the legs must be done in a controlled manner to avoid personal injury or damage to your Safari Chef 2. • To open the legs, turn the unit upside-down and hold the legs down while lifting each leg individually. You will hear a “click“ if the leg(s) has located correctly.
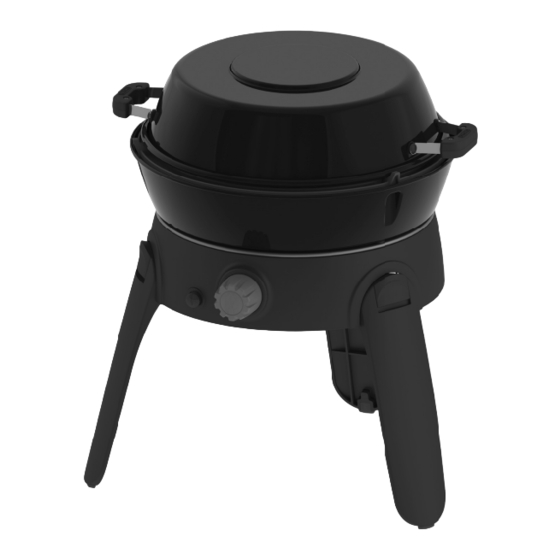
- Page 4 5. Component List Safari Chef 2 - High Pressure Lid (A) Pizza Stone (Optional Accessory) Pot Stand (F) Pot/Dome (B) (Max Pot Size: 300mm) (Min Pot Size: 150mm) BBQ Grid (C) Quick Release (H) Fat Pan (G) Flat Pan (D) Piezo Igniter (I) BBQ 2 Plancha (E)
- Page 5 6. Using the Appliance • This appliance must be used outdoors only! • When in use, protect from wind for optimum performance. • Do not move the unit whilst hot. The use of protective gloves is recommended. • CAUTION: Do not subject the non-stick cooking surfaces without food on / in it for extended periods as the heat may damage the non stick coatings. • CAUTION: Accessible parts may become very hot. Keep young children away from the appliance. • To pack away, let the unit cool. After cleaning, Fold the appliance as described is section 3 above. Place the pot / dome at the bottom of the bag. Next, place the pot stand upside down into the pot. Place the Fat Pan over the Pot and Pot Stand upside down. Then place the appliance upside down over the fat pan. Place the Grid and Flat Pan into their separate holders located in the lid of the bag, and zip them closed. Fold over the lid of the bag, and zip it closed. (Fig 7) • Keep the appliance in its Carry Bag when not in use, as this will prevent the ingress of dirt or insects which may affect the gas fl ow. • When attempting to light the appliance, make sure that the gas supply from the cylinder is open prior to turning on the gas supply to the appliance. • To light the appliance using the piezo ignition, open the control valve on the Fig. 7 appliance by slowly turning it in an anti-clockwise direction and press the piezo button in rapid succession to ignite the burner. If the burner fails to ignite, press the piezo button again continuously whilst increasing the gas fl ow by turning the control knob until the burner ignites. If the burner does not ignite in the fi rst 5 seconds, close the valve and wait 30 seconds before trying again (Fig. 6).
- Page 6 8. Cleaning BBQ Unit • To clean the Fat Pan, Flat Pan, and BBQ Grid, wash in warm water with a non-abrasive detergent after fi rst wiping off any excess fat left after cooking. • To Clean the Dome, wash in warm water with a non-abrasive detergent. • Do not use an abrasive cleaner on any part, as this will damage its surface coating. • These parts are perfectly safe to clean in the dishwasher after removing any excess fat. Body / Leg Unit • This is best cleaned by using a soft damp cloth and a mild non-abrasive detergent. Do not place in a dishwasher as this may allow water into the valve or burner ports, which will cause the unit to malfunction. • When cleaning the body/leg unit the pot stand may need to be removed. This can be done lifting the pot stand out of the locator groove in the heat shield. 9. General Maintenance • The onus of maintaining this appliance solely rests on the consumer from date of purchase. • This appliance does not require scheduled maintenance. • After prolonged storage, inspect the Air Holes under the unit and the inlet of the venturi for insects such as spiders, etc which could affect gas fl ow. After checking, refi t all components into the prescribed position. Replacing a Blocked Jet: • Your Safari Chef 2 is fi tted with a specifi c size jet to regulate the correct amount of gas.
- Page 7 10. Returning the appliance for repair or service. • Do not modify the appliance, as this could be dangerous. • If you cannot rectify a fault by following these instructions, contact your local CADAC distributor for details on how to return the product for attention. • Your CADAC Safari Chef 2 is guaranteed by CADAC for a period of 2 years against factory fault. 11. Spares and Accessories • Always use genuine CADAC spares as they have been designed to give optimum performance. 6540-100 6540-200 6540-300 6540-600 6540-700 6544-100...
Need help?
Do you have a question about the Safari Chef 2 and is the answer not in the manual?
Questions and answers