Advertisement
Advertisement
Table of Contents

Related Manuals for Yongnuo YN622C II


Summary of Contents for Yongnuo YN622C II
- Page 1 YN622C II 560-RX User Manual 用户手册...
-
Page 2: Table Of Contents
注意事项 Contents General Description ....1 Function Introduction ....2 Supported Functions List . -
Page 3: General Description
(slave unit) when a flash is installed or connected. On-Top Flash Off-Camera Flash 560-RX Flash Control Menu YN622C II (Camera Menu) Off-Camera Flash LCD Display YN622C-TX Recommended optional YN622C-TX E-TTL wireless flash controller as a transmitter,... -
Page 4: Function Introduction
Function Introduction Thank you for purchase the products of Yongnuo firstly. The new upgrade version YN622C II can set to "622" or Ÿ "560-RX" communication mode through the power switch, supports receiving the trigger signal of the YN560-TX/RF605(603 mode)/RF603(II) series products, with multi aspects improved, equipped with quick lock design and supports USB firmware upgrade. -
Page 5: Supported Functions List
1st, 2nd curtain/HSS (Super Sync) Support LCD Live view triggering Ÿ Support high-speed continuous shooting trigger Ÿ Settings saved automatically Ÿ Compatible with ALL YongNuo/ Canon EXII series flashes Ÿ Support single-contact of camera & flash triggering Ÿ (max sync speed is 1/250s) -
Page 6: Compatibility List
300D/350D/400D/1D/1D Mark II Compatible ETTL flash list: (support wireless remote control through camera menu) Canon 600EX(RT)/580EXII/430EXII/320EX/270EX(II) YongNuo YN600EX-RT /YN568EX(II)/YN565(II)/ YN468(II)/YN467(II)/YN465 430EX/550EX/580EX or other parts of the flash is not supported remote control via the camera menu, need to manually set the flash modes(parameters). -
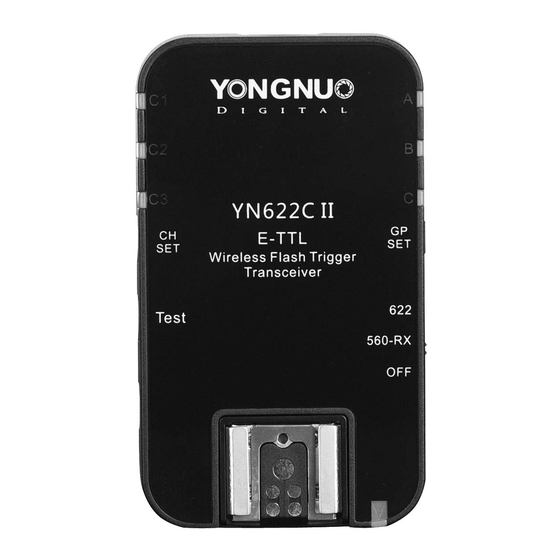
Page 7: Name Of Parts
Name of Parts Indicator Blinking Keep Lighting Communicating Channel Indicator Mix Control Mode (Remote control mode) Firing group or Testing Group Indicator receiving group Communicating State Indicator(green) TX Communicating(622) Testing Communicating RX Communicating(622) Standby State State Indicator(red) State Indicator(orange) RX Communicating(560-RX) Standby State ※The protective film can be torn out. -
Page 8: Preparation Before Use
Preparation Before Use 1. Installing the Batteries Open the cover and install two AA batteries (excluded)according to the + a n d - m a r k s , r e c h a r g e a b l e batteries of 1.2V can be used. - Page 9 Preparation Before Use 3 . I n s t a l l F l a s h o n t h e H o t S h o e of t h e Transceiver (as Receiver) 1. Install the transceiver into the flash bracket or other fixing devices (Not included in the product box).
-
Page 10: Setting
Setting 1.Power switch The YN622C II adopts 3 sections of power Ÿ switch design. When it set in the “622” communication mode, the red indicator light will bright, when set in the “560-RX’ Red Indicator communication mode, the orange indicator (622mode) light will bright, “OFF”for power off. - Page 11 Setting 4.Flash Test Group Setting (Test + GP SET Button) Set flash testing group Ÿ Type C camera uses the set firing group. Ÿ YN622C Ⅱ 560-RX 1. H o l d d o w n [ Te s t ] b u t t o n t h e n t h e g r o u p indicators will keep lighting, the flash on the receiver group having been selected will be woken up(p.10).
-
Page 12: Flash Awaking /Testing Flash
+B two groups of flash test, hold down the[Test] button, the flash on A and B of the receiver will be awakened, and when loosening [Test] button will fire a test flash. YN622C II 560-RX ※ If the flash can not be awakened, manually awaken the flash before shooting. -
Page 13: Remote Control Mode
Remote Control Mode Remotely setting all the flashes through the external flash function setting (camera menu) of the camera, just likes the flash being directly installed on the camera. The settings of camera menu is prior, settings will upgraded to the receiver after pressing down camera confirmation button or half pressing shutter button without needing to operate the flash control panel, the flash’s screen will display the current setting. - Page 14 Automatic Flash (E-TTL II) Fully-automatic Flash Shooting Ÿ 1. Select flash mode as E-TTL II mode. 2. Half press camera's shutter button to focus, and on the flash screen the aperture and effective range etc. parameters will be displayed. 3. Ensure that the subject is in the effective flash range, full press camera’s shutter button to shoot, the flash will be fire according to the setting.
- Page 15 Shutter Sync 1. 1st Curtain sync Ÿ The normal flash sync. 2. 2nd curtain sync The flash fires right before the shutter closes, lower shutter Ÿ speed needs to be used, support bulb 2nd curtain sync flash. ※Only when wireless flash function via the flash control menu is disable , the 2nd curtain sync can be use.
Need help?
Do you have a question about the YN622C II and is the answer not in the manual?
Questions and answers