Table of Contents
Advertisement
Advertisement
Table of Contents

Related Manuals for Samsung SC-MX20


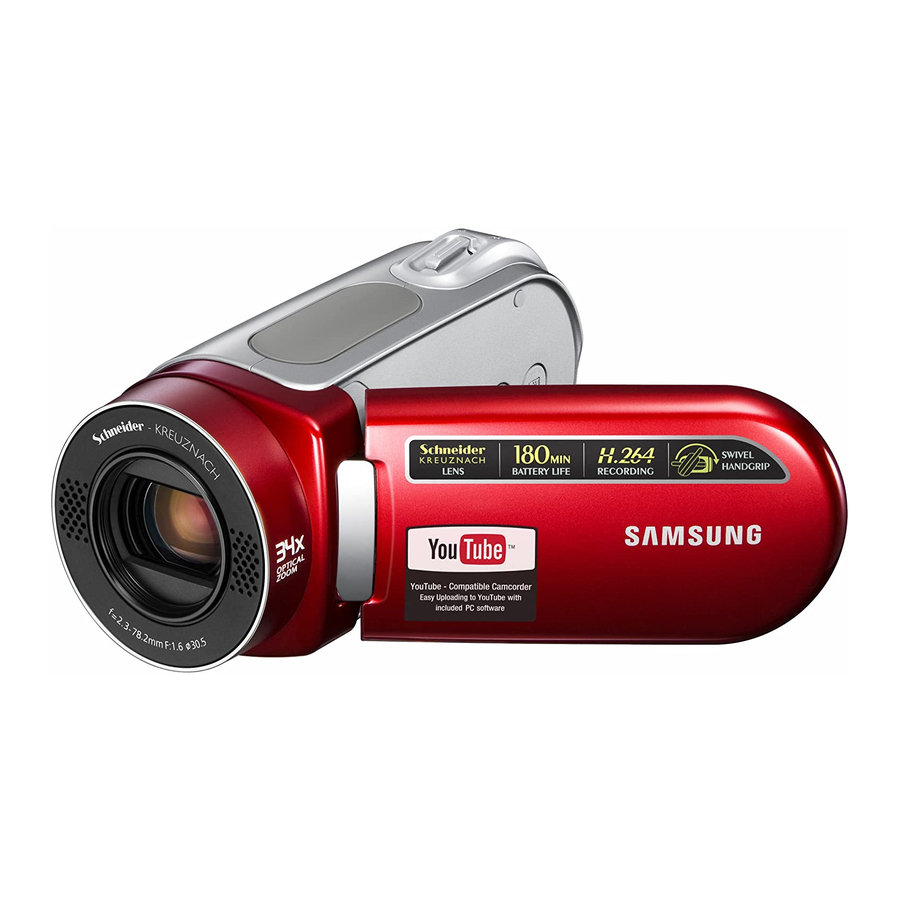
Summary of Contents for Samsung SC-MX20
-
Page 1: User Manual
Memory Camcorder user manual imagine Thank you for purchasing this Samsung product. To receive more complete service, please register your product at www.samsung.com/global/register the possibilities SC-MX20 SC-MX20B SC-MX20H SC-MX20L SC-MX20R SC-MX20C SC-MX20CH SC-MX20E SC-MX20EL SC-MX20ER... - Page 2 The memory camcorder’s external memory slot accepts both high capacity SDHC and MMCplus. Play and transfer videos, quickly and easily using the memory type of your choice. In addition to this slot the memory camcorder has the built-in flash memory.
- Page 3 Flexible 4:3 & 16:9 recording and viewing By offering a choice of recording in two different aspect ratios - 4:3 and 16:9, SAMSUNG ensures the entire image is captured for playback on everything from older TVs to your newest, wide-format TV screen.
-
Page 4: Safety Warnings
Apparatus shall not be exposed to dripping or splashing and no objects filled with liquids, such as vases, shall be placed on the apparatus. To disconnect the apparatus from the mains, the plug must be pulled out from the mains socket, therefore the mains plug shall be readily operable. -
Page 5: Important Safety Instructions
These openings must not be blocked or covered. Never place your CAMCORDER on a bed, sofa, rug, or other similar surface: on or near a radiator or heat register. This CAMCORDER should not be placed in a built-in installation such as a bookcase or rack unless proper ventilation is provided or the manufacturer’s instructions have been adhered to. - Page 6 The CAMCORDER should be operated only from the type of power source indicated on the label. If you are not sure of the type of power supply at your home, consult your appliance dealer or local power company. A CAMCORDER is intended to be operated from battery power, or other sources, refer to the operating instructions.
- Page 7 23. OVERLOADING: Do not overload wall outlets and extension cords as this can result in a risk of fire or electric shock. 24. OBJECTS AND LIQUIDS: Never push objects of any kind into this...
- Page 8 29. To prevent damage which may result in fire or shock hazard, do not expose this appliance to rain or moisture. 30. If this power supply is used at 240V ac, a suitable plug adaptor should be used. 31. This product is covered by one or more of the following U.S.
- Page 9 Also, Samsung cannot be responsible for your recorded video and audio. Recorded contents may be lost due to a mistake when handling this memory camcorder or memory card, etc. Samsung shall not be responsible for the compensation for damages due to the loss of recorded contents.
- Page 10 Handle the liquid crystal display (LCD) with care: • The LCD is a very delicate display device: Do not press its surface with excessive force, hit it or prick it with a sharp object. If you push the LCD surface, unevenness in display may occur. If unevenness does not disappear, turn the camcorder off, wait for a few moments, and then turn it on again.
- Page 11 - Using the memory camcorder in a place where the temperature is over 140°F (40°C) or lower than 32°F (0°C) may result in abnormal recording/playback. - Do not leave the memory camcorder on a beach or in a closed vehicle where the temperature is very high for a long time: This could cause malfunctions.
-
Page 12: Notes Regarding A Trademark
Illustrations of SC-MX20C model are used in this user manual. • The displays in this user manual may not be exactly the same as those you see on the LCD screen. • Designs and specifications of storage media and other accessories are subject to change without any notice. -
Page 13: Table Of Contents
Adjusting the LCD screen Using the MENU button Using the Control buttons Shortcut menu (OK Guide) Initial setting : Time Zone, Date and Time & OSD Language Selecting the storage media (SC-MX20C/MX20CH/MX20E/MX20EL/MX20ER only) Inserting / ejecting the memory card Selecting the suitable memory card... - Page 14 RECORDING PLAYBACK RECORDING OPTIONS Recording movie images Recording with ease for beginners (EASY Q mode) Zooming In and out Movie Images playback Changing the menu settings Menu items Using the recording menu items iSCENE White Balance Exposure Shutter Focus Anti-Shake (HDIS)
- Page 15 Menu items Setting the play option Deleting movie images Protecting movie images Copying movie images (SC-MX20C/MX20CH/MX20E/MX20EL/MX20ER only) File Information Changing the menu settings in "Settings" Menu items Using the settings menu items Storage Storage Info Format File No. Time Zone...
- Page 16 CyberLink MediaShow4 Installing the CyberLink MediaShow4 Connecting the USB cable Viewing the contents of storage media Transferring files from the memory camcorder to your PC Uploading movie images in the memory camcorder to YouTube Connecting to a TV Viewing on a TV screen...
-
Page 17: Introduction To Basic Features
✪ This chapter introduces you to the basic features of your memory camcorder. See the reference pages for more information. Step1: Preparation Connecting a power source ➥page 14 • Check out the storage media ➥page 37 •... - Page 18 MediaShow4 application provided with the product. Also, using the CyberLink MediaShow4 allows easy upload of recorded movies file to YouTube ( Tube Broadcast Yourself Step5: Easy Upload to YouTube You can upload recorded movie to YouTube using the CyberLink MediaShow4. ➥page 92 • English_08...
-
Page 19: Getting To Know Your Memory Camcorder
WHAT'S INCLUDED WITH YOUR MEMORY CAMCORDER Your new memory camcorder comes with the following accessories. If any of these items is missing from your box, call Samsung’s Customer Care Center. The exact shape of each item may vary by model. -
Page 20: Front & Left View
Lens open/close switch Internal microphone Lens MENU button OK button Control button ( Recording start/stop button Be careful not to cover the internal microphone and lens during recording. CAUTION LCD screen Built-in speaker EASY Q button LCD ENHANCER ( Zoom lever (W/T) - Page 21 REAR & BOTTOM VIEW MODE indicator ( Record ( ) / Player ( MODE button AV cable jack (AV) USB jack ( DC IN jack (DC IN) Jack cover Charging indicator (CHG) POWER switch...
-
Page 22: Preparation
This section provides information that you should know before using this memory camcorder; such as how to use the provided accessories, how to charge the battery, how to setup the operation mode and initialize setup. USING THE ACCESSORIES Attaching a Grip Belt Insert your right hand from the bottom of memory camcorder up to the base of your thumb. - Page 23 • the order of output signal is as follows: USB cable AV cable. Do not connect the connection cables to the memory camcorder and cradle at the same time, it may cause • conflict and may not work properly. If this occurs, remove all the connected cables and try the connection again.
-
Page 24: Connecting A Power Source
CONNECTING A POWER SOURCE There are two types of power source that can be connected to your memory camcorder. • Do not use provided power supply units with other equipment. • - The battery pack: used for outdoor recording. -
Page 25: Charging The Battery Pack
➥page 16 6. When the battery pack is fully charged, disconnect the AC power adaptor from the memory camcorder. Even with the power switched off, the battery pack will still discharge if it is left attached to the memory camcorder. •... -
Page 26: Charging Indicator
If the battery has been fully charged, the charge indicator is • green. If you are charging the battery, the color of the charge indicator • is orange. If an error occurs while the battery pack in charging, the charging •... - Page 27 Battery Level Display The Battery Level Display shows the amount of battery power remaining in the battery pack. Battery Level Indicator Exhausted (flickers): The device will soon turn off. Change the Battery Pack as soon as possible. (flickers): The device will be forced to turn off after Before using memory camcorder, charge the battery.
- Page 28 Assume that the recordable time with a fully charged battery pack is between 1/2 and 1/3 of the time in the table, and prepare additional charged battery pack(s) to allow the time you are planning to record on the memory camcorder.
- Page 29 • Dropping the battery pack may damage itself. Be careful to keep the battery pack out of the reach of children. There is danger that a child might swallow it. • Frequent use of the LCD screen or using the fast forward or rewind buttons wears out the battery pack faster.
- Page 30 We recommend only using the original battery pack that is available from your Samsung retailer. When the battery • reaches the end of its life, please contact your local dealer. The batteries have to be dealt with as chemical waste. Clean the terminals to remove any foreign substances before inserting the battery.
-
Page 31: Using A Household Power Source
• Using other AC power adaptors could cause electric shock or result in fire. The AC power adaptor can be used around the world. An AC plug adaptor is required in some foreign countries. • If you need one, purchase it from your distributor. -
Page 32: Basic Operation Of Your Memory Camcorder
BASIC OPERATION OF YOUR MEMORY CAMCORDER This section explains the basic techniques of recording movies, and also basic settings on your memory camcorder. Set the appropriate operation mode according to your preference using POWER switch and MODE button. Turning memory camcorder on or off You can turn the power on or off by sliding the POWER switch down. -
Page 33: Lcd Screen Indicators
Functions marked with * won’t be kept when the • memory camcorder is turned off and on again. For enhanced performance, the display indications • and the order are subject to change without prior notice. Movie Record mode Interval REC * Operating status ( [STBY] (standby) or [... - Page 34 Manual Control Bar/ Value Menu name Shortcut menu (OK Guide) / Return Value adjust (down) Manual Exposure Value adjust (up) The illustration to the left shows the Manual • Select Select Exposure screen. Functions marked with * won’t be kept when •...
- Page 35 Web & Mobile Delete Selected Button Guide Movie Play mode : Single View Movie Play mode Play Status ( Play ( ) / Pause ( Time code (Elapsed time / Recorded time) Storage media (Built-in memory (SC-MX20C/ MX20CH/MX20E/MX20EL/MX20ER only) or memory card) Battery info.
- Page 36 STBY Movie Play mode : Shortcut menu (OK Guide) Move to next file / FF (fast forward) ➥page 49 Volume Down Play Status ( Play ( ) / Pause ( Move to previous file / REW (rewind) ➥page 49...
-
Page 37: Turning The Screen Indicators On/Off ( )
Checking the remaining battery and memory capacity Without turning the camcorder on,you can check the remaining battery time and memory capacity. When the camcorder is turned off (battery is installed) press and release the • button to display the remaining capacity of the battery. -
Page 38: Using The Lcd Enhancer
• LCD enhancer function does not affect the quality of the image being recorded. • When LCD enhancer works at the low illumination, some stripes may occur on the LCD screen. • It is not a malfunction. Using the LCD Enhancer function may cause color looks different on the display. -
Page 39: Adjusting The Lcd Screen
1. Open up the LCD screen 90 degrees with your finger. 2. Rotate it to the best angle to record or play. If you rotate the LCD screen 180 degrees to the lens side, you can • close the LCD screen with it facing out. This is convenient during playback. -
Page 40: Using The Control Buttons
USING THE CONTROL BUTTONS Used for playback, pausing, fast forwarding, and rewinding. Also used as directional buttons (up, down, left, right) and to make a selection when selecting movie images or menus. 1. Press the Control button ( 2. Press the Control button ( Confirm your selection by pressing the OK button. - Page 41 Decreases the volume - Search playback RPS (Reverse Playback Search) rate: x2 → x4 → x8 → x16 - Previous Skip Playback - Search playback FPS (Forward Playback Search) rate: x2 → x4 → x8 → x16...
-
Page 42: Shortcut Menu (Ok Guide)
Shortcut menu (OK guide) is displayed. • 2. Press the Control button ( ) will display the Auto Exposure shortcut menu screen, where you can press OK button to set up Auto Exposure. 3. Press the Control button ( ) once again will display the Manual Exposure shortcut... -
Page 43: Shortcut Function Using The Control Buttons
Decreases the volume - Search playback RPS (Reverse Playback Search) rate: x2 → x4 → x8 → x16 - Previous Skip Playback - Search playback FPS (Forward Playback Search) rate: x2 → x4 → x8 → x16... -
Page 44: Initial Setting : Time Zone, Date And Time & Osd Language
The Date/Time Set screen appears. • 3. Set the month with Control button ( 4. Set day, year, hour and minute (AM/PM) in the same way, then move it next with Control button ( 5. Set DST set ( ) with Control button ( Set the icon ( ) to on to move the time forward 1 hour. - Page 45 After setting, the date and time are automatically recorded on a special data area of the storage media. • Turning the date and time display on/off To switch the date and time display on or off, access the menu and change the Date/Time mode. ➥page 80 • Setting the clock to the local time zone while traveling While traveling, you can easily set the clock to the local time by selecting the time zone on the camcorder.
- Page 46 English / 한국어/ Français / Deutsch / Italiano / Español / Português / • Nederlands / Svenska / Suomi / Norsk / Dansk / Polski / Čeština / Slovensky / Magyar / 4. Press the MENU button to exit the menu.
-
Page 47: About The Storage Media
SELECTING THE STORAGE MEDIA (SC-MX20C/MX20CH/MX20E/MX20EL/MX20ER only) You can record on the built-in memory or a memory card, so you should select the desired storage media before • starting recording or playback. You can use SDHC and MMCplus cards on your memory camcorder. (Some cards are not compatible depending •... -
Page 48: Inserting / Ejecting The Memory Card
If there is no memory card inserted, only the built-in memory will be available. • Do not eject a memory card while it is being used in the camcorder. The memory card and its data may be • damaged. -
Page 49: Selecting The Suitable Memory Card
The SDHC memory card supports a mechanical write protection switch. Setting the switch prevents accidental • erasure of files recorded on the SDHC memory card. To enable writing, move the switch up to the direction of terminals. To set write protection, move the switch down. - Page 50 Turning the power off or removing a memory card during operation such as formatting, deleting, recording, and • playback may cause the data loss. After you modify the name of a file or folder stored in the memory card using your PC, your camcorder may not • recognize the modified file.
- Page 51 • movie on the memory card. You can even lose your movie data during the recording. In an attempt to preserve any bit of the recorded movie, the memory camcorder forcibly stores the movie on • the memory card and displays a warning: "Low speed card. Please record a lower resolution."...
-
Page 52: Recordable Time And Capacity
) 720x480(60i) TV Fine ( 720x480(60i) TV Normal ( 720x480(60i) Web & Mobile ( 640x480 1GB= 1,000,000,000bytes : actual formatted capacity may be less as the internal firmware uses a portion of the memory. built-in memory (SC-MX20C/MX20CH/ MX20E/MX20EL/ MX20ER only) 16GB approx. - Page 53 To facilitate the movie recording, it is recommended to use a memory card that supports faster write speed. • (Write speed: 2MB / sec or higher) If you use a low write-speed memory card, recording may stop with a message of "Low speed card. Please record a lower resolution".
-
Page 54: Recording
The memory camcorder provides two Recording start/stop buttons. One is on the rear side of the camcorder • and the other one is on the LCD panel. Select the Recording start/ stop button according to the use. 1. Turn the memory camcorder on. -
Page 55: Recording With Ease For Beginners (Easy Q Mode)
You can not use a locked memory card for recording. You will see a message saying recording is disabled • due to the lock. You can select the resolution of movie images to be recorded. ➥page 61 • Note that power failure during a recording such as disconnected DC power jack or exhausted battery may •... -
Page 56: Zooming In And Out
This memory camcorder allows you to record using optical 34x power zoom and 1200x digital zoom. You can zoom with the zoom lever or the Control (W/T) button on the LCD panel. • Zoom magnification over 34x is done through digital image processing, •... -
Page 57: Playback
Shortcut menu for playback will be displayed for a while. • The selected movie images are played according to Play Option setting. • ➥page 69 To stop playback and return to the thumbnail index view, move the zoom lever. • ) to select the desired movie images, Select Select... -
Page 58: Adjusting The Volume
(When connected to external devices, volume adjustment should be done on the connected external device.) You can play back recorded movie files on a TV or a PC. ➥pages 88, 93 • You can upload recorded movie files to YouTube. ➥page 92 •... -
Page 59: Various Playback Operations
- To resume normal playback, press the OK button. Slow motion playback ( ) ❙ While playback is paused, press and hold the Control button ( • in slow motion at x1/2, x1/4, x1/8 and x1/16 speed. To resume normal playback, press the OK button. -
Page 60: Recording Options
CHANGING THE MENU SETTINGS You can change the menu settings to customize your memory camcorder. Access the desired menu screen by following the steps below, then change the various settings. 1. Slide POWER switch downward to turn the memory camcorder on. - Page 61 ✪ Follow the instructions below to use each of the menu items listed after this page. For example: setting the White Balance in Movie Record mode. 1. Slide the POWER switch downward to turn the memory camcorder on. 2. Select the operation mode.
-
Page 62: Menu Items
MENU ITEMS Accessing items in the menu depends on the operation mode. • For operation details, see the corresponding page. ➥pages 53~67 • Menu items in Movie Record ( Items SCENE White Balance Exposure Shutter Focus Anti-Shake (HDIS) -
Page 63: Using The Recording Menu Items
You can set up the menu items for movie images recording. SCENE This memory camcorder automatically sets the shutter speed and aperture according to the subject brightness for optimum recording: You can also specify one of various modes depending on subject conditions, recording environment or purpose of filming. item "Auto"... -
Page 64: White Balance
The indicator ( • 2. Frame a white object such as a piece of paper so that it fills the screen. Use an object that is not transparent. If the object that fills the screen is not focused, correct the focus using •... -
Page 65: Exposure
A subject can be recorded under various types of lighting conditions indoors (natural, fluorescent, candlelight, etc.). • Because the color temperature is different depending on the light source, the subject tint will differ depending on the white balance settings. Use this function for a more natural result. -
Page 66: Shutter
• This function will be set to "Auto" in the EASY Q mode. • When recording with a shutter speed of 1/1000 or higher, make sure the sun is not directly shining into the lens. • Contents ) to select the desired indicator to adjust the shutter speed, then press the OK button. -
Page 67: Focus
You can also manually focus a subject depending on the recording conditions. • item In most situations, it is better to use the automatic focus feature, as it enables you "Auto" to concentrate on the creative side of your recording. - Page 68 You can easily adjust the focus using Shortcut menu button. ➥page 32 • Manual focusing focuses on a point in the framed scene while auto focusing focuses on the center area automatically. • EASY Q mode will set the focusing to "Auto" automatically.
-
Page 69: Anti-Shake (Hdis)
It is recommended that you specify "Anti-Shake(HDIS): Off " when using the memory camcorder on a • desk or tripod. When you record pictures with 34x or more magnification and the "Anti-Shake(HDIS)" is set to "On" in • dark locations, after-images may appear. If this occurs, we recommend using a tripod and turning the "Anti-Shake(HDIS)"... -
Page 70: Digital Effect
The digital effect enables you to give a creative look to your recording. • Select the appropriate digital effect for the type of picture that you wish to record and the effect you wish to create. • There are 10 different digital effect options. -
Page 71: 16:9 Wide
Resolution You can select the resolution of a movie to be recorded. This memory camcorder can record in the "TV Super Fine", "TV Fine", "TV Normal" and "Web & Mobile" modes. The "TV Fine" mode is set as the factory default. -
Page 72: Wind Cut
You can reduce wind noise when recording sound from the built-in microphone. If "Wind Cut : On" is set, the low-frequency components in the sound picked up by the microphone will be cut off during recording: This makes it easier to hear voice and sound during playback. -
Page 73: Back Light
Back Light When subject is lit from behind, this function will compensate for lighting so that the subject is not too dark. item "Off" Disables the function. - Backlight compensation is executed. "On" - Backlight compensation brightens the subject quickly. -
Page 74: Interval Rec
Interval REC (Interval recording) Interval Rec records still images at specific intervals you can set and plays them as one movie file. This function is useful to observe the movement of clouds, the changes in daylight or blooming flowers, etc. - Page 75 Captured 30 contiguous images compose a movie clip of 1 second length. Since the minimum length of a movie to be saved by the memory camcorder is one second, Interval defines how long the interval recording should be taken. For example, if you set the interval to "30 Sec", interval recording should be taken for at least 15 minutes to record minimum movie length of 1 second (30 images).
-
Page 76: Fader
C.Nite You can take a shot of an object in slow motion by controlling the shutter speed, or a brighter image in dark places without compromising colours. item "Off" Disables the function. " " The memory camcorder automatically adjusts image brightness. -
Page 77: Guideline
• Digital Zoom You can select the maximum zoom level in case you want to zoom to a level greater than 34x (the default setting) • during recording. Up to 34x zoom is performed optically, and after that, up to 1200X zoom is performed digitally. -
Page 78: Playback Options
MENU ITEMS Accessible items in the menu vary depending on the operation mode. • See pages 47-49 for playback information and button operation. • See pages 69-73 for details on menu items during playback. • Menu items in Movie Play (... -
Page 79: Setting The Play Option
SETTING THE PLAy OPTION You can play all movie images continuously or play the selected movie images only. • You can also set the repeat option for all movie images. • 1. Slide the POWER switch downward to turn on the memory camcorder. -
Page 80: Deleting Movie Images
• To protect important images from accidental deletion, activate the image protection. ➥page 71 • Note that removing the battery pack or disconnecting AC power adaptor while you delete files may damage the • storage media. ) to select "Delete". -
Page 81: Protecting Movie Images
Protected movie images will show the indicator ( • If the write protection tab on the memory card is set to lock, you cannot set image protection. • ) to select "Protect". -
Page 82: Copying Movie Images
Movie images are copied to the destination storage while leaving original movie images in the source storage. • It copies from the currently-used memory to another. For example, if the built-in memory was used, it copies to a memory card. •... -
Page 83: (Sc-Mx20C/Mx20Ch/Mx20E/Mx20El/Mx20Er Only)
• Copying may take a while depending on the number of files and file size. • Copying may not operate if the battery charge is insufficient. If available, use AC adaptor while copying to • prevent power disconnection. Note that removing the battery pack or disconnecting AC power adaptor while you copy files may damage •... -
Page 84: Settings Options
Depending on the mode selected, not all items will be selectable to be changed. • (If there is no storage media inserted, it can not be selected and will be dimmed on the menu: "Storage", "Storage Info", "Format", etc.) Button Tips a. -
Page 85: Menu Items
MENU ITEMS You can setup the date/time, OSD language and display settings of the memory camcorder. • Items Storage (SC-MX20C/MX20CH/MX20E/ MX20EL/MX20ER only) Storage Info Format File No. Time Zone Date/Time Set Date Format Time Format Date/Time LCD Brightness LCD Color... -
Page 86: Using The Settings Menu Items
USING THE SETTINGS MENU ITEMS Storage You can record movie files on the built-in memory or a memory card, so you should select the desired storage media before starting recording or playback. settings Select the built-in memory for storage medium. So you can record or play back movie file "Memory"... -
Page 87: Format
Resets the file number to 0001 even after formatting, deleting all files or inserting a new "Reset" memory card. When you set "File No." to "Series", each file is assigned with a different number so as to avoid duplicating file names. It is convenient when you want to manage your files on a PC. contents... -
Page 88: Time Zone
Select it when using this memory camcorder for the first time or when returning the clock to your hometown date/time setting. When you visit a different time zone, it allows you to use the local time without changing your "Visit"... - Page 89 Cities used to set the time zone Cities London, Lisbon Rome, Paris, Berlin, Stockholm, Madrid, Frankfurt Athens, Helsinki, Cairo, Ankara Moskva, Riyadh Teheran Abu Dhabi, Muscat Kabul Tashkent, Karachi Calcutta, New Delhi Almaty, Kathmandu Dacca Yangon Bangkok Hong Kong, Beijing, Taipei, Singapore, Manila...
-
Page 90: Date/Time Set
Date/Time Set Set the current date and time so that the date and time are recorded correctly. ➥page 34 Date Format You can select the date format to display. settings "YY/MM/DD" The date is displayed in the order of year / month / date. -
Page 91: Lcd Brightness
You can change the color impression of the screen with a variety of color • options by adjusting the color rate of red and blue. When you set the red and blue color range, the higher the setting, the brighter • the LCD monitor will be. -
Page 92: Auto Power Off
Auto Power Off To save battery power, you can set the "Auto Power Off" function which turns off the memory camcorder if there is no operation for 5 minutes. settings "Off" The memory camcorder does not turn off automatically. -
Page 93: Version
- Right after "Demo" is set to "On" - With "Auto Power Off" set to "Off", if there is no operation for about 5 minutes in the STBY mode. Demonstration stops temporarily by pressing other buttons (MENU, Control button, Recording start/stop, etc). -
Page 94: Transfering A Recorded File Through A Usb Conection
✪ This chapter explains how to connect a PC using the USB cable for various actions. - When connecting a USB cable to a PC, refer to the software installation instructions and PC specifications below. TRANSFERRING A RECORDED FILE THROUGH A USB CONNECTION The camcorder supports both USB 1.1 and 2.0 standards. - Page 95 • If you connect the USB cable to a PC using a USB HUB or with other devices at the same time, it may cause conflict and may not work properly. If this occurs, remove all other USB devices and try the connection again.
-
Page 96: Installing The Cyberlink Mediashow4
INSTALLING THE CyBERLINk MEDIASHOW4 CyberLink MediaShow4 is a software for easy of editing MPEG, AVI, and other video files, still images, and other contents for creating a movie. This software has an interface that allows editing in either timeline or storyboard mode, maintains superior image quality, uses SVRT (Smart Video Rendering Technology) for high-speed rendering, and has a host of other advanced video editing features. - Page 97 • If you perform installation of software that is already installed, uninstallation will start. In this case, perform the installation again after uninstallation is finished. • This manual only refers to software installation and PC connection. For more details on software, refer to the “Online help/Read me” on the CyberLink MediaShow4 CD. English_87...
-
Page 98: Connecting The Usb Cable
CONNECTING THE USB CABLE Connect the USB cable to copy movie images in a recording medium to the PC and vice versa. When the USB cable is connected in Record / Play mode, the product will switch to USB mode immediately. -
Page 99: Viewing The Contents Of Storage Media
• (SC-MX20C/MX20CH/MX20E/MX20EL/MX20ER only) (If you want to view contents on a memory card, insert the memory card.) 2. Connect the memory camcorder to the PC with a USB cable. ➥page 88 Check out the USB connection on the LCD monitor. -
Page 100: Image Format
When the 9999th file is created in the 999th folder (i.e. SDV_9999.MP4 is created in the 999 VIDEO folder), • a new folder cannot be created anymore. Backup your files to a PC and format the storage media, and then reset file numbering from the menu. -
Page 101: Transferring Files From The Memory Camcorder To Your Pc
Use the provided software (CyberLink MediaShow4) to play back movie images on your PC. The movie images recorded on your memory camcorder may not be played back in other software. On a Macintosh computer, you can also transfer data by connecting the USB cable, but the provided •... -
Page 102: Uploading Movie Images In The Memory Camcorder To Youtube
UPLOADING MOVIE IMAGES IN THE MEMORy CAMCORDER TO youTube You can connect your camcorder to a PC and directly upload movie images to YouTube with the CyberLink Media Show4 software. If you are a Mac user, you can upload your content to YouTube using iMovie. -
Page 103: Connecting To Other Devices
You can view the recorded movie on a large screen by connecting the memory camcorder to a TV. CONNECTING TO A TV To playback your recordings, the television must be NTSC compatible. ➥page 99 • We recommend that you use the AC power adaptor as the power source for the memory camcorder. -
Page 104: Viewing On Tv Screen
• menu while viewing on TV screen. Information that the memory camcorder is recording will appear on the TV screen: You can also display only part of • information or switch off the display. Refer to "TURNING THE SCREEN INDICATORS ON/OFF ( and press the When "TV Display"... -
Page 105: Recording (Dubbing) Images On A Vcr Or Dvd/Hdd Recorder
RECORDING (DUBBING) IMAGES ON A VCR OR DVD/HDD RECORDER You can record (dub) images played back on this memory camcorder onto other video devices, such as VCRs or DVD/HDD recorders. Use the AV cable (provided) to connect the memory camcorder to another video device as shown in the following figure: 1. -
Page 106: Maintenance
- Wipe gently with a soft dry cloth. Do not apply excessive force when cleaning, gently rub the surface. - Do not use benzene or thinner to clean the camcorder. The coating of exterior could peel off or the case could deteriorate. -
Page 107: Additional Information
To clean the lens • Use an optional air blower to blow out dirt and other small object. Do not wipe the lens with cloth or your fingers. If necessary, wipe gently with lens cleaning paper. - Mold may form if the lens is left dirty. - Page 108 Fully charge the battery pack at least every 6 months when storing the battery pack over a long period of time. Remove the battery pack and charger from the camcorder when not in use, as the camcorder will use current even when switched off.
-
Page 109: Power Sources
Power sources The provided AC adaptor features automatic voltage selection in the AC range from 100 V to 240 V. You can use your camcorder in any countries/regions using the AC power adaptor supplied with your camcorder within the AC 100 V to 240 V, 50/60 Hz range. -
Page 110: Troubleshooting
TROUBLESHOOTING ✪ Before contacting a Samsung authorized service center, perform the following simple checks. They may save you the time and expense of an unnecessary call. Warning indicators and messages Power source Message Icon Low Battery The battery pack is almost discharged. - Page 111 Folder and file number reached to its files is full. Cannot limitation and you can not record. record video. Informs that... Format the memory card or replace it with a new one. Release write protection tab. Change to a memory card that we recommend.
- Page 112 What can I do? • Turn the power off and detach the battery pack, and leave it in a dry area for 1~2 hours before using it. When does the condensation occur? • When the device is relocated to a place with a higher temperature than the previous location, or when using it in a hot area suddenly, it will cause condensation.
-
Page 113: Symptoms And Solutions
✪ If you encounter any problem using your camcorder, check the following before asking for service repair. If these instructions do not solve your problem, contact the nearest Samsung authorized service center. Symptoms and solutions Power Symptom The camcorder does not turn on. - Page 114 Explanation/Solution You should check the size for recording before you record. The memory camcorder is in Demo mode. If you do not want to see Demo image, change the setting of "Demo" to "Off". A warning indicator or message appears on the screen.
- Page 115 Most of menu items cannot be selected when you set the EASY Q function. • If there is no storage media inserted, it can not be selected and will be dimmed • on the menu : "Storage", "Storage Info", "Format", etc.
- Page 116 Does not charge or operate even the battery pack is inserted. Explanation/Solution Insert a memory card into your camcorder properly. • If you use a memory card formatted on a computer, format it again directly • on your camcorder. page 77 ➥...
- Page 117 Explanation/Solution Press the MODE button to set Movie Record mode ( • There is not enough free space to record on the built-in memory or memory • card. Check if memory card is not inserted or write-protect tab is set to lock.
- Page 118 This is not an error. The internal temperature of your camcorder is unusually high. • Turn off your camcorder and leave it for a while in a cool place. Your camcorder is damp and moist inside (condensation). Turn off your •...
- Page 119 The recording conditions are not suitable for auto focus. • Adjust the focus manually. ➥page 57 The lens is dusty on the surface. Clear the lens and check the focus. • Recording is being made in a dark place. Light up to brighten the place.
- Page 120 Recording. Playback on other devices (TV, etc.) Symptom Connect the audio line of the AV cable to your camcorder or to the connected • You cannot view the image device (TV, DVD recorder, etc). (Red color- right, White color- left) or hear the sound on the The AV cable is not connected properly.
- Page 121 Disconnect the cable from the computer and camcorder, restart the computer, then connect them again correctly. A video codec is needed to play the file recorded on your memory camcorder. Install the software provided with your camcorder. ➥pages 86, 87 Please install by using the software CD that came with this camcorder.
- Page 122 The AV cable is not connected properly. Make sure that the AV cable is connected • You cannot dub correctly to the proper jack, i.e. to the input jack of the device used for dubbing an image using the AV cable. from your camcorder. ➥page 93...
- Page 123 NTSC Picture compression format H.264/AVC Format Audio compression format AAC (Advanced Audio Coding) TV Super Fine (about 5.0Mbps), TV Fine (about 4.0Mbps), TV Normal (about 3.0Mbps), Recording resolution Web & Mobile (about 2.0Mbps) Image device CCD (Charge Coupled Device) (Max/Effective : 680K/460K pixels) Lens F1.6 to 4.3, 34x (Optical), 1200x (Digital) Electronic zoom lens...
- Page 124 Some States do not allow the exclusions or limitations of incidental or consequential damages, or allow limitations on how long an implied warranty lasts, so the above limitations or exclusions may not apply to you. This warranty gives you specific legal rights, and you may also have other rights which vary from State to State.
- Page 125 RoHS compliant Our product complies with “The Restriction Of the use of certain Hazardous Substances in electrical and electronic equipment”, and we do not use the 6 hazardous materials- Cadmium(Cd), Lead (Pb), Mercury (Hg), Hexavalent Chromium (Cr +6), Poly Brominated...