Table of Contents
Advertisement
Advertisement
Table of Contents

Related Manuals for Standard Horizon HX210


Summary of Contents for Standard Horizon HX210
- Page 1 HX210 HX210E Floating VHF FM Marine Transceiver Owner’s Manual...
-
Page 2: Table Of Contents
11.3 TROUBLESHOOTING CHART ....37 8. BASIC OPERATION ........16 12. VHF MARINE CHANNEL ASSIGNMENTS ..38 PROHIBITED COMMUNICATIONS ..16 12.1 HX210 ( USA Version ) ....... 38 INITIAL SETUP ........16 RECEPTION ..........16 12.2 HX210E ............ 41 TRANSMISSION ........ -
Page 3: Quick Reference
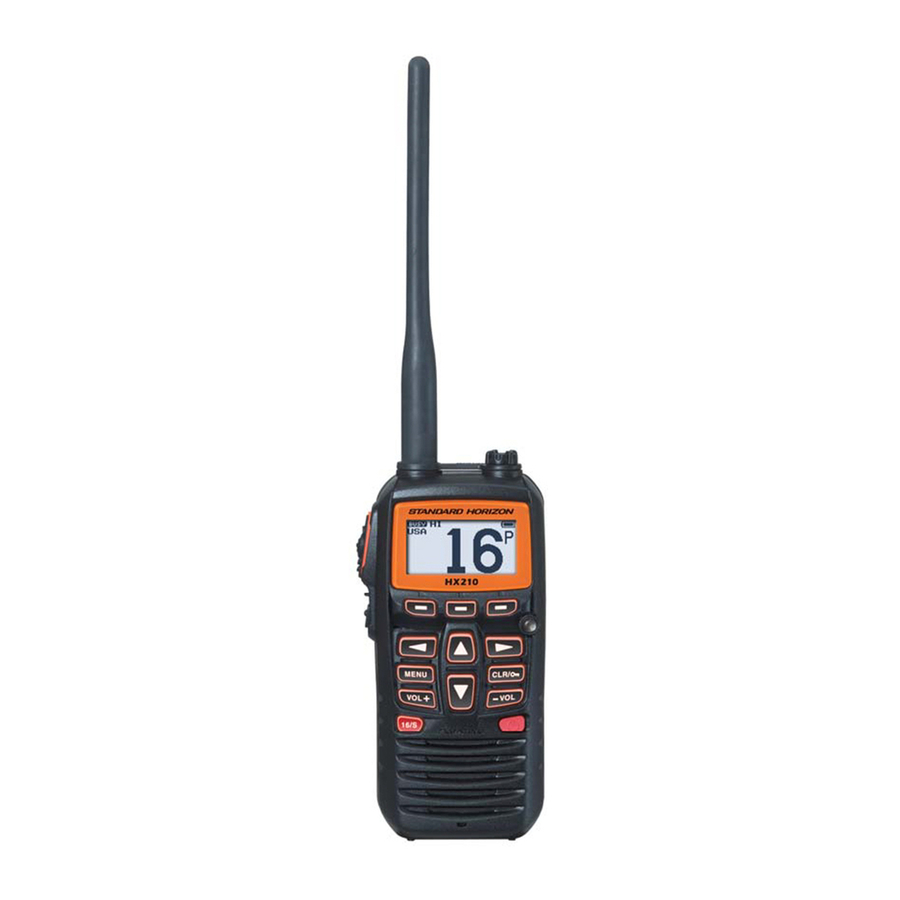
QUICK REFERENCE ① HX210 ⑦ ② ⑧ ③ ⑨ ④ ⑩ ⑤ ⑤ ⑥ ⑪ PTT (Push-To-Talk): Activates the transmitter when pressed. SQL: Press to display the SQL level setting screen, then press the [▲] key to squelch or press the [▼] to un-squelch the radio. -
Page 4: General Information
We appreciate your pur- chase of the HX210, and encourage you to read this manual thoroughly, so as to learn and fully understand the capabilities of the HX210. -
Page 5: Safety Precautions
2. SAFETY PRECAUTIONS Be sure to read the safety precautions, and use this product safely. Yaesu is not liable for any failures or problems caused by the use or misuse of this product by the pur- chaser or any third party. Also, Yaesu is not liable for damages caused through the use of this product by the purchaser or any third party, except in cases where ordered to pay damages under the laws. -
Page 6: Online Warranty Registration
VHF Marine Band on land could be fined up to $10,000 for the first offense. 4.2 ABOUT WATER PROTECTION The HX210 is only submersible * when the MIC/SP cap is installed in the MIC/SP jack. * ( IPX7 Specification for submersibility: 3 ft. (1 m) for 30 minutes) 4.3 DISTRESS AND HAILING ( CHANNEL 16 ) -
Page 7: Calling Another Vessel
1. Press the PTT (Push-To-Talk) switch and say “Mayday, Mayday, May- day. This is _____, _____, _____” (your vessel’s name). 2. Then repeat once: “Mayday, _____” (your vessel’s name). 3. Now report your position in latitude/longitude, or by giving a true or mag- netic bearing (state which) to a well-known landmark such as a naviga- tion aid or geographic feature such as an island or harbor entry. -
Page 8: Bridge Channels 13 And 67
After a transmission, say “over”, and release the PTT (Push-To-Talk) switch. When all communication with the other vessel is completed, end the last transmission by stating your Call Sign and the word “out”. Note that it is not necessary to state your Call Sign with each transmission, only at the begin- ning and end of the contact. -
Page 9: Notes To Assure Waterproof
Sea Tow Pensacola/Orange Beach ( Ala. ) - Ch. 27 4.8 NOTES TO ASSURE WATERPROOF INTEGRITY CAUTION! To ensure the waterproof integrity of the HX210, please make sure to ob- serve the precautions described below of the HX210 observe the precau- tions regarding waterproofing as described below. -
Page 10: Accessories
SCH-11 Belt Clip Hanger * 1(Antenna gain: -1.5dBi, Impedance: 50 ohm) * 2(Depending on the transceiver version) NOTE: Charge the battery before operating the HX210 for the first time. Please see section “6.1 BATTERIES AND CHARGERS” for details. Page 8... -
Page 11: Getting Started
6. GETTING STARTED 6.1 BATTERIES AND CHARGERS If the radio has never been used, or its charge is depleted, it may be charged by connecting the SBH-25 Charger Cradle with the SAD-23/SAD-11 AC Adapter, see section “6.1.2 BATTERY CHARGING”. If 12V DC power is available, the supplied E-DC-19A DC Cable with 12 V Cigarette Lighter Plug may be used for charging the battery. -
Page 12: Battery Charging
Do not reverse the charge polarity. Use only the proper charger. If this is tampered with or another charger is used, permanent damage may re- sult. Use only a STANDARD HORIZON approved charger. The use of any other charger may cause permanent damage to the battery. Battery Recycling... -
Page 13: Battery Life Information
NOTE The SAD-23/SAD-11 is only designed for the charging of the HX210’s built-in battery, and is not suitable for other purposes. The SAD-23/ SAD-11 may introduce noise to TV and radio reception in the immedi- ate vicinity, so it is not recommended for use adjacent to such devic- ... -
Page 14: Controls And Indicators
“8. BASIC OPERATION”. Refer to the below illustration for the locations of the following controls, switches, and con- nections. HX210 ANT Jack ( Top Panel ) The supplied CAT460 flexible antenna is attached here. - Page 15 Microphone The internal microphone is located here. When transmitting, position the microphone about 1/2 to 1 inch (1.2 ~ 2.5 cm) away from your mouth. Speak slowly and clearly into the microphone. Keypad p (UP) Key Press this key to change the operating channel or the squelch threshold level. Pressing the key momentarily, will increase the channel (or level) will increase one step.
-
Page 16: Lcd Indicators
Water Enabled Light When the HX210 comes in contact with water, the light will blink white to assist finding the radio in low light conditions. This feature operates when the radio is ON or OFF. - Page 17 “DW” Indicator DW: Dual Watch is activated. TW: Tri-Watch is activated. TRANSMIT POWER Indicator “HI”: 6 W ( 5 W ) * “MD”: 2.5 W “LO”: 1 W * ( 5 W TX required in some countries ) “MEM” Indicator This indicator shows the channel is registered in the transceiver “Scan Memory”.
-
Page 18: Basic Operation
8. BASIC OPERATION 8.1 PROHIBITED COMMUNICATIONS The FCC prohibits the following communications: False distress or emergency messages. Messages to “any boat” except in emergencies and radio tests. Messages to or from a vessel on land. Transmission while on land. ... -
Page 19: Transmit Power
8.4.1 TRANSMIT POWER ※ The TX output power of the HX210 is set to high level (6 W ) in factory de- fault, and the “HI” indicator is displayed on the top part of the screen. To change the TX output power: 1. -
Page 20: Keypad Locking
8. Press the [CLR/ ] key to return to radio operation. 8.6 KEYPAD LOCKING In order to prevent accidental channel change, the HX210’s keypad may be locked. ] key to lock the keypad (except the PTT, [VOL-], Hold down the [CLR/ [VOL+] and [CLR/ ] keys) so that they are not accidentally changed. -
Page 21: Noaa Weather Alert Testing
After stopping the beep sound, the weather alert reception confirmation screen will appear. Press any key to display a confirmation screen. The confirmation screen will ask whether to move to the weather channel, or return to the marine channel. Press [YES] to switch to the weather channel, or press [NO] to return to the marine channel. -
Page 22: Operation On A Preset Channel
6. Repeat steps 1 through 5 to program the additional channels into the preset channels. Up to 10 channels can be registered. If you attempt to register an 11th channel, the error beep will sound. 8.8.2 OPERATION on a Preset Channel 1. -
Page 23: Scanning
8.9 SCANNING The HX210 provides two types of scanning, “Memory Scan” or “Priority Scan”. “Memory Scan” scans the channels that were programmed into Scan Memory and also channels stored in the Preset Channel memory. “Priority Scan” is similar to the “Memory Scan” scan, however it scans the priority channel (channel 16) and dual watches to channels programmed in memory scan and preset channel memory. -
Page 24: Scanning Operation
CH1001 CH1001 CH88 CH09 CH88 CH09 CH1078 CH12 CH1078 CH12 Priority Channel CH68 CH15 CH68 CH15 CH1061 CH1018 CH1061 CH1018 CH1022 CH1022 Memory Scan (M-SCAN) Priority Scan (P-SCAN) 8.9.3 SCANNING OPERATION Memory Scanning (M-SCAN) 1. Set the scan type to “M-SCAN” in the SETUP menu (refer to “8.9.2 SE- LECTING SCAN TYPE”). -
Page 25: Multi Watch (To Priority Channel)
The HX210 watches the activity of the current channel and the priority channel. TRIPLE (Triple Watch): The HX210 watches the activity of the priority channel, the sub channel, and the current channel. 6. Press the [ENTER] soft key to store the selected setting. -
Page 26: Starting The Triple Watch
2. 6. While a signal is received on the channel selected in step 2, the HX210 will dual watch to the priority channel periodically. 7. To stop dual watch, press the [CLR/ ] key. -
Page 27: Fm Broadcast Frequency
2. Press the [▲] or [▼] key to select the de- sired frequency. 3. To exit from the FM Broadcast Reception mode, press the [MENU/SET] key to display the MENU screen, then press the [CH] soft key. The transceiver will revert to the channel in use prior to switching to the FM Broadcast band. 8.11.1 FM broadcast Frequency sweep operation 1. -
Page 28: Soft Keys
8.12 Soft Keys The soft key functions may be reconfigured, and the duration time of the soft key icon display, after a key is pressed, can be changed. 8.12.1 Key Assignment 1. Press and hold the [MENU/SET] key. 2. Press the [▲] or [▼] key to select “CONFIG”, then press the [SELECT] soft key. 3. -
Page 29: Menu ("Setup")
9. MENU (“SETUP”) The HX210’s Menu Mode allows enables a number of the HX210 operating parameters to be custom-configured. Use the following procedure to activate and set The Menu Mode parameters: 1. Press and hold the [MENU/SET] key. 2. Press the [▲] or [▼] key to select the desired menu item, then press the [SELECT] soft key. -
Page 30: Scan Resume
9.1.5 SCAN RESUME This selection is used to select the time the HX210 waits after a transmission ends before the radio starts to scan channels again. The default setting is 2 seconds. 1. Press and hold the [MENU/SET] key. 2. Press the [▲] or [▼] key to select “CHANNEL SETUP”, then press the [SELECT] soft key. -
Page 31: Fm Setup
4. Press the [▲] or [▼] key to select the de- sired channel to be the sub channel. 5. Press the [ENTER] soft key to store the new setting. 6. Press the [CLR/ ] key to return to radio operation. 9.2 FM SETUP 9.2.1 ADD 1. -
Page 32: Edit
9.2.2 EDIT This selection is used to edit the FM Broadcast frequency and name. 1. Press and hold the [MENU/SET] key. 2. Press the [▲] or [▼] key to select “FM SETUP”, then press the [SELECT] soft key. 3. Press the [▲] or [▼] key to select “EDIT”, then press the [SELECT] soft key. -
Page 33: Battery Save
4. Press the [▲] or [▼] key to select the de- sired level. The beep level can be set from “1” to “5”, or “OFF”. 5. Press the [ENTER] soft key to store the se- lected level. 6. Press the [CLR/ ] key to return to radio operation. -
Page 34: Key Setup
Water Hazard 1. Press and hold the [MENU/SET] key. 2. Press the [▲] or [▼] key to select “CONFIG”, then press the [SELECT] soft key. 3. Select “STROBE LED” with the [▲] or [▼] key, then press the [SELECT] soft key. 4. -
Page 35: Backlit Timer
9.3.6 BACKLIT TIMER This menu selection is used to setup the illumination time of the display and keypad. 1. Press and hold the [MENU/SET] key. 2. Press the [▲] or [▼] key to select “CONFIG”, then press the [SELECT] soft key. -
Page 36: About
4. Press the [▲] or [▼] key to select the de- sired category from: “CHANNEL”, “CON- FIG”, or “ALL” (all settings except the ATIS will be initialized). 5. Press the [SELECT] soft key. 6. Press the [▲] or [▼] key to select “OK?”, then press the [ENTER] soft key. -
Page 37: Atis Setup (Hx210E Only)
10. ATIS SETUP (HX210E only) The HX210E supports the ATIS (Automatic Transmitter Identification System) used in Inland waterways in Europe. When enabled ATIS mode transmits a unique ATIS code each time the PTT switch is released at the end of a trans- mission. -
Page 38: Atis Ch Group
10.2 ATIS CH GROUP The HX210E has the capability to turn on and off the ATIS feature for each channel group. 1. Press and hold the [MENU/SET] key to display “MENU”. 2. Press the [▲] or [▼] key to select “ATIS SETUP”, then press the [SE- LECT] soft key. -
Page 39: Maintenance
11. MAINTENANCE 11.1 GENERAL The inherent quality of the solid-state components in STANDARD HORIZON radios will provide many years of continuous use. Take the following precau- tions to prevent damage to the radio: Never key the microphone unless an antenna or suitable dummy load is connected to the transceiver. -
Page 40: Vhf Marine Channel Assignments
12. VHF MARINE CHANNEL ASSIGNMENTS 12.1 HX210 ( USA Version ) VHF MARINE CHANNEL CHART CHANNEL USE 160.650 Public Correspondence ( Marine Operator ) 156.050 Port Operation and Commercial. 1001 156.050 VTS in selected areas 160.700 Public Correspondence ( Marine Operator ) 156.100... - Page 41 VHF MARINE CHANNEL CHART CHANNEL USE 157.100 161.700 Port operation, ship movement US Coast Guard Liaison and Maritime Safety Information Broadcasts announced on chan- nel 16 (USA) 1022 157.100 Canadian Coast Guard Liaison and Maritime Safety Information Broadcasts announced on channel 16 (Canada) 161.750 Public Correspondence ( Marine Operator ) 157.150...
- Page 42 VHF MARINE CHANNEL CHART CHANNEL USE Non-commercial ( Inter-ship only ) 156.625 US: Port Operations, Canada: Commercial fishing only, 156.675 International: Inter-ship, Port operations and Ship movement US: Port Operations, Canada: Commercial fishing only, 156.725 International: Inter-ship, Port operations and Ship movement Port Operations ( Inter-ship only ) ( 1 W ) 156.775 Port Operations ( Inter-ship only ) ( 1 W )
-
Page 43: Hx210E
12.2 HX210E CHANNEL USE TX ( MHz ) RX ( MHz ) SIMPLEX/DUPLEX LOW PWR All countries Germany ( except Germany ) 156.050 160.650 DUPLEX – TELEPHONE NAUTIK 156.100 160.700 DUPLEX – TELEPHONE NAUTIK 156.150 160.750 DUPLEX – TELEPHONE NAUTIK 156.200 160.800 DUPLEX... - Page 44 CHANNEL USE TX ( MHz ) RX ( MHz ) SIMPLEX/DUPLEX LOW PWR All countries Germany ( except Germany ) 156.575 SIMPLEX LOW* PLEASURE SHIP-PORT 156.625 SIMPLEX LOW* SHIP-SHIP 156.675 SIMPLEX – PORT OPR NAUTIK 156.725 SIMPLEX LOW* PORT OPR SHIP-PORT 156.775 SIMPLEX...
-
Page 45: Specifications
13. SPECIFICATIONS Performance specifications are nominal, unless otherwise indicated, and are subject to change without notice. Measurements are in accordance with TIA/EIA-603 ( U.S.A. ) and EN301 178 ( EXP ) . (Except the FM Broadcast Receiver) z GENERAL Frequency Ranges ......... TX: 156.025 MHz - 161.600 MHz (Frequency differs in some regions) RX: 156.050 MHz - 163.275 MHz (Inter National, Including WX channels) -
Page 46: Fcc And Canada Radio License
14. FCC AND CANADA RADIO LICENSE INFORMATION Standard Horizon radios comply with the Federal Communication Commis- sion ( FCC ) and the Innovation, Science and Economic Development Canada ( ISED ) requirements that regulate the Maritime Radio Service. 14.1 MARITIME STATION LICENSE An FCC ship station license is no longer required for any vessel traveling in U.S. -
Page 47: Rf Exposure Safety Statement
15. RF EXPOSURE SAFETY STATEMENT 15.1 SAFETY INFORMATION Your wireless handheld portable transceiver contains a low power transmitter. When the Push-to-Talk ( PTT ) button is pushed, the transceiver sends out radio frequency ( RF ) signals. In August 1996, the Federal Communications Commis- sion adopted RF exposure guidelines with safety levels for hand-held wireless devices. -
Page 48: Fcc Notice
Unauthorized changes or modifications to this equipment may void compliance with FCC Rules. Any change or modification must be approved in writing by STANDARD HORIZON, a division of YAESU USA. THIS DEVICE COMPLIES WITH PART 15 OF THE FCC RULES. OPERATION... - Page 49 This radio transmitter (identify the device by certification number, or model num- ber if Category II) has been approved by Industry Canada to operate with the antenna types listed below with the maximum permissible gain and required an- tenna impedance for each antenna type indicated. Antenna types not included in this list, having a gain greater than the maximum gain indicated for that type, are strictly prohibited for use with this device.
-
Page 50: Standard Horizon Limited Warranty
Limited Warranty is valid only in the country/region where this product was originally purchased. On-line Warranty Registration: Thank you for buying STANDARD HORIZON products! We are confident your new radio will serve your needs for many years! Please register your product at www.standardhorizon.com - Owner’s Corner... - Page 51 EU Declaration of Conformity We, Yaesu Musen Co. Ltd of Tokyo, Japan, hereby declare that this radio equipment HX210E is in full compliance with EU Radio Equipment Directive 2014/53/EU. The full text of the Declaration of Conformity for this product is available to view at http:// www.yaesu.com/jp/red ATTENTION –...
- Page 52 Copyright 2018 YAESU MUSEN CO., LTD. All rights reserved. No portion of this manual may be reproduced without the permission of YAESU MUSEN CO., LTD. YAESU MUSEN CO., LTD. Tennozu Parkside Building 2-5-8 Higashi-Shinagawa, Shinagawa-ku, Tokyo 140-0002 Japan 1804M-BC YAESU USA Printed in China 6125 Phyllis Drive, Cypress, CA 90630, U.S.A.
Need help?
Do you have a question about the HX210 and is the answer not in the manual?
Questions and answers
Channel 16 blinking on and off
Channel 16 on the Standard Horizon HX210 blinks on and off because the radio is scanning, and Channel 16 is being monitored as part of the scan process. Some radios automatically monitor Channel 16 even when set to other channels or when scanning.
This answer is automatically generated