Advertisement
Advertisement
Table of Contents

Summary of Contents for Juiceman Jr. JM1
- Page 1 ® NSTRUCTION ANUAL : JM1, JM1A ODELS...
-
Page 2: Important Safeguards
Juicer. Make sure the Motor is completely stopped before disassembling. 13. Do not put your fingers or other objects into the Juicer opening while it is in operation. If food becomes lodged in opening, use Food Pusher or another piece of fruit or vegetable to push it down. - Page 3 Additional Important Safeguards 1. All users of this appliance must read and understand this Instruction Manual before operating or cleaning this appliance. 2. The cord to this appliance should be plugged into a 120V AC electrical outlet only. 3. Do not leave this appliance unattended during use. 4.
-
Page 4: Polarized Plug
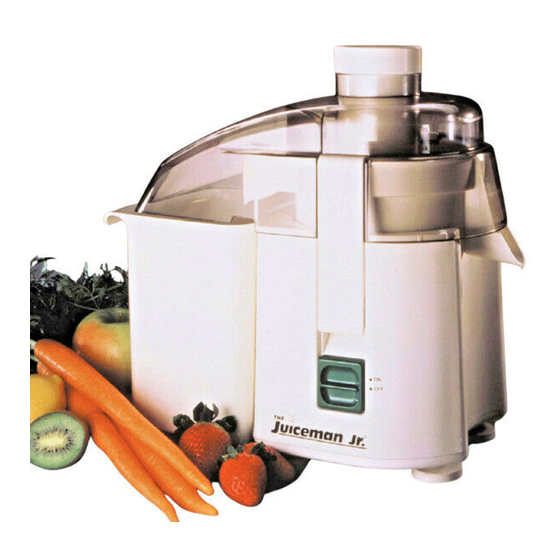
POLARIZED PLUG This appliance has a polarized plug (one blade is wider than the other). To reduce the risk of electric shock, this plug is intended to fit into a polarized outlet only one way. If the plug does not fit fully in the outlet, reverse the plug. - Page 5 YOUR JUICEMAN CLEAR COVER / WHITE COVER PRODUCT MAY VARY SLIGHTLY FROM ILLUSTRATIONS Feed Tube Cover JM1 (P/N 70081) JM1A White Cover (P/N 70081A) Stainless Steel Blade Basket (P/N 70082) Cutter Blade Pulp Spout Juice Bowl Tabs Pulp Basket (P/N 70084)
-
Page 6: Before First Use
• Make sure the Blade Basket is securely seated and the Pulp Basket is at the rear of the Juicer, ready to catch pulp. To save cleaning time, line the Pulp Basket with a plastic produce bag (the kind you put your produce in at the grocery store). - Page 7 Blade Basket with the Food Pusher. Tip: Try alternating types of produce to ensure maximum efficiency. TO TURN YOUR JUICEMAN® JR. OFF: • Press the ON/OFF Switch down to the OFF position. Unplug the Juicer from the outlet when not in use. ®...
-
Page 8: Disassembly Instructions
Clamp. Let the Clamps hang from the sides by the lower hinges. Step Two Lift Juicer Cover up and off the Juicer. Step Three Lift off the Juice Bowl and Blade Basket as one piece. These two pieces will then easily come apart for easy cleaning. -
Page 9: Assembly Instructions
Place Juice Bowl on top of the Motor Base. The Juice Spout fits over the front of the Juicer. Two tabs located on the underside of the Juice Bowl should rest in the two complimentary slots on top of the Motor Base. - Page 10 ASSEMBLY INSTRUCTIONS (Continued) Step Four Place the Juicer Cover on over the Juice Bowl with the large pulp ejection opening towards the back of the Juicer. Swing the Clamps upward as shown in the illustration. Step Five Place the tops of the Clamps...
-
Page 11: Cleaning Your Juicer
Please follow the procedures outlined in the DISASSEMBLY INSTRUCTIONS section of this Instruction Manual. To clean the Juicer Cover and Juice Bowl, we recommend using a fruit and vege- table brush with natural fibers. DO NOT USE A METAL BRUSH OR PAD. - Page 12 Basket is securely seated and the Pulp Basket is at the rear of performed by the Juicer to receive pulp. The pulp from your Juicer can be authorized used in many different applications such as breads, muffins, personnel only cakes, soup stocks, compressed facial packs and garden compost material.
-
Page 13: Troubleshooting
NOTE: Because of the Juiceman’s powerful motor, a small amount of turned on. noise and/or vibration is normal when the Juicer is turned on and as it comes to a complete stop. All Juicers sound slightly different. Juice sprays out Juice the produce as slowly as possible. - Page 14 Fruit tends to produce wetter pulp than vegetables. If problem persists, rinse Blade Basket. Try a different wall outlet. Also let Juicer sit for about an hour without Juicer stopped turning it on; moisture may have collected on the circuit board, while juicing.
- Page 15 NOTES...
-
Page 16: Limited One-Year Warranty
9:00 am and 5:00 pm Central Standard Time and ask for CONSUMER SERVICE stating that you are a consumer with a problem. Please refer to model number JM1 or JM1A when you call. In-Warranty Service (USA): For an appliance covered under the warranty period, no charge is made for service or postage.
Need help?
Do you have a question about the JM1 and is the answer not in the manual?
Questions and answers