Table of Contents
Advertisement
Advertisement
Table of Contents

Related Manuals for NEXIQ Technologies USB-Link 2

Summary of Contents for NEXIQ Technologies USB-Link 2
- Page 1 USB-Link™ 2 Wi-Fi Edition Installation and Setup Manual...
- Page 2 IDSC Holdings LLC. You may not decipher or de-compile USB-Link 2, develop source code for USB-Link 2, or knowingly allow others to do so. The USB-Link 2 and its documentation may not be sublicensed or transferred without the prior written consent of IDSC Holdings LLC.
-
Page 3: Table Of Contents
Chapter 1: Using this Manual ..........1 Manual Overview ................2 Conventions ...................3 Chapter 2: Introducing the USB-Link™ 2 Wi-Fi Edition ....5 Component Checklist ..............6 Product Specifications ..............7 System Requirements ..............8 Communication Options ..............9 Wired Connection ................. 9 Wireless Connection ................10 Mini Access Point Mode (Peer-to-Peer) .......... - Page 4 The Tools Menu ................. 36 Ping ....................36 Options .................... 37 The Help Menu ................... 39 USB-Link™ 2 Wi-Fi Edition Installation and Setup Manual...
-
Page 5: Using This Manual
Using this Manual Manual Overview, page 2 Conventions, page 3 his chapter provides an overview of this manual’s organization and the conventions used throughout. NOTE: Screen shots used throughout this manual are for illustrative purposes only. All data shown is fictitious in nature. -
Page 6: Manual Overview
Chapter • Using this Manual Manual Overview This manual provides basic and detailed information to support you during instal- lation and setup of the USB-Link™ 2 Wi-Fi Edition. This manual is composed of the following sections: • Table of Contents—helps you to find the information you are looking for quickly and easily. -
Page 7: Conventions
- Conventions Conventions This section provides descriptions of the conventions used throughout this guide. Special Messages Note NOTE provides an explanation, comment, or tip related to the subject matter that is being discussed. Example: NOTE: Refer to the page number provided for each described component for fur- ther details. - Page 8 Chapter • Using this Manual Warning WARNING indicates a potentially hazardous situation which, if not avoided, could result in death or serious injury to the operator or bystanders. Example: WARNING: ä Keep all cables clear of moving or hot engine parts. Troubleshooting Information intended to help you to address or anticipate potential issues are pre- sented in the following manner:...
- Page 9 Introducing the USB-Link™ 2 Wi-Fi Edition Component Checklist, page 6 Product Specifications, page 7 System Requirements, page 8 Device Features, page 9 The Reset Button, page 10 Communication Options, page 11 Wired Connection, page 11 ...
-
Page 10: Introducing The Usb-Link™ 2 Wi-Fi Edition
Chapter • Introducing the USB-Link™ 2 Wi-Fi Edition Component Checklist The following components are included with your USB-Link™ 2. Be sure you have all of the following items before using the device: USB-Link™ 2 Vehicle Communication Interface (VCI) Automotive A to Mini-B USB Cable ... -
Page 11: Product Specifications
- Product Specifications Product Specifications The USB-Link™ 2 is configured with the following specifications: Feature Data 6.75" x 3.75" x 1.06" Physical Dimensions (171 mm x 95 mm x 27 mm) Weight 8 oz. (0.22 kg) Power Requirements 6 - 32 VDC @ 350 mA maximum Operating Temperature 0 to +70 °C API Driver... -
Page 12: System Requirements
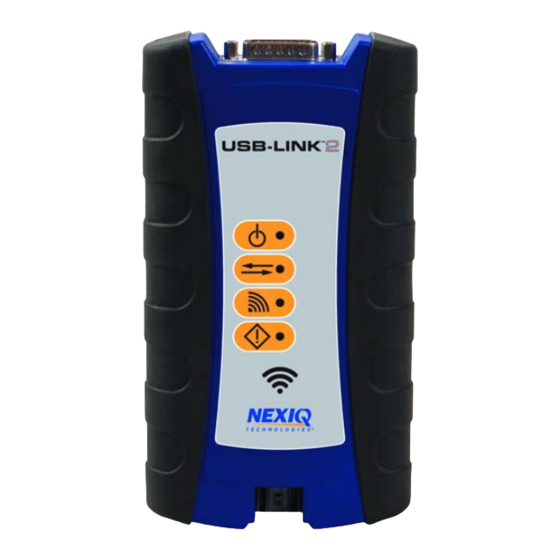
Chapter • Introducing the USB-Link™ 2 Wi-Fi Edition System Requirements Be aware of the following system requirements: Component Requirement IBM PC-compatible • 1GHz processor or more computer • RAM: 256MB or more (512MB recommended) • USB port, version 1.1 or higher •... - Page 13 - Device Features Device Features The following illustration details the features of the USB-Link™ 2 device. Reset Button Figure 2.1 USB-Link™ 2 Legend A—Vehicle Port D—Wireless LED B—Power LED E—Fault LED C—Data LED F—USB Port USB-Link™ 2 Wi-Fi Edition Installation and Setup Manual...
- Page 14 Chapter • Introducing the USB-Link™ 2 Wi-Fi Edition The following table outlines the features called out in Figure 2.1. Feature What It Does Vehicle Port Connects the USB-Link™ 2 to a vehicle. Power LED Illuminates when the device receives power. Data LED Illuminates when the device is receiving data from the vehicle.
-
Page 15: Communication Options
- Communication Options Communication Options Prior to using the USB-Link™ 2, you need to decide how you want the unit to com- municate with your PC. There are two options: • A wired connection to the PC using a USB cable (pg. 11) •... -
Page 16: Wireless Connection
Chapter • Introducing the USB-Link™ 2 Wi-Fi Edition Wireless Connection Wireless connectivity provides untethered operation, and that’s a bonus in a busy service bay. The USB-Link™ 2 uses Wi-Fi to provide wireless communication between the USB-Link™ 2 and your PC. There are two network options: •... -
Page 17: Mini Access Point Mode (Peer-To-Peer)
Internet, you may want to obtain an additional wireless network card for use with the USB-Link™ 2. Otherwise when you connect the USB-Link 2 to your PC using Mini Access Point mode, you will not have access to the Internet until you have finished your session and reconnected to your company’s network. -
Page 18: Infrastructure Mode (Connecting To Your Company's Network)
Chapter • Introducing the USB-Link™ 2 Wi-Fi Edition For instructions on connecting the USB-Link™ 2 and your PC using Mini Access Point Mode, see Connect Using Wi-Fi, in Chapter 3 of this manual. Infrastructure Mode (Connecting to your Company’s Network) In Infrastructure mode, your PC communicates with your company computer network through a Wireless Access Point (not included), which acts as a bridge between the wireless network and the wired network. -
Page 19: Installing The Drivers And Setting Up The Device
Installing the Drivers and Setting Up the Device Installation Process Outline, pg. 14 Step 1: Install the Drivers, pg. 15 Step 2: Connect the USB-Link™ 2 to a Vehicle, pg. 24 Connect Using a USB Cable, pg. 24 ... -
Page 20: Installation Process Outline
Chapter • Installing the Drivers and Setting Up the Device Installation Process Outline Step 1: Install the USB-Link™ 2 drivers (pg. 15). Step 2: Connect the USB-Link™ 2 to the vehicle (pg. 24). Perform one of the following: • Connect your PC using a USB cable (pg. 24) •... -
Page 21: Step 1: Install The Drivers
On your laptop or PC, navigate to the following website: www.nexiq.com/downloads Figure 3.1 NEXIQ™ Downloads From the USB-Link 2 Drivers section, select the latest version of the USB-Link 2 drivers. Carefully read the End User License Agreement. Scroll down to the bottom of the page and click on Accept. - Page 22 Firefox ), you may have to locate the file (i.e., USB-Link2xxxx.exe) from your Recent Downloads, and then double-click on it to run it. The Welcome to USB-Link 2 Setup screen is displayed. Figure 3.2 Welcome to USB-Link 2 Setup Screen Carefully read the information displayed on the screen, and follow the recommendations.
- Page 23 Read all the information on this screen, then click I Agree. NOTE: If you do not agree to the terms, click Cancel. A message is displayed prompting you to confirm quitting USB-Link 2 Setup. Click Yes to quit. USB-Link™ 2 Wi-Fi Edition Installation and Setup Manual 17...
- Page 24 Chapter • Installing the Drivers and Setting Up the Device The following warning message is displayed. Figure 3.4 Warning Message Carefully read the warning message, and disconnect all RP1210 adapters to which your laptop or PC might be connected prior to proceeding with the installation.
- Page 25 - Step 1: Install the Drivers The installation begins and the following screen is displayed. Figure 3.5 Installation Screen USB-Link™ 2 Wi-Fi Edition Installation and Setup Manual 19...
- Page 26 Chapter • Installing the Drivers and Setting Up the Device ® ® If you are running Windows 7 or Windows 8, the following Windows Security dialog may be displayed. Figure 3.6 Windows Security Dialog NOTE: You may want to place a check mark in the Always trust software from “Jungo LTD”...
- Page 27 - Step 1: Install the Drivers The Installation Complete screen is displayed. Figure 3.7 Installation Complete Screen Click Next. USB-Link™ 2 Wi-Fi Edition Installation and Setup Manual 21...
- Page 28 Chapter • Installing the Drivers and Setting Up the Device The following completion screen is displayed. Figure 3.8 Completion Screen Click Finish. 22 USB-Link™ 2 Wi-Fi Edition Installation and Setup Manual...
- Page 29 - Step 1: Install the Drivers The USB-Link™ 2 Explorer utility opens. Figure 3.9 USB-Link™ 2 Explorer Utility Move on to Step 2: Connect the USB-Link™ 2 to a Vehicle, next in this manual. USB-Link™ 2 Wi-Fi Edition Installation and Setup Manual 23...
-
Page 30: Step 2: Connect The Usb-Link™ 2 To A Vehicle
Chapter • Installing the Drivers and Setting Up the Device Step 2: Connect the USB-Link™ 2 to a Vehicle Once you have installed the USB-Link™ 2 drivers, you are ready to connect the USB-Link™ 2 to a vehicle using an adapter cable. Any of the following adapters can provide the interface: •... -
Page 31: Connect Using Wi-Fi
Internet, you may want to obtain an additional wireless network card for use with the USB-Link™ 2. Otherwise when you connect the USB-Link 2 to your PC using Mini Access Point mode, you will not have access to the Internet until you have finished your session and reconnected to your company’s network. - Page 32 Chapter • Installing the Drivers and Setting Up the Device Navigate to the System Tray on your PC. Figure 3.10 ® Windows System Tray Click on the Network icon in the System Tray. Figure 3.11 Network Selection Screen Select the USBLink2_xxx from the list. NOTE: If the USBLink2 is not displayed, make sure you are connected to the vehi- cle.
- Page 33 - Step 2: Connect the USB-Link™ 2 to a Vehicle The USBLink2.xxx is highlighted. Figure 3.12 Selection Highlighted Click Connect. USB-Link™ 2 Wi-Fi Edition Installation and Setup Manual 27...
- Page 34 Chapter • Installing the Drivers and Setting Up the Device The connection is made and the device selected is displayed in the USB- Link™ 2 Explorer. Figure 3.13 USB-Link™ 2 Explorer NOTE: The USB-Link™ 2 Explorer opened automatically when you installed the USB-Link™...
-
Page 35: Step 3: Test The Connection
- Step 3: Test the Connection Step 3: Test the Connection You use the Device Tester to test the connection between the USB-Link™ 2 and the vehicle. At startup, the Device Tester checks for any NEXIQ™ drivers installed on the PC. To test the connection between the USB-Link™... - Page 36 Chapter • Installing the Drivers and Setting Up the Device Press the Start Test button. The Device Tester screen is refreshed, and data received from the vehicle bus is displayed in the Bus Messages window. Figure 3.15 Device Tester Screen, Showing a Status of Connected NOTE: The Modules Detected window in the lower portion of the screen displays a list of all systems seen on the bus.
- Page 37 If the Connection Indicator button is red (i.e., Not Connected), do one of the following: —For wireless connection using Wi-Fi: • In the Device list, make sure that the heading is USB-Link 2 WiFi (Protocol desired). • Check to ensure that the connections between the USB-Link™...
-
Page 38: Using The Usb-Link™ 2 Explorer
Then, double-click on the USB-Link™ 2 icon NOTE: You can also access the USB-Link™ 2 Explorer from your PC’s Start menu. Click Start and then select All Programs NEXIQ USB-Link 2 USB-Link 2 Explorer. 32 USB-Link™ 2 Wi-Fi Edition Installation and Setup Manual... - Page 39 - Using the USB-Link™ 2 Explorer The USB-Link™ 2 Explorer opens. Figure 3.17 USB-Link™ 2 Explorer The following menu options are provided: • File (pg. 35) • Tools (pg. 36) • Help (pg. 39) Each menu option includes a number of features. Each of the menu options are discussed in the following sub-sections.
-
Page 40: The Configuration Tab
Chapter • Installing the Drivers and Setting Up the Device The Configuration Tab The Configuration tab provides the following information: • Device Name and MAC Address • Wireless Settings • Internet Protocol (TCP/IP) Settings This information can be useful when troubleshooting network connection prob- lems. -
Page 41: The File Menu
- Using the USB-Link™ 2 Explorer You can also use the Reset button on the bottom of the USB-Link™ 2 to switch from Infrastructure Mode back to Mini Access Point Mode (the factory default). Just push and hold the button until all the lights on the front of the device flash, about five (5) seconds. -
Page 42: The Tools Menu
Chapter • Installing the Drivers and Setting Up the Device The Tools Menu The Tools menu provides the following features: • Ping • Options Ping The Ping feature uses the PING protocol to check for the presence of a device on the network. -
Page 43: Options
- Using the USB-Link™ 2 Explorer Options The Options feature provides the following features, which are presented as check boxes: • Start USBLink2 Explorer when Windows starts (pg. 37) • Show New USBLink2 Notification (pg. 38) Start USBLink2 Explorer when Windows Starts You use this feature to manage when the USB-Link™... - Page 44 Chapter • Installing the Drivers and Setting Up the Device Show New USBLink2 Notification You use this feature to manage when to display the New USBLink2 notification message box. Figure 3.22 Notification Box The default is to display the notification message box whenever a new USB- Link™...
-
Page 45: The Help Menu
Select Help from the USB-Link™ 2 Explorer menu bar. Select About. Figure 3.24 About USB-Link 2 Explorer When you have finished reviewing the information, click OK to close the dialog box. USB-Link™ 2 Wi-Fi Edition Installation and Setup Manual 39... - Page 46 Chapter • Installing the Drivers and Setting Up the Device 40 USB-Link™ 2 Wi-Fi Edition Installation and Setup Manual...
Need help?
Do you have a question about the USB-Link 2 and is the answer not in the manual?
Questions and answers