Snorkel TM12 Service Manual
Hide thumbs
Also See for TM12:
- Service and parts manual (90 pages) ,
- Operator's manual (50 pages) ,
- Operator's manual (52 pages)

Related Manuals for Snorkel TM12


Summary of Contents for Snorkel TM12
- Page 1 Inc. Option 2-2 deg Part Number 514233-200 August 2017 Serial Number 060000 and after Replaces Nov 2014...
- Page 3 TM12 ENGLISH When contacting Snorkel for service or parts information, be sure to include the model and serial numbers from the equipment name plate. Should the name plate be missing, the serial number is also stamped on top of the chassis above the front axle pivot.
- Page 4 TM12 SEVICE AND PARTS MANUAL OREWORD OW TO ANUAL This manual is divided into six sections. NTRODUCTION ECTION General description and machine specifications. PERATION AND PECIFICATIONS ECTION Information on how to operate the work platform and how to prepare it for operation.
- Page 6 ...
- Page 7 Introduction ...
- Page 8 WARNING All personnel shall carefully read, understand and follow all safety rules and operating instructions before operating or performing maintenance on any SNORKEL aerial work platform. E L E C T R O C U T I O N TIP OVER HAZARD COLLISION HAZARD...
- Page 9 Harness attachment points are provided in the platform and the manufacturer recommends the usage of a fall restraint harness, especially where required by national safety regulations. All harness attachment points on SNORKEL vehicles have been tested with a force of 3,650 lbs (16.3 KN) per person.
- Page 10 5. In an event of an accident or breakdown, refer to the “Emergency lowering” on page 16. DO NOT operate the aerial work platform if it is damaged or not functioning properly. Qualified maintenance personnel must correct the problem before putting the aerial platform back into service. TM12 Page 2 -...
- Page 11 Page 2 - TM12...
-
Page 12: Table Of Contents
2-18 BATTERY MAINTENANCE 2-18 BATTERY CHARGING 2-19 INSPECTION AND MAINTENANCE SCHEDULE 2-20 MAINTENANCE CHECKLIST 2-21 DAILY PREVENTATIVE MAINTENANCE SCHEDULE 2-21 SPECIFICATIONS 2-22 SPECIFICATIONS (2-2 ON NAMEPLATE/2 MAX CHASSIS INCLINATION) OPTION 2-23 WASTE REMOVAL AND DISPOSAL 2-25 TM12 Page 2 -... -
Page 13: Introduction
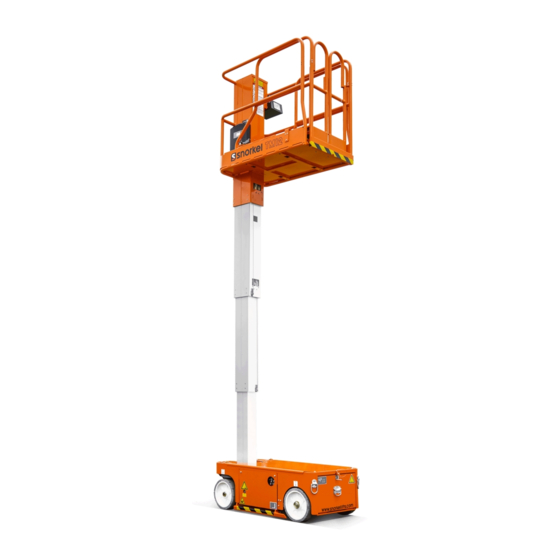
INTRODUCTION This manual covers all models of the TM12 aerial work platform. This manual must be stored on the machine at all times. Read, understand and follow all safety rules and operating instructions before attempting to operate the machine. GENERAL DESCRIPTION W A R N I N G DO NOT use the maintenance platform without guardrails properly assembled and in place. -
Page 14: Special Limitations
NOT intended to be driven over uneven, rough or soft terrain. PLATFORM CAPACITY The maximum platform capacity for the TM12 is 227kg (500lbs). Two people may occupy the platform indoors (only one person on the extension deck) while only one may occupy the platform outdoors. -
Page 15: Controls/Pre-Operation
6. Check that all guardrails are in place and all fasteners are correctly tightened. 7. Inspect the machine thoroughly for cracked welds and structural damage, loose or missing hardware, hydraulic leaks, damaged control cable and loose wire connections. Page 2 - TM12... -
Page 16: System Function Inspection
Visually inspect the two chain tensioning bolts on the platform mast and also the second mast to ensure locknuts are not loose. Ensure the bolt thread is vissible through the inspection holes in the tension blocks. TM12 Page 2 -... - Page 17 21. Push the platform emergency stop switch down to the the off position to check that all machine functions are disabled. Twist and pull up the platform emergency switch to enable all machine functions. Page 2 - TM12...
-
Page 18: Operation
While operating the joystick interlock switch, slowly push or pull the joystick forward or reverse to travel in the desired direction. The further you push or pull the joystick from the centre, the faster the machine will travel. TM12 Page 2 -... -
Page 19: Travel With Platform Elevated
1.5 degrees side to side or 2 degrees front to back, platform raise and drive functions are disabled and an alarm sounds when these controls are activated. If the drive/lift level sensor interlock shuts off the platform raise and drive functions, lower the plat- form and drive to a level surface. Page 2 - TM12... -
Page 20: Extending The Platform
2. While facing the rear of the platform, step down on the foot lever and pull the top rail of the extension deck forward until the pin engages the rear stop. Refer to figure 2-8. 3. Try to move the rails back and forth to make sure the platform extension deck is locked in position. TM12 Page 2 -... -
Page 21: Emergency Lowering
2. Park the machine on a firm level surface, preferably under cover, secure against vandals, chil- dren and unauthorised operation. 3. Turn the chassis key switch to OFF and remove the key to prevent unauthorised operation. Page 2 - TM12... -
Page 22: Machine Transportation
Forklift is for transport only. Refer to speci cations for weight of the machine on page 24 and be certain that the forklift is of adequate capacity to lift the machine. A view of the forklift lifting procedure is shown in figure 2-10. TM12 Page 2 -... -
Page 23: Truck
2. Secure the machine to the transport vehicle with chains or straps of adequate load capacity attached to the chassis lifting/tie down points. C A U T I O N Over tightening of the chains or straps attached to the tie down lugs may result in damage to the machine Page 2 - TM12... -
Page 24: Maintenance
FIGURE 2-12: Supporting the elevat- removed. ed assembly 2. Remove the block. 3. Push and hold the enable toggle switch and push the chassis lift/lower toggle switch to the down position and completely lower the platform. TM12 Page 2 -... -
Page 25: Hydraulic Fluid
Explosive gas mixture hazard: Keep sparks, ames and smoking material away from batteries. ALWAYS wear safety glasses when working near batteries. Battery uid is highly corrosive. Thoroughly rinse away any spilled uid with clean water. ALWAYS replace batteries with Snorkel batteries or manufacture approved replacements weighing 26.3 kg (58lbs) each. -
Page 26: Battery Charging
1. Check the battery fluid level. If the battery fluid level is lower than 10 mm (0.375 in.) above the plates, add distilled water only. 2. Connect an extension cord (1.5mm [12 gauge] minimum conductor diameter; 15m (50ft.) maximum length) to the charger plug located at the left side of the chassis. TM12 Page 2 -... -
Page 27: Inspection And Maintenance Schedule
Table 2-2 below is a daily preventative maintenance checklist. The checklist has been designed for the machine service and maintenance. Please photocopy and use the checklist when inspecting the machine. Page 2 - TM12... -
Page 28: Maintenance Checklist
Check entry gate closure functions correcly Table 2-2: Daily preventative maintenance checklist * NOTE: Use ISO #46 during summer and ISO #32 during winter TM12 Page 2 -... -
Page 29: Specifications
< 70dB (A) at Control station Operating temperature range C to +50 TABLE 2-3: TM12 Specification NOTE: Specifications are subject to change without notice. Hot weather or heavy use may affect performance. Refer to the service manual for complete parts and service information. This ma- chine meets or exceeds all applicable CE and GS machinery directive requirements. - Page 30 DO NOT remove the ballast weight. Please be aware this machine gets tted with additional ballast weight to allow for a 2 degree side to side chassis inclination. Removal of this additional ballast weight could make the machine unstable ITEM TM12 Platform size 740 mm X 960 mm (29” X 38”) Maximum platform capacity...
- Page 31 < 70dB (A) at Control station Operating temperature range C to +50 TABLE 2-4: TM12 Specification for 2 maximum chassis inclination option NOTE: Specifications are subject to change without notice. Hot weather or heavy use may affect performance. Refer to the service manual for complete parts and service information. This ma- chine meets or exceeds all applicable CE and GS machinery directive requirements.
- Page 32 This section contains instructions for the maintenance of the Work Platform. Refer to the General Informa- tion section for information relevant to all Snorkel work platforms. Referring to the Operator Manual will aid in understanding the operation and function of the various components and systems of the work platform, and help in diagnosing and repair of the machine.
- Page 33 Section 3 - Service & Repair 3-10 Elevating Assembly ............3-20 Lift Chain Lubrication .
-
Page 34: Supporting Elevating Assembly
Section 3 - Service & Repair Supporting Elevating Assembly 3-1 S UPPORTING LEVATING SSEMBLY W A R N I N G Never perform service on the work platform in the elevating assembly area while platform is elevated without first blocking the elevating assembly. DO NOT stand in elevating assembly area while deploying or storing brace. -
Page 35: Preventative Maintenance
Preventative Maintenance Section 3 - Service & Repair 3-2 P REVENTATIVE AINTENANCE The complete inspection consists of periodic visual and operational checks, along with periodic minor adjustments to assure proper performance. Daily inspection will prevent abnormal wear and prolong the life of all systems. -
Page 36: Preventative Maintenance Check List
Section 3 - Service & Repair Preventative Maintenance Check List 3-3 P REVENTATIVE AINTENANCE HECK REVENTATIVE AINTENANCE REVENTATIVE AINTENANCE EPORT Interval Date: _______________________________________ Daily=each shift or every day Owner:______________________________________ 50h/30d=every 50 hours or 30 days 250h/6m=every 250 hours or 6 months Model No: ___________________________________ 1000h/2y=every 1000 hours or 2 years Serial No: ___________________________________... -
Page 37: Parts Location
Parts Location Section 3 - Service & Repair 3-4 P ARTS OCATION Figure 3-2: Parts Location Controller Assembly Fuse Control Cable Assembly Electrical Box Assembly Hydraulic Power and motor control Reservoir module (EZlift 230) Assembly Batteries 6 Volt Power Unit (Pump/Motor Assy) Battery Charger Control Valve... -
Page 38: General Lubrication
Section 3 - Service & Repair General Lubrication 3-5 G ENERAL UBRICATION Mast Lubrication : Application: Approved Lubricant : Aerosol, Brush or Mist Application. Interflon Fin Lube TF +Teflon Lubricant should be applied as a extremely thin The use of Interflon Fin Lube is coating on the corners of the mast assembley recommended as it dries to prevent dirt contamination of lubricated parts unlike... -
Page 39: Batteries
Battery fluid is highly corrosive. Thoroughly rinse away any spilled fluid with clean water. Always replace batteries with Snorkel batteries or manufacturer approved replacements. Before disconnecting the battery negative (-) lead, make sure all switches are OFF. If ON, a spark will occur at the ground terminal which could cause an explosion if hydrogen gas or fuel vapors are present. -
Page 40: Hydraulics
Section 3 - Service & Repair Hydraulics 3-7 H YDRAULICS Y D R A U L I C A N K I L T E R LUID EVEL Figure 3-5: Hydraulic Oil Tank and Filter With platform fully lowered, oil should be visible between 1. -
Page 41: Hydraulic Pump
Hydraulics Section 3 - Service & Repair Y D R A U L I C U M P The Hydraulic Pump is located in the Power Module, and is mounted on the rear of the motor. EMOVAL NOTE: If the hydraulic tank has not been drained, suitable means for plugging the hoses should be provided to prevent excessive fluid loss. -
Page 42: Emergency Down Valve
Section 3 - Service & Repair Hydraulics Figure 3-7: Emergency Down Valve MERGENCY ALVE The Emergency Down Valve is located at the front of the machine and is mounted on the base of the cylinder. Pull to activate Front Emergency Down Valve Page 3-11... - Page 43 Figure 3-8: Hydraulic Manifold, Exploded View ADAPTORS REQUIRED SNORKEL PN PORT LOCATION END 'A' END 'B' 011941-005 D1 9/16"...
- Page 44 Section 3 - Service & Repair Hydraulics E T T I N G Y D R A U L I C A N I F O L D R E S S U R E S W A R N I N G The hydraulic oil may be of sufficient temperature to cause burns.
- Page 45 Hydraulics Section 3 - Service & Repair OUNTERBALANCE ALVES 1. Operate the work platform for 10-15 minutes to bring the hydraulic oil up to normal operating tempera- ture. 2. Remove the gauge port cap and install the pressure gauge assembly. 3.
-
Page 46: Cylinders
Section 3 - Service & Repair Cylinders 3-8 C YLINDERS E P R E S S I O N Y L I N D E R Figure 3-10: Depression Cylinder Remove & Replace EMOVAL 1. Mark and disconnect the hose assemblies from the cylinder fittings and immediately cap the openings to prevent foreign material from enter-... -
Page 47: Brake Cylinder
Cylinders Section 3 - Service & Repair R A K E Y L I N D E R The brake cylinder is located inside the right rear chassis wall above the wheel. Figure 3-11: Brake Cylinder, Remove & Replace EMOVAL 1. -
Page 48: Steering Cylinder
Section 3 - Service & Repair Cylinders T E E R I N G Y L I N D E R EMOVAL Figure 3-12: Steering Cylinder Remove & Replace 1. Mark and disconnect the hose assemblies from the cylinder fittings and immediately cap the openings to prevent foreign material from enter- ing. -
Page 49: Lift Cylinder
Cylinders Section 3 - Service & Repair I F T Y L I N D E R EMOVAL Refer to Figure 3-16: “Elevating Assembly,” on page Section 3-20 for details. 1. Fully lower platform. 2. Provide a suitable container to catch the hydraulic fluid, then disconnect the hydraulic hose. Immedi- ately plug hoses to prevent foreign material from entering. -
Page 50: Drive Motors
Section 3 - Service & Repair Drive Motors 3-9 D RIVE OTORS E M O V A L 1. Use a 1000Kg (one ton) capacity jack to raise the front of the machine. Position blocks under the machine to prevent the work platform from falling if the jack fails. 2. -
Page 51: Elevating Assembly
Elevating Assembly Section 3 - Service & Repair 3-10 E LEVATING SSEMBLY Maintenance of the elevating assembly consists of four separate tasks and maintenance intervals: Chain Lubrication ..... . . 6 months Elevating Assembly Wear Inspection . -
Page 52: Lift Chain Lubrication
Section 3 - Service & Repair Elevating Assembly I F T H A I N U B R I C A T I O N Refer to Figure 3-16: “Elevating Assembly,” on page Section 3-20. With platform in the stowed position; remove the platform mast cover (43). -
Page 53: Chain Elongation Inspection
Elevating Assembly Section 3 - Service & Repair H A I N E N S I O N N S P E C T I O N & DJUSTMENT Refer to Figure 3-16: “Elevating Assembly,” on page Section 3-20. The lifting chains can be seperatly adjusted and should always be close to the same tension. This tension should be checked annually and adjusted if necessar . -
Page 54: Removal Of Elevating Assembly
Section 3 - Service & Repair Elevating Assembly E M O V A L O F L E V A T I N G S S E M B L Y Refer to Figure 3-16: “Elevating Assembly,” on page Section 3-20. 1. -
Page 55: Tilt Sensor
Switch Adjustment Section 3 - Service & Repair 3.11T ensor ENSOR WITCH The tilt sensor is incorporated in the EZ230 Control Module, the switch is activated if machine inclination is greater than 1.5 ° side to side or 2 ° front to back and the Mast Proximity switch is open, this results in a continuous audible alarm and all movement is disabled exept for platform lowering.The only way to clear this alarm is to return the machine inclination below 1.5 °... -
Page 56: Controls
Section 3 - Service & Repair Controls 3-12 C ONTROLS L A T F O R M O N T R O L S The Platform Controller can be disassembled to replace defective switches. See the Parts Manual for replacement part numbers. Figure 3-19: Upper Controls Boot, Steering Rocker Rocker, Steering... -
Page 57: Chassis Controls
Controls Section 3 - Service & Repair H A S S I S O N T R O L S Figure 3-20: Chassis Controls The chassis control assembly is mounted on Right Side Door the inside of the chassis door, to the left of the Hydraulic tank. -
Page 58: Proximity Switch
Section 3 - Service & Repair Proximity Switch 3-13 P ROXIMITY SWITCH W A R N I N G Never perform work within the elevating assembly area while the platform is elevated without first blocking the elevating assembly, see Section 3-1. E M O V A L 1. - Page 59 Section 3 - Service & Repair Page 3-28...
-
Page 60: Troubleshooting
Section 4 ROUBLESHOOTING .1 I NTRODUCTION The following section on troubleshooting provides guidelines on the types of problems users may encounter in the field, helps determine the cause of problems, and suggests corrective actions. Careful inspection and accurate analysis of the symptoms listed in the Troubleshooting Guide will localize the trouble more quickly than any other method. -
Page 61: Troubleshooting
PECIAL OOLS Following is a list of tools which may be required to perform certain maintenance procedures on the TM12 work platforms. Flow Meter with Pressure Gauge ( P/N 067040-000) 0-69 bar (0-1000 psi ) Hydraulic Pressure Gauge with Adapter Fittings (P/N 014124-010) -
Page 62: Diagnostics Using Ezcal
Troubleshooting IAGNOSTICS SING CAL DISPLAY The EZcal Display can be switched into calibration mode to become an invaluable tool when troubleshooting on this machine. Switch the machine on, press and hold Esc for 5 seconds until “Ezlift menu” is displayed then select diagnostics, the following menu’s are available: SYSTEM –... - Page 63 Select 1= Scissor. (Enter) Enter to Save Scroll to model. (Enter) ENTER Entry Select 1 = TM12 (Enter followed by ESC) Scroll to tilt setups . (Enter) Scroll Calibrate level. (Enter) Left/Right Enter for yes. To confirm calibration has worked switch the machine of then back on again.
-
Page 64: Troubleshooting Guide
Troubleshooting 4.3 - Troubleshooting Guide 4.3 T ROUBLESHOOTING UIDE TROUBLE PROBABLE CAUSE POSSIBLE SOLUTION All functions 1. Blown electric motor fuse Check electric motor fuse. Replace if blown. inoperable, electric motor 2. Faulty battery Check the voltage output of the battery charger. If less than 24 VDC, does not start. -
Page 65: Electric
Troubleshooting 4-6 - Electric 4-6 E LECTRIC Table 4-1: Electrical Troubleshooting Table Component Alarm Batteries Battery Charger 175 AMP Fuse EZ230 Controller Motor Chassis Emergency Stop Switch Chassis Key Switch Platform Emergency Stop Switch Interlock Switch PQ Control Handle Height Limit Switch Platform Steering Switch Steering Solenoid (right) Steering Solenoid (left) -
Page 66: Hydraulic
Troubleshooting -7 - Hydraulic 4-7 H YDRAULIC Table 4-2: Hydraulic Troubleshooting Table Component Check Valve Steering Cylinder Lift Cylinder--CYL1 Depression Mechanism Cylinder Brake Cylinder Suction Strainer Return Filter Drive Motors (2) Pump Main Relief Valve Steering Relief Valve Lift Relief Valve Tank Steering Right/Left Valve Lift Valve... - Page 67 Troubleshooting -7 - Hydraulic Notes : Page 4-8...
-
Page 68: Schematics
Section 5 CHEMATICS 5.1 I NTRODUCTION This section contains electrical and hydraulic power schematics and associated information for maintenance purposes. The diagrams are to be used in conjunction with the information in Section 4. They allow understanding of the makeup and functions of the systems for checking, tracing, and faultfinding during troubleshooting analysis. -
Page 69: Electric
Schematics 5.2 E LECTRIC Page 5-2... - Page 70 Schematics 5.3 H YDRAULIC S CHEMATIC Page 5-3...
- Page 71 Schematics - Notes Page 5-4...
- Page 72 Decal Kit (USA)....... 6-32 NEVER Replace any components or part with anything other than original Snorkel replacement parts without the Manufacturers consent.
-
Page 73: General Assembly
Illustrated Parts Breakdown - General Assembly General Assembly Item Part Description QTY. PAGE 6-4 to 6-6 CHASSIS PAGE 6-8 to 6-9 PAGE 6-1 Page 6-2... - Page 74 Illustrated Parts Breakdown - General Assembly Page 6-3...
- Page 75 ITE M PAR T NUMBE R DE S CR IPTION ITE M PAR T NUMBE R DE S CR IPTION 512896-000 CHAS S IS W E LDME NT TM12 SEE PAGE 6-22 C YLINDE R AS S Y (BR AKE ) 065465-000...
- Page 76 Illustrated Parts Breakdown - Chassis Assembly 2 of 3 Chassis Assembly 2 of 3 505001-000 ITEM PART NUMBER DESCRIPTION 101125-001 MOTOR HYDRAULIC 101125-010 SEAL KIT (MOTOR) 510815-000 WHEEL, DRIVE 107186-000 WHEEL YOKE, L.H. 107185-000 WHEEL YOKE, R.H. 065517-000 STEER LINK RH 065518-000 STEER LINK LH 065445-000 BELL CRANK WELDMT CYLINDER ASSY, BRAKE/STEER...
- Page 77 Illustrated Parts Breakdown - Chassis Assembly 3 of 3 Chassis Assembly 3 of 3 ITEM PART NUMBER DESCRIPTION 512896-000 CHASSIS WELDMENT 514275-001 PUMP 501814-000 VIBRATION MOUNT 505024-000 LATCH (HINGING DOOR) 107149-010 DOOR (HINGED) 505025-000 HINGE See Pg 6-15 TANK, (HYDRAULIC RESERVOIR) 513615-000 HYDRAULIC MANIFOLD BLOCK (see page 6-12) 510816-000 IDLER WHEEL 505041-000 BUSHING, SPACER...
- Page 78 Notes Page 6-7...
-
Page 79: Mast Assembly
Illustrated Parts Breakdown - Mast Assembly Mast Assembly Item P art Descrip on QTY . 505066-000 INNE R MOUNT 513524-000 ANC HOR INNE R 107082-000 S TANDP IP E ADAP TE R 513523-000 OUTE R ANC HOR 505063-000 OUTE R MOUNT 505057-000 OUTE R AXLE 505056-000... - Page 80 Illustrated Parts Breakdown - Mast Assembly 44 45 505115-003 Page 6-9...
- Page 81 Illustrated Parts Breakdown - Platform Assembly Pla orm Extension Deck Op on PN:514184-850 Item Part Descrip on QTY. 503657-000 EXT DECK RETAINER BRACKET 502132-001 EXT DECK ROLLER 502150-000 EXT DECK ROLLER MOUNT 502131-000 EXT DECK GUIDE 502148-000 EXT DECK WEAR PAD 513252-000 HINGE BRACKET 513227-000 LH GATE 502206-000 DOOR PIVOT...
- Page 82 Illustrated Parts Breakdown - Platform Assembly CE Standard Deck 47,48 39, 40 43, 44 47,48 Deck with Extension Deck Option 23,24 Gate Locking Bars Option 13437 27,30,31 8,19 8,20 Page 6-11...
-
Page 83: Control Valve Assembly
ORFS build. Illustrated Parts Breakdown ORFS Build - Control Valve Assembly Control Valve Assembly 513615-000 ADAPTORS REQUIRED SNORKEL PN PORT LOCATION END 'A' END 'B' 011941-005 D1 9/16" MALE UNF 9/16" MALE ORFS ST 011941-005 D2 9/16" MALE UNF 9/16" MALE ORFS ST 011941-005 R 9/16"... - Page 84 Illustrated Parts Breakdown Build - Control Valve Assembly Page 6-13...
-
Page 85: Lower Controls Assembly
Illustrated Parts Breakdown - Lower Controls Assembly Lower Controls Assembly Item Part Description QTY. 107148-000 LID, LCB BOX 505053-000 CABLE GLAND 107400-000 LCB BOX (WE LDME NT) 510429-003 LCB OVERLAY 512543-000 KE Y S WITCH & MOUNT KE Y 510524-000 E ME R GE NCY S TOP BUTTON &... -
Page 86: Hydraulic Tank Assembly
Illustrated Parts Breakdown - Hydraulic Tank Assembly Hydraulic Tank Assembly Tank Assembly Item Part Description QTY. 512545-000 TANK (PLASTIC) 512566-000 RETURN FILTER (ELEMENT 510696-001) 512565-000 BREATHER CAP 512575-000 SUCTION STRAINER 011937-001 ADAPTOR 90° 514362-000 STRAIGHT ADAPTOR 512951-000 STRAIGHT ADAPTOR 512577-000 STRAIGHT ADAPTOR 505115-003 Page 6-15... -
Page 87: Upper Controls Assembly
Illustrated Parts Breakdown - Upper Controls Assembly Upper Controls Assembly 502541-002 Item Part Description QTY. 510471-000 JOYSTICK 510428-001 OVERLAY 510461-000 MOUNTING PLATE 510645-000 SEAL 0.75 510542-000 HORN PUSH BUTTON 511156-000 UPPER CONTROL BOX (BOX ONLY) 510524-000 EMERGENCY STOP BUTTON 510541-000 TOGGLE SWITCH 510525-000 N/C CONTACT BLOCK... - Page 88 Illustrated Parts Breakdown - Upper Controls Assembly Notes : 505115-003 Page 6-17...
-
Page 89: Hydraulic
Illustrated Parts Breakdown - Hydraulic Assembly Hydraulic Assembly (European Specification) Hose Kit with Fittings 512890-000 Page 6-18... - Page 90 Illustrated Parts Breakdown - Hydraulic Assembly Page 6-19...
- Page 91 Illustrated Parts Breakdown - Hydraulic Assembly notes Page 6-20...
- Page 92 Illustrated Parts Breakdown - Hydraulic Cylinder Assembly (Lift) Hydraulic Cylinder Assembly 512888-000 (Lift) TYPE A TYPE B Item Part Description QTY. Item Part Description QTY. 3077-000 LIFT CYLINDER SEAL KIT 512888-010 LIFT CYLINDER SEAL KIT 107082-000 STANDPIPE ADDAPTOR 107082-000 STANDPIPE ADDAPTOR 513286-000 EMERGENCY DOWN VALVE T-HANDLE 513286-000...
- Page 93 Illustrated Parts Breakdown - Hydraulic Cylinder Assembly (Steer / Brake) Hydraulic Cylinder Assembly 510895-000 (Steer / Brake) TYPE A TYPE B Item Part Description QTY. Item Part Description QTY. 505035-010 SEAL KIT, BRAKE/STEER CYLINDER (sn < 054179) 510895-010 SEAL KIT, BRAKE/STEER CYLINDER SEAL KIT, BRAKE/STEER CYLINDER (sn 054180 +) 512795-000 510893-000...
- Page 94 Illustrated Parts Breakdown - Hydraulic Cylinder Assembly (Pothole) Hydraulic Cylinder Assembly 512638-000 (Pothole) TYPE A TYPE B Item Part Descrip on QTY. Item Part Descrip on QTY. 512638-010 SEAL KIT, POTHOLE CYLINDER 512794-000 SEAL KIT, POTHOLE CYLINDER 512639-000 VALVE M1230E POTHOLE CYLINDER 512639-000 VALVE M1230E POTHOLE CYLINDER 503760-000 BUSHING...
- Page 95 Illustrated Parts Breakdown - 32 Electric Kit 510520-000 Kit Qty Part Number Description Ground Control Box 510522-000 Toggle Switch SPDT (on)-off-(on) 510521-000 Toggle Switch, on-(on) 510524-000 Twist to Release Emergency Stop 510525-000 Normally Closed Contact Block 510527-000 Normally Open Contact Block Platform Control Box 510541-000 Toggle Switch SPDT on-on...
-
Page 96: Illustrated Parts Breakdown
Illustrated Parts Breakdown - 32 Page 6-25... - Page 97 014222-903 DECAL,FORKLIFT POINT 100102-900 DECAL,NOT INSULATED 066522-900 DECAL,BATTERY SYMBOL 068635-001 DECAL,HARNESS HARDPOINT 501453-000 DECAL,WARNING (FOOT CRUSH) 503723-000 DECAL,BATTERY DISCONNECT 511093-000 DECAL “SNORKEL TM12” 512465-000 DECAL,WHEEL LOAD 512572-000 DECAL, CRUSHING HAZARD 513859-000 EXT DECK SWL 113kg, 514360-000 PINCH POINT, FOR HANDRAILS Page 6-26...
- Page 98 Illustrated Parts Breakdown - Label Kit, European (English) Page 6-27...
- Page 99 014222-903 DECAL,FORKLIFT POINT 100102-900 DECAL,NOT INSULATED 066522-900 DECAL,BATTERY SYMBOL 068635-001 DECAL,HARNESS HARDPOINT 501453-000 DECAL,WARNING (FOOT CRUSH) 503723-000 DECAL,BATTERY DISCONNECT 511093-000 DECAL “SNORKEL TM12” 512465-000 DECAL,WHEEL LOAD 512572-000 DECAL, CRUSHING HAZARD 513859-000 EXT DECK SWL 113kg, 514360-000 PINCH POINT, FOR HANDRAILS Page 6-28...
- Page 100 Illustrated Parts Breakdown - Label Kit, German Page 6-29...
- Page 101 014222-903 DECAL,FORKLIFT POINT 100102-900 DECAL,NOT INSULATED 066522-900 DECAL,BATTERY SYMBOL 068635-001 DECAL,HARNESS HARDPOINT 501453-000 DECAL,WARNING (FOOT CRUSH) 503723-000 DECAL,BATTERY DISCONNECT 511093-000 DECAL “SNORKEL TM12” 512465-000 DECAL,WHEEL LOAD 512572-000 DECAL, CRUSHING HAZARD 513859-000 EXT DECK SWL 113kg, 514360-000 PINCH POINT, FOR HANDRAILS Page 6-30...
- Page 102 Illustrated Parts Breakdown - Label Kit, French Page 6-31...
- Page 103 060197-001 DECAL,HYDROGEN GAS 514232-101 NAME PLATE 005221-000 DECAL, BATTERY FLUID 005223-005 DECAL, EMERGENCY DOWN 066554-000 DECAL, BEFORE OPERATING 510428-001 DECAL,UPPER CONTROLS 511093-000 DECAL “SNORKEL TM12” 101250-000 DECAL, MAX LOAD 500lbs 010076-001 DECAL, ATTENTION 061220-006 DECAL, ANSI 058534-000 DECAL, BATTERIES 066550-001 DECAL, DANGER...
- Page 104 Illustrated Parts Breakdown - 107012-011 Page 6-33...
-
Page 105: Waste Removal And Disposal
Section 7 Waste Removal and Disposal Page 7-0... - Page 106 Page 7-1...
- Page 107 Local Distributor / Lokaler Vertiebshändler / Distributeur local El Distribuidor local / ll Distributore locale EUROPE, MIDDLE EAST AFRICA & ASIA PHONE: +44 (0) 845 1550 058 FAX: +44 (0) 845 1557 756 NORTH & SOUTH AMERICA PHONE: +1 785 989 3000 TOLL FREE: +1 800 255 0317 FAX: +1 785 989 3070 AUSTRALIA...
Need help?
Do you have a question about the TM12 and is the answer not in the manual?
Questions and answers
Lift only goes up about a foot
The Snorkel TM12 lift may only go up about a foot if the drive/lift level sensor system detects that the platform is not on a hard, level surface or if the chassis is tilted more than two degrees side-to-side or front-to-rear. In such cases, the drive and lift functions are disabled and an alarm sounds. The lift must be on a firm, flat, level surface for full elevation.
This answer is automatically generated