Table of Contents
Advertisement
Quick Links
Q
uick
S
tart
G
uide
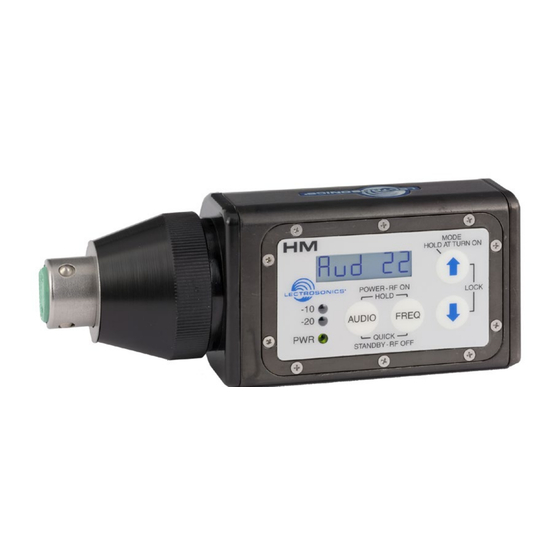
HM/E01 Plug-On
Transmitter
Fill in for your records:
Serial Number:
Purchase Date:
Digital Hybrid Wireless
This guide is intended to assist with
initial setup and operation of your
Lectrosonics product.
For a detailed user manual, down-
load the most current
version at:
www.lectrosonics.com/europe
U.S. Patent 7,225,135
15 September 2017
®
Advertisement
Table of Contents

Related Manuals for Lectrosonics HM/E01


Summary of Contents for Lectrosonics HM/E01
- Page 1 HM/E01 Plug-On Transmitter Digital Hybrid Wireless ® U.S. Patent 7,225,135 Fill in for your records: This guide is intended to assist with initial setup and operation of your Serial Number: Lectrosonics product. For a detailed user manual, down-...
- Page 2 ® design that allows the transmitter to operate in its native Digital Hybrid Wire- less mode, Lectrosonics 200 Series, 100 Series, IFB product groups, plus ® three modes for compatibility with analog receivers from other manufacturers. A unique multi-voltage phantom power feature allows the transmitter to be...
-
Page 3: Controls And Functions
Used to set the operating frequency and toggle the LCD between the operating frequency in MHz and a two-digit hexadecimal frequency code. UP/DOWN Arrows Used to view and select parameters and values during setup and operation. Battery Compartment Cover Hinged to housing to prevent loss. www.lectrosonics.com... -
Page 4: Battery Installation
Note: It is possible to install the batteries backward and close the battery door, but the batteries will not make contact and the unit will not work. Close the Battery Cover and slide it inward until it snaps shut. positive (+) terminal negative (–) terminal Battery Battery Cover Compartment LECTROSONICS, INC. -
Page 5: Power Off
XLR Pin 2 as positive (+) or negative (–) to match the polarity of other mics being used. Hold the UP arrow in, then press the AUDIO and FREQ buttons at the same time. Press Pin 2 the UP and DOWN arrows to select the (–) desired mode. www.lectrosonics.com... -
Page 6: Lcd Backlight Setting
Hold the UP arrow in while powering up the unit to enter the setup screen. Press the AUDIO button repeatedly to step through the setup items to reach the Step Size Mode screen. Use the UP or DOWN arrow button to select the desired setting. LECTROSONICS, INC. -
Page 7: Setting Transmitter Operating Frequency
The Frequency Screen displays the operating frequency in MHz or as a two-digit hexadecimal number that corresponds to the equivalent Lectrosonics Frequency Switch Setting. The example of the two-digit display shown here indicates CH (channel) and 2C as the frequen- cy. - Page 8 (+0 dB to +10 dB range during peaks). Note: Setting the audio level too high reduces the dynamic range of the audio signal. Setting the audio level too low may cause hiss and noise in the audio. LECTROSONICS, INC.
-
Page 9: Locking Or Unlocking The Control Panel
HM transmitter between the micro- phone and transmitter as shown. NOTE: This adapter is included P/N 21750 with the TM400 test and barrel adapter measurement system, but is available as a separate item with the HM transmitter and other wireless equipment. www.lectrosonics.com... - Page 10 LECTROSONICS, INC.
- Page 11 BE, BG, CZ, DK, DE, EE, EL, ES, FR, HR, IT, CY, LV, LT, LU, HU, MT, NL, AT, PL, PT, RO, SI, SK, FI, SE, UK The use of Lectrosonics wireless microphone and IFB equipment in all or most EU member states requires a license and/or is subject to certain restrictions with regard to frequencies and geographic locations.
-
Page 12: Limited One-Year Warranty
This warranty does not apply to used or demonstrator equipment. Should any defect develop, Lectrosonics, Inc. will, at our option, repair or replace any defective parts without charge for either parts or labor. If Lectrosonics, Inc. cannot correct the defect in your equipment, it will be replaced at no charge with a similar new item.
Need help?
Do you have a question about the HM/E01 and is the answer not in the manual?
Questions and answers