Advertisement
Quick Links
Advertisement

Summary of Contents for Rosewill RX358 Series
- Page 1 [ RX358 Series ] 3.5" SATA HDD to USB & eSATA Ext. Enclosure w/Int.80mm fan User Manual...
- Page 2 Motherboard supports HOT-SWAP function. Otherwise, the hot swappable Function won't be work as well. (Please refer back to motherboard user guide) Please register your product at www.rosewill.com for complete warranty information and future support. If you have any question while using our products, please feel free to contact us at feedback@rosewill.com .
-
Page 3: Front View
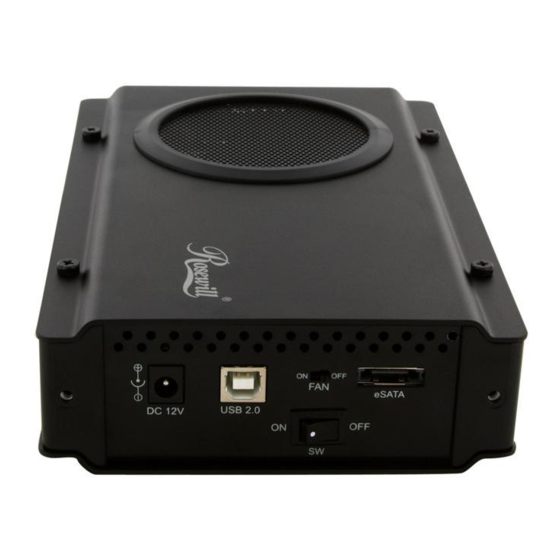
3.5" SATA HDD to USB & eSATA Ext. Enclosure w/Int.80mm fan Enclosure Figure Description Front View Rear View A. Ventilation design 1 C. Fan Switch E. Power Jack G. eSATA Port [ RX358 Series ] B. Ventilation design 2 D. Power Switch F. USB Port User Manual... - Page 4 3.5" SATA HDD to USB & eSATA Ext. Enclosure w/Int.80mm fan User Assembly Guide Please follow the instructions and make sure your HDD is successfully installed to the mobile disk! STEP1: Release the 4 screws, and then remove the bottom aluminum cover. [ RX358 Series ] User Manual...
- Page 5 3.5" SATA HDD to USB & eSATA Ext. Enclosure w/Int.80mm fan [ RX358 Series ] User Manual STEP2: Release 2 screws from back panel, and then slide out the side plates. STEP3: Place HDD into the enclosure properly. Connect HDD to...
- Page 6 3.5" SATA HDD to USB & eSATA Ext. Enclosure w/Int.80mm fan [ RX358 Series ] User Manual STEP4: Tight up 4 screws from side to side. STEP5: Reassemble two side plates back to the enclosure and fix the screws.
- Page 7 3.5" SATA HDD to USB & eSATA Ext. Enclosure w/Int.80mm fan [ RX358 Series ] User Manual STEP6: Replace the aluminum cover back and tight up 4 screws. Attention 1. Make sure HDD does not dash the leaves of fan during assembly.
- Page 8 Please make sure your external HDD is turned on and well connected to the PC before formatting the HDD. STEP1: Right-click “My Computer” icon and select the “Manage” column. STEP2: Select “Disk Management” and you will see your External HDD showed “Unallocated”. [ RX358 Series ] User Manual...
- Page 9 3.5" SATA HDD to USB & eSATA Ext. Enclosure w/Int.80mm fan [ RX358 Series ] User Manual STEP3: Right-click on the “Unallocated” blocks and selects “New Partition”. STEP4: The “New Partition Wizard” will appear. Please follow the instruction of the wizard to complete.
- Page 10 3.5" SATA HDD to USB & eSATA Ext. Enclosure w/Int.80mm fan [ RX358 Series ] User Manual STEP5: When new partition is completed, the external HDD will be recognized as a “New Volume”. STEP6: Double-click “My Computer”. You will see the new...
- Page 11 The computer will recognize the enclosure during the booting sequences and you should be able to see the drive after MS Windows boot up. [ RX358 Series ] User Manual...


Need help?
Do you have a question about the RX358 Series and is the answer not in the manual?
Questions and answers