Table of Contents
Advertisement
Advertisement
Table of Contents

Related Manuals for Pedego ELEVATE


Summary of Contents for Pedego ELEVATE
- Page 1 ASSEMBLY INSTRUCTIONS & OWNERS MANUAL...
-
Page 3: Table Of Contents
TABLE OF CONTENTS Introduction Warning Component Diagram Carton Contents Registration Assembly Instructions Required Assembly Tools Assembly Steps Torque Specifications Adjustments After Assembly Cockpit Dropper Seatpost & Saddle Hydraulic Disc Brakes Drivetrain Suspension Fork & Rear Shock Tire Pressure Appearance Care & Maintenance Safety Operating Procedures Installation of the Battery... -
Page 4: Introduction
PLEASE NOTE: THIS MANUAL IS NOT INTENDED AS A DETAILED SERVICE, REPAIR OR MAINTENANCE MANUAL. PLEASE SEEK ASSISTANCE FROM A QUALIFIED TECHNICIAN FOR SERVICE, REPAIRS OR MAINTENANCE. Introduction... - Page 5 WELCOME Thank you for choosing the Pedego Elevate electric mountain bike. We believe this technology, with the benefits of electric propulsion, provides you with the perfect vehicle to increase your mobility, extend your normal rides, and best of all, increase your fun!
-
Page 6: Warning
For replacement parts, technical information and warranty assistance, please contact Pedego at 800-646-8604 or support.pedego.com. DO NOT DISASSEMBLE, MODIFY... - Page 7 YOUR INSURANCE POLICIES MAY NOT PROVIDE COVERAGE FOR ACCIDENTS INVOLVING THE USE OF THIS BICYCLE. TO DETERMINE IF COVERAGE IS PROVIDED YOU SHOULD CONTACT YOUR INSURANCE COMPANY OR AGENT. Warning...
-
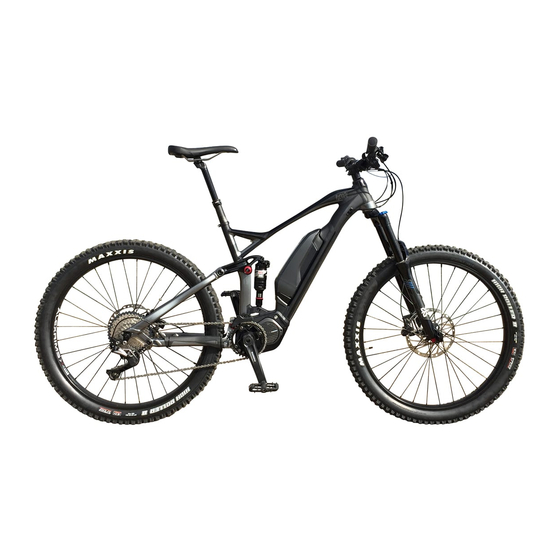
Page 8: Component Diagram
PEDEGO ELEVATE COMPONENT DIAGRAM Shimano Steps E8000 Cockpit Frame Suspension Fork Drivetrain Wheels Brakes Pedego Elevate Component Diagram... - Page 9 PEDEGO ELEVATE COMPONENT DIAGRAM Frame: Brakes: Head tube Front Caliper Top tube Rear Caliper Down tube Rotor Seat tube Seat stay Drivetrain: Chainstay Chain Dropout Cassette Rear Shock Derailleur Pedal Suspension Fork: Crown Wheels: Stanchions Lowers Spokes QR Thru-axle Valve...
-
Page 10: Carton Contents
CARTON CONTENTS Pedego Elevate Saddle w/ Dropper Seatpost Abus Keys 36V 14Ah (504 Wh) Lithium-Ion Battery Parts Kit Owner’s Manual & Assembly Instructions Component Manufacturer Manuals Battery Charger Pedals Front Rotor & Lockring Spoke Protector Front & Rear Reflectors Frame Mount Chain Device Adapter... -
Page 11: Registration
REGISTER YOUR PEDEGO TO JOIN THE PEDEGO OWNERS GROUP P L E A S E R E G I S T E R YO U R P E D E G O AT pedego.com/register Registration information on next page Registration... - Page 12 P L E A S E R E G I S T E R YO U R P E D E G O AT pedego.com/register YOU MUST REGISTER YOUR PEDEGO WITHIN 30 DAYS OF PURCHASE FOR WARRANTY TO BE VALID...
-
Page 13: Assembly Instructions
ASSEMBLY INSTRUCTIONS Required Assembly Tools • Diagonal cutting pliers • ¼” Torque wrench w/ 4, 5 and 6mm Allen key • ⅜” Torque wrench w/ Shimano TL-FC33 or Park Tool BBT-69.2, Park Tool TWB-15 • Pedal wrench w/ 6 mm Allen key or 15mm open end •... - Page 14 ASSEMBLY INSTRUCTIONS Open kit box and remove the pedals, disc brake rotor and lockring (this will be found in the manual bag inside the kit box). Remove packaging from the saddle and dropper seatpost, attach dropper seatpost to the bicycle frame (make sure to remove the zip tie on the dropper seatpost cable) and clamp the bicycle in a...
-
Page 15: Torque Specifications
ASSEMBLY INSTRUCTIONS Attach the stem and handlebar onto the front fork with the recommended torque specification of 8Nm. The handlebar and component angle should be set at a fairly comfortable 45 degrees or so that the brake levers are inline with your hands when on the bike. - Page 16 ASSEMBLY INSTRUCTIONS Grease and install pedals for each respective crank. Please note that the right pedal has right hand threads and the left pedal has left hand threads; they both thread on toward the front of the bicycle. The pedal required for each side is designated by a small CR-R + CR-L on each spindle of the...
-
Page 17: Cycle Computer
Pedego Elevate Torque Specifications Area Component Fastener Tool Torque Cockpit Assist Switch Unit Fixing Bolt 3mm Allen 2-2.2 Nm Lever Fixing 2mm Allen 0.5-0.7 Bolt Brake Lever Clamp Bolt 4mm Allen 6-8 Nm Cycle Clamp Bolt 3mm Allen 0.8 Nm... -
Page 18: Crank Arm
Pedego Elevate Torque Specifications Continued Area Component Fastener Tool Torque Drivetrain Chainring Lockring TL-FC39 35-45 Nm + TL- FC36/33 Crank Arms Pinch Bolts 5mm Allen 12-14 Nm Shimano 0.7-1.5 Nm TL-FC16 Pedals Axle Park TWB- 35-55 Nm Speed Sensor Fixing Bolt 4mm Allen 1.5-2 Nm... -
Page 19: Spoke Magnet
Pedego Elevate Torque Specifications Continued Area Component Fastener Tool Torque Frame Thru-axle SRAM Maxle Toolless Medium Ultimate / Hand Pressure Lever Saddle Seatpost Head / Rail 6mm Allen 20-22 Nm Clamp Seat Tube 4mm Allen 6-7 Nm Collar Wheels Front Brake... -
Page 20: Adjustments After Assembly
ADJUSTMENTS AFTER ASSEMBLY Cockpit • Adjust all of the components on the handlebar so they are easy to reach. Position the brake levers so that they are in-line with your arms and can be pulled without excessive effort. The shift levers and assist switch should be adjusted so they are easily operated. -
Page 21: Suspension Fork & Rear Shock
ADJUSTMENTS AFTER ASSEMBLY Suspension Fork & Rear Shock - Baseline Air Pressure & Sag Setup • It is recommended starting with 30% sag front and rear. Refer to the suspension manufacturer’s instruction manuals or videos for initial setup. ⸰ RockShox Fork: https://trailhead.rockshox.com/en/ ⸰... -
Page 22: Tire Pressure
ADJUSTMENTS AFTER ASSEMBLY Rear Shock Compression Damping Adjustment • The RockShox Monarch RT3 has a 3 position compression switch (open, pedal, and lock). Refer to the graphic indicating lever position on the shock body. • Turn the blue lever towards the chain for improved pedalling efficiency on trails, vertical to lock the rear shock for travelling on smooth terrain, and towards the non-drive side of the bike for descending. -
Page 23: Appearance Care & Maintenance
Periodically clean your Pedego electric bike with a damp cloth. To help avoid electrical issues, do not spray your Pedego Elevate with a hose. It is recommended to store your Pedego in a dry sheltered area, away from direct sunlight and moisture. It is also... -
Page 24: Safety
It is your responsibility to familiarize yourself with the local laws where you ride your Pedego Elevate and to comply with all applicable laws and regulations. Get to Know Your Bike: Familiarize yourself with your new Pedego Elevate. -
Page 25: Weight Limit
SAFETY Additional Passengers: The Pedego Elevate was designed for a single passenger. DO NOT carry any additional passengers. Weight Limit: The Pedego Elevate was designed with a maximum weight capacity of 250 lbs or 113 kg. Exceeding the maximum weight capacity can result in damage of the bike or components which can lead to serious injury. -
Page 26: Operating Procedures
OPERATING PROCEDURES Installation of the Battery Align the indentation in the bottom of the battery with the protrusion on the holder and insert the battery (Figure 1). Slide the battery to the right starting from the point where it is inserted. -
Page 27: Removing The Battery
OPERATING PROCEDURES Removing the Battery Turn the power off by pressing the power button on the battery, then insert the key into the key cylinder in the battery holder (Figure 1). To unlock the battery turn the key counter clockwise until you feel some resistance (Figure 2). -
Page 28: Charging The Battery
OPERATING PROCEDURES Charging the Battery • Charging can be carried out at any time regardless of the state of charge, but you should fully charge the battery at the following times. Be sure to use the supplied Shimano charger when charging the battery at these times. ⸰... - Page 29 OPERATING PROCEDURES Charger LED Lamp • After charging has started, the LED lamp on the charger lights up (Figure 1). • Once charging has completed, the LED lamp will stay illuminated for one hour and then turn off. • If the LED lamp is blinking, it indicates a charging error. •...
- Page 30 OPERATING PROCEDURES Battery LED Lamp • Charging in progress indication ⸰ While the battery is charging, the battery level indicator will display the charging progress, reference the chart below. Battery LED 1 LED 2 LED 3 LED 4 LED 5 Level 0% - 20% Blinking...
-
Page 31: Battery Storage
OPERATING PROCEDURES Battery Storage • If the bicycle will not be ridden for a long period of time, store it with approximately 70% battery capacity remaining or 4 out of 5 LEDs illuminated on the battery level indicator. • Take care not to let the battery become completely empty by charging it every 6 months. -
Page 32: Riding The Bicycle
OPERATING PROCEDURES Riding the Bicycle Turn on the power. • Do not place your feet on the pedals when turning the power on. A system error may result. • Power cannot be turned on while charging. Select your preferred assist mode. Assistance will start when the pedals start turning. -
Page 33: Assist Modes
OPERATING PROCEDURES Assist Modes RIDING CHARACTERISTICS ASSIST MODE SUB MODE FACTORY SETTING EXPLORER CUSTOM SETTINGS RANGE EXPECTANCY HIGH — Determined ü BOOST MODE 31mi (50km)* MEDIUM — ü LOW — — Rider HIGH — — Determined TRAIL MODE 46mi (75km)* MEDIUM ü ü — — LOW Rider ECO MODE Pre-Set --- 62mi (100km)* ü... -
Page 34: Changing Assist Mode
OPERATING PROCEDURES Assist Modes continued [OFF] - This mode does not provide power assistance when the power is turned on. Since there is no power con- sumption associated with the power assistance, it is useful for reducing battery consumption when the battery is running low. - Page 35 OPERATING PROCEDURES Assist Modes continued CHANGING TO [WALK] MODE With your feet off the pedals and current speed at 0 mph, hold down Y until [WALK] displays. Release Y when [WALK] displays. Hold down Y again to activate walk assist. •...
-
Page 36: Operating The Cycle Computer
OPERATING PROCEDURES Operating the Cycle Computer • A - Used for switching between screens and confirming settings. • X/Y - Used for moving the cursor, adjusting settings, etc. BASIC SCREEN DISPLAY • Displays the status of power assisted bicycle, travelling data. A. -
Page 37: Battery Level Indicator
OPERATING PROCEDURES Operating the Cycle Computer continued C. Assist gauge ⸰ Displays the assistance D. Assist mode display ⸰ Displays the current assist mode. (Assist mode automatically switches to [ECO] as remaining battery capacity declines. The switch to [ECO] occurs earlier if a battery powered light is connected.) E. -
Page 38: Accessing The Settings Menu
OPERATING PROCEDURES Operating the Cycle Computer continued ACCESSING THE SETTINGS MENU Hold down A when the bicycle is not moving to display the menu list screen. Press X or Y to select various menus. Press A to display the setting screen for the selected menu. For further information regarding the settings menu and operating the cycle computer, refer to the Shimano STEPS user’s manual included in your parts kit or online at: http://si.shimano.com. -
Page 39: Before The First Ride
BEFORE THE FIRST RIDE Charge the Battery • The battery is not fully charged at the time of purchase. Before riding, be sure to fully charge the battery with the provided Shimano charger. Hydraulic Disc Brakes Burn-In Procedure • This procedure should be performed when the brake system is new, and if the brake pads or rotors are replaced. -
Page 40: Troubleshooting
TROUBLESHOOTING Battery LED Lamp Error Indications System errors and similar warnings are indicated by the battery LED lamps through various lighting patterns. Error Indication Type: Error Indication Lighting pattern Recovery indication condition type System Error Communication Make sure that the error with the cable is not loose or bicycle system... - Page 41 TROUBLESHOOTING Battery LED Lamp Error Indications continued Error Indication Lighting pattern Recovery indication condition type Charging error This is displayed Remove the charger if an error occurs from the battery and during charging. press the power button. If an error appears contact the place of purchase.
-
Page 42: Error Messages On The Cycle Computer
TROUBLESHOOTING Error Messages on the Cycle Computer Warning Codes: If a warning message is displayed on the screen to the right of the battery level indicator, follow one of the procedures below to remedy the situation. • The warning message will disappear once the error is fixed. List of Warning Codes: Code Display... -
Page 43: Error Codes
TROUBLESHOOTING Error Messages on the Cycle Computer continued Code Display Operational Remedy preconditions restrictions while warning is displayed W013 Initialization of Power assistance With your foot off the torque sensor was may be lower than pedal, press the battery not completed usual. - Page 44 TROUBLESHOOTING Error Messages on the Cycle Computer continued List of Error Codes: Code Display Operational Remedy Preconditions Restrictions While Warning is Displayed E010 A system error was Power assistance is Press the power detected. not provided during button of the battery riding.
- Page 45 TROUBLESHOOTING Error Messages on the Cycle Computer continued E022 Battery connected All system functions Press the power to drive unit does not shutdown. button of the battery conform with system to turn it on again. If standards. the situation does not improve, contact the place of purchase.
-
Page 46: Faqs
100% in 5 hours. Q: Do I need to pedal for the motor to provide assistance? A: Yes, the Pedego Elevate requires pedaling input to provide assistance. Q: How much does the remaining battery capacity decrease after several years? A: The remaining battery capacity is affected by temperature and cycle count. -
Page 47: Frequently Asked Questions
Q: What is the size of the battery pack? A: The battery pack is 36V 14Ah or 504 watt-hours. Q: Can I transport the Pedego Elevate on a bike rack? A: Yes, we recommend 2” hitch mount bike racks, just make sure... - Page 48 PEDEGO ELECTRIC BIKES AND BATTERIES What is covered and for how long? For two (2) years after the date of purchase by the original retail purchaser, PEDEGO INC. (“PEDEGO”) warrants to the original retail purchaser that PEDEGO’s Electric Bike (“Bike”) and Bike battery (“Battery”) (individually, “Product” and collectively, “Products”) will be free from defects in material and workmanship under normal use...
- Page 49 Bike, or may replace the Bike with a new, rebuilt or reconditioned PEDEGO Electric Bike of the same or equivalent model. The repaired/replaced Bike will be covered by the Limited Warranty for a period equal to the remainder of the original Limited Warranty on the original Bike or for ninety (90) days, whichever is longer.
- Page 50 OPPORTUNITY, GOODWILL, PROFITS OR SAVINGS; INCONVENIENCE; INCIDENTAL, SPECIAL, CONSEQUENTIAL OR PUNITIVE DAMAGES; OR DAMAGES ARISING FROM THE USE OR INABILITY TO USE THE PRODUCT, EVEN IF PEDEGO HAD REASON TO BELIEVE SUCH DAMAGES WERE POSSIBLE. SOME STATES AND JURISDICTIONS DO NOT ALLOW LIMITATIONS ON HOW LONG AN IMPLIED WARRANTY LASTS, OR THE DISCLAIMER OR LIMITATION OF INCIDENTAL OR CONSEQUENTIAL DAMAGES, SO THE ABOVE LIMITATIONS AND DISCLAIMERS MAY NOT APPLY TO YOU.
- Page 51 (30) calendar days from the date of the original retail purchaser’s purchase of the Product, (1) sending notice by e-mail to optout@PEDEGO.com, with the subject line: “Arbitration Opt Out.” The opt-out email must include (a) the original retail purchaser’s name and address;...
-
Page 52: Warranty
Qualifying Lock and is not recovered during the first 30 days after the theft takes place. What is a Qualifying Lock? A Qualifying Lock is a bicycle lock which: (1) is either the Pedego Folding Lock, the Foldylock Classic, the Kryptonite New-U New York Fahgettaboudit Mini U-lock, the Trelock BS 650 U-lock, the Albus U-lock Granit XPlus 540, or a bicycle lock of equivalent strength;... - Page 53 (30) days, PEDEGO will, without charge, replace the Bike with, at PEDEGO’S sole option, a new, rebuilt or reconditioned PEDEGO Electric Bike of the same or equivalent model. The replacement bike will continue to be covered by the original Standard...
- Page 54 What is the procedure for resolving disputes? ALL DISPUTES WITH PEDEGO ARISING IN ANY WAY FROM THIS ANTI-THEFT LIMITED WARRANTY OR THE SALE, VALUE, CONDITION OR PERFORMANCE OF THE BIKE MUST BE...
- Page 55 (30) calendar days from the date of the original retail purchaser’s purchase of the Bike, (1) sending notice by e-mail to optout@PEDEGO.com, with the subject line: “Arbitration Opt Out.” The opt-out email must include (a) the original retail purchaser’s name and address;...
- Page 56 Follow us online: PedegoElectricBikes Pedego PedegoElectricBikes Pedego To find out more visit: pedego.com Part #: 85004...
Need help?
Do you have a question about the ELEVATE and is the answer not in the manual?
Questions and answers