Advertisement
Quick Links
1
2
3
4
5
6
Blood Glucose Monitoring System
7
Owner's Setup Guide
8
User's Manual
9
5
Intended Use
The FreeStyle Precision Neo Blood Glucose Monitoring System is for use outside the body
IMPORTANT:
only (in vitro diagnostic use) in the quantitative measurement of glucose in fresh whole
blood for self testing by lay users from the fingers. It is not intended to be used for testing
• Use only FreeStyle Precision Neo blood glucose test strips. Other test strips may produce
inaccurate results.
neonatal blood samples or for the diagnosis or screening of diabetes.
• See test strip instructions for use for more information about sample types.
The FreeStyle Precision Neo System is indicated for the home (lay) user in the management
of patients with diabetes. It is intended to be used by a single person and should not be
• The meter and its accessories are for use by a single person. They must not be used on
shared.
more than one person including other family members due to the risk of spreading
infection. All parts of the meter and its accessories are considered biohazardous and
The FreeStyle Precision Neo Blood Glucose Test Strips are for use with the FreeStyle
Precision Neo Blood Glucose Meter to quantitatively measure glucose (sugar) in fresh
can potentially transmit infectious diseases, even after performing the cleaning and
disinfection procedure.
capillary whole blood samples drawn from the fingertips.
• If the meter is being operated by a second person who is providing testing assistance to
the user, the meter and lancing device should be cleaned and disinfected prior to use by
the second person.
• Read the instructions in this Owner's Setup Guide. Failure to follow instructions may
cause incorrect results. Practice the testing procedures before using the meter.
• Follow your healthcare professional's advice when testing blood glucose levels.
• Observe caution when using around children. Small parts may constitute a choking
hazard.
• This device should not be used to test critically ill patients.
• Not for use on patients who are dehydrated, hypotensive, in shock, or for individuals in
hyperglycemic-hyperosmolar state, with or without ketosis.
We're here to help Monday through Friday, 8AM to 8PM Eastern Standard Time. If you have
any questions about any of our FreeStyle products, please contact Customer Care toll-free
at 1-800-527-3339.
8
Testing Your Blood Glucose
Performing a Blood Glucose Test
IMPORTANT:
• Only use a FreeStyle Precision Neo test strip once.
• Read the test strip instructions for use before performing your first blood glucose test.
It contains important information and will tell you how to store and handle the test
strips.
• The meter and its accessories are for use by a single person. They must not be used on
more than one person including other family members due to the risk of spreading
infection. All parts of the meter and its accessories are considered biohazardous and
can potentially transmit infectious diseases, even after performing the cleaning and
disinfection procedure.
1,2
• Do not put urine on the test strip.
• Refer to the lancing device insert for detailed instructions on how to use the FreeStyle
Lancing Device II.
• Do not re-use lancets due to risk of infection. Not suitable for re-sterilization.
• New lancets can be obtained at a retail pharmacy.
Prepare to Test
1. Wash your hands with soap and warm water.
• Rinse and dry thoroughly.
• Do not use lotion or cream on the test site.
Note: Avoid moles, veins, bones, and tendons. Bruising may occur at the test site.
2. Check test strip expiration.
Do not use expired test strips; they may cause inaccurate results.
10
Understanding The Hypo | Hyperglycemic Trend Indicators
The hypo/hyperglycemic trend indicators help you understand patterns in your blood
Low Blood Glucose Results
glucose readings. These trend indicators can show low and high blood glucose patterns.
When the arrows are solid, this indicates that the blood glucose reading just taken is
either low or high. When the arrows are blinking, it indicates that a pattern of either lows
or highs has developed.
When you first use your meter, the hypo/hyperglycemic trend indicators will be turned on.
The hypoglycemic trend indicator target is initially set to 70 mg/dL and the hyperglycemic
A solid
trend indicator target is initially set to 240 mg/dL. The trend indicator targets can
red arrow
be changed or the indicators can be turned off as recommended by your healthcare
professional.
Every time you check your blood glucose level, the FreeStyle Precision Neo meter searches
for patterns that have developed in your blood glucose levels over the past five days. If a
A blinking
pattern of low blood glucose readings is detected, the down arrow will blink. If a pattern
red arrow
of high blood glucose readings is detected, the up arrow will blink. Trend indicators
provide information from your past results and can help you identify when you have
High Blood Glucose Results
recurring lows and highs at specific times of day. Before making changes to your diabetes
management plan always consult your healthcare professional.
TABLE OF CONTENTS
TABLE OF CONTENTS
10
FreeStyle Precision Neo At-A-Glance
Understanding The Hypo | Hyperglycemic Trend Indicators
Low Blood Glucose Results
Meter Symbols
High Blood Glucose Results
Changing Hypo/Hyperglycemic Trend Indicator Targets
System Contents
Turning Off Hypo/Hyperglycemic Trend Indicators
Turning On Hypo/Hyperglycemic Trend Indicators
Quick Start - Testing Your Blood Glucose
11
MediSense Glucose and Ketone Control Solution
Intended Use
Performing a Control Solution Test
12
Transferring Meter Data to a Computer
Getting to Know Your Meter
Turning Your Meter On and Off
13
View Logbook
Checking Your Meter Screen Every Time You Turn it On
Viewing Your Logbook Events
Setting Up the Meter
Viewing Your Blood Glucose Averages
Set Time
14
Error Messages
Set Date
Testing Your Blood Glucose
15
Taking Care of Your Meter and Lancing Device
Prepare to Test
Changing Batteries
Performing a Blood Glucose Test
Cleaning and Disinfecting the Meter and Lancing Device
Cleaning and Disinfection
Understanding Blood Glucose Test Results
16
Troubleshooting
17
Meter Specifications
18
References
6
Getting to Know Your Meter
Turning Your Meter On and Off
To turn your meter on:
• Press the
, or
• Insert a strip
To turn your meter off:
• Press and hold the
for 3 seconds, or
• Do nothing for 2 minutes
Checking Your Meter Screen Every Time You Turn It On
1,2
Meter Off Screen
Start-up Test Screen
1. Open the foil test strip packet at the notch and
tear down to remove the test strip.
2. Insert the test strip into the meter until it stops.
This will turn on the meter.
Notes:
• Be sure to check that your meter screen is working
properly each time you turn your meter on. If you see
any white segments in the black off screen, or any
black segments in the white test screen, there may be
a problem with the meter. (See Section 6, Getting to
Know Your Meter, for more details)
• The meter turns off after 3 minutes of inactivity.
Remove and reinsert the unused test strip to restart
the meter.
If You See . . .
What It Means
Appears when result is lower than 70 mg/dL or the low target recommended by
your healthcare professional.
A pattern of low glucose has developed.
If 2 low results occur within the past 5 days AND both are within the same 3-hour
time period, the meter will display a blinking
.
If You See . . .
What It Means
Appears when result is higher than 240 mg/dL or the high target recommended
by your healthcare professional.
A solid
yellow arrow
A pattern of high glucose has developed.
If 3 high results occur within the past 5 days AND all are within the same 3-hour
time period, the meter will display a blinking
.
A blinking
yellow arrow
1
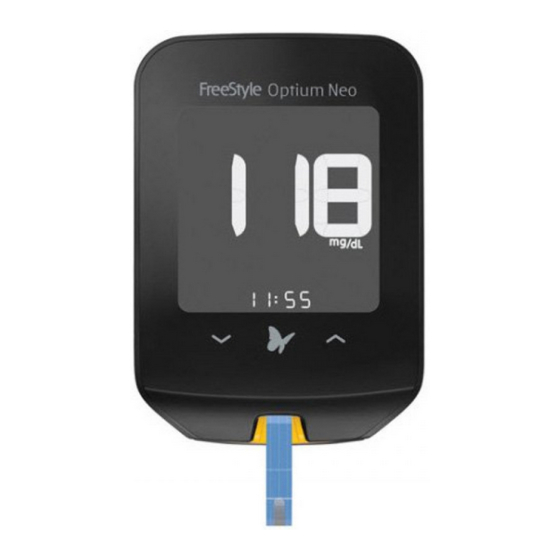
FreeStyle Precision Neo At-A-Glance
Display Window
• Displays meter Home screen
(shown here)
Logbook
• Displays your test results and
other important information
USB Port
USB Port
• Data cable port for
• Data cable port for
uploading test results to a
uploading test results to a
computer (compatible
computer (compatible
data management system
data management system
required, available
required, available
separately)
separately)
Down Button
Target Area
• Apply blood or control solution to the white
target area at the top or end of the test strip
7
Setting Up the Meter
To confirm that the date and time are set correctly, follow the steps below.
Set Time
1. Start with meter off (no test strip inserted)
• Press
Your meter screen should be fully black when powered
off. Each time you turn on your meter, a white start-up
test screen will appear.
If you see any white segments in the black off screen, or
2. Press and hold the time (11:50) on the
any black segments in the white test screen, there may
screen for 3 seconds until the screen
be a problem with the meter. Contact Customer Care.
changes.
Note: If the meter battery is low, the
will
appear in both the meter off screen and start-up test
screen.
The
blinks, indicating the meter is ready for you to
Notes:
• You will see a 5-second countdown.
apply a sample to the test strip.
• Do not remove the test strip from the meter during
the countdown.
• If the countdown does not start, you may not have
applied enough blood to the test strip. Remove the
used strip and discard it properly. Start a new test
with a new test strip.
3. Obtain a blood sample.
Use the lancing device to obtain a blood sample.
(See lancing device instructions for use for more
information.)
4. Apply blood to the test strip.
Bring the blood drop to the white area at the end or
top of the test strip. The blood is drawn into the test
IMPORTANT: You should clean and disinfect your meter at least once
strip.
per week. Refer to the Cleaning and Disinfecting the Meter and Lancing
Device section for instructions.
Hold blood to test strip until you see 3 short lines
on the meter screen. This means you have applied
enough blood.
Changing Hypo/Hyperglycemic Trend Indicator Targets
To change the hypo/hyperglycemic trend indicator targets, follow the steps below. The
What To Do
hypoglycemic and hyperglycemic targets should be set according to your healthcare
professional's instructions.
Follow your healthcare professional's advice to treat
Note: If you change your trend indicator targets, the meter will use the new ranges to determine
low blood glucose.
patterns.
1. Press
to turn meter on
Follow your healthcare professional's advice to treat
low blood glucose.
What To Do
2. Press and hold both
Follow your healthcare professional's advice to treat
time for 4 seconds until the screen changes
high blood glucose.
Follow your healthcare professional's advice to treat
high blood glucose.
2
Meter Symbols
Symbol
What It Means
Symbol
What It Means
Logbook
Connected to computer
Meter ready for sample
Setup mode
application
Up Button
Low blood glucose or
Control solution result
pattern
High blood glucose or
Power Button
Control solution test
pattern
• Turns meter on and
off and returns to the
Low battery
Home screen
3
System Contents
Strip Port
Quantity
Item
• Insert a test strip here
1
FreeStyle Precision Neo Meter
2
Owner's Setup Guides
Test Strip
1
Carry Case
• Insert the test strip into the meter
(available separately)
1
Freestyle Lancing Device II
10
Lancets
3. Set Time Format (12 hour or 24 hour clock)
• Press
or
to change
(e.g. 1:23 PM)
• Press
to continue
to turn on the meter
Note: Your meter can display either a 12 h (1:23
PM) or 24 h (13:23) time format. If you prefer
(e.g. 13:23)
the 12 h format, there is no "AM". If setting a
PM time, continue to press
the "PM".
4. Set Hour
• The hour blinks. Press
hour
• Press
to continue
hour
minute
5. Set Minutes
• The minutes blink. Press
the minutes
• Press
to continue
hour
minute
Example
5. View the result.
The test is complete when the result appears on the
meter screen (example shown). The result is stored
-
in memory.
Blood Glucose Result
6. Press and hold
to turn off the meter. Discard
the used test strip properly.
3. Press
or
to set hypoglycemic trend indicator
target. The hypoglycemic trend indicator target can be set
between 60 mg/dL and 119 mg/dL.
Note:
will appear if the hypoglycemic trend
indicator is turned off.
Press
to continue
4. Press
or
to set hyperglycemic trend indicator
target. The hyperglycemic trend indicator target can be set
between 120 mg/dL and 350 mg/dL.
and
buttons at the same
Note:
will appear if the hyperglycemic trend
indicator is turned off.
Press
to save settings
4
Quick Start – Testing Your Blood Glucose
1. Wash and dry hands before and after
testing.
Note: Check test strip expiration.
2. Insert strip.
3. Lance test site and apply blood.
4. View result.
For more information on how to perform a test,
see Section 8, Testing Your Blood Glucose.
Set Date
6. Set Month
• The month blinks. Press
or
to set
the month
• Press
to continue
month
until you see
day
7. Set Day
• The day blinks. Press
or
to set the
day
or
to set the
• Press
to continue
month
day
8. Set Year
• Press
or
to set the year
or
to set
• Press
to save. Setup complete
9
Understanding Blood Glucose Test Results
The meter displays blood glucose results in mg/dL. The unit of measurement is preset. You
cannot change this setting.
IMPORTANT: The meter displays results from 20 - 500 mg/dL. Low or high blood glucose
results can indicate a potentially serious medical condition.
The expected glucose range for a non-diabetic, non-pregnant fasting adult is under
100 mg/dL. Two hours after meals, levels should be less than 140 mg/dL.
3
Consult your healthcare professional to determine the range that is appropriate for you.
If You See . . .
What It Means
What To Do
Severe low blood glucose (lower
Repeat the test with a new test
than 20 mg/dL)
strip. If the result is LO, contact
or
your healthcare professional
There may be a problem with the
immediately.
test strip.
Severe high blood glucose (higher
Repeat the test with a new test
than 500 mg/dL)
strip.
or
If the result is HI, contact
There may be a problem with the
your healthcare professional
test strip.
immediately.
Note: If you see the error messages E-3 or E-4, consult the Error Messages section in this
Owner's Setup Guide.
IMPORTANT: Contact your healthcare professional if you have symptoms that do not match
your test result, and you have followed the instructions in this Owner's Setup Guide.
Turning Off Hypo/Hyperglycemic Trend Indicators
When hypo/hyperglycemic trend indicators are turned off, you will no longer see the
or
on the meter. To turn off trend indicators, follow the steps below.
Note: Trend indicators can be turned off independently.
1. Press
to turn meter on. Press and hold both
and
at the same time until the
screen changes. (Refer to "Changing Hypo/Hyperglycemic Trend Indicator Targets" section).
2. Press
past 60 mg/dL until
appears. When
appears, the
hypoglycemic trend indicator is turned off.
Press
to continue.
3. Press
past 350 mg/dL until
appears. When
appears, the
hyperglycemic trend indicator is turned off.
Press
to save settings.
4. Press and hold the
for 3 seconds to turn meter off.
Turning On Hypo/Hyperglycemic Trend Indicators
When hypo/hyperglycemic trend indicators are turned on, the
or
will appear when
you have low or high blood glucose results or patterns. To turn on trend indicators, follow the
steps below.
Note: Trend indicators can be turned on independently.
1. Press
to turn meter on. Press and hold both
and
at the same time until the
screen changes. (Refer to "Changing Hypo/Hyperglycemic Trend Indicator Targets" section).
2. Press
to turn on the hypoglycemic trend indicator and to set the indicator target.
Press
to continue.
3. Press
to turn on the hyperglycemic trend indicator and to set the indicator target.
Press
to save settings.
Advertisement

Related Manuals for Freestyle Precision Neo


Summary of Contents for Freestyle Precision Neo
- Page 1 6. Set Month blood for self testing by lay users from the fingers. It is not intended to be used for testing • Use only FreeStyle Precision Neo blood glucose test strips. Other test strips may produce • Press the , or (e.g.
- Page 2 3. If the test still does not start, contact Customer Care. Patent: https://www.abbott.com/patents frequency interference do not use the FreeStyle Precision Neo meter near cellular or cordless telephones, radio transmitters or other electrical or electronic equipment that are sources of electromagnetic radiation, as these may interfere with the proper...
Need help?
Do you have a question about the Precision Neo and is the answer not in the manual?
Questions and answers