
Related Manuals for DoggyRide Novel


Summary of Contents for DoggyRide Novel
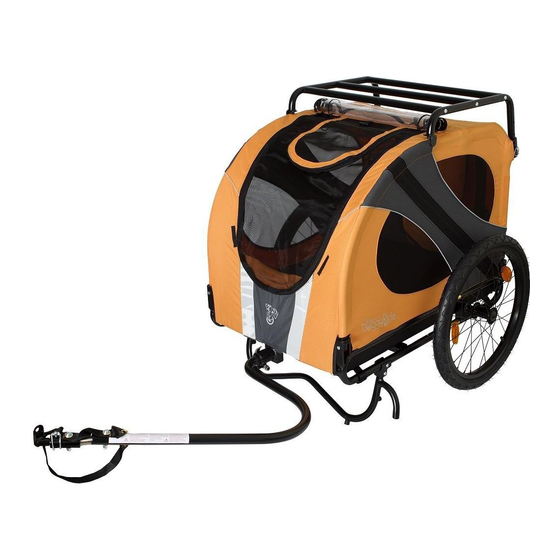
- Page 1 Owner’s Manual DoggyRide Original / Novel Novel model shown Foldable Crate / Dog Bike Trailer / Stroller DROROM09-EN...
-
Page 2: Table Of Contents
INTRODUCTION CONTENTS OF CARTON SAFETY GUIDELINES ASSEMBLY INSTRUCTIONS Crate Assembly Trailer Assembly Stroller Assembly DOGGYRIDE USE Cabin Use Trailer Use Stroller Use MAINTENANCE SAFETY CHECKLIST WARRANTY AND REPLACEMENTS... -
Page 3: Introduction
Introduction Congratulations with your purchase of a DoggyRide dog bike trailer. DoggyRide products are designed on safety, and are the best in comfort. DoggyRide products are the leading products on versatility which we hope you will experience once you start using it. This owner’s manual is the first step in enjoying the product for many years;... -
Page 4: Safety Guidelines
Please consult the leash set manual for properly leashing your dog. Avoid sudden swerving, rocks and curbs. Never pull the DoggyRide behind a motorized vehicle. It can be used behind electrical bikes, but observe the recommended speed maximum. Never use the DoggyRide to transport people. -
Page 5: Assembly Instructions
Assembly Instructions Crate Assembly Unfold the cabin Lift the two sides of the cabin and make sure that the fabric is in correct position for the sides to stand up vertically. Pull the detent pin out of the locking position. The cross bar locking position is located inside the cabin on the left side looking into it from the front position. -
Page 6: Trailer Assembly
(see image.) Mount the Reflectors Two reflectors will go on the Novel and 4 on the Original (2 red and 2 white). The red reflectors go onto the rear and the white reflectors go onto the front portion of the trailer. - Page 7 The thread on the tires needs to look like the image in forward position (towards the bicycle). Wheel Assembly Novel Push the button on the axle and slide them inside the wheel opening. Release the button and check whether they are firm inside by pulling it backward.
- Page 8 Assemble the axle onto the wheel using the hex wrench included with the product. There are two washers on the axle. The waved washer should be on the trailer side and the flat washer on the bolt side. Secure the bolt and wheel is now ready to attach to the trailer. Flip the cabin gently on the side to connect the wheels.
- Page 9 backward (depending on the wheel size.) Screw the bolt of the skewer and push the latch down firmly. The hitch will correct itself in the right position. (see image.) Hitch installation for bolted axles Unscrew the axle bolt and put the hitch onto it. Point the hitch downward or 45 degrees down backward (depending on the wheel size.) You can also attach the trailer and see if the trailer is leveled.
- Page 10 Install Safety Flag Join the pole section together. On the trailer’s left side, insert the flag pole into the flag receptacle. (see image.) ALWAYS use the safety flag while riding the trailer.
-
Page 11: Stroller Assembly
Stroller Assembly Instead of attaching the tow bar to the cabin with wheels you connect the front wheel and add the push bar. Connect the Front Wheel Gently flip the cabin with wheels backward on its rear and unscrew the latch pin out of the front opening. - Page 12 Take the push bar out of the carton and install it using the detent pins. The push bar can be installed on two positions depending on the desired height. Install the Parking Brake The parking brake is installed on the left when you stand behind the stroller.
-
Page 13: Doggyride Use
DoggyRide Use This section is meant to inform people on how to use the product in a versatile manner. The DoggyRide is built to be used by your four legged companion in many situations and especially when you take them with you. - Page 14 There are two leash hooks at the bottom (see image) and the Novel Trailer has two leash hooks in the top (see image). With the leash hooks on the top you can also hook the top harness of the dog.
-
Page 15: Stroller Use
Stroller Use The stroller can be used with a swivel wheel for the paved surface and a jogger wheel for the rough terrain, like the forest or the beach. Put the stroller on the parking brake at the type of entry and exit. The back opening is meant for entry and exit. -
Page 16: Maintenance
In order to avoid mildew on the fabric, wipe it dry after it has been exposed to water. In case you use the Novel Stroller in combination with the Trailer you can store the tow bar on the side while walking, see image. -
Page 17: Warranty And Replacements
Warranty and Replacements The DoggyRide dog bike trailer has a 1 year to a lifetime warranty on some components. The list below indicates the warranty term for each component. Original part Novel part SKU Warranty Crate Assembly Cover DROR09 DRNV09... - Page 18 The DoggyRide dog bike trailer owner must present the trailer for repair at place of purchase, with an original sales receipt or similar proof of purchase.
- Page 19 Comments...
- Page 20 Dutch Dog Design LLC 20731 NE 70 Pl, ste 100 Redmond, WA 98053 PH: 425-868-3100 – FAX: 951-221- info@doggyride.com – www.doggyride.com DoggyRide® is a registered trademark of Dutch Dog Design LLC DRORMN09-EN – DoggyRide Owner’s Manual (Original/Novel)
Need help?
Do you have a question about the Novel and is the answer not in the manual?
Questions and answers