Table of Contents
Advertisement
Quick Links
Instruction Manual &
Safety Warnings
Table of Contents
Instructions
1
1
1
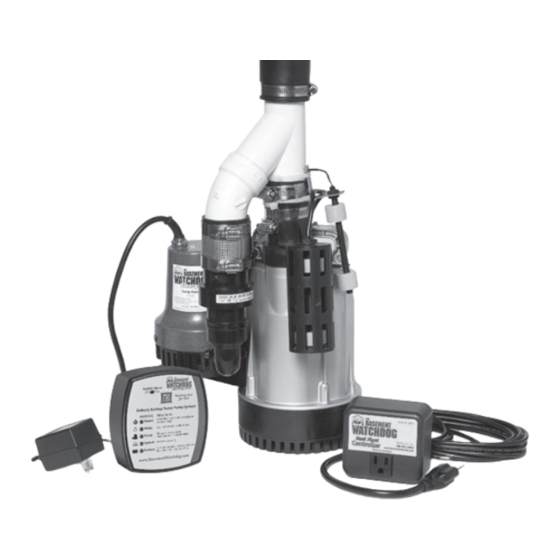
Items included in system
2
2
2
3
4,5
5
5
5
5
6
6
6
6
6
Lights and Alarms
an emergency
6
Power alarm
7
Water alarm
7
7
8
8
9
9
10
10
Testing the System
11
11
11
13
14
Combination Primary and
Backup Sump Pump System
IMPORTANT: Even if you have the Basement Watchdog sump pump system installed by
someone else, you must read and follow the safety information contained in this manual.
Failure to do so could result in property damage, serious injury, or death.
Advertisement
Table of Contents

Related Manuals for The Basement Watchdog Combo


Summary of Contents for The Basement Watchdog Combo
-
Page 1: Table Of Contents
Technical support Connecting the battery Replacement Parts Diagram & List 12 IMPORTANT: Even if you have the Basement Watchdog sump pump system installed by Connecting the charger Connecting the primary pump someone else, you must read and follow the safety information contained in this manual. -
Page 2: Important Safety Warnings And
0466, option 3. Return the product to the • ALWAYS disconnect the pump from the power • Use the Basement Watchdog control unit for manufacturer for any repairs at the following source before servicing or making adjustments. -
Page 3: Introduction
Introduction The Basement Watchdog combination sump pump system is designed to provide both primary and backup pumping capabilities. The primary pump will operate as long as it is receiving AC power. If the power is interrupted, or more Backup Pump... -
Page 4: Installing The Pipe And Pump
The Basement Watchdog combination system is raise the pump above the debris. 11. Position the top of the pump... -
Page 5: Preparing The Battery
Within 15-30 minutes of adding acid, the battery designed to fit the Basement Watchdog paper towels or newspaper on top of it while you will be 70-80% charged. The system will then batteries. -
Page 6: Battery Instructions
(b) Secure the controller to the 3. (a) Carefully push in the perforated tab at the the Basement Watchdog package. An arrow on discharge pipe by wrapping the tie around the top of the acid pack. Lift up the large tab When you fill the battery for the FIRST time, the top of the battery marks this position. -
Page 7: Connecting The Battery
Warnings & Alarms control unit will run the pump an additional 45 The Basement Watchdog backup control unit seconds to evacuate the pit. features a series of warning lights that pinpoint While the pumps are active, water will come out of potential problems. -
Page 8: Silencing The Alarm During
2. Check the charger. Make sure it is securely POWER and/or the on page 4. (The Basement Watchdog battery or in the molded hole on the top of the battery. plugged into the wall outlet. Make sure the... -
Page 9: Replacing The Backup Pump
• Check the main pump for failure. It may not DANGER be working, the float switch may be stuck, or Risk of electrical shock or battery explosion, the pump may be too small to handle the which can cause serious injury or death. inflow of water. -
Page 10: Charger
emitted from the battery. 24. Connect the top of the system to the rubber union and tighten the hose clamp. 5. Remove the sensor from the battery. 25. Connect the battery cables to the battery 6. Remove the battery wires from the battery terminals, WHITE to the NEGATIVE (-) post, terminals. -
Page 11: Cleaning Battery Terminals
immediate action needs to be taken to replace If the battery is relatively new and the battery the battery or clean the terminals. This alarm alarm is activated, before you replace the will sound when: battery, call the Glentronics service department. The phone number is 800-991-0466, option 3. -
Page 12: Testing The Pump
another nonmetallic material) to remove any TEST BUTTON pump will run for an additional 10 seconds after hydrogen or oxygen gas that may have been the float returns to the original position. It will The TEST button may be used to check the emitted from the battery. -
Page 13: Replacement Parts Diagram & List
Replacement Parts List BOTTOM VIEW Description Part No. 1/3 HP AC sump pump BW1033-GL Caged dual float switch with piggyback controller BWC2 Emergency backup pump 1011004 Emergency control unit BWE-CONT “Y” PVC pipe fitting 1120007 Support bracket for backup pump 1121003 Battery cap with hole for the fluid sensor 1125000... -
Page 14: Troubleshooting Guide
Primary Pump Troubleshooting Guide Backup Pump Troubleshooting Guide DANGER DANGER Read safety warnings & instructions before attempting any repairs or maintenance. Read safety warnings & instructions before attempting any repairs or maintenance. Potential Cause THE PUMP WILL NOT START OR RUN Solutions Potential Cause BATTERY FLUID LOW... -
Page 15: Warranty
Limited Warranty By opening this package and using this GLENTRONICS, INC. product, you are agreeing to be bound by the terms of the GLENTRONICS, INC. limited warranty (“warranty”) as set out below. Do not use your product until you have read the terms of the warranty. If you do not agree to the terms of the warranty, do not use the product and return it within the return period stated on your purchase receipt from the retail store or authorized distributor where you purchased it for a refund.
Need help?
Do you have a question about the Combo and is the answer not in the manual?
Questions and answers