Table of Contents
Advertisement
Advertisement
Table of Contents

Related Manuals for AT&T Velocity 2


Summary of Contents for AT&T Velocity 2
-
Page 1: User Guide
User Guide AT&T Velocity ®... - Page 2 Copyright © 2018 ZTE CORPORATION. All rights reserved. No part of this publication may be excerpted, reproduced, translated or utilized in any form or by any means, electronic or mechanical, including photocopying and microfilm, without the prior written permission of ZTE Corporation. The manual is published by ZTE Corporation.
-
Page 3: Table Of Contents
Reset Your Velocity 2 ........ - Page 4 Enable MAC/IP/Port Filtering ........41 Enable DMZ .
-
Page 5: Get Started
Power On or Wake Your Velocity 2 Press and hold the Power button for 2 seconds to power your Velocity 2 on or off. Press the Power button to wake up your Velocity 2 when the screen is inactive. GET STARTED... - Page 6 External antenna Power button WPS button connector Status indicator light Touch screen USB Type-C Nano-SIM/microSDXC™ charging port card slot GET STARTED...
- Page 7 Status Indicator Light The color and behavior of the light indicates the device's current status regarding network connection, nano-SIM card, software updates, and more. Color Status Meaning Green Blinking New message notification Software update notification Data usage notification Solid Battery fully charged Blinking Low battery No SIM card...
-
Page 8: Install The Battery
Install the Battery 1. Remove the back cover. 2. Insert the battery as shown. Align the contacts with the metal springs. Press the battery down into the case. 3. Replace the back cover. Note: The battery is precharged and ready to use. To recharge it, see Recharge the Battery on page 29. - Page 9 Accessories • USB Type-C cable – Connect to your Velocity 2 to recharge the battery or to provide a wired connection to your computer for internet access or file sharing. • Wall charger – Connect to your Velocity 2 using the USB Type-C cable to recharge the battery or to provide power from a wall outlet.
-
Page 10: Manage Your Device And Settings
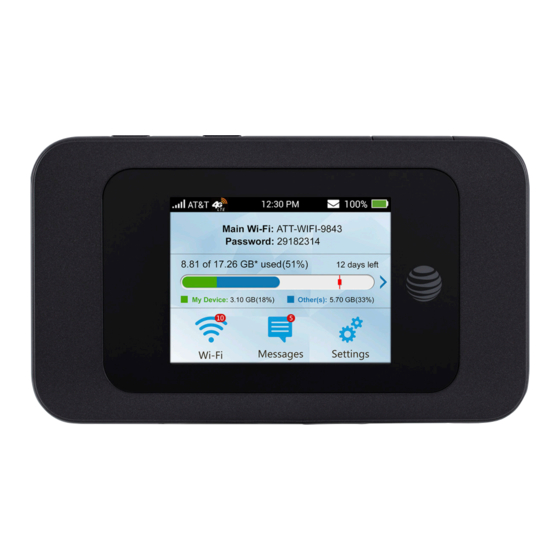
Manage Your Device and Settings There are two interface options for managing your Velocity 2 device and settings: the touch screen and the browser-based AT&T Wi-Fi Manager. Touch Screen Icons on the touch screen’s top row indicate the status of the... - Page 11 Touch Screen: Home Screen Elements Icon Indication Network signal strength Network type Network name and password. Wi-Fi capable Main Wi-Fi: devices can connect to the mobile hotspot Password: using this information. New system or network provider message(s). Data usage for current billing period. Tap to view detailed information.
- Page 12 If you forget it, you will need to reset your Velocity 2 to factory default settings to restore the default login. (See Reset Your Velocity 2 on page 38.)
-
Page 13: Connect To The Internet
2. Connect your computer or other wireless device(s) to your network. (Steps may vary by device.) a) On the home screen of your Velocity 2, locate the Main Wi-Fi network name and password. GET STARTED... - Page 14 From your AT&T Velocity 2: 1. Press and hold the WPS button on your Velocity 2. 2. On the touch screen, tap Pair with Main Wi-Fi or (if Guest Wi-Fi is enabled) Pair with Guest Wi-Fi.
- Page 15 Your mobile hotspot and the wireless device will communicate and establish the connection. Note: You can also initiate a WPS connection from the Velocity 2 touch screen without pressing the button. From the home screen, tap Wi-Fi Main Wi-Fi Network or Guest Wi-Fi Network WPS Pair with Main Wi-Fi or Pair with Guest Wi-Fi.
- Page 16 GET STARTED...
-
Page 17: Guest Wi-Fi
You can provide one-time access to your mobile hotspot with a second (Guest) network and password. You can enable the Guest Wi-Fi network on the Velocity 2 touch screen or on the AT&T Wi-Fi Manager. Note: The Guest Wi-Fi network is turned off when your Velocity 2 is restarted. - Page 18 On the AT&T Wi-Fi Manager: 1. Log in, and click Home in the navigation menu. 2. Click Turn On Guest Wi-Fi. 3. Now users can connect using the Guest Wi-Fi network name and password. GET STARTED...
-
Page 19: Use Your Velocity 2
Use Your Velocity 2 This chapter describes the basics of using and managing your Velocity 2 and its Wi-Fi network(s). It includes instructions for using the touch screen and the browser-based AT&T Wi-Fi Manager. Security Credentials Connecting to and managing your Velocity 2 and its Wi-Fi network(s) involves three different passwords: •... -
Page 20: View Your Data Usage
View Your Data Usage You can view estimates of your data plan usage on the Velocity 2 touch screen or the AT&T Wi-Fi Manager. These estimates are not accurate for billing purposes. The data counter resets automatically at the beginning of the next billing cycle. -
Page 21: Manage Wi-Fi
Manage Wi-Fi View Connected Devices You can view a list of devices connected to your mobile hotspot on the Velocity 2 touch screen or on the AT&T Wi-Fi Manager. On the touch screen: 1. From the home screen, tap Wi-Fi. -
Page 22: Set Maximum Number Of Connected Devices
Guest Wi-Fi networks. You can change the total number of connections allowed. You can also change how many connections are available for the Main and Guest Wi-Fi networks. You can change these settings from the Velocity 2 touch screen or the AT&T Wi-Fi Manager. On the touch screen: 1. - Page 23 Wi-Fi connections. beside Main Wi-Fi or Guest Wi-Fi to increase the 3. Click number of connections permitted for that network. This will decrease the number available for the other network. 4. Click Apply. USE YOUR VELOCITY 2...
- Page 24 • Preventing overuse of your bandwidth and possible resulting overage charges on your plan. • Temporarily restricting a child's internet access. You can block devices from the Velocity 2 touch screen or the AT&T Wi-Fi Manager. To unblock a device, see Unblock Devices on page 21.
- Page 25 You can unblock a device that you've previously blocked. This will allow it to connect to the mobile hotspot again. You can unblock devices from the Velocity 2 touch screen or the AT&T Wi-Fi Manager. Note: Whenever you block or unblock a device, the Wi-Fi connection resets to activate the new settings.
-
Page 26: Messages
Your Velocity 2 can receive important messages from your mobile service provider; you cannot reply to these messages. You can read and delete these messages on the Velocity 2 touch screen or the AT&T Wi-Fi Manager. On the touch screen: 1. -
Page 27: File Sharing
3. To delete a message, click the checkbox beside it, and then click Delete. To delete all messages on the page, click Delete All. File Sharing If a microSDXC card is inserted in your Velocity 2, you can share files on it via Wi-Fi or USB connection. Share Files via Wi-Fi You can use a browser-based interface to view, download, or upload files when you share via Wi-Fi. - Page 28 Use the File Browser: When Wi-Fi sharing is enabled, you can access files on the microSDXC card through a browser without logging in to the AT&T Wi-Fi Manager. 1. Open a browser window on a connected device. USE YOUR VELOCITY 2...
- Page 29 4. Use the File Browser to view, upload, or download files on the microSDXC card. Share Files via USB You can share files by connecting your Velocity 2 to a computer with the USB Type-C cable. On the touch screen: 1.
- Page 30 2. Click the Settings tab. 3. Click USB Only to set the sharing mode. 4. Click Apply. 5. Connect your Velocity 2 to a computer with the USB Type-C cable. 6. Press and hold the touch screen to unlock your Velocity 2, and tap OK to continue.
-
Page 31: Battery
• Shorten the Wi-Fi range if the devices that regularly connect to your mobile hotspot are located near your Velocity 2. • Reduce the wait time before your Velocity 2 enters Wi-Fi Sleep Mode (turns off Wi-Fi) when no devices are connected. - Page 32 The brighter the screen, the shorter the battery life. • Display Timeout – Tap to select a shorter time period (30 seconds or 1 minute). The shorter the time, the longer the battery life. USE YOUR VELOCITY 2...
-
Page 33: Recharge The Battery
(the faster option) or the USB port on a computer. Recharge using a wall outlet (faster): 1. Attach one end of the USB Type-C cable to your Velocity 2, and attach the other end to the wall charger (included). 2. Plug the wall charger into a wall outlet. -
Page 34: Security
Recharge using a USB port: 1. Attach one end of the USB Type-C cable to your Velocity 2. 2. Connect the other end of the cable to the USB port on a computer. When the battery is fully charged, the status indicator light on the... - Page 35 You can customize the login (password) used to access the AT&T Wi-Fi Manager. On the AT&T Wi-Fi Manager: 1. Log in, and click Settings in the navigation menu. 2. Click Advanced Administrator. 3. Enter the current login in the Current Login field. USE YOUR VELOCITY 2...
- Page 36 Note: Record the new login in a safe place. If you forget it, you will need to restore the default login (attadmin) by resetting the device to factory default. (See Reset Your Velocity 2 on page 38.) Change Wi-Fi Security Types You can set the preferred type of Wi-Fi security for your mobile hotspot on the AT&T Wi-Fi Manager.
- Page 37 WPA-PSK/WPA2-PSK – Other users can access your mobile • hotspot only if they enter the correct password. OPEN – Not recommended. Anyone can access your Wi-Fi • network without a password, and you are responsible for charges incurred. 4. Click Apply. USE YOUR VELOCITY 2...
-
Page 38: Configure International Data Roaming
4. Click Apply. View Details You can view details about your device, such as the wireless number, hardware version, and IMEI, on the Velocity 2 touch screen or the AT&T Wi-Fi Manager. On the touch screen: From the home screen, tap Settings About Your Device. -
Page 39: Software Update
Log in, and click About in the navigation menu. Software Update Software or firmware updates for your Velocity 2 may become available periodically. You will receive an alert when an update becomes available, and you can check for updates manually from the Velocity 2 touch screen. - Page 40 Note: If the update is critical, you will only have the Reboot & install option. 5. Before you begin the update, plug in your Velocity 2 to a wall outlet using the USB Type-C cable and the wall charger. This ensures that your Velocity 2 will have power so that the update can be completed.
-
Page 41: Replace The Sim Card
Replace the SIM Card Your Velocity 2 comes with the nano-SIM card preinstalled. If you need to replace the nano-SIM card, follow these steps: 1. Power off your Velocity 2. Insert the tip of the tray eject tool into the hole next to the card tray. -
Page 42: Reset Your Velocity 2
AT&T Wi-Fi Manager login if you have changed it and cannot remember the new one.) Notes: • If you reset your Velocity 2 to factory settings, all of your customizations will be lost. • When you reset your Velocity 2, any currently connected devices will be disconnected. -
Page 43: Advanced Settings
Advanced Settings This chapter provides information on how to configure advanced settings for your Velocity 2, such as Wi-Fi network options, WAN and router settings, and more. You can manage these settings from the AT&T Wi-Fi Manager. Set Wi-Fi Network Options 1. -
Page 44: View Network Information
5 GHz band, select 20 MHz, 20 MHz/40 MHz, or 20 MHz/40 MHz/80 MHz. Country/Region Code – Select the country in which your • Velocity 2 is located. • Frequency (Channel) – Select the frequency (channel) for your Wi-Fi network(s). The recommended option is Automatic, which will select the channel with the least potential interference. -
Page 45: Enable Mac/Ip/Port Filtering
2. Click Firewall Port Forwarding. 3. Beside Port Forwarding Settings, click Enable. 4. Click Apply. The Port Forwarding Settings options and Current Virtual Servers (port forwarding rules) list will appear. Incoming traffic will be forwarded to specific ports and devices on your network using their local IP addresses. -
Page 46: Enable Dmz
Some applications are predefined. You can define additional applications by clicking Add Custom Application, but you need to know details of the traffic used and generated by the applications you wish to define. In particular, you need to know the port numbers and the protocol (TCP, UDP) used by outgoing traffic. -
Page 47: Configure Apn Details
1. Log in to the AT&T Wi-Fi Manager, and click Settings in the navigation menu. 2. Click Advanced Router. 3. Beside VPN Passthrough, click Enable. 4. Click Apply. Configure APN Details The Access Point Name (APN) is checked to determine the type of network connection to establish. -
Page 48: Set Router Options
Select an APN Entry to Use 1. From Settings Network APN, beside Mode, click Manual. 2. In the Profile Selection drop-down menu, select the entry for the APN you wish to use. 3. Click Set Default OK. Remove an APN Entry 1. -
Page 49: Troubleshooting
Velocity 2 home screen. Enter the correct password for the network. The Main Wi-Fi network password appears on your Velocity 2 home screen. Check the IP address to ensure the wireless device can obtain an IP address automatically in the internet protocol (TCP/IP) properties. - Page 50 Check that the nano-SIM card is correctly cannot access the inserted in the Velocity 2. internet Move the Velocity 2 to a location with a better signal. Contact your service provider. Cannot access the Enter the correct address. The default AT&T Wi-Fi Manager...
-
Page 51: Specifications
Specifications Mechanical Specifications Weight 4.55 oz. Dimensions 4.54" (L) x 2.61" (W) x 0.61" (D) Display 2.4" QVGA TFT LCD 240 x 320 pixels Capacitive touch screen Memory 256 MB RAM 512 MB ROM Supports up to a 128 GB microSDXC card Battery 3,000 mAh Supported RF Bands... -
Page 52: Health And Safety Information
Health and Safety Information Don’t use at gas stations. Power off when asked to in hospitals and medical facilities. Small parts may cause choking. Avoid contact with anything magnetic. Avoid contact with liquids. Keep your device dry. Power off when near explosive materials or liquids. Don’t rely on your device for emergency communications. -
Page 53: Fcc Regulations
FCC Regulations This device complies with part 15 of the FCC Rules. Operation is subject to the following two conditions: (1) This device may not cause harmful interference, and (2) this device must accept any interference received, including interference that may cause undesired operation. -
Page 54: Rf Exposure Information (Sar)
operate the equipment. The antenna(s) used for this transmitter must not be co-located or operating in conjunction with any other antenna or transmitter. RF Exposure Information (SAR) This device is designed and manufactured not to exceed the emission limits for exposure to radio frequency (RF) energy set by the Federal Communications Commission of the United States. -
Page 55: Distraction
For this device, the highest reported SAR value for usage near the body is 1.41 W/kg. While there may be differences between the SAR levels of various devices and at various positions, they all meet the government requirements. SAR compliance for body operation is based on a separation distance of 10 mm between the unit and the human body. -
Page 56: Power Supply
• Do not expose your device or its accessories to liquid, moisture, or high humidity. • Do not drop, throw, or try to bend your device or its accessories. • Do not use harsh chemicals, cleaning solvents, or aerosols to clean the device or its accessories. -
Page 57: Electrical Safety
Device Heating Your device may become warm during charging and during normal use. Electrical Safety Accessories • Use only approved accessories. • Do not connect with incompatible products or accessories. • Take care not to allow metal objects, such as coins or key rings, to contact or cause a short-circuit in the battery terminals. -
Page 58: Medical Devices
Medical Devices Please consult your doctor and the device manufacturer to determine if operation of your device may interfere with your medical device. Hospitals Power off your device when requested to do so in hospitals, clinics, or health care facilities. These requests are designed to prevent possible interference with sensitive medical equipment. -
Page 59: Warranty
Warranty ZTE offers you a limited warranty that the enclosed subscriber unit and its enclosed accessories will be free from defects in material and workmanship for a period that expires one year from the date of sale of the Product to you, provided that you are the original end user purchaser of the Product and provided that your purchase was made from a supplier authorized by the Seller. -
Page 60: Limited Warranty
abuse, accident, alteration, improper installation, incorrect voltage application, food or liquid spillage, acts of God. c) Normal wear and tear. d) If the Product has been opened, modified or repaired by anyone other than a warranty service center or if it is repaired using unauthorized spare parts. -
Page 61: How To Get Warranty Service
How to Get Warranty Service To obtain warranty service, please call (877) 817-1759. Please have the following information available when you send the device in for repair: • A valid Proof of Purchase • Return address • Daytime phone number or fax number •...
Need help?
Do you have a question about the Velocity 2 and is the answer not in the manual?
Questions and answers
how to insert the sim card
To insert the SIM card in the AT&T Velocity 2, follow these steps:
1. Power off the Velocity 2.
2. Insert the tip of the tray eject tool into the hole next to the card tray.
3. Pull out the card tray and remove the existing nano-SIM card (if present).
4. Insert the new nano-SIM card into the tray.
5. Carefully slide the tray back into place.
You can also insert a microSDXC card in the card tray if needed.
This answer is automatically generated