
Related Manuals for Rae UltraRAE PGM-7200


Summary of Contents for Rae UltraRAE PGM-7200
- Page 1 UltraRAE COMPOUND SPECIFIC PID MONITOR PGM-7200 OPERATION AND MAINTENANCE MANUAL (Document No.: 012-4001) April 2003, Revision F2 RAE SYSTEMS INC. 1339 Moffett Park Drive Sunnyvale, CA 94089...
- Page 2 B. Recharge batteries only in non-hazardous locations. C. Do not connect external cable to serial interface jack in hazardous locations. D. Use RAE Systems Adapter P/N 500-0072 for connection to communication port and charging jack only in a non- hazardous area.
-
Page 3: Table Of Contents
Table of Contents 1. GENERAL INFORMATION 1.1 General Specifications.......... 1-3 2. OPERATION OF ULTRARAE 2.1 Physical Description..........2-2 2.2 Keys and Display..........2-3 2.3 Power On/Off ............2-4 2.4 Operation .............. 2-5 2.4.1 Idle Operation..........2-5 2.4.2 Measurement Overview....... 2-9 2.5 Alarm Signals ............. - Page 4 4.6.2 Clear All Data..........4-15 4.6.3 Change Data Log........4-16 4.7 Change Monitor Setup........4-17 4.7.1 Change Site ID .......... 4-18 4.7.2 Change User ID ......... 4-19 4.7.3 Change User Mode ........4-20 4.7.4 Change Date ..........4-21 4.7.5 Change Time ..........4-22 4.7.6 Change Backlight ........
- Page 5 8. TROUBLESHOOTING 8.1 Special Diagnostic Mode........8-2 8.2 Troubleshooting Table ......... 8-8 APPENDIX A. QUICK REFERENCE GUIDE A-1 APPENDIX B. TUBE DATA SHEETS APPENDIX C. TECHNICAL NOTES APPENDIX D. APPLICATION NOTES APPENDIX E. LITERATURE REQUEST APPPENDIX F . REQUEST RMA FORM Main Contact Numbers Outer Back Cover...
- Page 6 ! WARNING ! - Do NOT proceed before reading - This manual must be carefully read by all individuals who have or will have the responsibility for using, maintaining, or servicing this product. The product will perform as designed only if it is used, maintained, and serviced in accordance with the manufacturer's instructions.
- Page 7 Special Notes When the UltraRAE Monitor is taken out from the transport case and turned on for the first time, there may be some residual organic or inorganic vapor trapped inside the detector chamber. The initial PID sensor reading may indicate a few ppm.
- Page 8 WARNING: Use only RAE Systems battery packs, part nos. 012- 3050, 012-3051 or 012-3052. This instrument has not been tested in an explosive gas/air atmosphere having oxygen concentration greater than 21%. Substitution of components may impair intrinsic safety. Recharge batteries only in non-hazardous locations.
- Page 9 Étudier le manuel d’instructions en entier avant d’utiliser, d’entretenir ou de réparer l’équipement. WARNING: The calibration of all newly purchased RAE Systems instruments should be tested by exposing the sensor(s) to known concentration calibration gas before the instrument is used or put into service.
-
Page 10: General Information
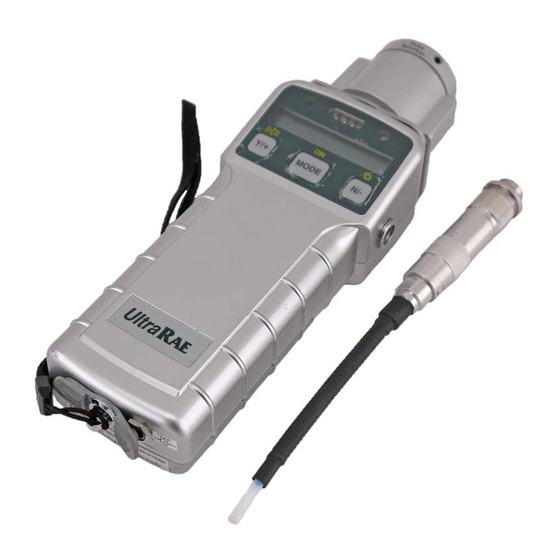
GENERAL INFORMATION 1. GENERAL INFORMATION The UltraRAE is a hand-held, programmable Compound Specific PID monitor designed to provide instantaneous exposure monitoring of a specific organic gas for workers in hazardous environments. It monitors a specific gas by utilizing a gas separation tube and the Photo-Ionization Detector (PID) with a 9.8 eV, 10.6 eV, or 11.7 eV gas discharge lamp. - Page 11 GENERAL INFORMATION Features are: Lightweight and Compact • - 20 oz (567 g), Cellular phone size Dependable and Accurate • - 10 hours monitoring with micro controller User Friendly • - menu driven, intuitive end-use operation Programmable Alarm Thresholds • - audio buzzer &...
-
Page 12: General Specifications
GENERAL INFORMATION 1.1 General Specifications Table 1.1 Compound Specific PID monitor Specification Size: 9.25"L x 3.0"W x 2.0"H Weight: 21 oz (567 g) with battery pack Detector: photo-ionization sensor with 9.8 eV UV lamp, optional 10.6 or 11.7 eV UV lamps Battery: rechargeable NiMH, NiCd, or Alkaline battery pack (snap in, field replaceable) - Page 13 GENERAL INFORMATION Intrinsic Safety: UL & cUL Class 1, Division I, Groups A, B, C, D (US & Canada) 0575 II 1G DEMKO 03 ATEX 0204759X Eex ia IIC T4 (Europe) no effect when exposed to 0.43 mW/cm 2 EM Interference: RFI (5 watt transmitter at 12 inches) Alarm Setting: preset alarm limits for two action levels...
-
Page 14: Operation Of Ultrarae
OPERATION 2. OPERATION OF ULTRARAE The UltraRAE PID Monitor gives the real time measurements and activates alarm signals whenever the exposure exceeds preset limits. Prior to factory shipment the UltraRAE is preset with default alarm limits and the sensors are pre-calibrated with standard calibration gas. -
Page 15: Physical Description
• Charge contact for plugging directly to the charging station • Gas entry and exit ports with 5-in. Teflon inlet probe • RAE-SEP tube holder and electronic tube type reader • Serial communication port for PC interface 2 - 2... -
Page 16: Keys And Display
OPERATION 2.2 Keys and Display Figure 2-2 shows the LCD display and the keypad on the front panel of the monitor. The function of the 3 keys during normal operation are summarized below: Alarm LED’s Light sensor Charge LED 0.0 ppm Figure 2-2. -
Page 17: Power On/Off
OPERATION 2.3 Power On/Off To turn on the UltraRAE Compound Specific PID monitor, press [MODE] key for one second and release. The audio buzzer will beep once and the display will show “ON!..” and then “Ver #.##” to indicate the unit’s current firmware version number. -
Page 18: Operation
OPERATION 2.4 Operation After the monitor is turned on and cycles through the start up menu, the message “Ready..” will be displayed even if no tube is presently inserted. At this point, the user has two options: 1) step through the idle operation menu, or 2) take a measurement. - Page 19 OPERATION To choose a specific display, press the [MODE] key one or more times until the desired display appears. Note: To get back to “Ready” mode from any of the above display, press the [MODE] key repeatedly until the “Ready” message appears. Ready…...
- Page 20 OPERATION CHANGE CURRENT TUBE TYPE [Only in the default condition where the barcode reader is turned “Off”]: The present tube type is displayed e.g., “Benzene?” and can be altered by pressing [N/-] until the desired tube type is displayed. Press [Y/+] to accept the displayed tube. With the barcode reader “Off,”...
- Page 21 OPERATION PC COMMUNICATION: Allows user to up load data from the UltraRAE to a Personal Computer (PC) or send/receive configuration information between a PC and the UltraRAE. Connect the monitor to the serial port of a PC, and start the UltraRAE application software.
-
Page 22: Measurement Overview
Unit is ready to start a sample. Tube Preparation Break both ends of a new RAE-Sep tube using the tip cutter on the tube reader of the UltraRAE, Figure 2-4. Use a new tube for each measurement. The tube contents may be hygroscope and should be used within a short time of opening. - Page 23 ***CAUTION: Wear hand and eye protection when breaking tube tips. Use caution in handling tubes with broken ends. Keep away from children. RAE-Sep tubes should be disposed of according to local regulations. See footnotes of data sheets for disposal information.***...
- Page 24 OPERATION circumvented by pressing [Y/+] and selecting the appropriate tube at the subsequent prompts using the [N/-] and [Y/+] keys. Start Measurement Press the [Y/+] key to start the measurement cycle. The pump will start and the remaining wait time will be displayed. If a VOC tube is inserted, the real-time ppm measurement will be display.
-
Page 25: Alarm Signals
OPERATION 2.5 Alarm Signals At the end of each measurement period, the gas concentration is compared with the programmed alarm limits (two gas concentration alarm limit settings: Low & High). A separate set of limits can be programmed for each tube. If the concentration exceeds either of the preset limits, the loud buzzer and red flashing LED are activated immediately to warn user of... - Page 26 OPERATION Alarm Signal Summary: Condition Alarm Signal Gas exceeds “High 3 beeps/flashes per second plus sensor Alarm” limit name on LCD Gas exceeds “Low 2 beeps/flashes per second plus sensor Alarm” limit name on LCD Pump failure 3 beeps/flash per second plus “Pump” message on LCD PID lamp failure 3 beeps/flash per second plus...
-
Page 27: Preset Alarm Limits And Calibration
OPERATION 2.6 Preset Alarm Limits and Calibration The UltraRAE Compound Specific PID monitor is factory calibrated with standard calibration gas, and is programmed with default alarm limits as listed below. Refer to Section 4 for programming procedures if new calibration or alarm limits are required. -
Page 28: Integrated Sampling Pump
OPERATION 2.7 Integrated Sampling Pump The UltraRAE Compound Specific PID monitor includes an integrated sampling pump. This is a diaphragm type pump that provides 400-500 cc per minute flow rate (with no tube in place). Connecting a 1/4 inch Tygon tubing with 1/8 inch inside diameter to the gas inlet port of the UltraRAE, this pump can pull in air sample from 200 feet away horizontally, or 90 feet vertically, at 3 feet per second flow speed. -
Page 29: Backlight
OPERATION 2.8 Backlight The LCD display is equipped with an LED backlight to assist in reading the display under poor lighting conditions. In manual mode, the backlight can be turned on by pressing and holding the [N/-] key for one second in normal operation. The backlight can be turned off by pressing [N/-] a second time. -
Page 30: Datalogging
OPERATION 2.9 Datalogging The UltraRAE Compound Specific PID monitor stores the time stamp, sample number, tube name and measured gas concentration at the end of every sample period (when data logging is enabled). In addition, the following information is stored: user ID, site ID, serial number, last calibration date, and alarm limits. -
Page 31: Operation Of Accessories
OPERATION OF ACCESSORIES 3. OPERATION OF ACCESSORIES The accessories for the UltraRAE include: Battery charger • Alkaline battery adapter • Dilution fitting • Calibration adapter • 3.1 Battery Charging Operation The charging circuit of the UltraRAE is built into the monitor. It only needs a regular AC to 12 V DC adapter (wall mount transformer) to charge the monitor. - Page 32 OPERATION OF ACCESSORIES the red LED will turn on for two or three seconds, every minute, to maintain the full charge. A completely discharged UltraRAE monitor will be charged to full capacity within 10 hours. Charging Figure 3-1 Charging the Battery The battery will be drained slowly even if the monitor is turned off.
-
Page 33: Alkaline Battery Adapter
The internal charging circuit is designed to prevent damage to alkaline batteries and the charging circuit when alkaline batteries are installed inside the monitor. Note: The AA Alkaline battery adapter supplied by RAE Systems Inc. is intrinsically safe! 3 - 3... -
Page 34: Dilution Fitting
Dilution Fitting The user may wish to install a dilution fitting in front of the RAE-SEP tube to dilute the gas samples. One application for a dilution fitting is to measure organic gas when the concentration exceeds the upper limit of the sensor range. -
Page 35: Programming Of Ultrarae
PROGRAMMING 4. PROGRAMMING OF ULTRARAE The UltraRAE Monitor is built with a microcomputer to provide programming flexibility for the user. Authorized users can re-calibrate the monitor, change the alarm limits, change site ID, user ID, lamp type, real time clock, etc. Programming is menu-driven to provide intuitive end-user operation. -
Page 36: Programming Mode
PROGRAMMING 4.1 Programming Mode The programming mode allows users to change the setup in the monitor, calibrate the monitor, modify the sensor configuration enter user information, etc. programming functions are organized in a three tier menu structure. Each menu item includes several sub-menus to perform additional programming functions. -
Page 37: Keys For Programming Mode
PROGRAMMING 4.2 Keys for Programming Mode The three keys perform a different set of functions during the programming mode as summarized below. Function in Programming Mode [MODE] Exit menu when press momentarily or exit data entry mode when pressed and held for 1 second [Y/+] Increase numerical value for data entry or... -
Page 38: Entering Into Programming Mode
PROGRAMMING 4.3 Entering into Programming Mode 1. Turn on the UltraRAE monitor, wait for the “Ready..” message to be displayed. 2. Press and hold down both [MODE] and [N/-] keys for three seconds to enter programming mode. Note: This is to prevent user from entering programming mode by accident. -
Page 39: Calibration Of The Ultrarae Monitor
PROGRAMMING 4.4 Calibration of the UltraRAE Monitor CALIBRATION WARNINGS: The Calibration of all newly purchased RAE Systems instruments should be tested by exposing the sensor(s) to known concentration calibration gas before the instrument put into service for the first time. - Page 40 It is necessary to calibrate for each type of RAE-Sep tube directly with the gas to be measured and with the corresponding RAE-Sep tube in place. It is NOT possible to calibrate with a surrogate gas (such as isobutylene) and then apply a correction factor.
-
Page 41: Fresh Air Calibration
Tedlar bag with “fresh” air from the bottle before starting. 1. The first sub-menu shows: “Fresh air calib?” 2. Insert a new, unused, RAE-SEP tube into the monitor and secure the cap. If a “fresh” air bottle is available, fill the Tedlar bag with the “fresh”... -
Page 42: Span Calibration
1. Advance to the next calibration phase (Span calib), the display should show “Span calib? 2. Insert a new RAE-SEP tube into the monitor. (Note: For VOC calibration, there is no need to use a new VOC tube). First fill the Tedlar bag (Do not overfill with span gas). -
Page 43: Modify Span Value
PROGRAMMING 4.4.3 Modify Span Value This function allows the user to change the span value of the standard calibration gas. 0005.0 Figure 4-2 Modify Span Value The cursor blinks at the first digit of the span value. Use the [Y/+] or [N/-] key to modify the digit at the cursor position. Press the [MODE] key momentarily to advance the cursor to the next digit. -
Page 44: Change Alarm Limits
PROGRAMMING 4.5 Change Alarm Limits In this menu, the user can change the high and low alarm limits for each RAE-SEP tube. Alarm Limit Sub-Menu High limit? Low limit? 4.5.1 Change High Alarm Limit 1. The first sub-menu item allows the user to change the High Alarm limit. - Page 45 PROGRAMMING flashing digit will move on to the next digit to its right. Press and hold the [MODE] key for 1 second to exit data entry mode. If there is any change to the existing value, the display shows “Save?” Press the [Y/+] key to accept the new value and move to the next sub-menu.
-
Page 46: Change Low Alarm Limit
PROGRAMMING 4.5.2 Change Low Alarm Limit 1. The second sub-menu item allows the user to change the Low Alarm limit. Press [Y/+] key. The monitor will identify the inserted tube and display the tube name. If the tube cannot be identified, the tube can be manually selected by responding with [N/-] until the correct tube name is displayed. -
Page 47: View Or Change Datalog
PROGRAMMING 4.6 View or Change Datalog The UltraRAE monitor calculates and stores the concentration and ID of each sample taken. The user can review this stored data, clear the datalog memory, and enable or disable the data logging function. Datalog Sub-Menu View data? Clear data? Change data log? - Page 48 PROGRAMMING 1. At the “View data?” menu display, press the [Y/+] key. The LCD display will next show the first event number and start date and time of the event. Press the [N/-] key to view the next event. # 1? Figure 4-4 Viewing Data 2.
-
Page 49: Clear All Data
PROGRAMMING 4.6.2 Clear All Data This function will erase all data stored in the non-volatile data memory. 1. “Clear All Data?” is the first sub-menu. Press the [Y/+] key to clear the data memory. Display shows: “Are you sure?” 3. Pressing the [Y/+] key again confirms erasure of all the data memory. -
Page 50: Change Data Log
PROGRAMMING 4.6.3 Change Data Log This function allows the user to enable or disable the data logging. At the beginning of each measurement sample, the current status of this feature is displayed (Log On/Log Off). 1. “Change data log?” is the first sub-menu. 2. -
Page 51: Change Monitor Setup
PROGRAMMING 4.7 Change Monitor Setup Several monitor unit specific variables can be changed. The following is a list of configuration data that can be modified by the user. Monitor Setup Sub-Menu Change Site ID? Change User ID? Change User Mode? Change Date? Change Time? Change backlight? -
Page 52: Change Site Id
PROGRAMMING 4.7.1 Change Site ID The user can enter an 8 digit alphanumeric Site ID in the programming mode. This Site ID will be included in the data log report. 1. “Change Site ID?” is the first sub-menu item. 2. Press the [Y/+] key and the display shows the current site ID: “Site ID = xxxxxxxx”... -
Page 53: Change User Id
PROGRAMMING 4.7.2 Change User ID The user can enter an eight digit alphanumeric user ID in the programming mode. This user ID will be included in the datalog report. 1. “Change User ID?” is the second sub-menu item in Table 4.5. -
Page 54: Change User Mode
PROGRAMMING 4.7.3 Change User Mode There are two different user modes: display and program that can be selected from the programming menu. 1. “Change User Mode?” is displayed. 2. Press the [Y/+] key, the display shows the current user mode selection: “User Mode = Program?” 3. -
Page 55: Change Date
PROGRAMMING 4.7.4 Change Date The UltraRAE monitor is equipped with a real time clock (RTC) into which the user can enter the correct date and time. 1. “Change Date?” 2. Press [Y/+] key, the display shows both the current date and time: “Date = mm / dd”... -
Page 56: Change Time
PROGRAMMING 4.7.5 Change Time 1. “Change Time?” 2. Press [Y/+] key, the display shows both the current date and time: “Time = hh : mm” with the left most digit of the time flashing. 3. To modify this value, use the [Y/+] or [N/-] key to change the digit value and press the [MODE] key momentarily to advance to the next digit. -
Page 57: Change Backlight
PROGRAMMING 4.7.6 Change Backlight The UltraRAE monitor allows the user to turn the LCD back light on and off. This can be done automatically when ambient light falls below or above a certain level, or manually by pressing the [N/-] key. 1. -
Page 58: Change Dac/Alarm Output
PROGRAMMING 4.7.7 Change DAC / Alarm Output The UltraRAE monitor allows the user to specify if the communication / alarm connector is used for DAC output or alarm output (see Figure 8-1 for connections). The default setting is DAC signal output. DAC output is normally used to connect to a chart recorder for plotting a gas concentration represented by 0-2.5 volts DC. -
Page 59: Change Dac Range
PROGRAMMING 4.7.8 Change DAC Range The DAC output function allows the user to set the gas concentration span to be represented by the maximum 2.5V DC output. This prevents the signal from going off scale during measurements. 1. “Change DAC range?” 2. -
Page 60: Change Bar Code Reader
PROGRAMMING 4.7.9 Change Bar Code Reader The UltraRAE monitor allows the user to turn the tube bar code reader on and off. The default condition is off. 1. “Change Bar Code Reader?” 2. Press the [Y/+] key, the display shows the reader status: Bar Code Reader = Off?”... - Page 61 PROGRAMMING In the “On” mode, the barcode reader can be circumvented by pressing “Start?…” [Y/+] with no tube in place, and then selecting the tube manually after the prompt. 4 - 27...
-
Page 62: Change Sensor Configuration
PROGRAMMING 4.8 Change Sensor Configuration Configurations that can be changed in this menu include measurement wait time, PID lamp type, and dilution ratio. Sensor Configuration Sub-Menu Change measure wait time? Change lamp? Change dilution ratio? 4.8.1 Change Measure Wait Time The “measure wait time”... -
Page 63: Change Pid Lamp
PROGRAMMING 4.8.2 Change PID Lamp There are three different energy UV lamps available for the PID sensor: 9.8 eV, 10.6 eV and 11.7 eV . The user must select the correct lamp from the programming menu. 1. “Change lamp?” is the second sub-menu item. 2. -
Page 64: Change Dilution Ratio
PROGRAMMING 4.8.3 Change Dilution Ratio The user can insert an optional dilution fitting on the UltraRAE gas inlet port to dilute the gas sample. In this case the user must enter a dilution ratio (from 1 to 20) from the programming menu so that the reading can be compensated to show the actual concentration of the gas sample with the dilution fitting. -
Page 65: Exit Programming Mode
PROGRAMMING 4.9 Exit Programming Mode 1. To exit programming mode from the first tier menu level, press the [MODE] key once. The “Ready” message will be displayed. 2. To exit programming mode from 2nd tier sub-menu, press the [MODE] key twice. The “Ready” message will be displayed. -
Page 67: Ultrarae Computer Interface
COMPUTER INTERFACE 5. UltraRAE COMPUTER INTERFACE Each UltraRAE is shipped with an integral software package, called the ProRAE Suite , and a serial computer interface cable. This software package runs on any IBM compatible Personal Computer (PC) under Windows 3.1 or Windows 95, 98 or NT and later environments. -
Page 68: Install Prorae-Suite Software
ProRAE-Suite software package will be installed under the default directory : C:\Program Files\RAE Systems Inc\ProRAE-Suite . After the software is installed successfully, a new menu item ProRAE-Suite is added to the Programs menu. To start the... - Page 69 COMPUTER INTERFACE ProRAE-Suite and Readme , as shown in Figure 5-2. Click the ProRAE-Suite submenu item to start the ProRAE-Suite software. Figure 5-2 Start Menu 5 - 3...
-
Page 70: Connecting The Ultrarae To A Pc
COMPUTER INTERFACE 5.2 Connecting the UltraRAE to a PC The UltraRAE monitor includes a serial interface cable. Connect the DB-9 connector side of the cable to the serial port of the PC, and connect another side of the cable to the MultiRAE PLUS monitor. -
Page 71: Start Prorae-Suite Software
COMPUTER INTERFACE 5.3 Start ProRAE-Suite Software To start the ProRAE-Suite software, click the Start button on the taskbar to display the Start menu, click Programs -> ProRAE-Suite -> ProRAE-Suite submenu item to start the ProRAE-Suite software. Figure 5-3 shows the main window of the ProRAE-Suite software. - Page 72 COMPUTER INTERFACE logged data in different format, exporting the logged data to a tab delimited text file so that it can be read by the Microsoft Excel software, etc.. 3) The Upgrade category allows the UltraRAE firmware to be upgraded to the latest version. There is a tool bar beneath the menu bar.
-
Page 73: Setup Communication Port
COMPUTER INTERFACE 5.4 Setup Communication Port It is necessary to setup the communication port on the ProRAE- Suite software so that the UltraRAE monitor can communicate with the PC correctly. Figure 5-4 shows the Setup Port dialog box. Choose the appropriate port according to the PC’s serial port setup. -
Page 74: Configure Ultrarae From Pc
COMPUTER INTERFACE Configure UltraRAE from PC Open a configuration file from an UltraRAE by choosing Receive Configuration in the Communication menu. Figure 5-5 Load Configuration from an UltraRAE A user can also open a default configuration file shipped with the ProRAE Suite software. The configuration file is a document with extension “.cfg”. - Page 75 COMPUTER INTERFACE Figure 5-6 Opening a Configuration File If modification to the default monitor configuration from the generic .CFG file is not necessary, skip the following steps, and go to Section 5.5 directly. Figure 5-7 Edit Configuration 5 - 9...
- Page 76 COMPUTER INTERFACE Site/User ID: This section sets the identification that is used throughout the datalog information. The Site ID is an eight digit alphanumeric field. The User ID is an eight digit alphanumeric field. Security Level: There are three levels of security to provide protection against unauthorized changes to monitor settings.
- Page 77 COMPUTER INTERFACE Comfort Beep: This option allows the user to specify a time interval that the buzzer will beep once to remind the user that the monitor is on. If zero is entered for the time interval, then the security beep feature is disabled.
-
Page 78: Send Configuration To Ultrarae
COMPUTER INTERFACE 5.6 Send Configuration to UltraRAE After the configuration has been loaded to the ProRAE Suite, click on the “conf” icon, the configuration is ready for modification. To send a modified configuration to the UltraRAE, select the Send Configuration… function from the Communication menu or click the Send icon (right arrow with “Send”... -
Page 79: Ultrarae Data
COMPUTER INTERFACE 5.7 UltraRAE Data To read the logged data from the UltraRAE, select the Receive data… from the Communication menu or click the Receive icon. User can select Save As… from the File menu to save the data as a file. Type in a desired file name with “..dat” as the data file name extension. -
Page 80: Password Of Ultrarae Configuration
COMPUTER INTERFACE 5.8 Password of UltraRAE Configuration Each UltraRAE configuration is protected by a 4-digit password. The user needs to enter the correct password before a new configuration file can be sent to the UltraRAE monitor. Default Password The initial default password is “0000”. Create Password First, open the default configuration file by clicking on the “CONF”... -
Page 81: Theory Of Operation
The gas separation tube filters out unwanted gases and allows the target gas to be measured. The RAE-SEP benzene tube uses a combination of adsorption and oxidation to remove most common organic compounds other than benzene. - Page 82 THEORY OF OPERATION The PID sensor for this UltraRAE monitor is constructed as a small cavity in front of the UV lamp. A diaphragm pump is installed inside the monitor enclosure to draw air sample into the sensor through the gas separation tube and then exits through the gas outlet port on the side of the enclosure.
-
Page 83: Maintenance
MAINTENANCE 7. MAINTENANCE The major maintenance items of the UltraRAE are: • Battery pack • Sensor modules • PID lamp • Sampling pump • Tube tip reservoir • Inlet connectors and filter 7.1 Battery Replacement When the display shows a flashing message “Bat”, the battery requires recharging. - Page 84 MAINTENANCE Replacing and Recharging the Battery Pack Battery Cover Battery Pack Battery Compartment Charger Connector Communication Connector Figure 7-1 Battery Replacement 1. Turn off power of the UltraRAE. 2. Unscrew the two battery compartment screws, located on the bottom of the monitor, and remove the cover. 3.
- Page 85 MAINTENANCE 6. Ensure the battery plug is securely connected to the UltraRAE. 7. Close the battery cover and tighten the two screws. Replacing the Alkaline Battery Adapter 1. Insert four fresh AA size alkaline batteries into the alkaline battery adapter. Make sure that the polarity of the batteries is correct.
-
Page 86: Pid Sensor Cleaning / Replacement
MAINTENANCE PID Sensor Cleaning / Replacement During normal operation, a film of dust or gas condensate may build up inside the PID sensor module and the UV lamp. The rate at which this film develops depends on the type and concentration of vapors being sampled. - Page 87 MAINTENANCE If the lamp does not turn on, the monitor will display an error message (Lamp) to indicate replacement of the lamp may be required. Periodic cleaning of the lamp window will remove film deposits and restore lamp sensitivity. Care must be exercised when cleaning the window surface so that it is not damaged.
- Page 88 MAINTENANCE 1. Turn off UltraRAE power. 2. Open the bar code (tube) reader cover by unscrewing the four case screws from the front of the monitor case. 3. Remove the sensor module from the lamp housing by gently pulling on the module. Note the sensor is made of Teflon and stainless steel material.
-
Page 89: Sampling Pump
3/16” (4 mm) glass or metal tubing into the rubber tube connector in the sensor module (see Figure 7-4 ). The flow should be above 350 cc/min. The flow with a RAE-SEP benzene tube in the normal configuration should be greater than 200 cc/min. - Page 90 MAINTENANCE Pump Replacement 1. Turn off UltraRAE power. 2. Open the battery cover, remove the battery pack , carefully unscrew the six screws to open the bottom cover. 3. Unplug the pump from the PCB. Unscrew the two screws that hold the pump assembly to the PCB. Disconnect the Tygon tubing that connects the pump to the gas inlet port and gas outlet port.
-
Page 91: Tube Tip Reservoir
MAINTENANCE 7.4 Tube Tip Reservoir After a RAE-SEP tube end is broken off, the tube tip will be collected in the tube tip reservoir, as shown in Figure 7-5. When the tube tip reservoir is full, it is necessary to empty the reservoir. -
Page 92: Inlet Connector And Filter
MAINTENANCE 7.5 Inlet Connector and Filter When a RAE-SEP tube is inserted into the monitor, both ends of the tube are sealed with rubber fittings to make an airtight connection for the gas inlet. When a RAE-SEP tube is inserted into the Bar Code Reader Cap, the tube end is pushed against the rubber tube connector inside the sensor module, as shown in Figure 7-3. - Page 93 RAE-SEP tube against the sensor module. A piece of rubber tube is glued on to the metal tube adapter and provides airtight seal to the other end of the RAE-SEP tube. After repeated insertion, the rubber tube may also be worn out. Replace the entire metal tube adapter with a new one if necessary to ensure airtight seal for the RAE-SEP tube.
-
Page 95: Troubleshooting
TROUBLESHOOTING 8. TROUBLESHOOTING To aid the user in diagnosing the monitor, the monitor has a special diagnostic mode that can display critical, low level parameters. Section 8.1 describes the operation of the diagnostic mode. Section 8.2 summarizes the frequently encountered problems and suggested solutions. Turning on the UltraRAE monitor in diagnostic mode and using the troubleshooting table in Section 8.2, the user can usually narrow the problem down to one or two areas and correct the problem... - Page 96 TROUBLESHOOTING 8.1 Special Diagnostic Mode To place the monitor into the special diagnostic mode, first turn the monitor off. Next push and hold the [Y/+] key, while still holding the [Y/+] key, also push and hold the [MODE] key for at least two seconds.
- Page 97 TROUBLESHOOTING Key Action Display Raw readings, 1A (+ = 10X) [MODE] Raw readings, 10A (+ = 10X) [MODE] Raw readings, 1B (+ = 10X) [MODE] Raw readings, 10B (+ = 10X) [MODE] Lamp current [MODE] Lamp fail level (+/-) [MODE] Lamp drive (+/-)* [MODE] Battery (Alkaline/NiCd)
- Page 98 TROUBLESHOOTING The following is a brief description of a few diagnostic displays: 1) Raw Sensor Readings The raw sensor readings provide a quick diagnosis on the response and the sensitivity of the sensor. When zero gas (fresh clean air) is applied to the monitor, the raw sensor readings typically should be between 100 and 300.
- Page 99 TROUBLESHOOTING 5. Push the [Y/+] or [N/-] key to increase or decrease the threshold value “yyy” until it is about 10 - 15 counts above the “xxx” value. This will optimally set the lamp failure threshold. Press [MODE] key to exit this display. If the threshold value has changed, a message “Save?”...
- Page 100 TROUBLESHOOTING 5) DAC Output Counts The menu allows the user to adjust the value of the analog output DAC use the [Y/+] and [N/-] keys. The remote alarm output signal on the serial interface cable is deselected and the analog output signal is selected in its place. This signal has a range of 0 to 2.5V in 4096 steps.
- Page 101 [Y/+] key until this number just reaches 64. Then press the [Y/+] key two more times. With a Benzene RAE-SEP tube inserted, this number should be 46 to 52. For the VOC tube, this number should be 59 to 61.
- Page 102 TROUBLESHOOTING 8.2 Troubleshooting Table Table 8-2 Problem Possible Reasons & Solutions Cannot turn Reasons: Discharged battery. Defective on power after battery Microcomputer hang- charging the battery Solutions: Charge or replace battery. Disconnect, then connect battery to reset computer No LED or Reasons: Trigger level too low, in LCD back...
- Page 103 TROUBLESHOOTING Problem Possible Reasons & Solutions Reasons: Reading Dirty sensor module abnormally Dirty water trap filter high Excessive moisture and water condensation Solutions: Clean & dry sensor module Replace water trap filter Re-calibrate “Lamp” Reasons: Weak or defective PID lamp, message defective lamp drive circuit during...
- Page 104 TROUBLESHOOTING Problem Possible Reasons & Solutions Reasons: Read a small There is actually a small background background gas level Sensor value zero drift Solutions: Do fresh air calibration (see Section 4.4.1) Reading Reasons: Incorrect calibration gas jumping value. around Low sensitivity to cal gas randomly Solutions: Calibrate the monitor.
- Page 105 TROUBLESHOOTING Problem Possible Reasons & Solutions Reasons: “Bat” message Discharged battery in operation Solutions: Recharge battery Full scale Reasons: Dirty or wet sensor measurement in humid Solutions: Clean and dry sensor environment Replace water trap filter Reasons: PID lamp is strong measurement saturates at Solutions: Place a UV block Teflon disk...
- Page 107 APPENDIX A QUICK REFERENCE GUIDE PROGRAMMING MODE Calibrate monitor? Fresh air calib? Span calib? Modify span value? Change alarm limits? High limit? Low limit? View or change datalog? View data? Clear data? Change data log? Change monitor setup? Change Site ID? Change User ID? Change User Mode? Change Date?
- Page 108 APPENDIX B TUBE DATA SHEETS Benzene C Part No.: 012-3022-005 Standard Lamp Typical Range (ppmv) 9.8 eV 0.1 – 1000 Temperature Range: 2 - 40°C (36 - 104°F) Temp (°C) 2-10 10-15 15-30 30-40 Temp (°F) 36-50 50-60 60-86 86-104 Measure Time (sec) Calibration should be performed at the same temperature as the measurement.
- Page 109 APPENDIX B Butadiene (Polymer) C Part No.: 012-3024-005 Standard Lamp Typical Range (ppmv) 9.8 eV 0.1 - 200 Temperature Range: 5 - 40°C (41 - 104°F) Temp (°C) 5-18 18-30 30-40 Temp (°F) 41-64 64-86 86-104 Measure Time (sec) Sample Vol. (mL) 1500 Calibration should be performed at the same temperature as the measurement.
- Page 110 APPENDIX B Halocarbon (CH Part No.: 012-3023-005 Standard Lamp Typical Range (ppmv) 11.7 eV 0.1 - 200 Temperature Range: 2-40°C (41-104°F) Meas. Vol. Temp (°C) 2-10 10-15 15-30 30-40 Substance Time (sec) (mL) Temp (°F) 36-50 50-60 60-86 86-104 Methyl Chloride Time (sec) Methylene Chloride (MC) 0.67x...
- Page 111 TN-116 ToxiRAE Oxygen Monitor (PGM-36) at a Glance TN-117 ToxiRAE Combustible Gas Monitor (PGM-37) at a Glance TN-118 Use of RAE PIDs for Soil Headspace Measurements TN-119 Calculation of STEL, TWA, Min., Max., and Average Values for ToxiRAE PID. TN-120 Measuring Correction Factors for Volatile Compounds...
- Page 112 TN-135 UltraRAE Firmware & Tube Data Upgrade Procedures TN-136 UltraRAE Operations Tips TN-137 Exiting Diagnostic Mode for ToxiRAE LEL TN-138 RAE System Year 2000 Compliance TN-139 UltraRAE Communication with NT TN-140 Extension Tubing Volume and Delay Time TN-141 MultiRAE Remote Control Functions...
- Page 113 AP-207 PIDs as an Arson Investigation Tool AP-208 HAZMAT User List AP-209 UltraRAE User List AP-210 North American RAE User List AP-211 PIDs for Continuous Monitoring of VOCs AP-212 PIDs for Indoor Air Quality AP-213 ModuRAE PID Configuration and Applications...
- Page 114 Please send me the following information: Name: Company: Mailing Address: City, State, Zip: Country: Telephone: Fax: Technical Notes: (just list TN #) Application Notes: (just list AP #) Comments: Thank you, RAE Systems Sales & Marketing Department E - 1...
- Page 115 Only send accessories with the instrument when they are also in need of repair. This will help us get your equipment back to you in an efficient manner. Thank you, RAE Systems Service Department F - 1...
- Page 116 RAE Systems Inc. 1339 Moffett Park Drive Sunnyvale, California 94089 Main Contact Numbers TEL: 408.752.0723 FAX: 408.752.0724 Toll Free Numbers Instrument Sales: 877.RAE.CUSTomer (723.2878) Technical Service: 888.RAE.4800 (723.4800) Tube Sales: 888.RAE.TUBE (723.8823) E-mail: Instrument Sales: raesales@raesystems.com Technical Service: tech@raesystems.com World Wide Web site:...
Need help?
Do you have a question about the UltraRAE PGM-7200 and is the answer not in the manual?
Questions and answers