Table of Contents
Advertisement
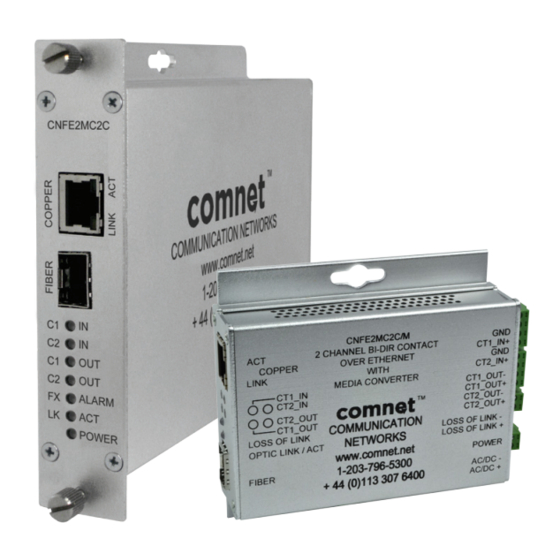
INSTALLATION AND OPERATION MANUAL
CNFE2MC2C[/M]
10/100MBPS ETHERNET ELECTRICAL TO OPTICAL
MEDIA CONVERTER WITH CONTACT CLOSURE RELAY
v1.0 Jan 2012
The ComNet™ CNFE2MC2C[/M] Ethernet 10/100Mbps Ethernet media converter is
designed to transmit and receive 10/100 Mbps data and bi-directional contact relay
over multimode or single mode optical fiber using sold-separately Small Form-Factor
Pluggable (SFP) modules to select distance and connector type. The electrical interface
will Auto-Negotiate to a 10 Mbps, or 100 Mbps Ethernet rate without any adjustments.
The optical interface operates at a 100 Mbps Ethernet rate. It can be one-to-one
mapped over Ethernet or controlled via a PC. Included is a driver that allows the
CNFE2MC2C[/M] to read or write contact information from a PC-based application.
A software utility allows customers to search for this device when installed on the
network. The CNFE2MC2C[/M] supports Windows® Discovery.
Open source com0com TCP/IP protocol is supported for any customer PC applications
to communicate with the units over the Ethernet. The software utility allows customers
to create virtual com ports for each module installed on the same subnet.
These media converters are environmentally hardened to operate in extreme
temperatures. LED indicators are provided to determine equipment operating status.
The CNFE2MC2C[/M] has a normally-open Fiber optic link alarm relay output.
The CNFE2MC2C[/M] small package size allows the unit to be installed in those
locations where space is at a premium, either wall or rack-mounted, or may be DIN-rail
mounted by the addition of ComNet model DINBKT1 adaptor plate.
Advertisement
Table of Contents

Related Manuals for Comnet CNFE2MC2C/M


Summary of Contents for Comnet CNFE2MC2C/M
- Page 1 The CNFE2MC2C[/M] has a normally-open Fiber optic link alarm relay output. The CNFE2MC2C[/M] small package size allows the unit to be installed in those locations where space is at a premium, either wall or rack-mounted, or may be DIN-rail mounted by the addition of ComNet model DINBKT1 adaptor plate.
-
Page 2: Table Of Contents
Using Module as Remote Contact over Ethernet Install ComNet Software Utilities Install the com2com Install the com2tcp Install ComNet Module Configuration software Using the Module through a Virtual COM port (VCP) Manual VCP Configuration Verify VCP Operation Using TeraTerm Telnet Connection... -
Page 3: Hardware Description
CNFE2MC2C[/M] Hardware description The ComNet™ CNFE2MC2C[/M] contact over Ethernet module supports up to 2 bi-directional contact closures over Cat5/6 cable, or 1 or 2 optical fibers. All configurations are done through its web server. The CNFE2MC2C[/M] has two contact inputs and two contact outputs, which communicate through the network. - Page 4 INSTALLATION AND OPERATION MANUAL CNFE2MC2C[/M] The contact connector pin-out is as below: CNFE2MC2C[/M] Module Input/Output Mapping INS_CNFE2MC2C[/M]_REV– Tech Support: 1.888.678.9427 01/18/12 PAGE 4...
-
Page 5: Assign Ip Address To A Module
INSTALLATION AND OPERATION MANUAL CNFE2MC2C[/M] Assign IP Address to a Module A unique IP address has to be assigned to each contact over Ethernet application. You can connect one at a time to change the default IP address. The default IP address of the CNFE2MC2C[/M] is: 192.168.10.1. - Page 6 INSTALLATION AND OPERATION MANUAL CNFE2MC2C[/M] » Next, manually set your PC IP address to 192.168.10.100 and your subnet mask to 255.255.255.0, as shown below. Figure 3 – Internet Protocol (TCP/IP) Properties Dialog Box » Click OK to finish the setting. »...
- Page 7 INSTALLATION AND OPERATION MANUAL CNFE2MC2C[/M] Figure 4 – CNFE2MC2C[/M] Log in Page INS_CNFE2MC2C[/M]_REV– Tech Support: 1.888.678.9427 01/18/12 PAGE 7...
- Page 8 INSTALLATION AND OPERATION MANUAL CNFE2MC2C[/M] Figure 5 – CNFE2MC2C[/M] Home Page » Click on the Configuration link on the left of the screen. Change the IP address to an IP address with subnet appropriate for your network. In the following examples an IP address in subnet 192.168.10.xxx will be used.
- Page 9 INSTALLATION AND OPERATION MANUAL CNFE2MC2C[/M] Figure 6 – CNFE2MC2C[/M] Configuration Page » Log in to the module again using the new IP address 192.168.10.2. If an IP address in a different subnet was used, be sure to change the PC’s network address to an IP address in the appropriate subnet.
- Page 10 INSTALLATION AND OPERATION MANUAL CNFE2MC2C[/M] » Change Contact input/output settings as shown in Table 1. Contact Input Contact Output Local Network Port Number Remote Network Port Number Network Mode Server Client Network Protocol TCP/IP TCP/IP Server IP 192.168.10.1 TCP/IP Timeout Table 1 –...
- Page 11 INSTALLATION AND OPERATION MANUAL CNFE2MC2C[/M] Figure 8 – CNFE2MC2C[/M] Settings Page in Server Mode Figure 9 – CNFE2MC2C[/M] Settings Page after Changes INS_CNFE2MC2C[/M]_REV– Tech Support: 1.888.678.9427 01/18/12 PAGE 11...
-
Page 12: Using Module As Remote Contact Over Ethernet
INSTALLATION AND OPERATION MANUAL CNFE2MC2C[/M] Using Module as Remote Contact over Ethernet Figure 10 – Remote contact input To use the CNFE2MC2C[/M] as a remote contact input or contact output from a PC, some software utilities need to be installed. Refer to following instructions to install all the utilities. INS_CNFE2MC2C[/M]_REV–... -
Page 13: Install Comnet Software Utilities
COM ports each time Windows starts. » Insert the ComNet Contact over Ethernet module Documentation and Software CD into the CD-ROM drive of your computer. Use Windows Explorer or other browser to open directory com0com-2.2.1.0\. - Page 14 INSTALLATION AND OPERATION MANUAL CNFE2MC2C[/M] Figure 12 – com0com Setup Wizard, License Agreement » Click I Agree. Figure 13 – com0com Setup Wizard, Component Selection » Leave the Component setup at the default settings. Click Next. INS_CNFE2MC2C[/M]_REV– Tech Support: 1.888.678.9427 01/18/12 PAGE 14...
- Page 15 INSTALLATION AND OPERATION MANUAL CNFE2MC2C[/M] Figure 14 – com0com Setup Wizard, Install Location » Choose the Install Location. Click Install. Figure 15 – com0com Setup Wizard, Installation Progress » Installation will complete. When installation is done, click Next. INS_CNFE2MC2C[/M]_REV– Tech Support: 1.888.678.9427 01/18/12 PAGE 15...
- Page 16 Com ports CNCA0 and CNCB0. These ports will be visible to Windows serial applications such as HyperTerminal or TeraTerm, which will be installed later. The port names can be change by running the ComNet Contact over Ethernet module Configuration application, which will be installed next.
-
Page 17: Install The Com2Tcp
» Install the freeware TeraTerm » Go to directory \TeraTerm on the ComNet Contact over Ethernet module Documentation and Software CD. Double click on the application file setup.exe. » Follow the instruction to finish the installation. By default, the application will be installed in the directory C:\Program Files\TTERMRO\. -
Page 18: Install Comnet Module Configuration Software
CNFE2MC2C[/M] Install ComNet Module Configuration software » Create a directory comnet under your C: drive. Simply copy the application cns2econf.exe on the ComNet Contact over Ethernet module Documentation and Software CD to C:\comnet\. You can make an Windows application shortcut of cns2econf.exe, and move it the your desktop. - Page 19 Figure 19 – Main ComNet Contact over Ethernet module Configuration application window This is the Main ComNet contact over Ethernet module configuration application window you will see when you start the application next time. Wait approximately 30 seconds for the “Contact over Ethernet Modules:”...
-
Page 20: Using The Module Through A Virtual Com Port (Vcp)
» The legacy serial application connects to a virtual COM port on the PC. This port is one of a pair created using com0com. From within the ComNet Contact over Ethernet module Configuration application you can create new port pairs and edit the names of existing ports to cater to serial applications that do not understand the default CNCA/CNCB naming convention used by com0com. - Page 21 To create a new connection between a virtual COM port on the PC and remote device: » Select Start ComNet Contact over Ethernet module Configuration application by double click on the icon cns2econf.exe, The “Main ComNet Contact over Ethernet module Configuration application window”...
- Page 22 COMm, where m is the port number. Since com0com ports are named CNCAn and CNCBn by default, this can cause problems. If you encounter this problem, ComNet Contact over Ethernet module Configuration application allows you to change the names of virtual COM ports, as long as neither port in the pair is currently part of a configured connection.
-
Page 23: Manual Vcp Configuration
CNFE2MC2C[/M] Manual VCP Configuration If you do not want to install the ComNet Contact over Ethernet module Configuration application, you can manually configure and start com0com and com2tcp connections. To manually create a virtual port pair, first select Start > All Programs > com0com > setup. Once you create a virtual port pair, com2tcp establishes a link between one of the two ports in the pair and the contact over Ethernet module. - Page 24 INSTALLATION AND OPERATION MANUAL CNFE2MC2C[/M] Com0com now has established a link between CNFE2MC2C[/M] and virtual COM port CNCB0, allowing Windows applications to connect to the CNFE2MC2C[/M] through the virtual COM port CNCA0. When communication occurs, com2tcp provides status information in the command prompt window, as shown in Figure 23 below.
-
Page 25: Verify Vcp Operation
» In the Connect Using pull-down menu, select CNCA0. Then click OK. » Now you can type in the command sets from ComNet in HyperTerminal window. The command will be sent to the CNFE2MC2C[/M] over the Ethernet network. The contacts will open and close according to the commands. -
Page 26: Using Teraterm Telnet Connection
INSTALLATION AND OPERATION MANUAL CNFE2MC2C[/M] Using TeraTerm Telnet Connection As an easier solution, Telnet support of Teraterm can be used to connect a terminal window direct to the contact over Ethernet module. » Start the TeraTerm application. Check TCP/IP box, and type in the contact over Ethernet module IP address 192.168.10.1. -
Page 27: Using Windows Upnp To Discover Your Contact Over Ethernet Modules
INSTALLATION AND OPERATION MANUAL CNFE2MC2C[/M] Using Windows UPnP to Discover Your Contact over Ethernet modules Universal Plug and Play (UPnP) support is provided by default in Windows XP and Windows Vista, but must be enabled. All the contact over Ethernet modules MUST be assigned with different IP address. - Page 28 INSTALLATION AND OPERATION MANUAL CNFE2MC2C[/M] » In the example shown in Figure 25, go to Start > My Network Places. › Media Converter with Contacts (192.168.10.1) and Media Converter with Contacts (192.168.10.2) will appear in the window as shown in Figure 26. Figure 26 –...
- Page 29 8 Turnberry Park Road | Gildersome | Morley | Leeds, UK LS27 7LE T: +44 (0)113 307 6400 | F: +44 (0)113 253 7462 | info-Europe@comnet.net © 2013 Communications Networks Corporation. All Rights Reserved. “ComNet” and the “ComNet Logo” are registered trademarks of Communication Networks, LLC.
Need help?
Do you have a question about the CNFE2MC2C/M and is the answer not in the manual?
Questions and answers