Table of Contents
Advertisement
Advertisement
Table of Contents

Summary of Contents for IK Multimedia iRig Pro I/O
-
Page 1: User Manual
Portable Audio/MIDI interface for iOS, USB USER MANUAL... -
Page 2: Table Of Contents
Register your iRig Pro I/O Installation and setup iOS devices MAC/PC iRig Pro I/O LEDs Status / Audio level LED Status / Audio level LED Setting input gain on iRig Pro I/O Stand adapter Troubleshooting Specifications Warranty Support and more info... -
Page 3: English
• Quick start guide • Registration card iRig Pro I/O is the next generation of the iRig Pro — the first mobile interface for connecting all of your studio gear to your iPhone, iPad, Mac and PC. iRig Pro I/O is a pocket-sized full-featured audio and MIDI interface that gives you 24-bit/96kHz recording studio quality sound everywhere you go with a few additional essential features for mobile recording. -
Page 4: Installation And Setup
English Installation and setup iRig Pro I/O can be powered by internal AA batteries or external PSU (not included). For iOS users: the external PSU (not included) will charge the device’s battery. *Power adapter not included Use only the “iRig PSU 3A”... - Page 5 3. If you have not done so already, download the AmpliTube 4 iOS/MAC/PC, T-RackS Deluxe for MAC/PC and SampleTank SE. AmpliTube 4 iOS/Mac/PC, SampleTank SE and T-RackS Deluxe for Mac/PC FREE DOWNLOAD ikdownloads.com/irigproio 4. If you are using a microphone connect it using an XLR cable to the iRig Pro I/O microphone input. 48V ON 48V OFF...
- Page 6 6. To play MIDI compatible apps from an external controller, use the included MIDI cable to connect your controller’s MIDI OUT port to iRig Pro I/O’s MIDI IN port. Always check the specific MIDI input settings in your app to make sure that the app is ready to receive incoming MIDI data.
- Page 7 7. To control an external MIDI device from an app, use the included MIDI cable to connect the MIDI OUT port of the iRig Pro I/O to the MIDI IN port of the external device. Always check for specific MIDI output settings in your app to make sure they are set to transmit MIDI data.
-
Page 8: Mac/Pc
3. Make sure phantom power is turned off by setting the Phantom Power switch to the OFF position. Check that the phantom power LED is OFF. 48V OFF 4. If you are using a microphone connect it using an XLR cable to one of the iRig Pro I/O microphone input. 5. If you are using an instrument like a guitar or a bass, connect it using a regular 1⁄4” guitar cable to one of the iRig Pro I/O instrument input. -
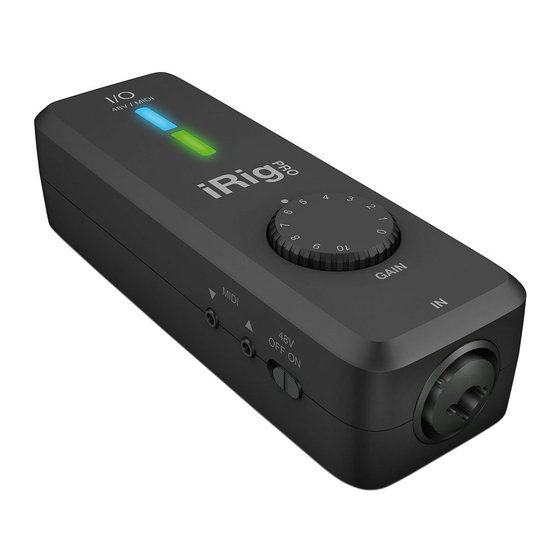
Page 9: Irig Pro I/O Leds
• LED Off: iRig Pro I/O is not connected to any power source. • LED Bright blue: iRig Pro I/O is connected and a signal is present at the input of the channel. • LED Green: The input signal of the corresponding channel is low. -
Page 10: Setting Input Gain On Irig Pro I/O
• If the LED is alternating between BLUE and GREEN, or is always GREEN, you should increase the iRig Pro I/O input gain by rotating the GAIN control clockwise. • If the LED sometimes flashes RED, you should decrease the iRig Pro I/O input gain by rotating the GAIN control counter-clockwise. -
Page 11: Stand Adapter
Sound is distorted. You’re probably overloading the input. Check that the input gain on iRig Pro I/O is set properly. If the Audio Level LED is red when you play your instrument or sing or talk into a mic, decrease the input gain as described in this guide. -
Page 12: Specifications
English Specifications Microphone Input Microphone Input: balanced female 3-pin, XLR. Pin 2: hot / Pin 3: cold / Pin 1: ground Microphone Input Level: from 6 mVpp to 1.4 Vpp Microphone Input Impedance: 1.6 kOhms Gain Range: 40 dB Phantom Power: +48V ± 4V Frequency Response: 20 Hz - 20 kHz +/-1.5dB Input Noise: -103 dB(A), -97 dB RMS Instrument Input... -
Page 13: Warranty
English Warranty Please visit: www.ikmultimedia.com/warranty for the complete warranty policy. Support and more info www.ikmultimedia.com/support www.irigproio.com Apple is not responsible for the operation of this device or its compliance with safety and regulatory standards. - Page 14 Pro I/O is a trademark or registered trademark property of IK Multimedia Production Srl. All other product names and images, trademarks and artists names are the property of their respective owners, which are in no way associated or affiliated with IK Multimedia.
Need help?
Do you have a question about the iRig Pro I/O and is the answer not in the manual?
Questions and answers