Table of Contents
Advertisement
Advertisement
Table of Contents

Subscribe to Our Youtube Channel
Related Manuals for Taski Combimat swingo 3500


Summary of Contents for Taski Combimat swingo 3500
- Page 1 ATTENTION! Before first start-up, it is essential that you read the instructions of use and the safety notes carefully. Keep the instructions of use in a good and easily accessible place so that they can be consulted at any time. combimat swingo 2500/3500 Instructions of use...
-
Page 2: Table Of Contents
Content Safety instructions ..........Transport . -
Page 3: Safety Instructions
Safety instructions Due to their design and construction, TASKI machines comply with health and safety requirements of the EC guidelines and therefore carry the CE sign. This machine may only be used by persons who have been properly trained to do so! - Page 4 Important! Switch the machine off when you: • e.g., carry out cleaning, maintenance or repair work, replace components or change to another function • replace the tools or other accessories • store it in a suitable room to avoid any unauthorised use of the unit •...
-
Page 5: Transport
Disposal When placed out of service, the machine and its accessories must be disposed of according to the national regulations. Your TASKI partner can support you with proper disposal upon notification. Batteries The batteries must be removed from the machine before being disposed of properly. -
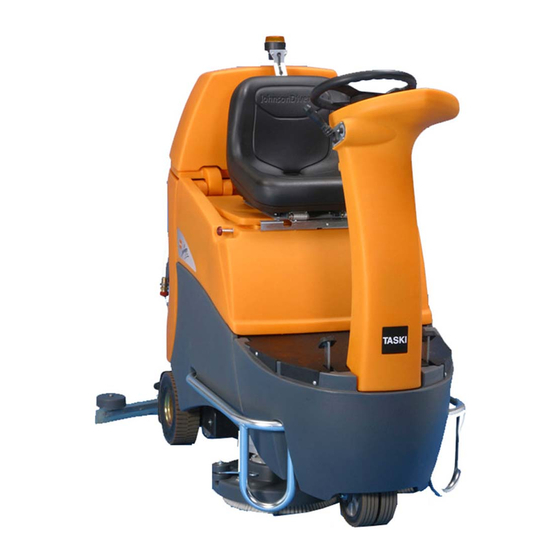
Page 6: Overview
Overview 1 Probe (dirty water tank full) 14 Impact protection 2 Nozzle-/ tube holder 15 Parking brake 3 Option: Recycling filter 16 Drive pedal 4 Soiled solution tube 17 Brake pedal 5 Flexible suction hose 18 Forwards / Backwards lever and horn 6 Tank cover 19 Keyswitch... - Page 7 Display 27 Brush button ( +/- ) 37 Suction aggregate OFF (soiled solution tank full) 28 Cleaning solution button ( +/- ) 38 Tool aggregate ON 29 Display button 39 Fault accelerator pedal 30 Slow drive button 40 Hours in total 31 Vacuum on/off 41 Tool aggregate hour indicator 32 Service indicator...
-
Page 8: Before Putting Into Service
before putting into service Batteries Safety measures when working with batteries: • Never bring an open flame or a glowing objects into the vicinity of the battery, as there is a danger of explosion from the electrolytic gas present in the cells! No smoking! •... -
Page 9: Parking Brake
Parking brake Locking: t By first pressing down the brake pedal (1) and then the parking brake (2). Release the brake pedal,and the machine is locked. Unlocking: t By pressing the brake pedal fully down. The machine is unlocked. Adjust the seat: t Pull out the key and operate the parking brake (see Parking brake‘... - Page 10 t specify driving direction by using the driving direction lever (Forwards/Backwards). t Run the machine to the destination and then release the drive pedal. Fixing tools t Pull out the key and operate the parking brake (see Parking brake‘ Page 9). Check: •...
-
Page 11: Beginning Work
t Fold the driver seat forward and open the tank cover. t Take the dosing cup out of the fresh water tank (diaphragm sack). Caution: Maximum permissible water temperature 60 °C/140 °F. t Fill the fresh water tank with water (diaphragm sack). The markings show you the maximum permitted filling level. - Page 12 t Choose the amount of solution with +/- button for setting the amount (min. level 1/ max. level 7). t Press the brush pressure button. The indicators light up. t Increase the brush pressure by using +/- button (min. level 1/ max. level 4). t specify driving direction by using the driving direction lever (Forwards/Backwards).
- Page 13 Cleaning method Direct method: Scrubbing and Vacuuming in one pass. Indirect working method: Scrubbing and vacuuming in several passes. Cleaning methods are described in detail in the "Method Card". You can obtain "Method Cards" from your TASKI partner or representative.
- Page 14 Refilling the solution tank Caution: Do not clean without solution, as it could cause floor damage. Cleaning solution tank indication empty: t When the cleaning solution indicator lights up it is accompanied by a tone simultaneously. Cleaning solution tank is empty. t Pull out the key and operate the parking brake (see Parking brake‘...
- Page 15 Emptying soiled recovery tank Recovery tank full indicator: t When the soiled solution tank indicator lights up, the suction nozzle will rise and the suction aggragate turns off. t Empty the recovery tank (Page 16).
-
Page 16: End Of Operation
End of operation After cleaning t Stop the flow of solution. t Drive a further few metres to avoid subsequent ,,dripping’’. Very important when using contact pads! t Press the brush pressure button. The tools will be stopped. t Drive on a few metres further in order to pick up the remaining waste water. t Only now switch off the vacuum unit. - Page 17 t Lift the fresh water tank (diaphragm sack). t Lay the fresh water tank (diaphragm sack) in the recovery tank. Cleaning solution leakage. t Remove the empty fresh water tank (diaphragm sack) from the recovery tank. Soiled solution pump (Option) t Pull out the key and operate the parking brake (see Parking brake‘...
- Page 18 Caution: Clogged filters reduce the flow of the cleaning solution. As a consequence you may damage the floor coating. t Place the recycling filter in the fresh water tank (diaphragm sack). Remove and clean the squeegee t Pull out the key and operate the parking brake (see Parking brake‘ Page 9). t Lift the tool lightly.
- Page 19 Cleaning the machine t Pull out the key and operate the parking brake (see Parking brake‘ Page 9). Caution: Never clean the machine with a high water pressure or a water hose. The ingress of water into the machine might cause considerable damage to mechanical or electrical parts.
-
Page 20: Service, Maintenance And Care
Clean squeegee, check whether the blades are worn and replace if necessary Wipe down the machine with a moist cloth Clean level probe (full recovery tank) and test functionality Clean seal of tank hood, check for cracks and replace if necessary Maintenance programs by TASKI service made by TASKI technician... - Page 21 Maintenance of batteries (wet batteries) Caution: Observe the operating instructions of the battery manufacturer! Daily, after charging: t Measure the acidity in 3 or 4 cells. It should be approx. 30° Bé. The batteries are discharged when the acidity is reduced to approx. 18° Bé. t Please enlist the measurements into the booklet.
- Page 22 You can find this information on the name plate of your machine, and the address of your nearest TASKI partner can be found on the last page of these operating instructions.
- Page 23 Blades replacement Blade on the inside radius t Place the clean squeegee unit with the outer radius face down on a solid surface table, floor etc. t Press one hand onto the squeegee body at the hose connector. t Grasp the blade with your thumb and forefinger in the middle of the arch and pull strongly until the metal band clicks open and the blade is released from the squeegee body.
- Page 24 Replace fuses t Pull out the key and operate the parking brake (see Parking brake‘ Page 9). t Fold the driver seat forward and open the battery cover. t Disconnect battery plug with external battery charger. Caution: Use fuses with the correct value only! False fuses can cause damages on the machine.
-
Page 25: Malfunctions
Malfunctions Malfunction Possible causes Troubleshooting page Turn the key Machine switched off Connect the battery plug with the Activated emergency machine stop button Machine does not run Check/replace the fuse Main fuse defective Call for technical service Error code on display On the last page of these instructions of Set on the driver seat Immobiliser is activated... - Page 26 Malfunction Possible causes Troubleshooting page Press the Vacuum on/off button Vacuum motor not activated Suction hose connect Suction hose not connected Clean the squeegee Squeegee not on the Check that the squeegee up/down floor mechanism is functioning correctly Replace blades Worn blades Poor vacuum performance...
-
Page 27: Squeegee Settings
Squeegee settings... - Page 28 If you have an uneven suction result, the settings of the suction nozzle should be corrected:Proceed as follows:: Before carrying out the settings, check that: • the slats are not damaged (replace). • the suction nozzle is not damaged. Height setting(Fig. A) •...
-
Page 29: Technical Data
Technical data type Co 2500 Co 3500 Theoretical performance area operation width x drive 5250 5950 m2/h speed (7) x 1000 Working width Squeegee width Cleaning solution tank / recovery tank Machine weight / for operation (max.) 273/652 276/653 Rated voltage Tools 2 x 35 1 x 43... -
Page 30: Accessories
Accessories Article 2500 3500 Scrubbing brush for washed concret 35cm Scrubbing brush 35cm nylon Scrubbing brush abrasive 35cm Driving disc Instalok 35cm Scrubbing brush for washed concret 43cm Scrubbing brush 43cm nylon Scrubbing brush abrasive 43cm Driving disc Instalok 43cm Filling hose with universal water coupling Recycling filter Drainage pump... -
Page 31: Recommended Chemicals
Recommended chemicals Please use the recommended TASKI chemical products only. Caution: Using other chemicals (e.g. chemicals containing solvents, chlorine, hydrochloric acid and hydrofluoric acid) can damage or destroy the machine. Dosage: The max. filling level in the tank corresponds to the quantity of the measuring cup. -
Page 32: Index
Index Hours of operation ......7 Accessories ........30 Adjust the seat Immobiliser is activated . -
Page 34: Eu Declaration Of Conformity
EU Declaration of Conformity JohnsonDiversey Switzerland CH-9542 Münchwilen hereby declare that the product described below both in this basic design and construction and in the version marketed by us conforms to the relevant safety- and health-related requirements of the appropriate EU Directive. This declaration shall cease to be valid if modifications are made to the product without our approval. - Page 35 JohnsonDiversey JohnsonDiversey JohnsonDiversey Austria Trading GmbH Haachtsesteenweg 672 Eschlikonerstrasse Guglgasse 7-9 1910 Kampenhout 9542 Münchwilen 1030 Wien Tel (32) 16 617 802 Tel (41) 71 969 27 27 Tel (43) 1 605 57 0 Fax (32) 16 605 395 Fax (41) 71 969 22 53 Fax (43) 1 605 57 1908 JohnsonDiversey JohnsonDiversey...
- Page 36 JohnsonDiversey JohnsonDiversey JohnsonDiversey Z. Ind. Abrunheira Romania s.r.l. Zvenigorodskaya 2-aya 2714-505 Sintra Baneasa Business Center, ul.,13, bld. 15 Tel (351) 2 191 57 000 Etaj 5 123022 Moscow Fax (351) 2 192 50 615 Sos. Bucuresti - Ploiesti Tel (7) 095 970 17 97 17-21 Fax (7) 095 970 17 98 Sector 1, Bucaresti...
Need help?
Do you have a question about the Combimat swingo 3500 and is the answer not in the manual?
Questions and answers