Table of Contents
Advertisement
Test Equipment Depot - 800.517.8431 - 99 Washington Street Melrose, MA 02176
TestEquipmentDepot.com
Armada Technologies Pro900
Advanced Underground Locator
USER GUIDE
Warning – Read and understand the instructions before
operating this unit. Failure to do so could lead to injury or
death.
Advertisement
Table of Contents

Related Manuals for Armada Pro900


Summary of Contents for Armada Pro900
- Page 1 Test Equipment Depot - 800.517.8431 - 99 Washington Street Melrose, MA 02176 TestEquipmentDepot.com Armada Technologies Pro900 Advanced Underground Locator USER GUIDE WARNING – Read and understand the instructions before operating this unit. Failure to do so could lead to injury or...
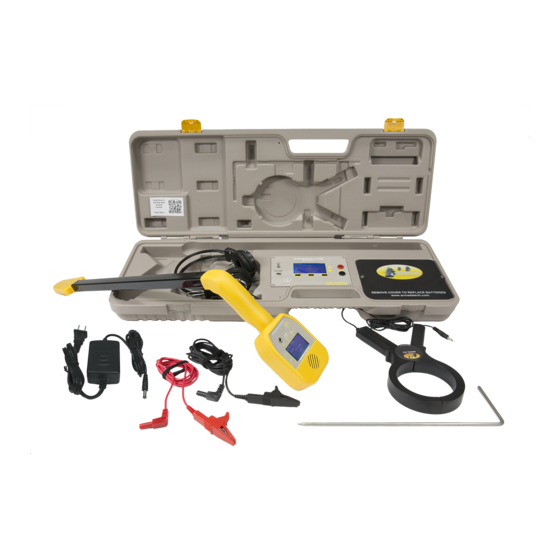
- Page 2 Armada Technologies Pro900 LOCATOR USER GUIDE The Armada Technologies Pro900 Advanced Underground Locator is designed to track underground wiring and find lost sprinkler valves. In addition, broken or severely damaged wires may also be located. The complete Pro900 kit consists of: ...
- Page 3 Power – The Pro900 has two options for powering the transmitter; AC mains power or internal batteries. The AC adapter is useful when 120 Vac power outlets are available nearby. The adapter provides constant power and does not diminish batteries.
- Page 4 A 9-volt square (6LR61) alkaline battery is needed for the Pro900 receiver. To install this battery, remove the battery compartment cover located on the back top portion of the Pro900 receiver. Install the 9 volt battery by connecting it to the battery snap boot inside the battery compartment.
- Page 5 Armada Technologies Pro900 LOCATOR USER GUIDE Selection Transmitter Controls Display Inductive Clamp Jack Direct Connect External Lead Jacks Power Jack On/Off Mode Control Controls Pro900 Transmitter Controls...
-
Page 6: Transmitter Operation
Armada Technologies Pro900 LOCATOR USER GUIDE Transmitter Operation – Pro900 Transmitter Display Operation Turn the Transmitter ON. After a momentary banner screen you will see the HOME display. From here you can elect to use the Broadcast or Clamp connectionless mode or the Direct Clip-on mode. - Page 7 Armada Technologies Pro900 LOCATOR USER GUIDE grounds unless you have no choice. An independent ground stake usually works better than a common ground. Select Direct Clip-on, which turns on the transmitter output at the lead jacks. In LO-F, adjust the power output selector arrows to increase the power to a visible level on the bar graph (Not Applicable to HI-F).
- Page 8 POWER DOWN ON, 30 MIN, 15 MIN, 5 MIN Battery: allows the user to adjust the Pro900 transmitter to be used with either traditional alkaline batteries or rechargeable ones. BATTERY...
- Page 9 Armada Technologies Pro900 LOCATOR USER GUIDE Adjustment Controls Pro900 Receiver Display Mode Controls On/Off Control Headset Jack Pro900 Receiver Controls...
- Page 10 Armada Technologies Pro900 LOCATOR USER GUIDE Receiver Operation – Turn on the receiver. From the “Ready” screen select which tracing mode you will be using (connectionless, or direct clip-on LO-F or HI-F, matching the mode of the Transmitter. When Start is then selected, the receiver becomes active, with the display indicating the signal level detected.
- Page 11 Armada Technologies Pro900 LOCATOR USER GUIDE SETUP OPTIONS: User options are accessible via the Pro900 Receiver SETUP menu as follows: Power Down: allows the user to select the amount of time from turn on that the unit will automatically shut down to save battery power.
- Page 12 Armada Technologies Pro900 LOCATOR USER GUIDE Tracing Wire - After the transmitter has been properly connected and verified to have a good ground with power set, turn on the receiving wand. The receiver defaults to the most recently used mode with null antenna reception at every start-up.
- Page 13 Finding Faults – Breaks or severe wire damage can be found with the Pro900. The setup of the unit is the same as when tracing wire. The difference comes in the reception. Whereas the traced wire continues to emit a signal along the path of the cable, a break will cause the signal to stop at the point of the break.
- Page 14 The first method is to connect the red lead of the transmitter to the station wire leading to that valve and the black to ground as described above. We refer to this as the ‘unbalanced’ method. Operate the Pro900 as above and begin your locate. When you reach the point where a valve/solenoid is located, the signal will expand into a large (approx.
- Page 15 Armada Technologies Pro900 LOCATOR USER GUIDE of your locate. Once the valve is located, verify that it is indeed your target either manually, with the Pro48, or from the controller. There may be more than one valve on the cable being traced. You may wish to continue past the first valve located to determine if other valves are also located on this wire.
- Page 16 OTHER Pro900 COMPONENT TO LIVE ELECTRICAL LINES. DEATH OR INJURY COULD OCCUR. To use the passive mode, turn on the Pro900 wand and select the Passive AC mode using the control panel. This switches the receiver into an unfiltered mode that detects the electrical field generated by...
- Page 17 Armada Technologies Pro900 LOCATOR USER GUIDE 50Hz or 60Hz electrical current. Once the Pro900 wand is on, simply search an area until you hear a buzzing sound. There is no beeping signal as the transmitter is not used. Follow the buzzing sound in either null or peak mode, both will work, to track the cable.
- Page 18 The best way to really learn the Pro900 is to use it. Set up a test site at your home or office and get used to how it works. There is no substitute for experience in the art of locating.
- Page 19 Armada Technologies Pro900 LOCATOR USER GUIDE SPECIFICATIONS Tracking Range Depth: 8 feet (2.4 m) (LO-F, 2kHz) Wire length: 5,000 feet (1.5 km) with direct connection Wire length: unlimited with broadcast mode and leapfrogging Tracking Signals Frequency One (LO-F): 2 kHz direct connect...
- Page 20 Technologies will repair or replace any component that is returned to Armada Technologies within 12 months of purchase and does not exhibit signs of abuse or misuse. It is Armada Technologies sole discretion to determine this condition. Armada Technologies also reserves the right to require a proof of purchase in order to determine date and validity of purchase.
Need help?
Do you have a question about the Pro900 and is the answer not in the manual?
Questions and answers