Table of Contents
Advertisement
Advertisement
Table of Contents

Related Manuals for REMOVU K1

Summary of Contents for REMOVU K1
- Page 1 User Manual V 1.0 4K Camera with an Integrated 3-axis Gimbal...
-
Page 2: Table Of Contents
How to use Low Angle Status Battery LED Indicator Description Menu Check the Battery Level Video Settings Insert / Remove Battery into K1 Video Resolution & Available Functions Battery Specifications Slow Motion Video Resolution & Available Functions Unlocking the Gimbal Time-lapse Video Resolution &... -
Page 3: Introduction
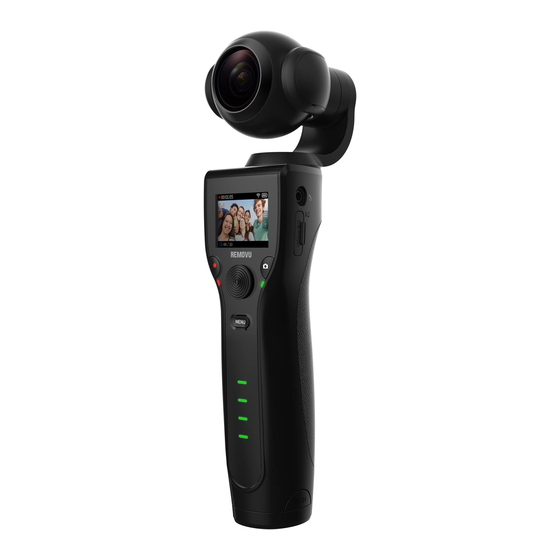
REMOVU K1 is a 4K Camera with an integrated 3-axis gimbal. It is lightweight, portable, user-friendly and affordable. To ensure that everything is in the shot, the K1 has a custom designed F2.8 wide angle lens. It shoots sharp 12MP photos and stable video up to 4K. With the built-in 1.5” LCD screen, you can preview and playback recorded videos and photos instantly. -
Page 4: Charging The Battery
Getting Started Charging the Battery ⚠ Be sure to fully charge the Smart Battery before using for the first time. Connect the K1 battery to a power outlet by using a 5V/2A adaptor and the provided USB cable. It will take approximately 150 minutes for the battery to be fully charged. Refer to the “Status LED Indicator Descriptions”... -
Page 5: Check The Battery Level
Removing the Battery Inserting the Battery Press and hold the lock buttons on both sides of the Slide the battery into the bottom of the K1 until it battery and pull down to remove the battery. clicks into place. Battery Specifications - Read the user manual and Smart Battery Safety Guidelines before use. -
Page 6: Unlocking The Gimbal
The motor may be damaged if rotating is excessive. Inserting the Micro SD Card (Sold Separately) 1. Locate and open the micro SD card cover on the right side of the K1. 2. As illustrated in the image, insert a micro SD card with the label facing the backside of the K1, then close the cover. -
Page 7: Powering On And Off
Release the power switch once the device has turned ON/OFF. Install the REMOVU K1 App Search for ‘REMOVU’ in the App Store or Google Play to download the app onto your mobile phone. Connecting to the K1 App 1. Power on the K1. -
Page 8: Controls And Operations
Controls and Operations There are buttons on the front of the camera, a joystick and a trigger button to set or operate various functions. Power Switch Turn On/Off Record Button Start/Stop Recording Select Menu Shutter Button Start/Stop Capturing Menu Navigation Control the Cameras Orientation 4-Way Joystick Menu Navigation... -
Page 9: Status Led Indicator Descriptions
Status LED Indicator Descriptions Camera Status LED System Status LED Camera Status LED Description ○ LED Off Camera is functioning normally ●‧ ‧ ‧ ‧ Blinks Red slowly Recording video ● ×3 Blinks Red three times Stop recording ● Blinks Red once Shooting photo ●‥... -
Page 10: Camera Status Screen
Camera Status Screen Recording Status (Current Recording Time & Remaining Recording Time) Wi-Fi On/Off Battery Level Gimbal Mode Tuning On/Off Night Mode On/Off Low Light On/Off Timer Status Video Mode Photo Setting Video Setting Photo Mode List of Key Icons Display Description 00:00:10 | 02:00:00... -
Page 11: List Of Key Icons
List of Key Icons Display Description Battery Level Battery Level while charging Display Description Display Description Pan Mode Wi-Fi On Follow Mode Tuning On Photo Night Mode On Video Low Light On Photo Timer On Display Description Display Description Video Photo Slow Motion Video Burst... -
Page 12: Gimbal Mode
Gimbal Mode Tilt axis Tilt axis Pan axis Pan axis Pan Mode Follow Mode Tilt and Roll are fixed and camera is permitted to Camera is permitted to Pan left or right and Tilt up Pan left or right. and down, while Roll is fixed. Note: Functions such as re-center and selfie/front modes are available in Pan and Follow Mode. -
Page 13: How To Use Low Angle
How to use Low Angle 1. With the camera held upright, change the camera to Selfie mode by quickly tapping the trigger three times. 2. Hold the camera down and quickly tap the trigger button two times to center the camera or use the joystick to set the camera in the desired position. -
Page 14: Menu
Menu - To enter the Menu, press the Menu Button. - To navigate the menu, move the joystick or press the shutter button. - To enter the highlighted menu item, press the recording button. - To return to the previous menu or main screen, press the Menu Button. Display Description Video Setting... -
Page 15: Video Resolution & Available Functions
Video Resolution & Available Functions Screen Resolution Capture Photo Resolution / FPS Low Light Motion Setting (Aspect Ratio) while recording 4K / 30FPS 3840×2160 (16:9) ○ WQHD / 60FPS 2560×1440 (16:9) ○ ○ WQHD / 30FPS 2560×1440 (16:9) ○ 3840×2160 1440P / 60FPS 1920×1440 (4:3) ○... -
Page 16: Motion Setting For Video / Photo
Motion Setting for Video / Photo 1. Select ‘Motion Setting’ in Video/Photo Setting. 2. Move the joystick left / right to navigate. Move the joystick up / down to adjust the recording duration. When finished selecting the settings, press the record button to start. Duration (Recording Time): Indicates recording time for the motion lapse. -
Page 17: Photo Setting
Photo Setting Setting for Single, Burst and Time-lapse Photo can be set. • Mode: Single, Burst, Time-lapse Photo. • Frames: Change frames for Burst or Time-lapse Photo. • Night Mode (Night Photo): Control shutter speed manually. • Self-Timer: Set the self-timer. •... -
Page 18: Playback Video & Photo
Changes the direction of the joystick inversely. Auto Calibration Calibrate the K1 when the horizontal axis is unbalanced. ⚠ Perform calibration when K1 is upright on a flat surface. ⚠ When used in abrupt changes of temperature, calibration needs to be performed to balance the gimbal. -
Page 19: Camera Setting
Turn on and off the settings that automatically start recording after the power is on. Date / Time Set the date and time on the camera. • Tip: By connecting K1 to the App, K1’s date and time will be synced with the smartphone. SD Format Formats the memory card. -
Page 20: Important Messages
The Temperature Alert Message appears on the camera status screen when the camera becomes too hot and needs to cool down. Simply let it sit and cool before attempting to use it again. The K1 was de- signed to identify overheating and shuts down when needed. -
Page 21: List Of The Recommended Micro Sd Cards
List of the Recommended Micro SD Cards Name of Card Capacity Compatibility Samsung micro SDXC Class10 UHS-I U3 EVO 100MB/s Good Samsung micro SDXC Class10 UHS-I U3 EVO 100MB/s 128G Good Samsung micro SDXC Class10 UHS-I U3 EVO Plus 100MB/s Good Samsung micro SDXC Class10 UHS-I U3 EVO Plus 100MB/s 128G... -
Page 22: Firmware Update
To verify the version of software, select Menu > Camera Settings > Information. 1. Download the latest version of firmware from the REMOVU website. 2. Copy the .bin files to the memory card’s root directory. While K1 is turned off, insert the memory card into the slot.
Need help?
Do you have a question about the K1 and is the answer not in the manual?
Questions and answers